Articles
How To Set Clock On GE Glass Top Stove
Modified: February 29, 2024
Learn how to easily set the clock on your GE glass top stove with our step-by-step articles. Simplify your cooking experience and save time.
(Many of the links in this article redirect to a specific reviewed product. Your purchase of these products through affiliate links helps to generate commission for Storables.com, at no extra cost. Learn more)
Introduction
Setting the clock on your GE glass top stove is an essential step in ensuring accurate and synchronized timing for your cooking needs. With the clock properly set, you can easily keep track of cooking times, program delayed start or end times, and even use timer functions.
In this article, we will walk you through the step-by-step process of setting the clock on your GE glass top stove. Whether you are a new owner of the appliance or simply need a refresher, this guide will help you navigate through the clock setting feature with ease.
Before we dive into the steps, it’s important to note that different models of GE glass top stoves may have slight variations in their interface and button layout. However, the general process for setting the clock remains relatively consistent across the different models.
Now, let’s get started and ensure that the clock on your GE glass top stove is properly set and ready to assist you in your culinary adventures!
Key Takeaways:
- Easily set the clock on your GE glass top stove by following simple steps. Ensure accurate timing for cooking and utilize timer functions with confidence.
- Prepare, locate, adjust, save, and verify – the key steps to setting the clock on your GE glass top stove. Enjoy synchronized timing for your culinary adventures!
Read more: How To Fix Samsung Glass Top Stove Burners
Step 1: Preparing the Stove
Before you begin setting the clock on your GE glass top stove, it’s important to ensure that the appliance is ready for programming. Follow these steps to prepare the stove:
- Make sure the stove is plugged into a power outlet and turned on. Without power, you won’t be able to set the clock.
- If your stove has a lock function, ensure that it is unlocked. The lock function prevents accidental changes to the settings, including the clock.
- Ensure that there are no active cooking functions or timers running on the stove. It’s easier to set the clock when the stove is not actively in use.
- Clear any clutter or objects from the control panel area. This will give you easy access to the clock setting button and prevent accidental button presses.
Once you’ve completed these preliminary steps, you’re ready to move on to the next step of setting the clock on your GE glass top stove.
Step 2: Locating the Clock Setting Button
Now that you’ve prepared the stove, it’s time to locate the clock setting button on your GE glass top stove. Follow these instructions to find the button:
- Look for a dedicated “Clock” or “Timer” button on the control panel of your stove. This button is usually located near the display area or in the settings section of the control panel.
- If you can’t find a specific clock button, look for a button with a clock icon or symbol on it. This is typically used for accessing the clock setting menu.
- Refer to your stove’s user manual for precise information on the location of the clock setting button. The manual will provide detailed instructions and illustrations specific to your stove model.
Once you have located the clock setting button, you’re ready to move on to the next step of adjusting the hour on your GE glass top stove.
Step 3: Adjusting the Hour
Now that you have located the clock setting button, it’s time to adjust the hour on your GE glass top stove. Follow these steps to set the correct hour:
- Press the clock setting button to enter the clock menu. The display may show the current hour or default to a flashing digit.
- Use the “+”, “-“, or arrow buttons on the control panel to adjust the hour. Press the button once to increase the hour, or press and hold the button to fast forward through the hours.
- Observe the display as you adjust the hour. Most GE glass top stoves use a 12-hour clock system, so ensure that you select the appropriate AM or PM designation for the hour.
- Double-check that the correct hour is displayed on the stove’s screen. Take your time to ensure accuracy, as an incorrect hour setting may lead to issues with cooking times and programming features.
Once you have successfully adjusted the hour on your GE glass top stove, you can proceed to the next step of setting the minutes.
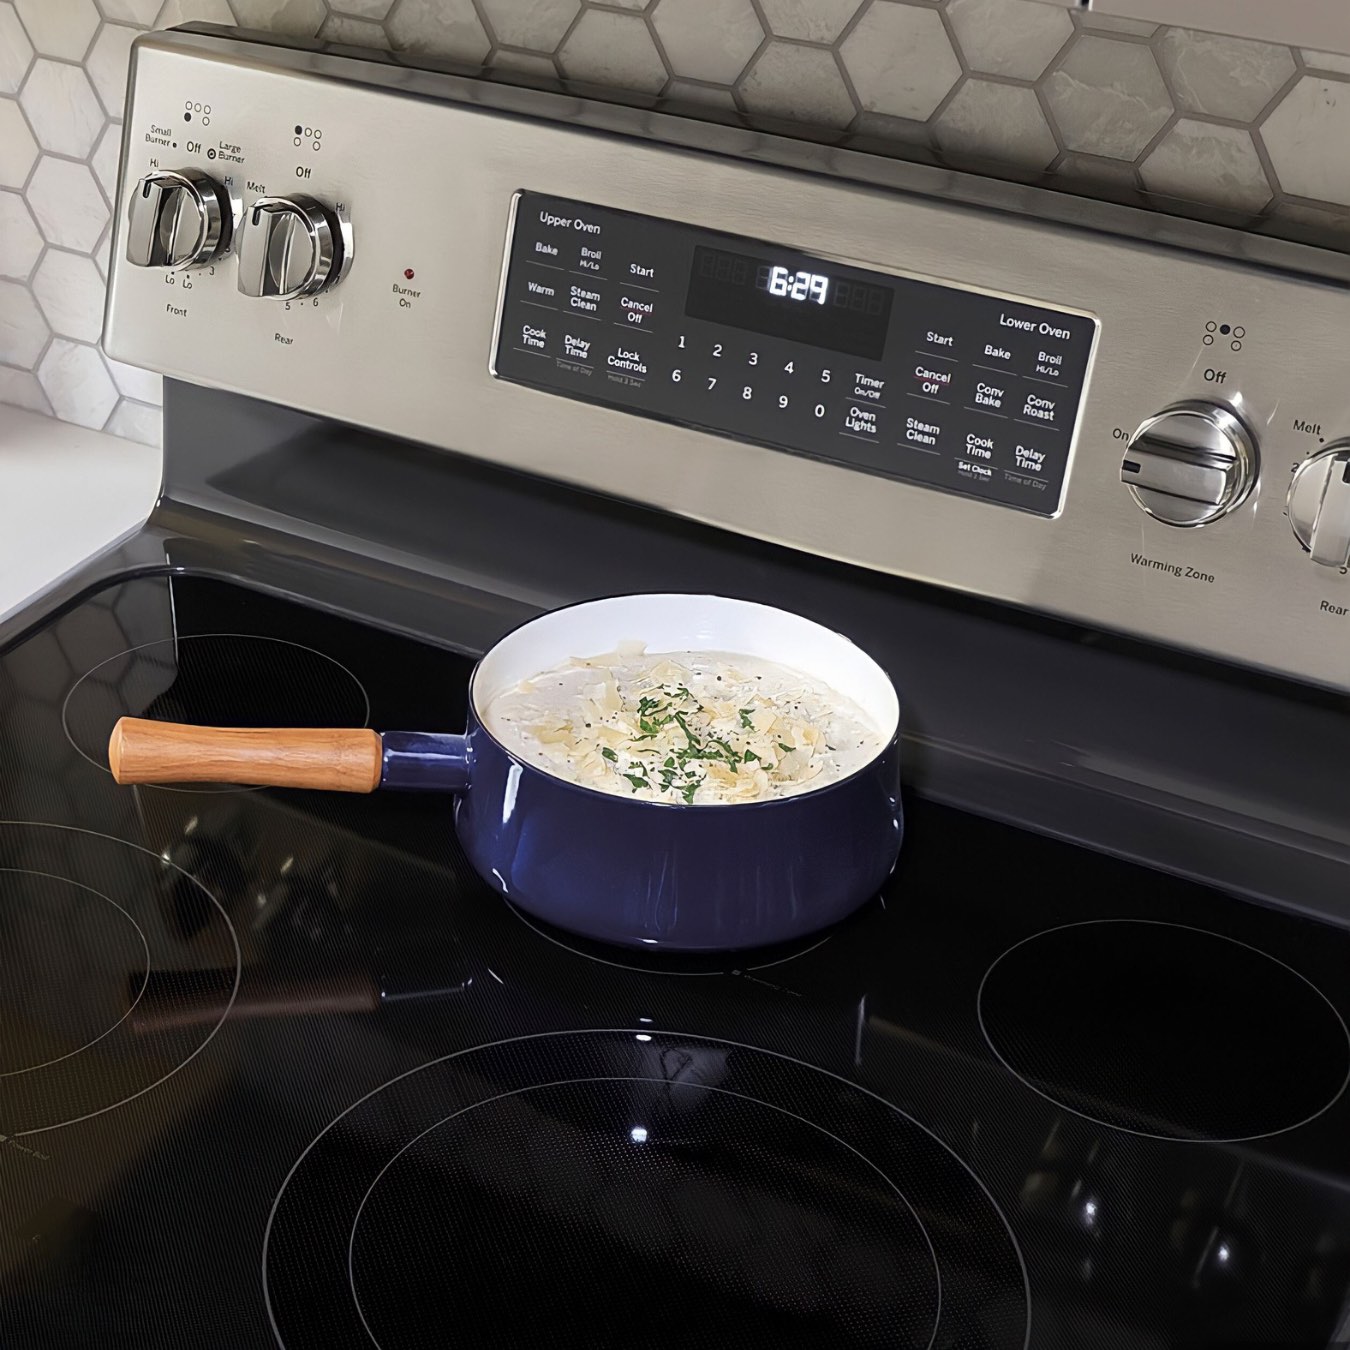
To set the clock on a GE glass top stove, press the “Clock” button, then use the “+” and “-” buttons to adjust the time. Press “Start” to confirm.
Step 4: Adjusting the Minute
After setting the hour on your GE glass top stove, it’s time to adjust the minutes. Follow these steps to accurately set the minute display:
- Continuing from the clock setting menu, focus your attention on the minute digit or display. It may be flashing or showing a default value.
- Use the same buttons as before (+, -, or arrow buttons) to adjust the minutes. Press the button once to increase the minutes, or press and hold to rapidly change the value.
- Pay close attention to the display as you adjust the minutes. Take note of any AM or PM indicators to ensure accuracy.
- Double-check the displayed minutes to ensure the correct value. Precise timing is important for accurate cooking and timer functions on your GE glass top stove.
After successfully adjusting the minutes, you are one step closer to having the correct time displayed on your GE glass top stove. Proceed to the next step for saving the clock settings.
Read more: How To Style A Vintage Glass Top Side Table
Step 5: Saving the Clock Settings
Once you have adjusted the hour and minute on your GE glass top stove, it’s time to save the clock settings to ensure they remain accurate. Follow these steps to save the clock settings:
- Look for a “Save” or “Set” button on the control panel of your stove. This button is typically used to confirm and save any changes made to the clock settings.
- Press the “Save” or “Set” button to finalize the clock settings. Some stoves may require you to press and hold the button for a few seconds.
- Observe the display to confirm that the clock settings have been successfully saved. The display should stop flashing or changing and should now show the correct time you have set.
- Press any other button on the control panel or wait for a few seconds to exit the clock setting menu. The stove will often automatically exit the menu after a short period of inactivity.
With the clock settings successfully saved, your GE glass top stove now has the correct time displayed. This ensures that your cooking and timer functions will be synchronized and accurate for your culinary needs.
Now, let’s move on to the final step to verify that the clock display is indeed correct.
Step 6: Verifying the Clock Display
After setting and saving the clock settings on your GE glass top stove, it’s important to verify that the clock display is showing the correct time. Follow these steps to ensure the clock display is accurate:
- Take a moment to look at the clock display on your stove. Verify that the hour and minute values are correct.
- If the clock display is not showing the correct time, repeat the previous steps to adjust the hour and minute until the display reflects the accurate time.
- Pay attention to any other indicators on the display, such as the AM or PM designation, to make sure they are also accurate.
- Compare the clock display to another reliable source of time, such as a wall clock, wristwatch, or your smartphone, to validate the accuracy of the stove’s clock.
- If you find any discrepancies or inaccuracies, repeat the clock-setting process to rectify the issue. It’s crucial to have the correct time displayed for precise cooking and timer functions.
Once you have verified the clock display on your GE glass top stove and confirmed its accuracy, you can now confidently use the clock functions and timers on your stove for all your cooking needs.
Congratulations! You have successfully set the clock on your GE glass top stove and can now enjoy the convenience and accuracy of synchronized timing in your culinary adventures.
Remember, in case you encounter any difficulties or have specific questions related to your stove model, always refer to the user manual or seek assistance from the manufacturer’s customer support.
Thank you for following this step-by-step guide. Happy cooking!
Conclusion
Setting the clock on your GE glass top stove is a straightforward process that ensures accurate timing and synchronization for all your cooking needs. By following the steps outlined in this guide, you can easily navigate through the clock setting feature and have the correct time displayed on your stove.
We started by preparing the stove and ensuring it was plugged in, unlocked, and free from any active cooking functions or timers. Then, we located the clock setting button on the control panel, which may vary slightly depending on the model of your GE glass top stove.
After locating the clock setting button, we adjusted the hour and minute using the designated buttons on the control panel, taking care to select the appropriate AM or PM designation. We then saved the clock settings to finalize the changes and ensure the accuracy of the displayed time.
Finally, we verified the clock display by comparing it to a reliable time source and making any necessary adjustments to achieve synchronization.
With the clock properly set on your GE glass top stove, you can now take advantage of its timer functions, plan delayed start or end times, and accurately track cooking durations.
Remember, each GE glass top stove model may have slight variations in the interface and button layout, so always consult your user manual for specific instructions pertaining to your appliance.
Thank you for following this comprehensive guide on how to set the clock on your GE glass top stove. We hope you found it helpful, and that it enhances your cooking experience with accurate timekeeping and precise timing.
Wishing you many delicious and perfectly timed meals!
Frequently Asked Questions about How To Set Clock On GE Glass Top Stove
Was this page helpful?
At Storables.com, we guarantee accurate and reliable information. Our content, validated by Expert Board Contributors, is crafted following stringent Editorial Policies. We're committed to providing you with well-researched, expert-backed insights for all your informational needs.


0 thoughts on “How To Set Clock On GE Glass Top Stove”