Articles
How To Build A Guitar With Hand Tools
Modified: January 8, 2024
Learn how to build a guitar using only hand tools with our informative and detailed articles. Gain the knowledge and skills needed for this rewarding craft.
(Many of the links in this article redirect to a specific reviewed product. Your purchase of these products through affiliate links helps to generate commission for Storables.com, at no extra cost. Learn more)
Introduction
Welcome to the world of guitar building! Crafting your own guitar from scratch can be a rewarding and fulfilling experience. Not only will you have the opportunity to create an instrument that is uniquely yours, but you’ll also gain valuable knowledge about the inner workings of guitars and the art of lutherie.
Building a guitar with hand tools allows you to have complete control over every aspect of the instrument’s construction. From choosing the right wood to shaping the body and installing the frets, every step of the process contributes to the final result.
In this article, we will guide you through the process of building a guitar using hand tools. We will cover everything from selecting the right wood to the final setup and adjustments. Whether you’re a seasoned woodworker or a beginner with a passion for music, this guide will provide you with the necessary information and techniques to successfully complete your own guitar build.
Before we dive into the details, it’s important to note that building a guitar requires patience, attention to detail, and a set of high-quality hand tools. While power tools can expedite the process, using hand tools allows for a more intimate connection with the materials and a greater level of precision.
So, if you’re ready to embark on this exciting journey of building your own guitar from scratch, let’s dive in and start with the first step – choosing the right wood…
Key Takeaways:
- Crafting a guitar with hand tools is a labor of love, allowing for a deep connection with the instrument and a profound understanding of lutherie. Each step, from wood selection to final setup, contributes to a unique and rewarding musical masterpiece.
- Building a guitar by hand is not just about creating an instrument, but also about embracing the journey of self-expression, creativity, and personal growth. The handmade guitar becomes a symbol of dedication, craftsmanship, and the joy of bringing something beautiful into the world.
Read more: How To Build A Desk With Hand Tools
Choosing the Right Wood
When it comes to building a guitar, selecting the right wood is crucial. The type of wood you choose will affect the sound, playability, and overall aesthetic of the instrument. Here are some key factors to consider when choosing the wood for your guitar:
- Tonewood: The tonewood refers to the wood used for the soundboard (top), back, and sides of the guitar. Common tonewoods include spruce, cedar, mahogany, and maple. Each tonewood has its own unique characteristics that impact the tone and resonance of the guitar. Research different tonewoods and choose one that suits the sound you’re aiming for.
- Body Wood: The body wood refers to the wood used for the guitar’s body. Traditional electric guitars often use woods like alder, ash, or mahogany, which offer different tonal qualities and weights. Acoustic guitars typically use tonewoods for the body, but the choice of wood for the back and sides can still impact the overall sound.
- Neck Wood: The neck wood plays a significant role in the stability and feel of the guitar. Common neck woods include maple, mahogany, and rosewood. Consider factors such as strength, weight, and the neck’s ability to resist warping when selecting a neck wood.
- Fingerboard Wood: The fingerboard wood is the material used for the playing surface of the neck. Common options include rosewood, ebony, and maple. Different fingerboard materials can affect the feel, look, and sound of the guitar. Consider factors such as durability, smoothness, and tonal characteristics when choosing a fingerboard wood.
- Aesthetics: The visual appeal of the wood is also an important factor to consider. Different woods have distinct patterns, colors, and grain structures that can enhance the overall appearance of the guitar.
It’s essential to do thorough research and consult with experienced luthiers or guitar builders to gain a deeper understanding of tonewoods and their characteristics. It’s also a good idea to visit local guitar shops to try out different guitars and get a sense of the tonal qualities associated with various woods.
Once you’ve selected the appropriate woods for your guitar, it’s time to move on to the design phase, where you’ll plan and shape the body of your instrument.
Designing the Guitar Body
The design of the guitar body is an important element that contributes to both its aesthetics and functionality. When designing the body, you’ll need to consider factors such as shape, size, and ergonomics. Here are some steps to follow when designing the guitar body:
- Research and Inspiration: Begin by researching different guitar body designs and finding inspiration from various sources such as books, magazines, or online resources. Examine guitars of different styles and genres to get a sense of what resonates with your preferences.
- Consider Player Ergonomics: A well-designed guitar body takes into account the comfort and ease of playing. Consider factors such as body contours, weight distribution, and balance. This ensures that the guitar feels comfortable in the player’s hands, whether sitting or standing.
- Choose a Body Shape: Decide on the overall shape of your guitar body. Traditional electric guitar body shapes include the Stratocaster, Telecaster, and Les Paul designs, while acoustic guitars may feature a dreadnought, jumbo, or concert shape. Alternatively, you can opt for a unique or customized body shape that aligns with your personal style.
- Create a Template: Once you’ve settled on a body shape, create a template out of cardboard or plywood. This template will serve as a reference point when shaping the body and cutting out the wood.
- Scale Length and Bridge Placement: Determine the scale length of your guitar, which affects the placement of the bridge and frets. The scale length is the distance between the nut and bridge, and it impacts the playability and intonation of the instrument. Take into account the type of music you’ll be playing and your preferred string tension to determine the scale length.
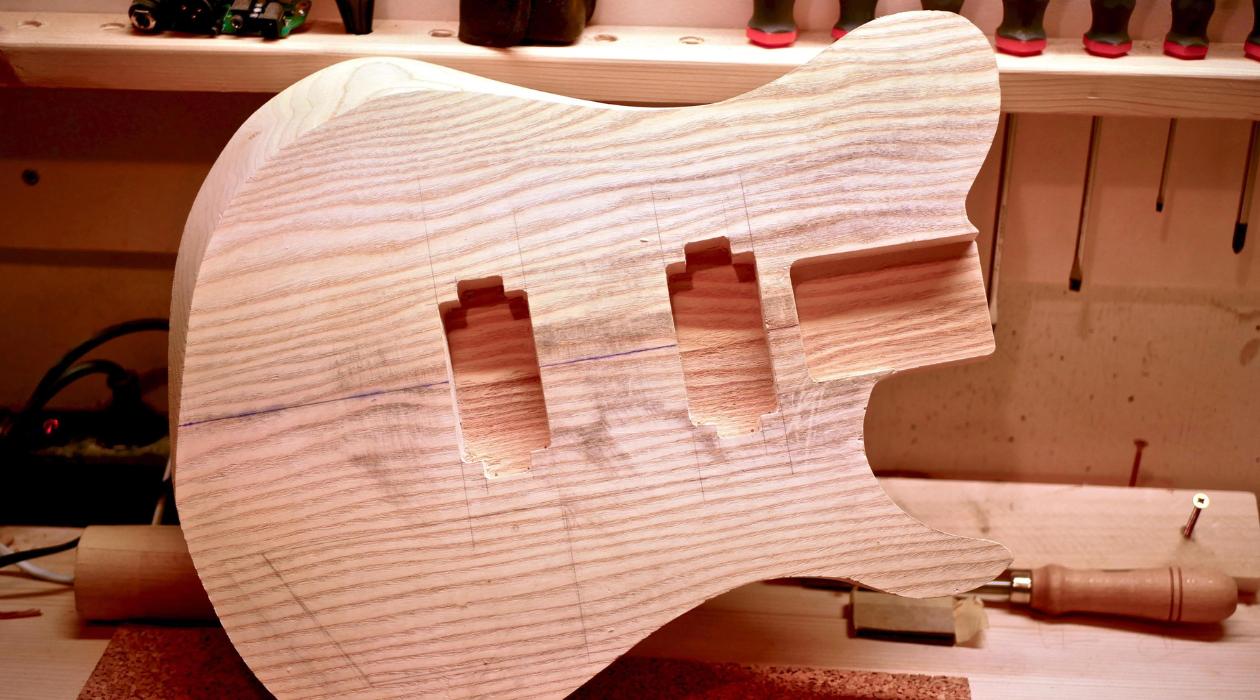
- Routing and Control Cavities: If you’re building an electric guitar, plan for any necessary routing for pickups, controls, and other electronics. This step ensures that you have sufficient space for all the components within the body.
Remember, the design process allows for creativity and personalization. Experiment with different body shapes and features until you find a design that excites you. Once you’re satisfied with the design, move on to preparing the wood before you start building the guitar body.
Preparing the Wood
Before you can start shaping and assembling the guitar, it’s essential to prepare the wood to ensure its stability and suitability for the instrument. Here are the steps to follow when preparing the wood for your guitar:
- Acclimation: Wood is sensitive to changes in humidity and temperature. To prevent warping or cracking, allow the wood to acclimate to your workshop environment for a few weeks before working with it. This process allows the wood to adjust and reach equilibrium with the ambient conditions.
- Surfacing: Begin by surfacing the wood to ensure it is flat and even. Use a thickness planer and a jointer to remove any imperfections, such as rough or uneven surfaces. This step is crucial for achieving a precise fit and an aesthetically pleasing finish.
- Cutting and Shaping: Once the wood is surfaced, you can proceed with cutting and shaping the body and other components. Use a band saw, jigsaw, or router to carefully cut out the body shape and other parts of the guitar, following your template.
- Routing Cavities: If you’re building an electric guitar, this is the time to route cavities for pickups, controls, and wiring. Take precise measurements and use a router or chisel to create cavities with the necessary depth and dimensions.
- Sanding: After all the components are cut and shaped, sand the wood to achieve a smooth and polished surface. Start with a coarse grit sandpaper and gradually move to finer grits until you achieve a desired level of smoothness. Pay attention to details and make sure all edges and surfaces are properly sanded.
- Apply a Sealer or Finish: Applying a sealer or finish is an optional step but can enhance the durability and appearance of the wood. Consider using a wood sealer or apply a finish such as lacquer or oil to protect the wood from moisture and give it a professional look.
Throughout the wood preparation process, it’s crucial to pay attention to detail and ensure precision. Take your time to measure accurately, cut precisely, and sand thoroughly to ensure the best possible results. Once the wood is prepared, you can proceed to the next step – creating the neck of the guitar.
Creating the Neck
The neck of a guitar is a vital component that determines its playability and stability. Creating a well-crafted neck requires attention to detail and precision. Here are the steps to follow when creating the neck for your guitar:
- Selecting the Neck Wood: Choose a high-quality wood for the neck that provides strength and stability. Common choices include maple, mahogany, and rosewood. Consider the tonal qualities, weight, and feel of the wood when making your selection.
- Cutting the Neck Blank: Begin by cutting a piece of neck wood into a blank that’s slightly larger than the final dimensions of your neck. Use a band saw or a handsaw to make the initial cut, and then proceed with fine-tuning the shape.
- Shaping the Neck Profile: Use rasps, files, and sandpaper to shape the neck profile according to your desired specifications. Consider factors such as the thickness, width, and curvature of the neck to create a comfortable and ergonomic feel.
- Adding Fretboard and Frets: Attach the fretboard to the neck blank, ensuring a tight and secure fit. Use a fret saw to cut slots for the frets and insert them into the slots. Take care to align the frets properly and hammer them in using a fretting hammer or a rubber mallet.
- Shaping the Headstock: Shape the headstock according to your desired design. Use a bandsaw or a coping saw to remove excess wood, and then refine the shape using rasps, files, and sandpaper. Consider adding a veneer or inlay for added visual appeal.
- Drilling Tuner Holes: Mark and drill holes for the tuners on the headstock, ensuring proper spacing and alignment. Use a drill press or a handheld drill with a bit that matches the diameter of your chosen tuning machines.
- Final Sanding and Finishing: Once the neck is shaped, sanded, and all the necessary components are installed, give it a final sanding to achieve a smooth and polished surface. Consider using fine grit sandpaper and sanding blocks to ensure a uniform finish. Apply a finish of your choice, such as lacquer or oil, to protect the wood and enhance its appearance.
Creating the neck of a guitar requires patience and precision. Take your time to shape the profile and fretboard, ensuring proper alignment and a comfortable feel. A well-crafted neck will contribute to the overall playability and tone of the guitar. Once the neck is complete, you can move on to shaping the body of the guitar.
Read more: How To Build A Drawer With Hand Tools
Shaping the Body
Shaping the body of a guitar is a critical step in creating the instrument’s aesthetic appeal and overall functionality. This process involves carefully crafting the contours and curves of the body to enhance comfort, balance, and tone. Here are the steps to follow when shaping the body of your guitar:
- Trace and Cut the Body Shape: Transfer the outline of your guitar body template onto the wood, ensuring accurate placement. Use a bandsaw or a jigsaw to cut out the rough shape, leaving some excess material around the edges.
- Rough Shaping: Use rasps, files, and sandpaper to begin shaping the body. This involves removing excess material and refining the contours. Pay close attention to curves, bevels, and any other design elements that are present in your chosen body shape.
- Fine Shaping: As you progress, switch to finer grit sandpaper and continue shaping the body with more precision. Focus on achieving smooth transitions between different sections of the body, and ensure that the overall shape matches your desired design.
- Contouring: Create body contours and armrest bevels to enhance player comfort. Use rasps or sanding blocks to carefully shape these areas, ensuring smooth and comfortable contact points for the player’s arm and hand.
- Bridge Placement: Mark and locate the position for the bridge on the guitar body. Consider factors such as scale length, intonation, and string alignment. Use a ruler and marking tools to ensure accuracy when determining the bridge’s placement.
- Control and Pickup Cavities: If you’re building an electric guitar, this is the time to route cavities for pickups, controls, and wiring. Use a router or chisel to carefully cut out these cavities, following precise measurements and templates.
- Final Sanding and Smoothing: Once you’ve achieved the desired shape, perform a final sanding to ensure a smooth and polished surface. Use progressively finer grit sandpaper to remove any imperfections and achieve a professional finish.
During the shaping process, it’s crucial to have a keen eye for detail and a steady hand. Take your time and make small adjustments as needed to achieve the perfect body shape. Remember that the body shape not only affects the visual appeal of the guitar but can also contribute to its tone and resonance.
With the body shaped to your satisfaction, it’s time to proceed to the next step – installing the frets onto the guitar neck.
When building a guitar with hand tools, make sure to use high-quality materials and take your time with each step to ensure precision and a professional finish.
Installing the Frets
Installing the frets is a critical step in building a guitar as they determine the pitch and playability of the instrument. Proper fret installation requires precision and attention to detail. Here are the steps to follow when installing the frets onto the guitar neck:
- Prepare the Fretwire: Start by selecting high-quality fretwire that matches the scale length of your guitar. Cut the fretwire into individual pieces, ensuring they are slightly longer than the width of the fretboard.
- Measure and Mark: Using a fret slotting template or a fret scale ruler, mark the positions of the frets on the fretboard. Take into account the scale length, the desired number of frets, and any specific design considerations.
- Create Fret Slots: Use a fret saw or a fret slotting miter box to carefully cut the fret slots along the fretboard. Make sure the slots are deep enough to accommodate the width of the fretwire, but not too deep that they compromise the integrity of the neck.
- Apply Fretwire: Apply a small amount of wood glue into each fret slot. Insert the cut fretwire into the slots, ensuring a snug fit. Use a fret press or a rubber mallet to gently seat the frets into place. Ensure that each fret is fully seated and aligned properly.
- Trim Excess Fretwire: Once the frets are installed, use a pair of flush-cutting pliers or a fret end nippers to trim the excess fretwire along the edges of the fretboard. Be careful not to damage the wood or scratch the guitar’s finish.
- Smooth and Level the Frets: Use a leveling beam or a straightedge with sandpaper to level the surface of the frets. This ensures a consistent playing surface and minimizes any buzzing or unevenness. Follow up with finer grit sandpaper to smoothen the frets further.
- Crown the Frets: To ensure a comfortable playing experience, use a fret crowning file to shape and round the frets. This creates a smooth and curved crown on each fret, facilitating accurate and precise string bending.
- Polish the Frets: Lastly, use steel wool or a fret polishing cloth to polish the frets, removing any scratches or oxidation. This step enhances the appearance and playability of the guitar.
Installing the frets requires patience and precision, as they significantly impact the playability and intonation of the instrument. Take your time to ensure each fret is properly seated, leveled, and crowned. Once the fret installation is complete, you can move on to assembling the various components of the guitar.
Assembling the Guitar
Assembling the various components of the guitar is an exciting stage of the building process, as it brings the instrument to life. This step involves putting together the body, neck, hardware, electronics, and other elements of the guitar. Here are the steps to follow when assembling your guitar:
- Attach the Neck to the Body: Begin by aligning the neck with the body and ensuring a proper fit. Depending on the design of your guitar, you may need to use screws, bolts, or a mortise and tenon joint to securely attach the neck to the body.
- Install the Bridge: Place the bridge on the body in the predetermined location. Ensure that it aligns with the scale length, and adjust its position as necessary. Once aligned, secure the bridge to the body using screws or other appropriate hardware.
- Attach the Tuning Machines: Install the tuning machines onto the headstock, ensuring they are aligned properly and evenly spaced. Secure them in place following the manufacturer’s instructions, making sure they are tight enough to hold the strings in tune.
- Install the Nut: Cut a slot in the nut to accommodate the strings, ensuring the spacing and height are appropriate for proper string action. Use wood glue or a similar adhesive to secure the nut in place at the headstock end of the neck.
- Install the Electronics: If you’re building an electric guitar, install the pickups, control knobs, and other electronic components. Follow the wiring diagram specific to your guitar model to connect the pickups, switches, and pots properly.
- String the Guitar: Install the strings onto the guitar, starting from the bridge and winding them onto the tuning machines. Ensure they are properly seated in the nut slots and properly tensioned to achieve the desired pitch.
- Test and Adjust: Once the guitar is fully assembled, perform a thorough inspection, ensuring all components are secure and properly aligned. Check for any buzzing, intonation issues, or other inconsistencies and make necessary adjustments, such as truss rod adjustments or saddle height adjustments.
Assembling the guitar requires a careful approach to ensure a proper and functional instrument. Take your time during this stage, ensuring all components are securely attached and aligned. Once the guitar is fully assembled, you can focus on the finishing touches to complete your project.
Finishing Touches
The finishing touches are the final steps in the guitar-building process, where you add the details that enhance the aesthetics and protect the wood. These steps involve applying a finish, polishing the guitar, and adding any additional decorative elements. Here are the finishing touches to consider:
- Choose a Finish: Select a finish that suits your desired look and provides protection for the wood. Common options include lacquer, polyurethane, oil, or wax. Research different finishes and consider their characteristics, such as durability, ease of application, and the desired effect on the wood’s appearance.
- Prepare the Surface: Before applying the finish, ensure that the wood is clean and smooth. Remove any dust, dirt, or imperfections by gently sanding the surface with fine grit sandpaper or using a tack cloth to wipe away any residue.
- Apply the Finish: Follow the manufacturer’s instructions for applying the chosen finish. Whether it’s spraying, brushing, or wiping on the finish, ensure even coverage and avoid any drips or excess buildup. Allow sufficient drying time between coats as recommended by the manufacturer.
- Sand and Buff: Once the finish has dried, use progressively finer grit sandpaper to sand the surface of the guitar, achieving a smooth and polished feel. Be careful not to sand through the finish or damage any delicate areas. After sanding, buff the guitar using a soft cloth to enhance the shine and bring out the luster of the finish.
- Add Decorative Elements: If desired, you can add decorative elements to personalize your guitar. This may include inlays, bindings, or custom artwork. These elements can be added to the fretboard, body, or headstock, adding a unique touch to your instrument.
- Install Hardware: Install any remaining hardware such as strap buttons, pickup covers, knobs, and other accessories. Ensure they are securely attached and adjusted to your preference.
- Final Inspection: Conduct a final inspection of the guitar, checking for any imperfections or issues. Make any necessary adjustments, such as adjusting the action or intonation, to fine-tune the playability of the instrument.
Finishing touches are the final steps that bring your guitar-building project to completion. Take your time during this phase to ensure a professional-looking result that reflects your personal style and attention to detail. With the finishing touches complete, your guitar is now ready for the final setup and adjustments.
Read more: How To Tear A Building Down With Hand Tools
Final Setup and Adjustments
The final setup and adjustments of a guitar are crucial for ensuring optimal playability, comfort, and tonal quality. This stage involves fine-tuning various elements of the instrument to achieve the desired sound and feel. Here are the key steps to consider during the final setup and adjustments:
- String Height and Action: Adjust the string height or action to ensure that the strings are at a comfortable distance from the fretboard. This adjustment affects the playability of the guitar, allowing for smooth fretting and minimal buzzing. Use an Allen wrench to adjust the bridge saddles or the truss rod to achieve the desired string height.
- Intonation: Check the intonation of the guitar to ensure that each string plays in tune across the entire fretboard. Use a tuner to compare the pitch at the 12th fret with the open string. If there is a discrepancy, adjust the position of the bridge saddles to correct the intonation.
- Nut Slot Adjustment: Inspect the nut slots and ensure that they are properly cut to allow the strings to move freely. If necessary, file the slots slightly to ensure smooth string movement and proper string spacing.
- Pickup Height: Adjust the height of the pickups to achieve the desired balance and tone. Experiment with different heights to find the sweet spot where the pickups capture the right amount of string vibration without overpowering or distorting the sound.
- Electronics Check: Verify that all the electronic components, such as pots, switches, and wiring, are properly connected and functioning. Ensure that there are no loose connections or unwanted noise in the signal path.
- Fretboard Conditioning: Apply a small amount of fretboard conditioner or oil to hydrate and protect the wood. This step helps prevent the fretboard from drying out and improves its longevity.
- Test and Play: Take the time to test the guitar and play it extensively to assess its playability, tone, and overall feel. Pay attention to any areas that require further adjustment and make necessary tweaks to achieve a comfortable and satisfying playing experience.
The final setup and adjustments may require some trial and error to achieve the desired results. It’s important to be patient and make small adjustments, testing and playing the guitar between each adjustment to assess the impact on the instrument’s performance.
Once you are satisfied with the final setup and adjustments, you can proudly consider your guitar-building project complete! Enjoy the fruits of your labor and make music with an instrument that is unique to you.
Conclusion
Building a guitar with hand tools is truly a labor of love that allows you to create a masterpiece that is unique to you. Throughout the process, you have carefully chosen the right wood, designed the body, prepared the materials, crafted the neck, shaped the body, installed the frets, assembled the guitar, added the finishing touches, and performed the final setup and adjustments.
By investing time and effort in each step, you have not only created a beautiful instrument, but also gained a deeper understanding of the art of lutherie. Building a guitar by hand is an opportunity to connect with the instrument on a profound level, combining craftsmanship, artistry, and a passion for music.
Remember, the journey of building a guitar is as important as the destination. Embrace the challenges, relish the small victories, and learn from every setback you encounter along the way. Every guitar you build will be a testament to your dedication, creativity, and commitment to the art of lutherie.
Now, it’s time to play your masterpiece, to bring it to life and let your music resonate through its strings. Each note you play will be a testament to your craftsmanship and the joy that comes from creating something with your own hands. Whether you keep the guitar for yourself or gift it to someone, it will hold a special place in your heart as a testament to your skills and passion.
Remember, building a guitar is not only about crafting an instrument but also about the journey of self-expression, creativity, and personal growth. Let the guitar you have built be a reminder of your ability to bring something beautiful into the world.
So go ahead, strum those strings, unleash your creativity, and let your handmade guitar be the catalyst for all the melodies and emotions that flow through your music. Congratulations on your guitar-building journey, and may it be the start of a musical adventure that lasts a lifetime.
Frequently Asked Questions about How To Build A Guitar With Hand Tools
Was this page helpful?
At Storables.com, we guarantee accurate and reliable information. Our content, validated by Expert Board Contributors, is crafted following stringent Editorial Policies. We're committed to providing you with well-researched, expert-backed insights for all your informational needs.


0 thoughts on “How To Build A Guitar With Hand Tools”