Home>Articles>How To Build Louvered Wood Shutters With Hand Tools Only
Articles
How To Build Louvered Wood Shutters With Hand Tools Only
Modified: May 6, 2024
Learn how to build louvered wood shutters using only hand tools in this step-by-step guide. Find helpful articles and tips for creating beautiful shutters for your home.
(Many of the links in this article redirect to a specific reviewed product. Your purchase of these products through affiliate links helps to generate commission for Storables.com, at no extra cost. Learn more)
Introduction
Wood shutters are a timeless and elegant addition to any home exterior. They not only enhance the curb appeal but also provide privacy and protection from the elements. While there are various types of shutters available in the market, building your own louvered wood shutters can be a rewarding DIY project.
In this article, we will guide you through the process of building louvered wood shutters using only hand tools. Whether you are a seasoned woodworker or a novice, with a little patience and some basic tools, you can create beautiful shutters that perfectly complement your home.
Before we dive into the step-by-step process, let’s take a look at the materials and tools you will need for this project.
Key Takeaways:
- Elevate your home’s exterior with elegant louvered wood shutters, crafted by hand using basic tools. Enjoy privacy, protection, and timeless charm with this rewarding DIY project.
- Precision and patience are key in creating custom louvered wood shutters. From measuring and cutting to assembly and installation, meticulous attention to detail ensures professional results that enhance your home’s aesthetic appeal.
Read more: How To Start A Garden With Only Hand Tools
Materials and Tools Required
Before getting started, gather the following materials and tools:
Materials:
- Wood boards (e.g. cedar or pine) – Ensure they are suitable for outdoor use and the desired dimensions for your shutters.
- Louvered shutter template or jig – This will help you create uniform louvers.
- Screws or nails – Choose corrosion-resistant fasteners to withstand outdoor conditions.
- Wood glue – Use a strong adhesive to reinforce the joinery.
- Primer and paint or stain – Protect the wood and enhance the aesthetic appeal.
- Finishing materials – Sandpaper, wood filler, and a putty knife for surface preparation.
Tools:
- Measuring tape – Accurately measure the dimensions of your windows or desired shutter size.
- Square – Ensure your cuts are precise and corners are squared.
- Miter saw or circular saw – Ideal for cutting straight and angled cuts.
- Hand plane or sandpaper – Smooth the wood surfaces and remove any splinters.
- Drill/driver or hammer – Secure the shutters in place with screws or nails.
- Chisel – Trim and clean up the mortises for the louvers.
- Paintbrush or sprayer – Apply the primer, paint, or stain to the shutters.
Having these materials and tools ready will ensure a smooth building process and help you achieve professional-looking results.
Step 1: Measuring and Planning
The first step in building louvered wood shutters is to measure your windows or determine the desired size for the shutters. Measure the height and width of the window, taking into account any desired overlap or clearance.
Once you have the measurements, consider the desired spacing between the louvers. Generally, a spacing of 2-3 inches works well, but you can adjust it to your preference. Keep in mind that the overall width of the shutter will increase slightly due to the addition of louvers.
With the measurements in hand, it’s time to plan the design of your shutters. Decide on the number of louvers and their placement. Typically, shutters have three to six louvers, evenly spaced between the top and bottom rails.
Sketch out the design on paper, indicating the dimensions of each component – stiles, rails, and louvers. This will serve as your guide throughout the building process.
Remember to account for the spacing needed between the shutters when planning for multiple shutters on a single window.
Take this opportunity to also consider the style of the shutters – whether you want a more traditional look with evenly spaced louvers or a more contemporary design.
Once you have finalized the measurements and design, it’s time to move on to the next step – cutting the wood.
Read more: How To Carve Wood With Hand Tools
Step 2: Cutting the Wood
Now that you have your measurements and design plan, it’s time to cut the wood for your louvered wood shutters. Start by marking the dimensions of each component on the wood boards, including the stiles, rails, and louvers.
Using a miter saw or a circular saw, carefully cut the wood boards to the desired lengths. Ensure that the cuts are accurate and the corners are squared for a neat and professional finish.
For the stiles and rails, cut them to match the height and width of your window, accounting for any desired overlap or clearance. Remember to cut two stiles and two rails for each shutter.
For the louvers, refer to your design plan for the required lengths. Cut them slightly longer than needed to allow for trimming and fitting later on. It’s better to have them longer initially and then trim them to fit perfectly.
When making your cuts, it’s important to work on a stable and secure surface. Use clamps to hold the wood in place and ensure your fingers are clear of the saw blade.
Once all the components are cut, double-check their measurements before moving on to the next step. Accurate cuts are essential for a precise and well-fitted final product.
With the wood components cut to size, you are ready to move on to the next step – sanding the wood.
Step 3: Sanding the Wood
After cutting the wood for your louvered wood shutters, it’s important to sand the surfaces to achieve a smooth and polished finish. Sanding not only enhances the appearance of the shutters but also prepares the wood for painting or staining.
Start by using coarse-grit sandpaper, around 80-100 grit, to remove any rough edges, splinters, or imperfections on the wood surfaces. Sand in the direction of the wood grain to avoid creating scratches or marks.
Continue sanding with progressively finer-grit sandpapers, such as 120 grit and 220 grit, to achieve a smoother finish. This will also help to remove any remaining marks left by the coarse-grit sandpaper.
Pay extra attention to the edges and corners of the wood components. Use a sanding block or folded sandpaper to ensure even sanding and prevent rounding of the edges.
As you sand, frequently check the smoothness of the wood surfaces by running your hand over them. It should feel smooth to the touch without any roughness or splinters.
Once you are satisfied with the smoothness of the wood, use a damp cloth or tack cloth to remove any dust or debris caused by sanding. This will ensure a clean surface for the next steps of the process.
Take this time to inspect the wood for any remaining imperfections or gaps. If necessary, use wood filler to fill in small holes or cracks. Allow the wood filler to dry completely before proceeding.
By sanding the wood and preparing it properly, you are now ready to move on to the next step – creating the louvers.
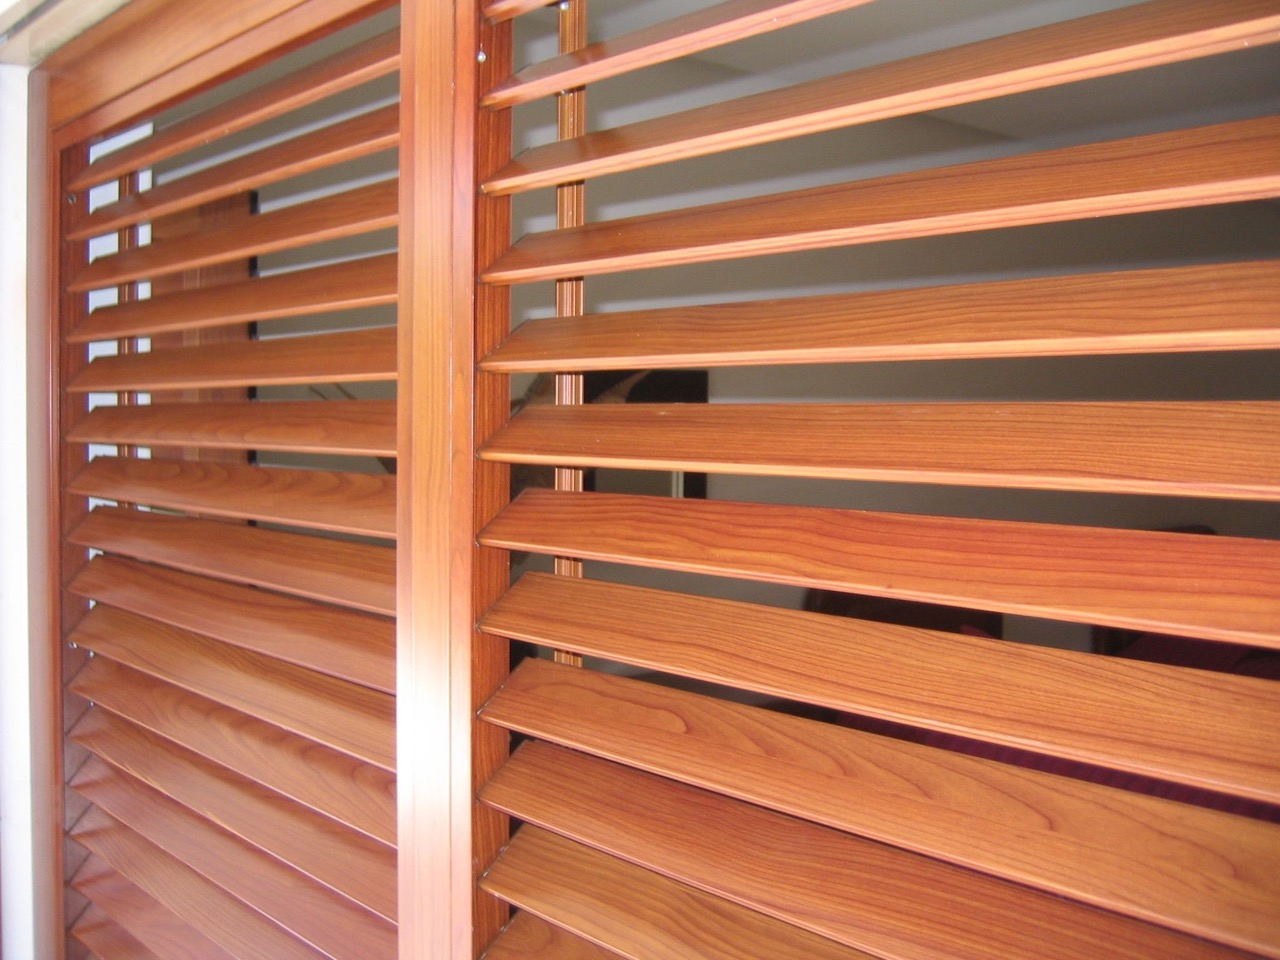
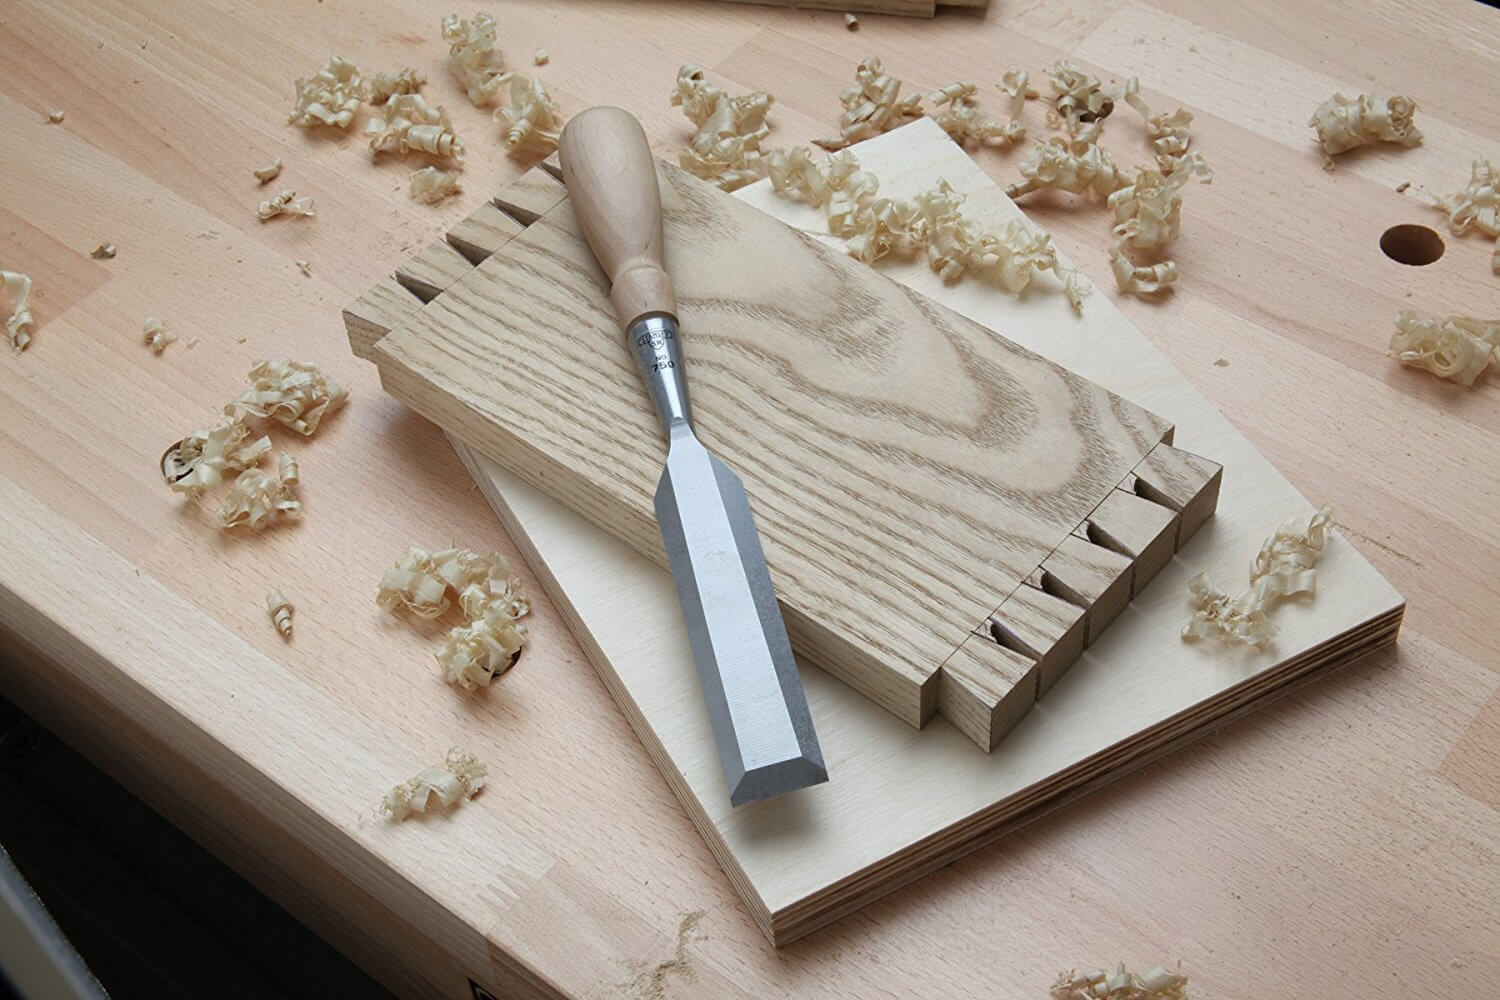
Step 4: Creating the Louvers
Creating the louvers is a crucial step in building louvered wood shutters. Louvers are the slats that allow light and air to pass through while still providing privacy. There are various methods to create them, but we will focus on using a louvered shutter template or jig for consistent and accurate results.
Start by setting up the louvered shutter template or jig according to the instructions provided. This template will guide you in creating evenly spaced and aligned louvers.
Place one of the stile pieces onto the template and secure it using clamps. Ensure that the edges are flush with the template to maintain consistency.
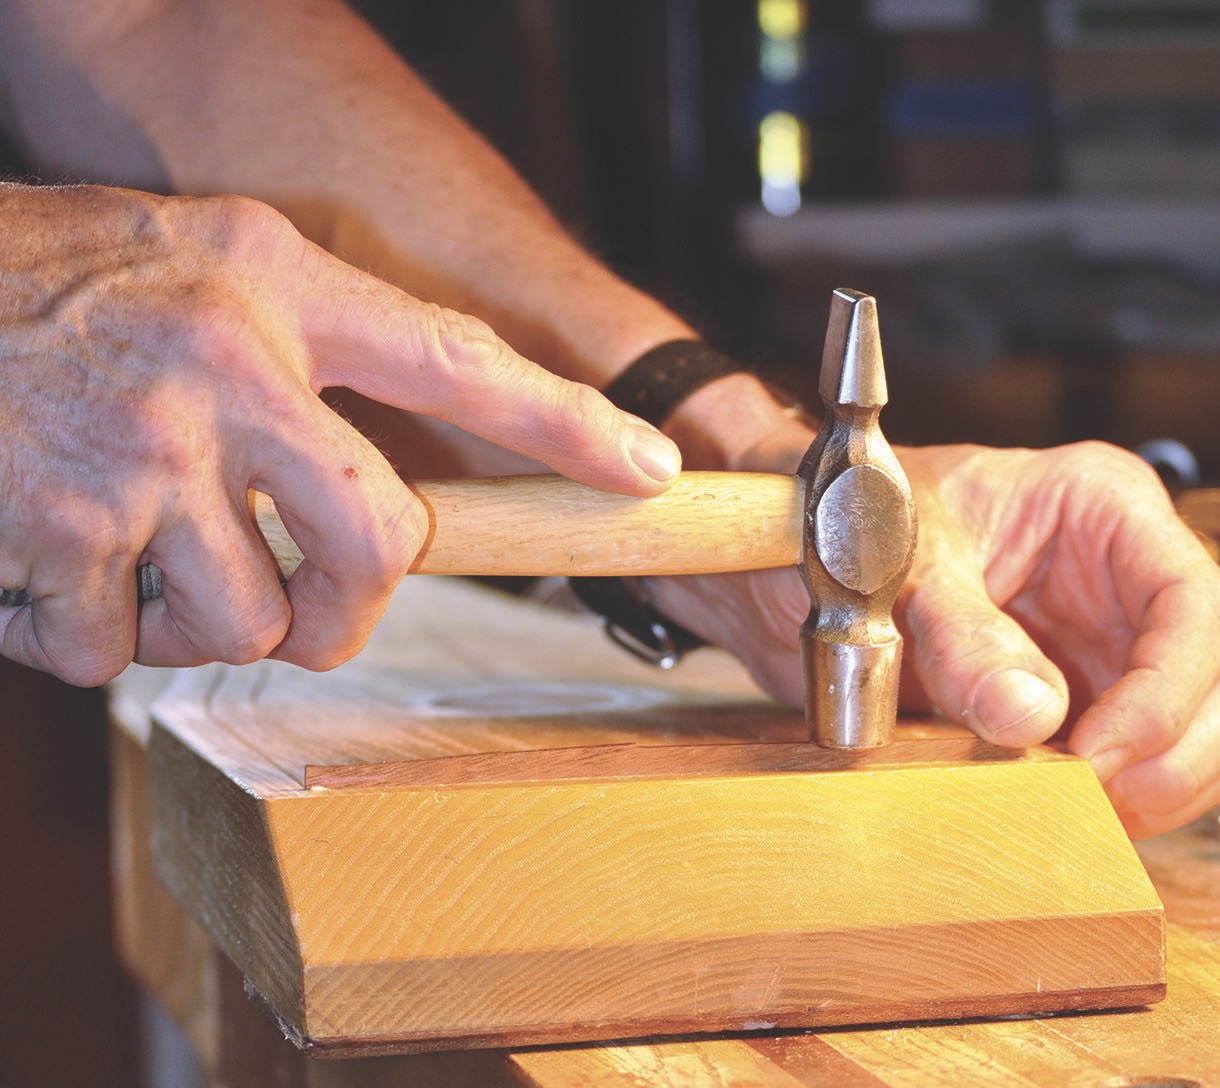
Using a chisel or router, carefully remove the material between each of the marked spots on the template, creating the slots for the louvers. Take your time to ensure clean and precise cuts.
Repeat this process for all the stiles, ensuring that the slots are identical in size and spacing. This will ensure that the louvers fit properly and provide a uniform appearance.
Once all the slots are created, test the fit of the louvers. Insert one louver into each slot to ensure a snug fit. Make any necessary adjustments to the slots to achieve the desired fit.
After confirming the fit, remove the louvers and sand the slots lightly to remove any rough edges. This will ensure smooth movement and prevent any snagging when operating the shutters.
Once you have created the louvers on all the stiles, you are ready to move on to the next step – assembling the shutters.
When building louvered wood shutters with hand tools only, make sure to measure and mark each slat carefully to ensure they are evenly spaced and aligned. This will result in a professional-looking finished product.
Step 5: Assembling the Shutters
With the components prepared, it’s time to assemble the louvered wood shutters. Assembling the shutters involves joining the stiles and rails together to form the frame and attaching the louvers within the slots.
Begin by laying out the stiles and rails in their correct positions. Apply a thin layer of wood glue to the ends of each rail and align them with the stiles. Use clamps to hold the pieces together firmly.
Ensure that the corners are square and the joints are flush. Use a square to check for accuracy and make any necessary adjustments. Once aligned, secure the joints with screws or nails, ensuring they penetrate both the stiles and rails.
Continue assembling the other shutter frames in the same manner, following your design plan and dimensions.
Once the frames are assembled, it’s time to insert the louvers into the slots. Apply a small amount of wood glue to the end of each louver and insert it into the corresponding slot. Press it firmly in place, ensuring that it is seated securely.
Repeat this process for each louver, making sure they are evenly spaced and aligned. Use clamps or weights to hold the louvers in place until the glue dries.
Once the glue has dried, check the shutters for any excess glue and remove it with a damp cloth. Sand any areas that require touch-ups, ensuring a smooth and uniform surface.
At this stage, you can also add additional decorative elements such as trim or moulding to enhance the aesthetic appeal of the shutters.
With the shutters assembled, it’s time to move on to the final step – installing the shutters onto your windows.
Step 6: Installing the Shutters
Now that you have completed the construction of your louvered wood shutters, it’s time to install them onto your windows. Follow these steps to ensure a successful installation:
1. Positioning: Hold the shutter frame up against the window, making sure it is centered and level. Mark the locations for the mounting holes on the window trim or siding. It’s recommended to have at least two screws or nails per rail for secure installation.
2. Pre-drilling: Use a drill with a bit slightly smaller than the screws or nails you are using. Pre-drill the marked locations to prevent the wood from splitting when you attach the shutters.
3. Attaching: With the pre-drilled holes, align the shutter frame with the markings on the window trim or siding. Drive the screws or nails through the pre-drilled holes and into the frame, ensuring a tight and secure fit. Repeat this process for each mounting hole.
4. Test the Functionality: After installing the shutters, open and close them to ensure that they operate smoothly. Check for any obstructions or misalignment and make any necessary adjustments to ensure proper functionality.
5. Finishing: If desired, apply a coat of primer and paint or stain to protect the wood from the elements. Follow the manufacturer’s instructions for proper application and drying time. Ensure that any exposed edges or cut ends of the wood are adequately covered with paint or stain.
6. Enjoy Your Shutters: With the shutters properly installed, take a step back and admire your handiwork. These beautiful louvered wood shutters will not only enhance the aesthetic appeal of your home but also provide privacy and protection.
Remember to periodically inspect and maintain your shutters. Regularly check for any signs of damage or wear and take appropriate measures to keep them in good condition.
Congratulations on successfully building and installing your louvered wood shutters! Sit back and enjoy the charm and elegance they bring to your home.
Conclusion
Building louvered wood shutters with hand tools only is a rewarding DIY project that allows you to add a touch of elegance and charm to your home. By following the steps outlined in this guide, you can create beautiful shutters that perfectly complement your windows while providing privacy, protection, and visual appeal.
Throughout the process, we discussed the importance of accurate measurements and careful planning. By taking the time to measure your windows, design the shutters, and gather the necessary materials and tools, you set yourself up for success.
We walked through cutting the wood, sanding the surfaces, creating the louvers, and assembling the shutters. These steps require precision and attention to detail, ensuring that each component fits together seamlessly.
Finally, we covered the installation process, guiding you on how to position, attach, and test the functionality of the shutters. With the shutters securely in place, you can enjoy the aesthetic and functional benefits they bring to your home exterior.
Remember to finish the shutters with primer, paint, or stain to protect the wood from the elements and enhance their appearance. Regularly inspect and maintain your shutters to keep them looking their best for years to come.
Building louvered wood shutters with hand tools allows you to showcase your craftsmanship and create customized shutters that truly reflect your personal style. So, roll up your sleeves, gather your tools, and get started on this satisfying and fulfilling project.
With a little time, effort, and patience, you’ll have beautiful louvered wood shutters that will make a lasting impression on your home’s exterior.
Now that you've mastered building louvered wood shutters with hand tools, why not expand your carpentry skills even further? Our next feature delves into the latest and greatest woodworking techniques, sure to inspire your next project. Whether you're looking to refine your craft or tackle something entirely new, these insights will guide you through the exciting world of woodworking, tailored for enthusiasts eager to learn and grow. Don't miss out on this opportunity to enhance your woodworking repertoire!
Frequently Asked Questions about How To Build Louvered Wood Shutters With Hand Tools Only
Was this page helpful?
At Storables.com, we guarantee accurate and reliable information. Our content, validated by Expert Board Contributors, is crafted following stringent Editorial Policies. We're committed to providing you with well-researched, expert-backed insights for all your informational needs.


0 thoughts on “How To Build Louvered Wood Shutters With Hand Tools Only”