Articles
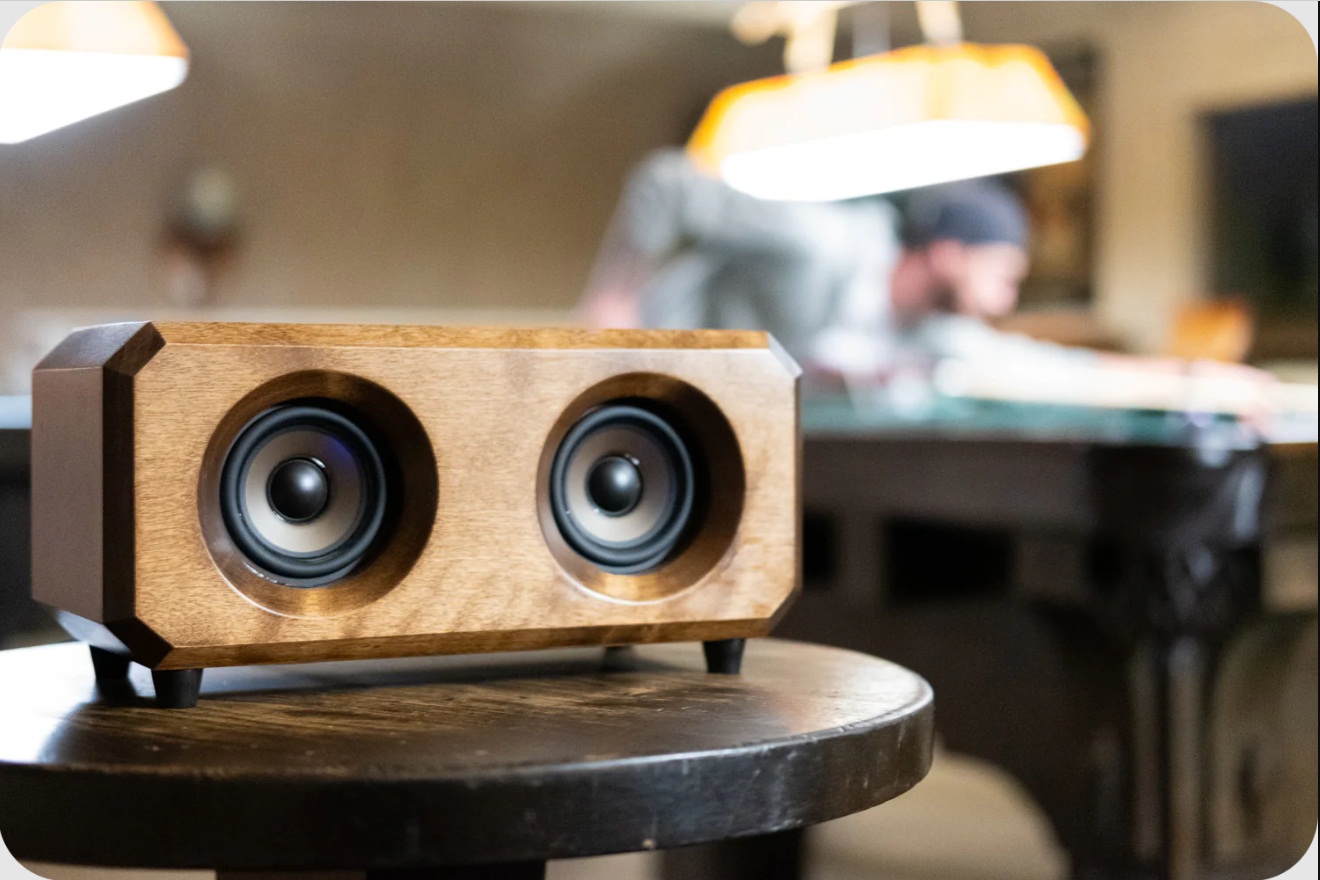
How To Build Speaker Boxes
Modified: October 20, 2024
Learn how to build speaker boxes with a focus on interior design. Enhance the aesthetics of your speakers while optimizing functionality in minimal space.
(Many of the links in this article redirect to a specific reviewed product. Your purchase of these products through affiliate links helps to generate commission for Storables.com, at no extra cost. Learn more)
Introduction
Building your own speaker boxes can be a rewarding and fulfilling project for audio enthusiasts and DIY enthusiasts. Not only does it allow you to customize the design and size of the speakers according to your preferences, but it also gives you the opportunity to achieve superior sound quality.
In this step-by-step guide, we will walk you through the process of building speaker boxes from start to finish. Whether you are a seasoned DIYer or a beginner, this guide will provide you with the necessary information and instructions to successfully complete your own custom speaker boxes.
Before diving into the steps, it’s important to understand the basic components of a speaker box. Speaker boxes, also known as cabinets or enclosures, serve several functions. They provide a housing for the speaker drivers, which are responsible for producing sound waves. Additionally, they help to enhance the speaker’s efficiency, control the direction of the sound, and minimize unwanted vibrations and resonances.
This guide will cover everything you need to know, from choosing the right speaker drivers and calculating the appropriate box dimensions to assembling the box and wiring the speakers. By following these steps, you can create speaker boxes that not only look great but also deliver exceptional audio performance.
So, if you’re ready to embark on this exciting DIY project, let’s get started with step one: choosing the speaker drivers!
Key Takeaways:
- Building custom speaker boxes allows for personalized design and superior sound quality. From choosing the right drivers to assembling and testing, DIY enthusiasts can create speakers tailored to their preferences for a rewarding audio experience.
- Attention to detail is crucial in achieving optimal sound performance. Calculating box dimensions, proper assembly, and thorough testing ensure that custom-built speakers deliver exceptional audio and a sense of accomplishment.
Read more: How To Build Cabinet Box
Step 1: Choosing the Speaker Drivers
When it comes to building your own speaker boxes, the first and most crucial step is selecting the right speaker drivers. Speaker drivers, also known as loudspeakers, are responsible for converting electrical signals into sound waves. Choosing the right drivers will greatly influence the overall sound quality and performance of your speakers.
There are several factors to consider when selecting speaker drivers:
- Speaker Size: Determine the size of the speakers you want to build. This will depend on your space constraints and personal preferences. Common sizes include 6.5-inch, 8-inch, and 10-inch drivers.
- Power Handling: Consider the power handling capabilities of the speaker drivers. This is typically measured in watts and indicates the maximum amount of power the drivers can handle without distortion.
- Frequency Response: Pay attention to the frequency range of the speaker drivers. This refers to the range of sound frequencies that the drivers can reproduce. A wider frequency response will provide better audio reproduction.
- Sensitivity: Sensitivity is measured in decibels (dB) and indicates how efficient the speakers are in converting power to sound. Higher sensitivity speakers will produce louder sound with less power.
- Impedance: Impedance refers to the electrical resistance of the speakers. It is important to choose speakers with an impedance that is compatible with your amplifier or receiver.
Before making a final decision, it is recommended to research different speaker models and read reviews to ensure that they meet your requirements and expectations. Additionally, consider the type of music or audio content you will primarily be listening to, as different drivers excel in reproducing specific genres or sound effects.
Once you have chosen the speaker drivers, you can move on to the next step: calculating the speaker box dimensions.
Step 2: Calculating the Speaker Box Dimensions
Calculating the proper speaker box dimensions is crucial in achieving optimal audio performance. The size and shape of the box will affect the sound quality by influencing factors such as bass response, frequency response, and overall speaker efficiency.
To calculate the speaker box dimensions, you will need to consider the parameters of the selected speaker drivers, such as Vas (equivalent volume of air compliance), Fs (resonant frequency), and Qts (total speaker Q-factor). These parameters can usually be found in the speaker’s datasheet or specifications.
There are different types of speaker box designs, including sealed, ported (vented), and bandpass. Each design has its own characteristics and advantages, and the choice will depend on the desired sound characteristics and specific speaker drivers.
For a sealed box design, the calculations typically involve determining the internal volume of the box based on the Vas parameter of the speaker drivers. This volume should be within a recommended range specified by the manufacturer to achieve optimal performance.
If you opt for a ported box design, you will need to calculate the ideal port dimensions to achieve the desired bass response. This involves considering the desired tuning frequency and the dimensions of the port tube.
Bandpass box designs, on the other hand, require both a sealed and ported chamber to control the sound frequencies. The calculations for a bandpass box design are more complex and involve determining the dimensions and volumes of the sealed and ported chambers.
To simplify the calculations, there are online calculators and software programs available that can assist in determining the optimal speaker box dimensions based on the selected driver parameters and desired box design.
Once you have the calculated dimensions, you can proceed to the next step: selecting the speaker box design.
Step 3: Selecting the Speaker Box Design
Choosing the right speaker box design is essential to achieving the desired sound characteristics and performance. The design you select will depend on factors such as the type of music you listen to, the space available, and your personal preferences.
Here are three common speaker box designs to consider:
- Sealed Box: A sealed box design, also known as an acoustic suspension enclosure, provides tight and accurate bass reproduction. It is a straightforward design that seals the speaker drivers inside an airtight enclosure. Sealed boxes generally require a larger volume compared to other designs but offer excellent low-frequency control.
- Ported Box: Ported or vented box designs enhance low-frequency performance by incorporating a tuned port or vent. The port allows internal air pressure to interact with external air, resulting in increased low-frequency output. Ported boxes are often smaller than sealed boxes but still provide extended bass response.
- Bandpass Box: A bandpass box design combines both sealed and ported chambers to achieve maximum efficiency in a specific frequency range. These boxes are more complex and require precise calculations to achieve the desired sound characteristics. Bandpass boxes can deliver powerful and deep bass but may sacrifice some overall sound quality.
Consider your listening preferences and the intended use of the speakers when selecting the box design. If you mainly listen to music genres that rely heavily on accurate bass reproduction, such as electronic or hip-hop, a ported or bandpass box design might be a better choice. For a more balanced and precise sound reproduction across all frequencies, a sealed box design can be a suitable option.
It’s important to note that each speaker and driver combination may have specific recommendations on the preferred enclosure type and volume. These recommendations help ensure optimal performance and prevent damage to the speakers. Refer to the speaker manufacturer’s documentation or consult with experts in the field to determine the most suitable box design for your chosen speaker drivers.
Once you have selected the speaker box design, you can proceed to the next step: gathering the necessary materials and tools.
Step 4: Gathering the Materials and Tools
Before diving into the construction of your speaker box, it’s important to gather all the necessary materials and tools. Having everything prepared in advance will make the building process smoother and more efficient.
Here is a list of materials you will typically need:
- Wood: Choose a sturdy and acoustically suitable type of wood for constructing the speaker box. MDF (medium-density fiberboard) is a popular choice due to its density and low resonance.
- Screws or Nails: Depending on your preference, select the appropriate fasteners to assemble the wood panels of the speaker box.
- Wood Glue: Use wood glue to reinforce the connections between the wood panels for added strength and stability.
- Speaker Drivers: The selected speaker drivers that you chose in step one will be necessary for the construction.
- Speaker Wire: Choose high-quality speaker wire to connect the speakers to your audio source.
- Damping Material: Acoustic damping material, such as polyfill or foam, can be used to reduce internal vibrations and improve sound quality.
- Terminal Cups: These are connectors that allow you to easily connect and disconnect the speaker wires.
In addition to the materials, you will also need a set of tools to facilitate the construction process:
- Power Drill: A power drill with appropriate drill bits will be necessary for creating holes and securing screws or nails.
- Saw: Acquire a saw suitable for cutting the wood panels to the required dimensions.
- Screwdriver or Hammer: Depending on your choice of fasteners, be sure to have the appropriate screwdriver or hammer for assembling the speaker box.
- Tape Measure: An accurate tape measure will assist in measuring and marking the wood panels for precise cutting.
- Sanding Tools: Sandpaper or a sanding block will be useful for smoothing rough edges and ensuring a neat finish.
- Protective Equipment: Invest in safety goggles and ear protection to safeguard yourself during the construction process.
It’s important to have all the necessary materials and tools ready before starting the construction of the speaker box. This will ensure a smoother and more efficient building process, allowing you to focus on creating a high-quality speaker box.
Next, we will move on to step five: cutting the wood panels.
Step 5: Cutting the Wood Panels
With all the necessary materials and tools gathered, it’s time to start cutting the wood panels for your speaker box. Precise and accurate cuts are crucial to ensure a proper fit and structural integrity of the box.
Here are the steps to follow when cutting the wood panels:
- Measurements: Refer to your calculated speaker box dimensions from step two and mark the measurements on the appropriate wood panels. Use a tape measure and a pencil to make precise markings.
- Cut the Panels: Using a saw suitable for cutting wood, carefully cut along the marked lines to create the individual panels of the speaker box. Take your time and ensure clean and accurate cuts.
- Double-Check Measurements: After cutting each panel, double-check the measurements against the calculated dimensions to ensure accuracy. Make any necessary adjustments before moving on to the next step.
- Smooth Edges: Use sandpaper or a sanding block to smooth any rough edges or splinters on the cut wood panels. This will create a neat and professional-looking finish.
- Label and Organize: As you cut each panel, it’s helpful to label them and keep them organized. This will make it easier to identify the correct panels during the assembly process.
- Set Aside: Once all the wood panels are cut and smoothed, set them aside in a safe and organized manner, ready for the next step of assembling the speaker box.
Remember to take caution and observe proper safety measures while cutting the wood panels. Wear protective goggles to shield your eyes from any debris, and ensure you have a stable work surface to prevent accidents.
By carefully cutting the wood panels according to your measurements, you are one step closer to building your own custom speaker box. In the next step, we will guide you through the process of assembling the speaker box.
When building speaker boxes, make sure to use the correct type and thickness of wood to minimize vibrations and resonance. Additionally, consider the internal volume and porting to achieve the desired sound quality.
Step 6: Assembling the Speaker Box
Now that you have your wood panels cut and ready, it’s time to assemble the speaker box. Proper assembly is crucial for a sturdy and well-functioning enclosure.
Follow these steps to assemble your speaker box:
- Layout the Panels: Start by laying out the wood panels in the desired arrangement, aligning the edges properly.
- Apply Wood Glue: Apply a thin layer of wood glue to the edges of the panels that will be joined together. This will help create a strong bond between the panels.
- Secure with Fasteners: Join the wood panels together by using screws, nails, or other appropriate fasteners. Make sure the fasteners are properly aligned and tightened to ensure a secure connection.
- Check for Squareness: Use a carpenter’s square to check if the corners of the speaker box are 90 degrees. Adjust and reposition the panels if necessary to achieve a perfect square shape.
- Wipe Off Excess Glue: Immediately wipe off any excess wood glue that squeezes out from the joints. This will prevent glue stains and ensure a clean finish.
- Allow for Drying Time: Let the wood glue dry according to the manufacturer’s instructions. This typically takes a few hours or overnight.
- Reinforce with Braces: If desired or necessary, you can reinforce the corners or other critical areas of the speaker box with additional braces or corner brackets. This will add extra stability to the enclosure.
- Apply Damping Material: Once the box is fully assembled, consider lining the inner walls with acoustic damping material. This can help reduce internal vibrations and improve sound quality.
Throughout the assembly process, pay close attention to details and ensure that all connections are secure and properly aligned. Taking the time to properly assemble the speaker box will result in a durable and high-quality enclosure.
With the speaker box assembled, it’s time to move on to step seven: installing the speaker drivers.
Step 7: Installing the Speaker Drivers
Now that your speaker box is fully assembled, it’s time to install the speaker drivers, which will bring your custom speakers to life. Proper installation is essential for optimal sound performance and longevity of the drivers.
Follow these steps to install the speaker drivers:
- Prepare the Mounting Holes: Measure and mark the locations for the mounting holes on the front panel of the speaker box. Refer to the specifications provided by the speaker manufacturer for the correct hole placement.
- Drill the Holes: Use a drill with a drill bit appropriate for the size of the mounting screws provided with the speaker drivers. Carefully drill the marked holes on the front panel, ensuring that the drill remains perpendicular to the surface.
- Attach the Speaker Drivers: Place the speaker drivers over the drilled holes. Align the mounting holes on the drivers with the drilled holes on the front panel, then secure the drivers in place using the provided screws, washers, and nuts.
- Ensure a Secure Fit: Make sure the speaker drivers are tightly secured to the front panel, but be cautious not to overtighten the screws, as it could damage the drivers or distort the front panel.
- Check Alignment and Position: Ensure that the speaker drivers are aligned properly and centered within their respective mounting holes. This will contribute to a symmetrical appearance and optimal sound dispersion.
- Connect the Terminals: Locate the terminal cups on the back panel of the speaker box. Connect the speaker wire from the speaker drivers to the corresponding terminals on the terminal cups.
- Secure the Terminal Cups: Once the speaker wire is connected, secure the terminal cups to the back panel using screws or other provided fasteners.
Take care during the installation process to handle the speaker drivers gently and avoid placing excessive pressure on the cones or other vulnerable parts. It’s also important to follow any specific instructions or recommendations provided by the speaker manufacturer.
After installing the speaker drivers, you’re almost ready to enjoy your custom-built speakers. The next step is to wire the speakers properly, which we will cover in step eight.
Step 8: Wiring the Speakers
Now that you have installed the speaker drivers in your custom speaker box, it’s time to wire them properly. Proper wiring ensures efficient power transfer and correct polarity, resulting in optimal sound performance.
Follow these steps to wire your speakers:
- Prepare the Speaker Wire: Measure and cut the appropriate length of speaker wire for each speaker driver. Ensure that the wire is of suitable gauge for the power requirements of your speakers.
- Strip the Wire Ends: Strip off a small portion of insulation from the ends of the speaker wire, exposing the bare wire strands. This will allow for proper connection to the speaker terminals.
- Identify Polarity: Most speaker drivers are labeled with a positive (+) and negative (-) terminal. Take note of the polarity markings, as it’s crucial to connect the wires to the correct terminals for proper phase alignment.
- Connect the Wires: Connect the positive (+) wire of each speaker driver to the corresponding positive terminal on the speaker box’s terminal cup. Likewise, connect the negative (-) wire to the negative terminal. Ensure a secure and tight connection.
- Note Bipolar Speakers: If you have bipolar speakers, which have multiple speaker drivers with their own polarities, make sure to connect the wires accordingly to maintain proper phase alignment.
- Double-Check Connections: Once all the wires are connected, double-check the connections to ensure they are secure and properly aligned with the terminal markings.
- Tie off Excess Wire: If you have any excess wire, neatly tie it off or use wire clips to keep it organized and prevent it from interfering with the functioning of the speakers.
Wiring the speakers correctly is essential for achieving balanced sound reproduction and avoiding phase cancellation issues. Take your time to ensure accurate connections and a well-organized wiring setup.
With the speakers properly wired, you’re almost ready to enjoy the fruits of your labor. The last step is to thoroughly test and troubleshoot for any potential issues, which we will cover in step nine.
Read more: How To Build Bee Boxes
Step 9: Testing and Troubleshooting
After completing the construction, installation, and wiring of your custom speaker boxes, it’s time to thoroughly test and troubleshoot any potential issues. This step ensures that your speakers are functioning optimally and delivering the desired sound quality.
Follow these steps for testing and troubleshooting:
- Test Sound Output: Connect your custom speakers to an audio source, such as a receiver or amplifier. Play a variety of audio tracks to evaluate the sound output and quality across different frequencies.
- Adjust Settings: Use the controls on your audio source to adjust the volume, tone, and balance settings to your preference. Make note of any issues such as distorted sound, weak bass, or uneven sound distribution.
- Check Wiring Connections: Inspect all wiring connections to ensure they are secure and properly connected. Pay close attention to the speaker wire connections at the terminal cups, ensuring no loose or crossed wires.
- Inspect Speaker Drivers: Examine the speaker drivers for any physical damage or irregularities such as torn cones or loose parts. Ensure that the drivers are properly seated and aligned within the speaker box.
- Test Each Speaker Individually: If you notice any issues while testing, isolate each speaker driver by playing audio through them individually. This helps identify if the problem lies with a specific driver or the overall wiring setup.
- Check for Vibrations and Resonances: Listen for any excessive vibrations or resonances coming from the speaker box. Adding additional acoustic damping material or adjusting the internal bracing can help reduce unwanted vibrations.
- Make Necessary Adjustments: If you encounter any issues during testing, make the necessary adjustments. This may involve repositioning the speakers, adjusting the wiring connections, or fine-tuning the crossover settings on the audio source.
- Repeat Testing: After making adjustments, retest the speakers to determine if the issues have been resolved. Repeat the process until you are satisfied with the sound quality and performance of your custom speakers.
Remember, the testing and troubleshooting process may require patience and attention to detail. It’s not uncommon to encounter minor issues that can be easily resolved with some adjustments and fine-tuning.
By thoroughly testing and troubleshooting your custom speakers, you can ensure that they are performing optimally and delivering the desired audio experience. Once you’re satisfied with the results, sit back, relax, and enjoy the sound of your own creation!
With step nine completed, you have successfully completed the process of building your own speaker boxes. Congratulations on your DIY endeavor, and may your custom speakers bring you countless hours of enjoyment and superior sound quality!
Conclusion
Building your own speaker boxes can be a rewarding and fulfilling experience for audio enthusiasts and DIY enthusiasts alike. With the right speaker drivers, calculated box dimensions, and proper construction techniques, you can create custom speakers that not only look impressive but also deliver exceptional sound performance.
Throughout this step-by-step guide, we have walked you through the process of building speaker boxes from start to finish. From choosing the right speaker drivers and calculating box dimensions to assembling the box, installing the speaker drivers, and wiring the speakers, we have covered the essential steps necessary for a successful project.
By following these steps, you have the opportunity to customize the design, size, and characteristics of your speakers to suit your personal preferences and listening requirements. This level of flexibility allows you to create speakers that deliver the sound signature you desire, whether it’s deep and powerful bass, accurate and detailed midrange, or sparkling high frequencies.
Remember, attention to detail is crucial in ensuring the best sound quality from your speakers. Take the time to measure and cut the wood panels accurately, properly wire the speakers, and thoroughly test and troubleshoot for any potential issues. These steps will help you achieve optimal sound performance and longevity from your custom-built speakers.
Building your own speaker boxes is not only a way to save money compared to purchasing pre-built speakers, but it is also a fulfilling and creative endeavor. You have the satisfaction of knowing that you have crafted something unique and tailored to your own audio preferences.
So, if you are ready to embark on this exciting DIY project, follow the steps outlined in this guide, gather the necessary materials and tools, and let your creativity and passion for audio guide you through the process. Build your own speaker boxes and experience the joy of listening to music and audio with speakers that you have created and customized with your own hands.
Happy building and enjoy the ultimate audio experience with your custom-built speakers!
Excited about your new speaker boxes? Why not dive deeper into crafting with our guide on top woodworking trends for next year? Whether you're a seasoned woodworker or just starting out, this article offers valuable insights and tips on materials, tools, and techniques that will elevate your woodworking projects. Don't miss out on crafting masterpieces that are not only functional but also aesthetically pleasing.
Frequently Asked Questions about How To Build Speaker Boxes
Was this page helpful?
At Storables.com, we guarantee accurate and reliable information. Our content, validated by Expert Board Contributors, is crafted following stringent Editorial Policies. We're committed to providing you with well-researched, expert-backed insights for all your informational needs.


0 thoughts on “How To Build Speaker Boxes”