Home>Articles>How To Build A Plywood Box For Modular DIY Storage
Articles
How To Build A Plywood Box For Modular DIY Storage
Modified: December 7, 2023
Learn how to build a plywood box for modular DIY storage with our informative articles. Create versatile and customizable storage solutions for your home.
(Many of the links in this article redirect to a specific reviewed product. Your purchase of these products through affiliate links helps to generate commission for Storables.com, at no extra cost. Learn more)
Introduction
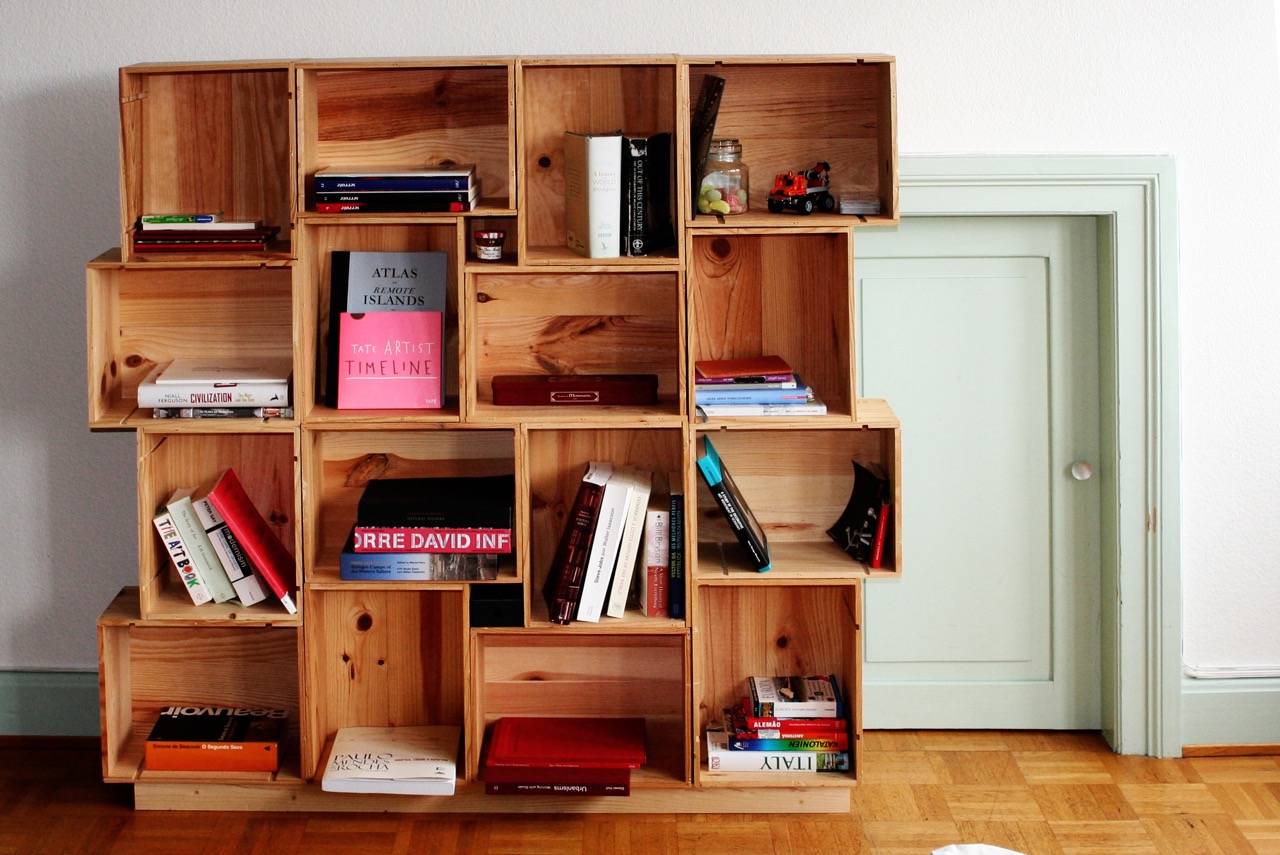
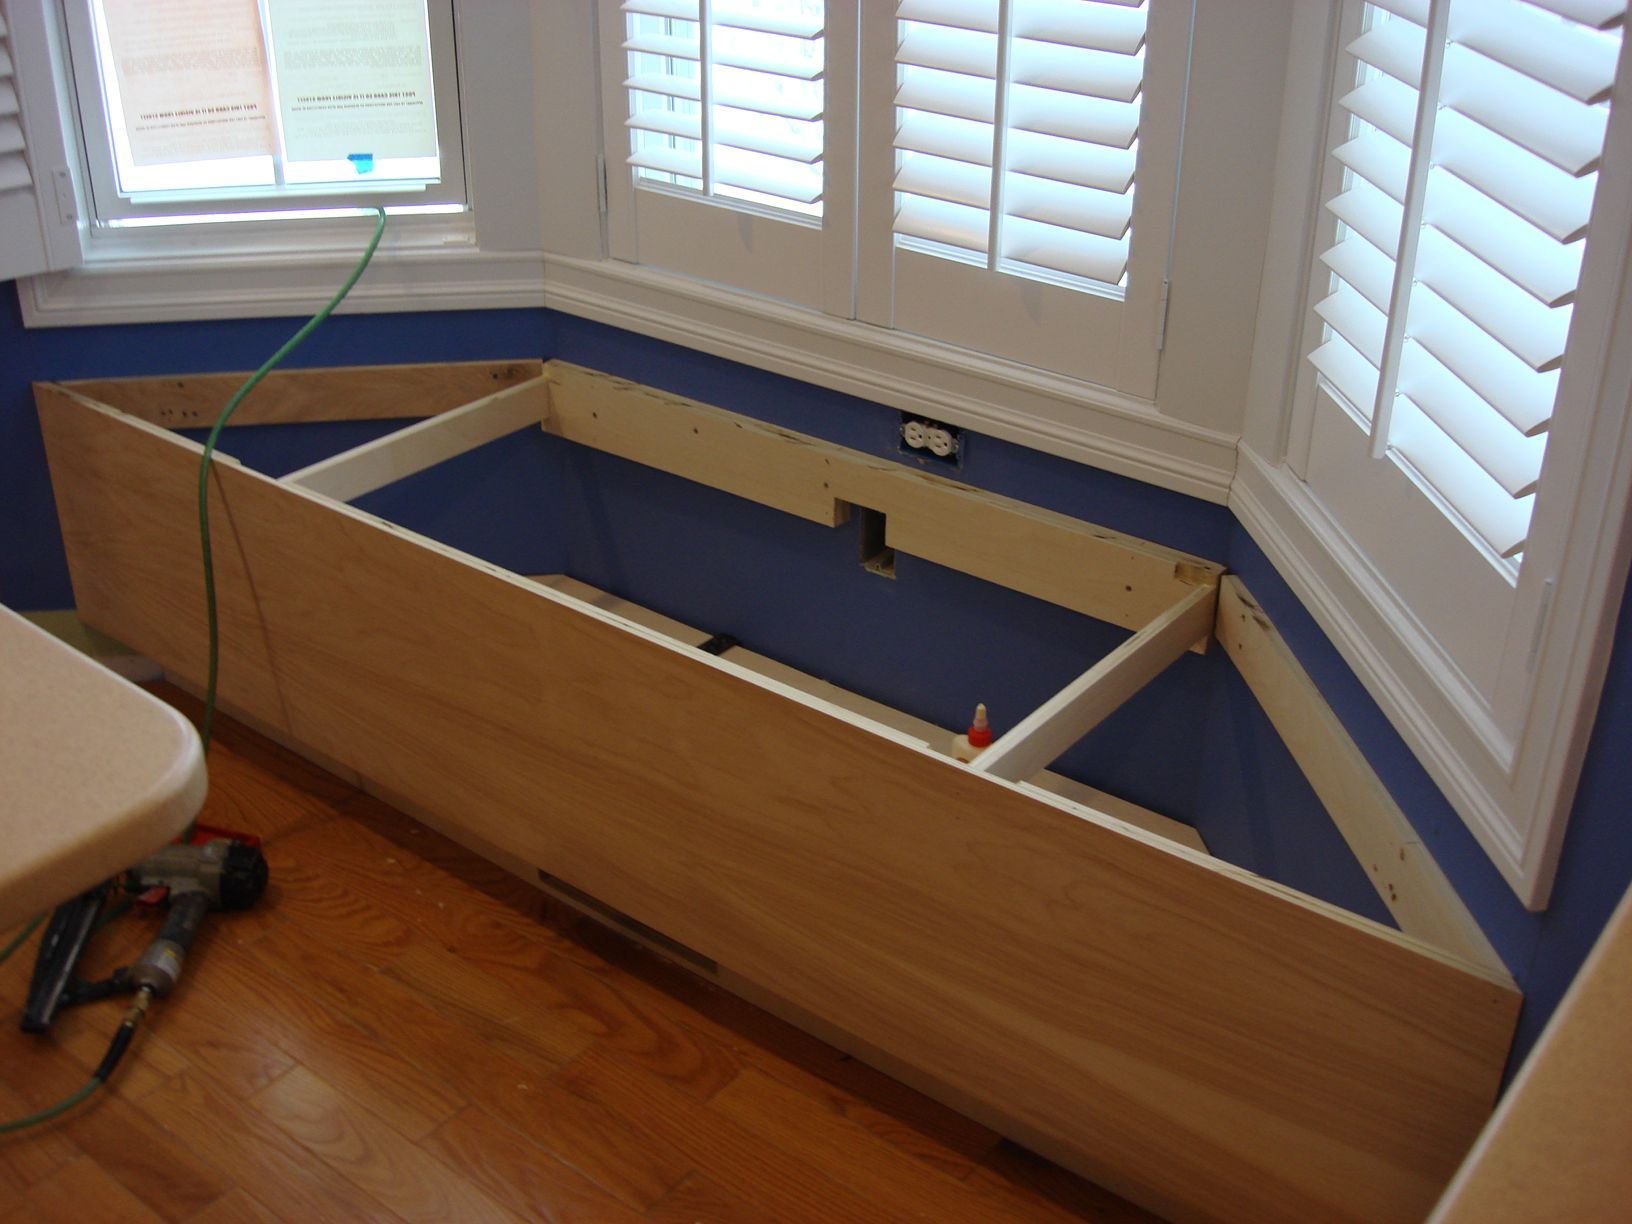
Building your own plywood box for modular DIY storage is a practical and cost-effective solution to help you organize your space. Whether you need extra storage in your garage, basement, or living area, a plywood box can be customized to fit your specific needs and can be easily modified or expanded in the future.
In this article, we will guide you through the process of building a plywood box step-by-step. We will discuss the materials and tools you’ll need, as well as provide detailed instructions on measuring and cutting the plywood panels, assembling the box, adding reinforcements, and finishing touches.
By following these guidelines, you’ll be able to create a sturdy and functional plywood box that will not only help you declutter your space but also add a touch of personalization and style.
So, let’s gather our materials and get started on this DIY storage project!
Key Takeaways:
- Building a plywood box for modular DIY storage is a customizable and cost-effective solution that not only declutters your space but also adds a touch of personalization and style to your home.
- By following the step-by-step instructions, using quality materials, and adding reinforcements, you can create a sturdy and functional plywood box that meets your storage needs for years to come.
Read more: How To Build Cabinet Box
Materials and Tools Needed
Before we dive into the construction process, let’s first gather all the necessary materials and tools. Here’s what you’ll need:
– Plywood: Choose a high-quality plywood with a thickness of at least ¾ inch. The amount of plywood will depend on the size of the box you plan to build.
– Circular Saw or Table Saw: Either of these saws will be required for cutting the plywood panels to size.
– Measuring Tape: An essential tool for accurate measurements.
– Pencil: Used for marking the plywood panels before cutting.
– Clamps: These will come in handy for holding the plywood panels securely during assembly.
– Drill: You’ll need a drill to create pilot holes and screw the panels together.
– Screws: Select screws that are appropriate for the thickness of your plywood panels.
– Sandpaper: This will be used for sanding and smoothing the surfaces of the box.
– Wood Glue: It’s recommended to use wood glue for added strength and stability during assembly.
– Paint or Stain: If you want to add a pop of color or protect the plywood, consider using paint or stain.
Ensure you have all the required materials and tools before starting the project to make the construction process smoother and more efficient. Additionally, it’s always a good idea to wear safety goggles and gloves to protect yourself during the cutting and assembly stages.
Now that you’re ready with all the necessary supplies, let’s move on to the first step: measuring and cutting the plywood panels.
Step 1: Measuring and Cutting the Plywood Panels
To begin constructing your plywood box, you’ll first need to measure and cut the plywood panels to the desired dimensions. Follow these steps:
1. Measure the dimensions: Determine the size of the box you want to build. Consider the height, width, and depth based on your storage needs and available space. Use a measuring tape to accurately measure each dimension.
2. Mark the plywood panels: Use a pencil to mark the dimensions on the plywood sheets. Double-check your measurements to ensure accuracy. It’s a good idea to label each panel according to its intended position in the box (e.g., front, back, sides, top, bottom).
3. Cut the plywood panels: Using a circular saw or table saw, carefully cut along the marked lines to create the individual plywood panels. Take your time and make precise cuts to ensure a clean and accurate fit. Remember to wear safety goggles and follow proper safety precautions when operating power tools.
4. Sand the edges: After cutting the plywood panels, lightly sand the edges to remove any roughness or splinters. This will not only enhance the appearance of the box but also make it safer to handle.
It’s essential to take accurate measurements and make precise cuts to ensure that the plywood panels fit together properly during assembly. Planning and precision at this stage will contribute to a more stable and professional-looking end result.
With the plywood panels cut to size, you are now ready to move on to the next step: creating the box sides.
Step 2: Creating the Box Sides
With the plywood panels cut to the desired dimensions, it’s time to start assembling the box. In this step, we will focus on creating the sides of the plywood box. Follow these instructions:
1. Lay out the panels: Start by laying out the front, back, and two side panels on a clean and flat work surface. Ensure that the panels are aligned properly and that the edges are flush.
2. Apply wood glue: Apply a thin and even layer of wood glue along the edges of one of the side panels. This will help create a strong bond between the panels.
3. Align the panels: Carefully align the glued side panel with the front panel, ensuring that the corners are square and the edges are flush. Secure the panels together using clamps to hold them in place.
4. Drill pilot holes: Pre-drill pilot holes through the front and side panels to prevent the wood from splitting when screws are inserted. Use a drill bit that is slightly smaller than the screws you will be using.
5. Screw the panels together: Insert screws through the pilot holes and into the adjacent panel. Make sure to tighten the screws firmly, but be careful not to overtighten and strip the wood. Repeat this process to attach the other side panel to the front panel.
6. Repeat for the back panel: Once the sides are securely attached to the front panel, follow the same steps to attach the back panel to the remaining edges of the side panels.
7. Remove excess glue: Wipe away any excess wood glue with a damp cloth or sponge before it dries. This will ensure a clean and professional-looking finish.
8. Allow the glue to dry: Follow the manufacturer’s instructions for the specific wood glue you are using to determine the drying time. It’s important to let the glue fully cure before moving on to the next step.
By following these steps, you will create the basic structure of the plywood box. The sides of the box are now securely connected, setting the stage for the next step: adding reinforcements for added stability and durability.
Step 3: Assembling the Box
In this step, we will focus on assembling the rest of the plywood box. By following these instructions, you will create a sturdy and functional structure for your DIY storage. Let’s get started.
1. Position the box: With the side panels securely attached, position the box in an upright position so that the front and back panels are parallel to the ground.
2. Apply wood glue: Apply a thin layer of wood glue along the top edges of the front, back, and side panels. This will help strengthen the joints and provide additional support.
3. Align the top panel: Carefully place the top panel on the box, ensuring that it is aligned properly with the front, back, and side panels. Press it firmly into place to allow the wood glue to bond.
4. Secure with screws: Pre-drill pilot holes through the top panel and into the front, back, and side panels. Insert screws through the pilot holes and tighten them to securely attach the top panel.
5. Repeat for the bottom panel: Follow the same process to attach the bottom panel to the box, ensuring it is aligned with the front, back, and side panels. Pre-drill pilot holes, insert screws, and tighten them to secure the bottom panel in place.
6. Check for squareness: Use a carpenter’s square or measuring tape to check the corners of the box for squareness. Adjust if necessary by applying gentle pressure and rechecking the measurements.
7. Reinforce with corner braces (optional): If you desire extra stability and reinforcement, you can add corner braces to the inside corners of the box. Secure them using screws, making sure they are flush with the edges.
8. Allow the assembly to dry: Leave the box in a well-ventilated area and allow the wood glue to dry completely according to the manufacturer’s recommendations. This may take several hours to overnight.
By completing this step, you have assembled the basic structure of your plywood box. The front, back, sides, top, and bottom panels are securely attached, creating a stable and reliable storage solution. Next, we will move on to Step 4: Adding reinforcements for additional strength and durability.
When building a plywood box for modular DIY storage, make sure to use a high-quality plywood that is at least 3/4 inch thick for sturdiness and durability.
Read more: How To Build Bee Boxes
Step 4: Adding Reinforcements
To ensure the longevity and strength of your plywood box, it’s important to add reinforcements to key areas. Reinforcements will help prevent the box from warping or bowing over time, especially if you plan to store heavy items. Follow these steps to add reinforcements:
1. Measure and mark the reinforcement locations: Use a measuring tape to determine where you will place the reinforcements inside the box. Mark these locations on the interior walls with a pencil.
2. Cut plywood strips: From the leftover plywood, cut strips that are approximately 1-2 inches wide and the same height as the interior of the box. These strips will serve as the reinforcements.
3. Apply wood glue: Apply a thin layer of wood glue along the back surface of each strip. This will ensure a strong bond with the interior walls of the box.
4. Attach the reinforcements: Press each plywood strip firmly against the marked locations on the interior of the box. Hold them in place with clamps or use screws to secure them to the interior walls. Make sure to pre-drill pilot holes to prevent splitting.
5. Allow the glue to dry: Leave the clamps in place or let the screws hold the reinforcements securely until the wood glue has fully dried. Refer to the manufacturer’s instructions for the recommended drying time.
6. Test for stability: Once the reinforcements have dried, test the stability of the box by gently shaking it. If it feels sturdy and there is no noticeable movement, then the reinforcements have been successfully added.
By adding reinforcements to your plywood box, you are reinforcing the structure and ensuring its strength and durability. This step is especially important for larger boxes or if you plan to store heavy items. With the reinforcements in place, your box is now ready for the next step: installing the bottom panel.
Step 5: Installing the Bottom Panel
In this step, we will focus on installing the bottom panel of the plywood box. The bottom panel adds stability and provides a solid foundation for your storage items. Follow these instructions to install the bottom panel:
1. Measure and cut the bottom panel: Measure the dimensions of the opening at the bottom of the box. Using these measurements, cut the plywood panel to fit snugly inside the box.
2. Apply wood glue: Apply a thin layer of wood glue along the top edges of the box where the bottom panel will be placed. This will help create a stronger bond and prevent any movement.
3. Position the bottom panel: Carefully lower the cut plywood panel into the box, ensuring it is aligned properly with the front, back, and side panels. Press it firmly down onto the glued edges.
4. Secure with screws: Pre-drill pilot holes through the bottom panel and into the front, back, and side panels. Insert screws through the pilot holes and tighten them to securely attach the bottom panel.
5. Check for flushness: Check that the bottom panel is flush with the edges of the box. If there are any protruding edges, you can sand them down for a smoother finish.
6. Allow the assembly to dry: Leave the box in a well-ventilated area for the wood glue to dry completely. Check the drying time on the glue manufacturer’s instructions.
With the bottom panel installed, your plywood box is now complete in terms of its main structure. The box is securely assembled, reinforced, and equipped with a stable bottom panel. However, you may choose to add some additional finishing touches to enhance its appearance. In the next step, we will cover the sanding and finishing process.
Step 6: Sanding and Finishing
To give your plywood box a polished and professional look, it’s important to sand and finish the surfaces. Sanding will smoothen any rough edges or imperfections, while finishing will enhance the aesthetics and protect the wood. Follow these steps for sanding and finishing your plywood box:
1. Sand the surfaces: Use sandpaper or a power sander to gently sand all the exposed surfaces of the plywood box. Start with a coarse grit sandpaper (around 80 or 100) and gradually move to finer grit (around 150 or 180). Sand along the grain of the wood to avoid scratching the surface. Pay extra attention to the corners and edges to ensure a smooth finish.
2. Clean the surfaces: After sanding, use a damp cloth or tack cloth to remove any dust or debris from the surfaces. This will ensure a clean and smooth surface for the finishing process.
3. Apply wood filler (if needed): If there are any visible gaps or holes in the plywood, you can use wood filler to fill them in. Follow the instructions on the wood filler product and allow it to dry completely before proceeding.
4. Choose a finish: Decide whether you want to paint, stain, or varnish the plywood box. Consider the look and feel you want to achieve and choose a finish that complements your space. Follow the manufacturer’s instructions for the chosen finish for proper application and drying time.
5. Apply the finish: Using a brush or a cloth, apply the chosen finish in smooth and even strokes, following the grain of the wood. Allow the first coat to dry completely before applying additional coats if necessary. Follow the recommended drying time between each coat.
6. Sand between coats (if necessary): If you choose to apply multiple coats of stain or varnish, lightly sand the surfaces between coats using a fine-grit sandpaper. This will help create a smooth and even finish.
7. Allow the finish to cure: Once you have applied the desired number of coats, allow the finish to cure according to the manufacturer’s instructions. This may take a few hours or several days, depending on the type of finish used.
By sanding and finishing your plywood box, you are not only enhancing its appearance but also protecting it from moisture and wear over time. The finishing process adds a layer of durability and helps preserve the beauty of the wood.
Congratulations! You have successfully completed all the steps involved in building a plywood box for modular DIY storage. Your customized box is ready to be used for organizing and storing your belongings.
Conclusion
Building a plywood box for modular DIY storage is a rewarding and practical project that allows you to create a customized storage solution for your space. By following the step-by-step instructions outlined in this article, you can confidently construct a sturdy and functional plywood box.
Throughout the process, we discussed the materials and tools needed, how to measure and cut the plywood panels, assemble the box, add reinforcements, install the bottom panel, and finish the surfaces. These steps ensure that your plywood box is not only structurally sound but also aesthetically appealing.
Not only does building your own plywood box provide you with a cost-effective storage solution, but it also allows you the flexibility to customize the dimensions and design to suit your specific needs. Whether you’re organizing your garage, basement, or living area, a plywood box can help declutter and optimize your space.
Remember to always take accurate measurements, use quality materials, and follow safety precautions when cutting and assembling the plywood panels. Taking the time to sand and finish the surfaces will result in a polished and professional look.
With your completed plywood box, you can now enjoy the benefits of a well-organized space. The durability and versatility of the plywood construction will ensure that your storage needs are met for years to come.
So, gather your materials, prepare your tools, and embark on this DIY storage project. Enjoy the sense of accomplishment and satisfaction that comes with building a plywood box that is not only functional but also a reflection of your personal style. Happy building!
Frequently Asked Questions about How To Build A Plywood Box For Modular DIY Storage
Was this page helpful?
At Storables.com, we guarantee accurate and reliable information. Our content, validated by Expert Board Contributors, is crafted following stringent Editorial Policies. We're committed to providing you with well-researched, expert-backed insights for all your informational needs.
0 thoughts on “How To Build A Plywood Box For Modular DIY Storage”