Articles
How To Build A Laser Level Box Scraper
Modified: February 23, 2024
Learn how to build a laser level box scraper with our informative articles. Discover step-by-step instructions and expert tips for constructing the perfect tool.
(Many of the links in this article redirect to a specific reviewed product. Your purchase of these products through affiliate links helps to generate commission for Storables.com, at no extra cost. Learn more)
Introduction
Welcome to the world of do-it-yourself construction and landscaping projects. If you are looking for an efficient tool to level and grade surfaces, a laser level box scraper might be just what you need. This handy device combines the accuracy of a laser level with the functionality of a box scraper, allowing you to achieve professional-grade results.
Whether you are working on a backyard renovation or a larger construction project, having a laser level box scraper in your toolkit can save you time and effort. By using laser technology to ensure precise measurements and a box scraper to even out surfaces, you can achieve perfectly level areas for foundations, driveways, patios, and more.
In this article, we will walk you through the step-by-step process of building your own laser level box scraper. We’ll cover everything from designing and planning to assembling and fine-tuning the scraper. So, grab your tools and get ready to take your construction projects to the next level.
Key Takeaways:
- Building a laser level box scraper allows for precise leveling and grading, combining the accuracy of a laser level with the functionality of a box scraper. It’s a versatile and cost-effective DIY tool for construction and landscaping projects.
- By carefully designing, assembling, and fine-tuning the laser level box scraper, you can achieve professional-grade results in leveling and grading tasks. The tool’s versatility and efficiency make it an invaluable asset for various projects.
Read more: How To Level A Laser Level Tripod
Overview of a Laser Level Box Scraper
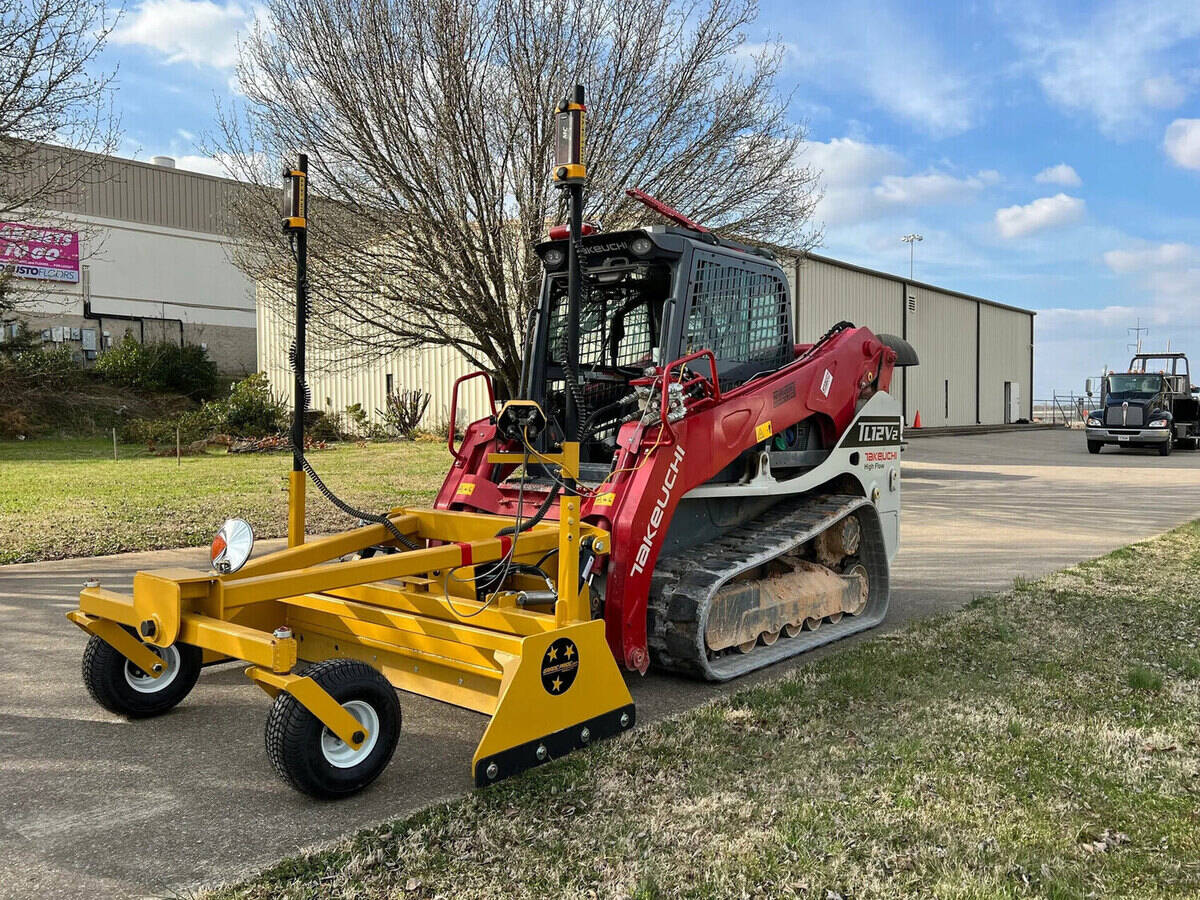
A laser level box scraper is a versatile tool that combines the functionality of a laser level and a box scraper into one unit. It is primarily used for leveling and grading surfaces, making it an essential tool for various construction and landscaping projects. The laser level component ensures precise measurements and accurate leveling, while the box scraper allows for even distribution of materials and the removal of uneven surfaces.
One of the key advantages of a laser level box scraper is its ability to provide consistent and accurate results. The laser level emits a laser beam that acts as a visual guide, allowing you to determine the desired level or grade. This eliminates the need for manual measurements and guesswork, resulting in faster and more precise leveling.
In addition to leveling, a laser level box scraper can also be used for grading surfaces. Grading involves reshaping the terrain to achieve a desired slope or contour. With the laser level box scraper, you can easily adjust the angle and depth of the scraper blade to achieve the desired grade. This is especially useful for projects such as creating proper drainage on a lawn or preparing a surface for paving.
Another advantage of a laser level box scraper is its versatility. It can be used on a wide range of surfaces, including soil, gravel, sand, and even concrete. This makes it suitable for various applications, from landscaping projects to construction sites. The adjustable scraper blade allows for precise material removal, ensuring a smooth and even surface.
Overall, a laser level box scraper is an invaluable tool for anyone involved in construction, landscaping, or site preparation. It saves time and effort by providing accurate measurements, efficient leveling, and precise grading. By building your own laser level box scraper, you can customize it to suit your specific needs and have a reliable tool at your disposal for years to come.
Materials and Tools Needed
Before you begin building your laser level box scraper, it’s important to gather all the necessary materials and tools. Here’s a comprehensive list of what you’ll need:
Materials:
- 1/2-inch plywood or similar sturdy material for the box
- Laser level kit (including laser receiver and tripod)
- Scraper blade or steel cutting edge
- Bolts, nuts, and washers for attaching the laser level system
- Screws or nails for assembling the box
- Wood glue
- Paint or sealant for protecting the box from moisture
Tools:
- Measuring tape or ruler
- Pencil or marker for marking measurements
- Circular saw or jigsaw for cutting the plywood
- Drill or screwdriver for assembling the box
- Sanding block or sandpaper for smoothing rough edges
- Level to ensure the box is straight and flat
- Adjustable wrench or socket set for tightening bolts
It’s important to note that the specific materials and tools you need may vary depending on your design and preferences. For example, you may choose to use different types of wood for the box or opt for a specific brand of laser level kit. However, the list above provides a basic outline of the essential items you’ll need to build a functional laser level box scraper.
Once you have gathered all the necessary materials and tools, it’s time to move on to the next step: designing and planning your laser level box scraper.
Read more: How To Work A Water Level Or Laser Level
Step 1: Design and Planning
Designing and planning your laser level box scraper is a crucial step that will ensure the functionality and effectiveness of the final product. Before you start cutting and assembling the materials, consider the following factors:
1. Box Dimensions:
Determine the desired size of the box based on your specific needs and the size of the laser level kit you will be using. The box should be wide and long enough to accommodate the laser level and the scraper blade, while still being manageable and easily transportable.
2. Box Depth:
Decide how deep the box should be, taking into account the depth of the scraper blade and the desired amount of material removal. The box depth will affect the efficiency of the scraper and the overall leveling performance.
3. Laser Level Placement:
Consider where you will mount the laser level on the box. It should be positioned in a way that allows the laser beam to project horizontally, enabling accurate leveling. Ensure that the laser level is securely attached and aligned properly.
Read more: How Dangerous Is Laser Level
4. Scraper Blade Attachment:
Plan how the scraper blade will be attached to the box. This can be done by either bolting it directly to the box or using a bracket system. Ensure that the blade is securely fastened and aligned parallel to the bottom of the box.
5. Material Selection:
Choose a suitable material for the box that is sturdy enough to withstand the rigors of scraping and leveling. Plywood is a common choice due to its strength and availability, but you may opt for other materials depending on your preferences and project requirements.
Once you have finalized the design and planning, you can proceed to the next step of the construction process: cutting and preparing the box.
Step 2: Cutting and Preparing the Box
Now that you have the design and measurements in place, it’s time to start cutting and preparing the box for your laser level box scraper. Follow these steps to ensure a smooth and accurate construction process:
1. Mark the Measurements:
Using a measuring tape or ruler, mark the dimensions of the box on the plywood or chosen material. Take into consideration the length, width, and depth that you determined during the design phase. Use a pencil or marker to make clear and visible marks.
Read more: How To Repair Laser Level
2. Cut the Box Sides and Bottom:
Using a circular saw or jigsaw, carefully cut along the marked lines to create the sides and bottom of the box. Take your time and ensure that the cuts are straight and accurate. Sand down any rough edges or splinters to create a smooth finish.
3. Assemble the Box:
Begin assembling the box by attaching the sides to the bottom using screws or nails. Apply wood glue to the edges before joining the pieces together to ensure a strong and sturdy bond. Use a level to ensure that the box is straight and is sitting flat on the ground.
4. Reinforce the Box:
To add extra stability and durability to the box, consider adding reinforcement pieces to the corners or along the edges. This can be done by cutting and attaching additional pieces of plywood or using metal brackets. Reinforcement will prevent the box from warping or bending during use.
5. Apply Paint or Sealant:
To protect the box from moisture and weathering, apply a coat of paint or sealant. Choose a paint or sealant that is suitable for outdoor use and provides a waterproof barrier. Allow sufficient drying time before moving on to the next step.
Once the box is cut, assembled, and prepared, you can proceed to the next step: assembling the laser level system onto the box.
Read more: How To Use A Laser Level
Step 3: Assembling the Laser Level System
With the box prepared, it’s time to assemble the laser level system onto the box. Follow these steps to ensure a secure and accurately aligned setup:
1. Determine Laser Level Placement:
Based on your design and planning, decide where the laser level will be mounted on the box. This should be a location that allows for accurate leveling and even projection of the laser beam. Mark the desired placement on the box.
2. Attach Laser Level Mounting Bracket:
Using bolts, nuts, and washers, attach the laser level mounting bracket to the marked location on the box. Make sure the bracket is securely fastened to the box. Ensure that the bracket is level and aligned properly for accurate laser projection.
3. Mount Laser Level on the Bracket:
Place the laser level onto the mounting bracket and secure it in place using the provided screws or clamps. Ensure that the laser level is securely attached and levelled. Refer to the manufacturer’s instructions for the specific mounting process for your laser level model.
Read more: How To Choose A Laser Level
4. Attach Laser Receiver:
If your laser level comes with a laser receiver, attach it to a suitable location on the box. The receiver will allow you to accurately measure the height of the laser beam and determine the desired level or grade. Securely fasten the receiver using the provided screws or clamps.
5. Test the Laser Level System:
Before moving on to the next step, it’s important to test the laser level system to ensure proper functioning. Turn on the laser level and receiver and verify that the laser beam is projecting horizontally and accurately. Make any necessary adjustments to the alignment or height of the laser level.
Once the laser level system is assembled and tested, you are ready to mount it onto the box. In the next step, we will cover the process of mounting the laser level system onto the box.
Step 4: Mounting the Laser Level System onto the Box
Now that the laser level system is assembled, it’s time to mount it onto the box. Follow these steps to ensure a secure and stable setup:
1. Determine Mounting Location:
Based on your design and planning, decide the exact location where you want to mount the laser level system on the box. Ensure that it is positioned in a way that allows for accurate leveling and even projection of the laser beam. Mark the mounting location on the box.
Read more: How To Use A Self Leveling Laser Level
2. Attach Mounting Bracket to the Box:
Using bolts, nuts, and washers, attach the mounting bracket to the marked location on the box. Make sure the bracket is securely fastened to the box, providing a stable anchor for the laser level system. Ensure that the bracket is level and aligned properly.
3. Securely Mount the Laser Level System:
Place the laser level system onto the mounting bracket and ensure that it is properly aligned. Use the provided screws, clamps, or other mounting mechanisms to securely attach the laser level system to the bracket. Double-check that everything is tightly fastened and stable.
4. Verify Alignment and Levelness:
With the laser level system mounted on the box, verify that the laser beam is projecting horizontally and accurately. Use a level to ensure that the box is level as well. Make any necessary adjustments to the mount or the laser level system to achieve the desired alignment and levelness.
5. Test the Laser Level System:
Before proceeding to the next step, it’s crucial to test the mounted laser level system to ensure it is working properly. Turn on the laser level and receiver, and check if the laser beam is projecting correctly and consistently. Make any final adjustments as needed.
Once the laser level system is securely mounted and properly aligned, you are ready to move on to the next step: testing and adjusting the laser level.
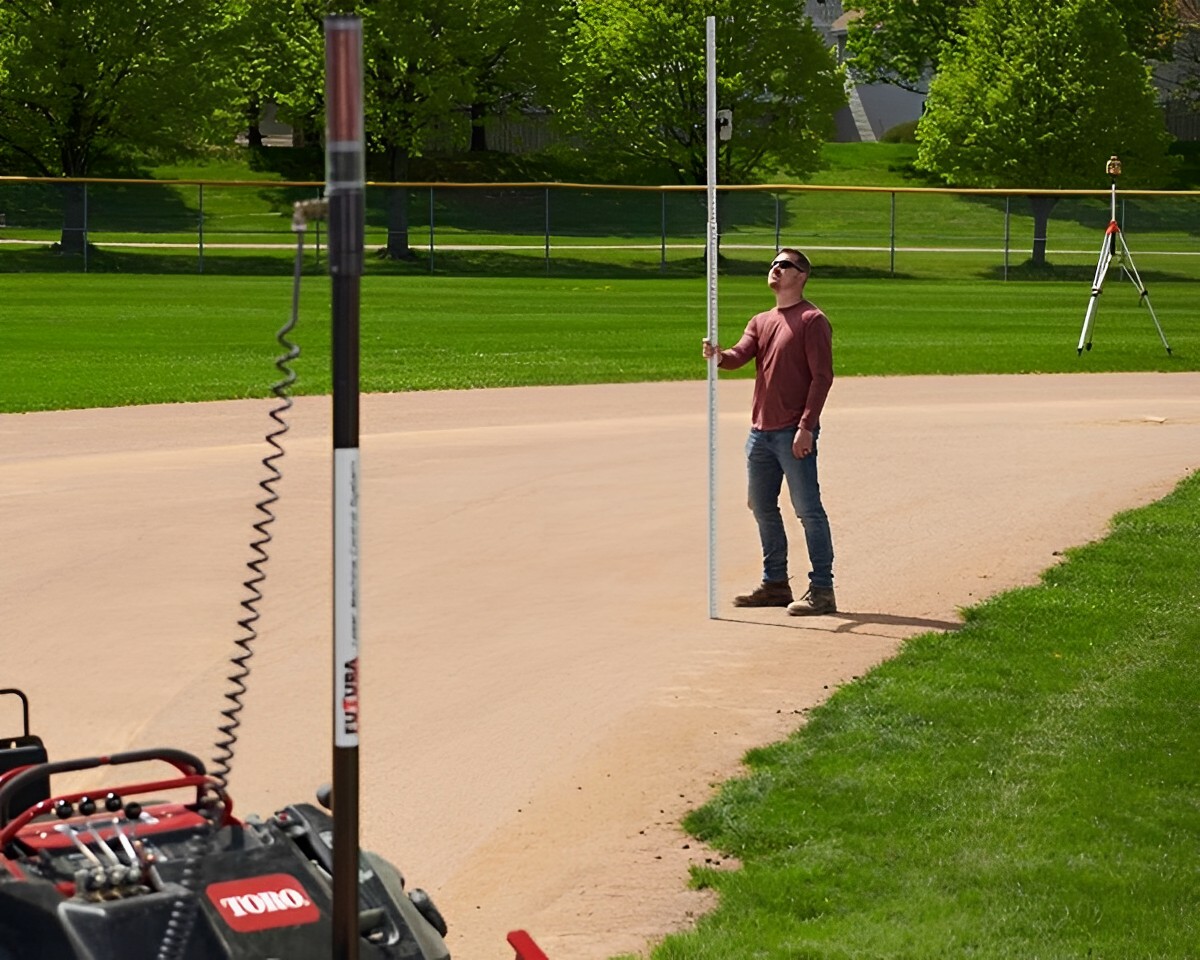
Step 5: Testing and Adjusting the Laser Level
Now that the laser level system is mounted onto the box, it’s time to test and adjust it to ensure accurate leveling and grading. Follow these steps to effectively test and adjust the laser level:
1. Set Up the Laser Level:
Position the laser level box scraper on a level surface or tripod at the desired location. Ensure that the box is stable and won’t move during testing. Extend the tripod legs or adjust the height accordingly to achieve the desired elevation.
2. Turn On the Laser Level:
Switch on the laser level and allow it to stabilize. The laser beam should project horizontally across the work area. If necessary, adjust the laser level’s position or the tripod height until the laser beam is properly aligned.
3. Check the Laser Level Beam:
Using the laser receiver, move across the area where you intend to level or grade. Ensure that the laser beam is consistently detected by the receiver at the same height. If the beam is inconsistent or varies in height, make the necessary adjustments to the laser level setup.
Read more: How To Use Level Pro 3 Laser Level
4. Adjust the Laser Level:
If the laser beam is not at the desired height, you may need to adjust the laser level itself. Refer to the manufacturer’s instructions for your specific laser level model. Most laser levels have features that allow you to adjust the elevation or angle of the laser beam.
5. Fine-Tune the Laser Level:
Make small adjustments to achieve the desired level or grade. Use the laser receiver to verify the accuracy of the leveling or grading based on your project requirements. Take your time and make incremental adjustments until you achieve the desired results.
6. Repeat the Testing Process:
Perform multiple tests across different areas of the work site to ensure consistent and accurate leveling. Adjust the laser level system as needed to maintain proper alignment and height. Repeating the testing process will ensure the reliability of the laser level box scraper throughout the project.
Once you are satisfied with the testing and adjustments, you can proceed to the next step: attaching the scraper blade to the laser level box scraper.
Step 6: Attaching the Scraper Blade
With the laser level system tested and adjusted, it’s time to attach the scraper blade to the laser level box scraper. Follow these steps to ensure a secure and effective attachment:
Read more: What Is Laser Level
1. Select the Scraper Blade:
Choose a suitable scraper blade or steel cutting edge that matches the dimensions and requirements of your laser level box scraper. Consider the thickness, width, and length of the blade, as well as the material it is made of. Select a blade that is durable and appropriate for the type of surface you’ll be working on.
2. Position the Scraper Blade:
Determine the desired position of the scraper blade beneath the box. Align it parallel to the bottom surface of the box, ensuring that it will effectively scrape and level the material during use. Mark the positions for the mounting holes on the box.
3. Drill Mounting Holes:
Using a drill bit that matches the size of the mounting bolts or screws, carefully drill holes through the marked positions on the box. Ensure that the holes are accurately placed and aligned. Use a level to check that the holes are parallel to the bottom of the box.
4. Attach the Blade to the Box:
Place the scraper blade onto the bottom of the box, aligning it with the drilled holes. Insert bolts or screws through the mounting holes and tighten them securely. Ensure that the blade is centered and level with the box. Use washers and nuts if required to provide additional stability.
Read more: How To Level Ceiling Joist With Laser Level
5. Double-Check the Blade Alignment:
Verify that the scraper blade is properly aligned with the box and parallel to the bottom surface. Use a level to check for any misalignment or tilting. Make any necessary adjustments to ensure that the scraper blade is positioned correctly for effective scraping and leveling.
6. Test the Scraper Blade:
Before proceeding further, test the scraper blade by dragging it across a test surface. Verify that it effectively scrapes and levels the material as intended. Make any final adjustments to the blade or the attachment if needed to maximize its functionality.
Once the scraper blade is securely attached and aligned, you are ready to move on to the final step: fine-tuning the laser level box scraper to achieve optimal results.
Step 7: Fine-Tuning the Box Scraper
Now that you have attached the scraper blade to the laser level box scraper, it’s time to fine-tune the scraper to ensure optimal performance. Follow these steps to make any necessary adjustments:
1. Check the Scraper Blade Height:
Verify that the height of the scraper blade is set according to your leveling or grading requirements. The ideal height will depend on the depth of material you want to remove and the desired smoothness of the surface. Use the laser receiver to check if the blade is at the desired height.
Read more: How To Establish Level Without Laser Level
2. Adjust the Blade Height:
If the scraper blade needs to be higher or lower, make the necessary adjustments. This can typically be done by adjusting the mounting bolts or screws that secure the blade to the box. Refer to the manufacturer’s instructions or consult with a professional if you’re unsure how to adjust the blade height.
3. Test the Box Scraper:
Perform a test run with the laser level box scraper to evaluate its performance. Drag the box scraper across a test surface while the laser beam projects onto it. Observe how the scraper blade interacts with the material and see if it achieves the desired leveling or grading results.
4. Make Incremental Adjustments:
Based on your observations during the test run, make incremental adjustments to the scraper blade height, leveling, or any other components of the box scraper as necessary. Fine-tune the settings by small increments and retest until you achieve the desired leveling or grading outcome.
5. Evaluate and Refine:
Continuously monitor the performance of the laser level box scraper throughout your project. Assess the results it produces and make further refinements if needed. Pay attention to any areas that may require additional scraping or leveling adjustments and carefully fine-tune the box scraper accordingly.
Read more: How To Use A Laser Level For Framing
6. Maintain and Clean:
Regularly clean and maintain the laser level box scraper to ensure its longevity and optimal performance. Remove any debris or dirt that may accumulate on the scraper blade or box. Keep the laser level system clean, and check for any signs of wear or damage that may require repair or replacement.
By fine-tuning your laser level box scraper and consistently evaluating its performance, you can ensure that it continues to deliver accurate and efficient leveling or grading results throughout your construction or landscaping projects.
Congratulations! You have successfully built and fine-tuned your own laser level box scraper. Now you can confidently tackle your leveling and grading tasks with precision and ease.
Conclusion
Building your own laser level box scraper is a rewarding endeavor that can greatly enhance your construction and landscaping projects. This versatile tool combines the accuracy of a laser level with the functionality of a box scraper, allowing you to achieve precise leveling and grading results.
Throughout this article, we have covered the step-by-step process of constructing a laser level box scraper. From designing and planning to fine-tuning and testing, each step is crucial in ensuring the effectiveness and efficiency of the final product.
By following the outlined steps and taking the time to carefully assemble and adjust the laser level box scraper, you can achieve professional-grade results in your leveling and grading projects. The laser level system provides accurate measurements and visual guidance, while the scraper blade allows for the even distribution of materials and the removal of uneven surfaces.
Remember to use high-quality materials and tools, and take the time to align and level the laser level box scraper accurately. Regularly check and adjust the scraper blade height and monitor the performance of the tool throughout your projects to ensure consistent results.
Building your own laser level box scraper not only allows for customization to suit your specific needs, but it also saves costs compared to purchasing a commercial-grade tool. The satisfaction of completing a DIY project and the ability to rely on a powerful and efficient tool make the construction process well worth the effort.
So, whether you are preparing a site for construction, leveling a backyard, or grading a driveway, your laser level box scraper will prove to be an invaluable asset. With precise measurements, accurate leveling, and smooth grading, you can achieve professional-quality results in a fraction of the time.
Now it’s time to put your new laser level box scraper to work and enjoy the efficiency and accuracy it brings to your projects. Get ready to take your construction and landscaping endeavors to the next level!
Frequently Asked Questions about How To Build A Laser Level Box Scraper
Was this page helpful?
At Storables.com, we guarantee accurate and reliable information. Our content, validated by Expert Board Contributors, is crafted following stringent Editorial Policies. We're committed to providing you with well-researched, expert-backed insights for all your informational needs.


0 thoughts on “How To Build A Laser Level Box Scraper”