Articles
How To Calibrate Laser Level LL100N
Modified: August 27, 2024
Learn how to calibrate the Laser Level LL100N with our informative articles. Improve your accuracy and efficiency with step-by-step instructions.
(Many of the links in this article redirect to a specific reviewed product. Your purchase of these products through affiliate links helps to generate commission for Storables.com, at no extra cost. Learn more)
Introduction
Calibrating a laser level LL100N is an essential task for ensuring accurate and precise measurements in construction and surveying projects. A laser level is a valuable tool used to establish a horizontal or vertical reference plane, allowing for consistent measurements across a variety of applications. The LL100N is a popular laser level model known for its reliability and versatility.
In this article, we will explore the process of calibrating a laser level LL100N. We will discuss the importance of calibration, the necessary steps involved, and provide additional tips and troubleshooting advice to help you achieve optimal results.
Calibration is the process of adjusting the laser level to accurately project a level or plumb laser beam. Over time, the internal components of a laser level may experience slight shifts or wear, which can affect the accuracy of the laser beam. By calibrating the laser level LL100N, you can ensure that it is aligned with the true level or plumb reference, allowing for precise measurements and reliable results.
Proper calibration of a laser level LL100N is crucial for various construction tasks, such as installing ceiling grids, aligning doors and windows, setting up foundations, and establishing accurate grading for landscaping projects. Whether you are a professional contractor or a DIY enthusiast, taking the time to calibrate your laser level is essential for achieving accurate and consistent results in your projects.
Next, we will discuss the necessary preparations before calibrating your laser level LL100N, followed by a step-by-step guide on how to perform the calibration process. Additionally, we will provide some additional tips to help you optimize the calibration and troubleshoot common issues that may arise.
So, let’s dive into the world of laser level calibration and discover how to calibrate your LL100N for precise and reliable measurements.
Key Takeaways:
- Calibrating your laser level LL100N is crucial for accurate measurements, safety, and cost savings in construction projects. Regular calibration ensures precision, quality, and a professional reputation in the industry.
- Prepare for calibration by cleaning the lens, choosing a stable location, and checking the leveling mechanism. Follow the step-by-step calibration process, use additional tips for optimization, and troubleshoot common issues for reliable results.
Read more: How To Calibrate Dewalt Laser Level
What is a Laser Level LL100N?
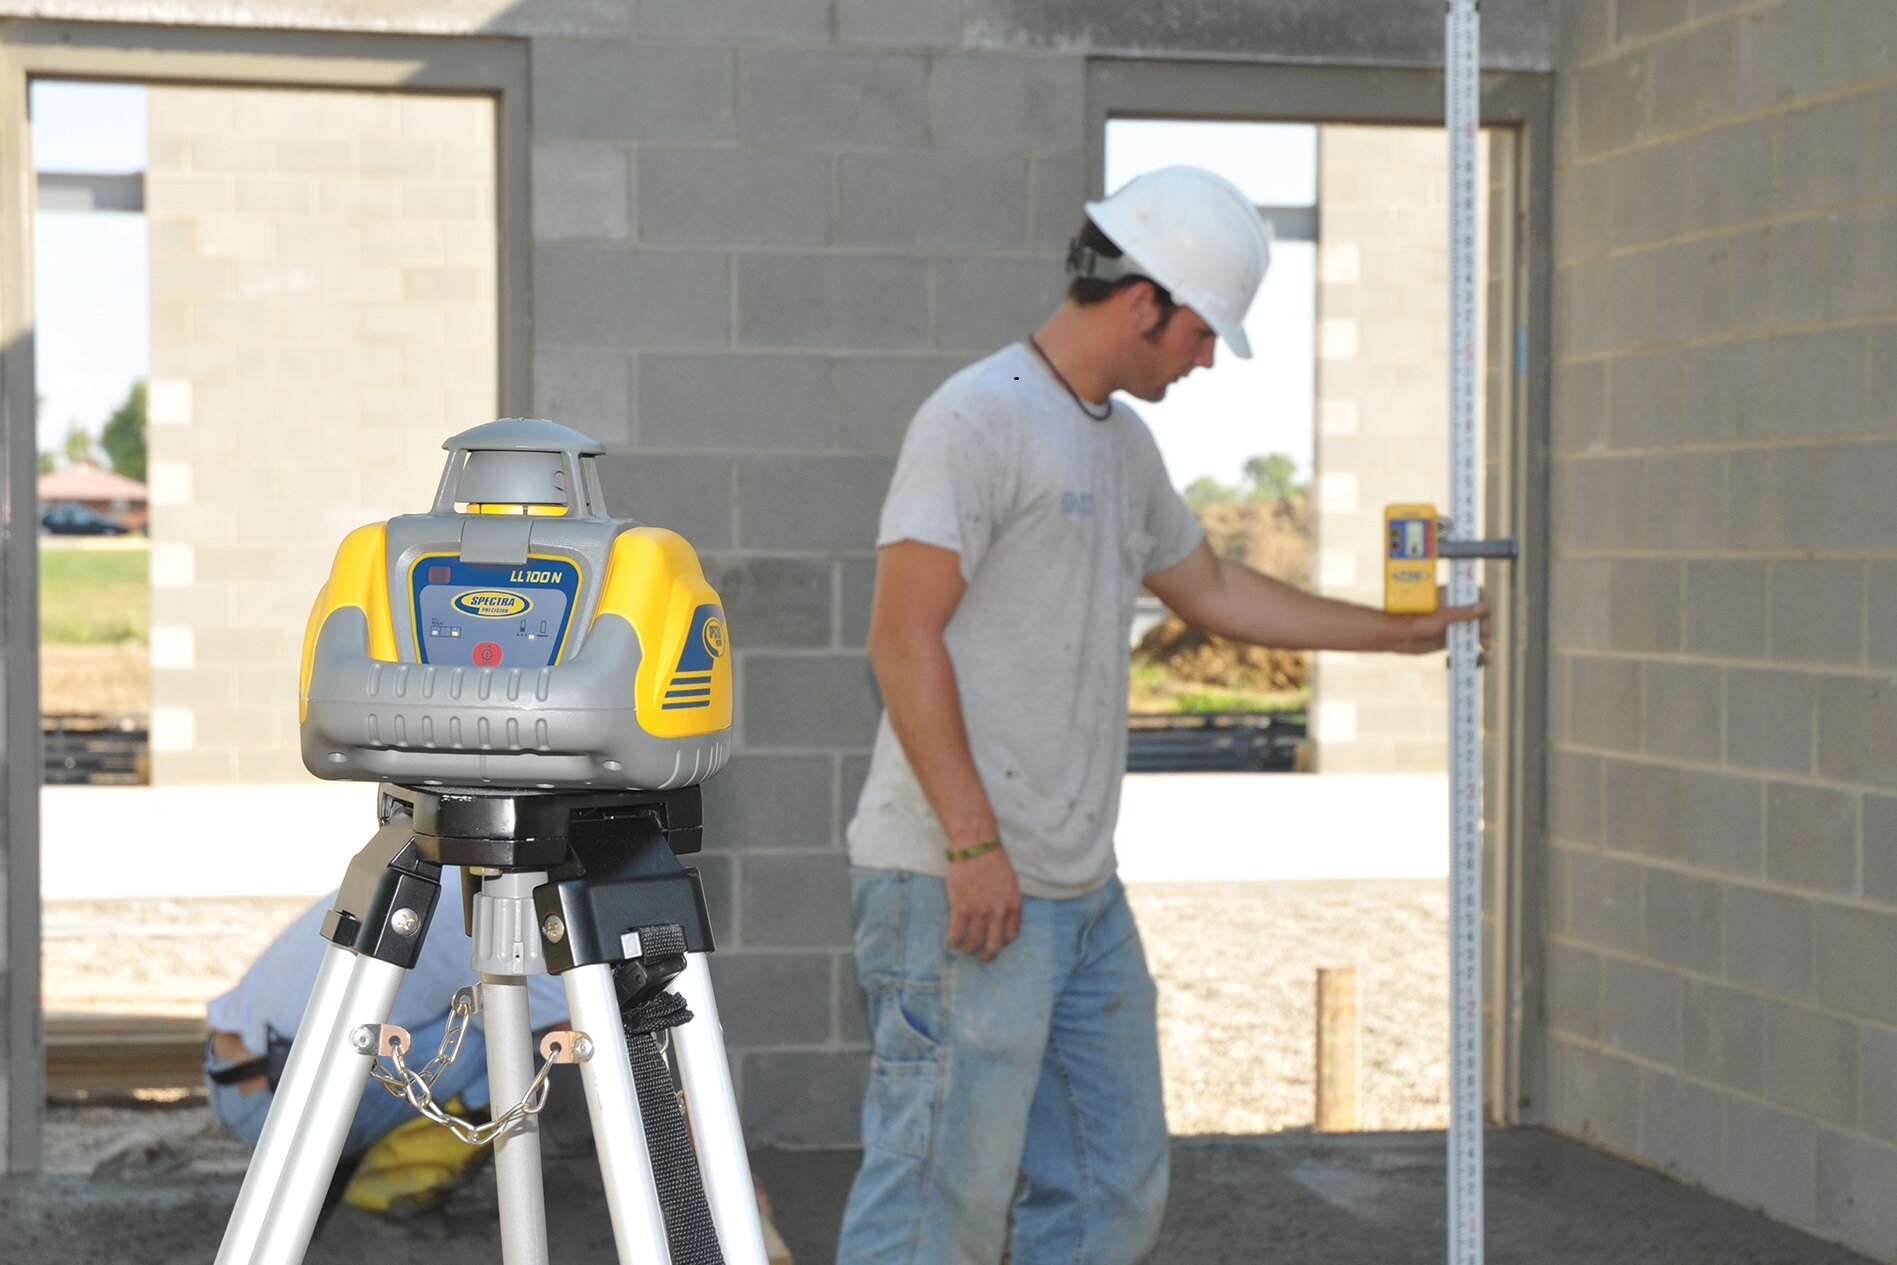
A laser level LL100N is a specialized tool used in construction and surveying projects to establish a level or plumb reference. It utilizes laser technology to project a straight, highly visible beam onto a surface, allowing for precise measurements and alignments.
The LL100N model is one of the popular laser level models manufactured by Spectra Precision. It is known for its durability, accuracy, and ease of use, making it a go-to tool for professionals and DIY enthusiasts alike.
The laser level LL100N consists of several key components that work together to provide accurate leveling and alignment capabilities. The main component is the laser diode, which emits the laser beam. This beam is then directed by a rotary motor, which spins the beam in a continuous 360-degree circle. The rotation ensures that the laser beam covers a large area and can be easily seen from different angles.
The LL100N also features a leveling mechanism that automatically levels the laser, ensuring that the generated beam is perfectly horizontal or vertical. This leveling mechanism is crucial for obtaining accurate measurements and alignments.
One of the standout features of the LL100N is its range and visibility. This laser level can project a beam up to 100 feet indoors and can be visible in various lighting conditions. The high visibility of the beam makes it easier to work in different environments, even in bright sunlight or when there are other sources of ambient light.
The LL100N laser level is designed to be highly portable and user-friendly. It is compact and lightweight, making it easy to transport to different job sites. It also comes with a variety of mounting options, such as brackets and tripods, for convenient and stable placement during use.
Overall, the laser level LL100N is a reliable and versatile tool that plays a vital role in construction and surveying projects. Its accurate leveling capabilities, high visibility beam, and user-friendly design make it a valuable asset for professionals and enthusiasts seeking precise measurements and alignments. In the following sections, we will explore why calibrating the LL100N is essential and provide a step-by-step guide on how to perform the calibration process.
Why Calibrate a Laser Level LL100N?
Calibrating a laser level LL100N is of utmost importance to ensure accurate and reliable measurements in construction and surveying projects. Here are some key reasons why calibration is crucial for optimal performance:
1. Accuracy: Laser levels are used to establish precise reference planes for various applications, such as aligning walls, installing fixtures, and determining elevations. Calibration ensures that the laser beam projected by the LL100N is accurately aligned with the true level or plumb reference, resulting in precise measurements. By calibrating regularly, you can trust the accuracy of your LL100N and achieve consistent results.
2. Safety: In construction and surveying, safety is paramount. A calibrated laser level LL100N helps ensure that structures are built with proper alignments, reducing the risk of accidents and hazards. By calibrating the laser level, you can have confidence in the accuracy of measurements and prevent costly mistakes or rework.
3. Quality Assurance: Calibration plays a vital role in maintaining quality standards in construction projects. It allows you to meet industry specifications and regulations, ensuring that the work meets the required standards. Whether you are working on a residential or commercial project, using a calibrated LL100N ensures the accuracy and precision needed for high-quality results.
4. Cost Savings: Calibration can save you money in the long run. By ensuring accurate measurements, you can minimize errors and reduce the need for expensive additional materials or corrective measures. Investing in regular calibration of your LL100N can help avoid costly rework, delays, and potential legal disputes due to inaccurate measurements.
5. Professional Reputation: As a construction professional, your reputation is invaluable. By using a calibrated laser level LL100N, you demonstrate your commitment to precision and accuracy. Clients and colleagues will trust your workmanship and rely on your expertise, enhancing your professional reputation in the industry.
Calibrating a laser level LL100N may seem like an additional task, but the benefits it brings far outweigh the time and effort invested. Regular calibration ensures that your LL100N performs optimally, providing accurate measurements, ensuring safety, maintaining quality standards, saving costs, and enhancing your professional image.
In the next sections, we will discuss the necessary preparations and provide a step-by-step guide on how to calibrate your laser level LL100N effectively.
Preparing for Calibration
Before you begin the calibration process for your laser level LL100N, it is essential to ensure that you have the necessary tools and a suitable environment. Here are some steps to prepare for the calibration process:
1. Read the User Manual: Familiarize yourself with the user manual provided by the manufacturer for your LL100N laser level. The manual will provide specific instructions and guidelines for calibration, as well as any precautions or special considerations.
2. Gather the Calibration Tools: Check that you have the required tools for calibration. Typically, you will need a calibration target, a flat and stable surface, a bubble level, a screwdriver (if adjustments are needed), and any specific tools mentioned in the user manual.
3. Choose a Suitable Location: Select a location that is free from excessive vibrations, dust, and direct sunlight. The area should have a stable surface where you can set up your LL100N securely. Clear any obstructions that might interfere with the calibration process or affect the accuracy of the laser beam.
4. Prepare the LL100N: Make sure your laser level LL100N is clean and free from any debris or particles that could hinder its performance. Check the batteries or power source to ensure proper functionality during calibration. If the LL100N requires battery replacement, it is recommended to use fresh and fully charged batteries for optimal results.
5. Warm-Up Period: Some laser levels may require a warm-up period before calibration. Refer to the user manual to understand if your LL100N has any specific warm-up requirements and allow the unit to stabilize accordingly.
6. Check the Leveling Mechanism: Before calibrating, ensure that the automatic leveling mechanism of your LL100N is functioning correctly. Use a bubble level to check if your laser level is already leveled. If it is not leveled, refer to the user manual for instructions on adjusting the leveling mechanism.
By following these preparation steps, you can ensure that both your laser level LL100N and the environment are optimized for the calibration process. Preparing adequately will help you achieve more accurate and reliable results during the calibration and subsequent use of your laser level. In the next sections, we will delve into the steps involved in calibrating your LL100N for optimal performance.
When calibrating the Laser Level LL100N, ensure that the device is placed on a stable surface and follow the manufacturer’s instructions for adjusting the laser beam to the correct position. Double-check the calibration by testing the laser level on a known horizontal or vertical surface.
Steps to Calibrate a Laser Level LL100N
Calibrating a laser level LL100N involves a series of steps to properly align the laser beam with the true level or plumb reference. Follow these step-by-step instructions to effectively calibrate your LL100N:
1. Set Up the LL100N: Place your laser level LL100N on a flat and stable surface in the chosen calibration area. Ensure that it is securely positioned and not subject to any vibrations or movements during the calibration process.
2. Power On the LL100N: Turn on the power of your LL100N laser level and allow it to initialize. Depending on the model, this may involve a brief self-leveling process. Refer to the user manual for specific instructions.
3. Position the Calibration Target: Place the calibration target a suitable distance away from the laser level. The target should be positioned at a height where the laser beam will intersect with it. Ensure that the target is perpendicular to the ground and securely fixed.
4. Align the Leveling Bubble: Check the leveling bubble on the LL100N to ensure that it is centered between the leveling indicators. If it is not centered, adjust the bubble by using the leveling screws or knobs as indicated in the user manual.
5. Activate the Laser Beam: Activate the laser beam from your LL100N. The beam should project onto the calibration target. Take note of where the beam intersects the target.
6. Adjust the LL100N: Use the leveling screws or knobs to make fine adjustments to the LL100N. The goal is to move the intersection point of the laser beam on the calibration target to the desired position. For horizontal leveling, adjust the screws or knobs until the beam aligns with the reference line on the target. For vertical alignment, adjust the screws or knobs until the beam aligns with the reference dot on the target.
7. Check for Accuracy: After making adjustments, observe the beam’s position on the calibration target. Repeat step 6 if further adjustments are required to achieve the desired accuracy and alignment.
8. Lock the Calibration: Once you have achieved the desired calibration and accuracy, lock the leveling mechanism of the LL100N to maintain the calibration during use. Refer to the user manual for instructions on how to lock the leveling mechanism.
9. Verify the Calibration: To verify the calibration, measure the distance from the laser level to a reference point using a measuring tape or other appropriate measuring tool. Ensure that the measured distance matches the distance indicated on the calibration target for the given position of the laser beam. Repeat this verification process at different distances to ensure consistent calibration accuracy.
Following these steps will help you calibrate your laser level LL100N effectively, ensuring accurate and reliable measurements in your construction and surveying projects. In the next section, we will provide some additional tips to optimize the calibration process and troubleshoot common issues that may arise.
Read more: How To Calibrate Bosch Laser Level
Additional Tips for Calibration
To further optimize the calibration process of your laser level LL100N and ensure accurate measurements, consider the following additional tips:
1. Clean the Laser Lens: Regularly clean the laser lens of your LL100N to remove any dirt, dust, or debris that may obstruct the laser beam and affect its accuracy. Use a soft, lint-free cloth and gently wipe the lens to maintain optimal visibility.
2. Use a Stable Mounting Option: When setting up the LL100N for calibration, consider using a stable mounting option such as a tripod or mounting bracket. This will provide a more secure and stationary base for your laser level, reducing the risk of unintentional movement during calibration.
3. Check for Interference: Ensure that there are no objects or obstacles blocking the path of the laser beam during calibration. Objects in the beam’s path can cause inaccurate readings and affect the calibration process. Remove or adjust any objects that may interfere with the laser beam.
4. Perform Calibration in a Controlled Environment: Choose a controlled environment for calibration, away from strong winds, extreme temperature conditions, or excessive vibrations. These external factors can impact the stability of the laser level and compromise the accuracy of the calibration.
5. Calibration Frequency: It is recommended to calibrate your LL100N laser level regularly, especially if it is exposed to harsh conditions or heavy usage. The frequency of calibration may vary depending on the manufacturer’s recommendations and the specific demands of your projects. Refer to the user manual for guidance on the recommended calibration frequency.
6. Record Calibration Results: Keep a record of the calibration results, including the adjustments made and any measurements taken for verification. This documentation will help you track the calibration history of your LL100N and provide reference points for future calibrations.
7. Recheck Calibration Periodically: Even after calibrating your LL100N, it is beneficial to periodically recheck the calibration to ensure its ongoing accuracy. External factors or minor shifts in components can lead to a slight calibration drift over time. Performing occasional verification checks will help maintain the integrity of your calibration.
By following these additional tips, you can enhance the calibration process of your laser level LL100N and ensure accurate and reliable measurements. Regular cleaning, stable mounting, and performing calibration in controlled environments are essential practices for maximizing the performance of your LL100N. In the next section, we will discuss troubleshooting common issues that may arise during calibration.
Troubleshooting and Common Issues
During the calibration process of your laser level LL100N, you may encounter some common issues. Here are a few troubleshooting tips to help resolve these issues and ensure a successful calibration:
1. Beam Not Visible or Weak: If the laser beam from your LL100N is not visible or appears weak, first check the battery level or power source to ensure sufficient power. Clean the laser lens to remove any dirt or debris that may obscure the beam. If the issue persists, consult the user manual for instructions on adjusting the beam intensity or consider replacing the batteries.
2. Beam Inaccurate or Misaligned: If the laser beam appears inaccurate or misaligned during calibration, double-check the positioning of the calibration target. Ensure that it is securely fixed in a perpendicular position and aligned with the LL100N. Calibrate in a controlled environment to minimize any factors that may affect the beam’s accuracy, such as vibrations or air currents.
3. Leveling Not Stable: If the leveling mechanism of your LL100N is not stable during calibration, verify that the laser level is set up on a firm and level surface. Check the bubble levels on the LL100N and use the leveling screws or knobs to make adjustments as necessary. It is also important to calibrate in an area free from excessive vibrations or disturbances.
4. Calibration Drift: Over time, the calibration of your LL100N may experience slight drift. If you notice a consistent discrepancy in measurements or alignment, consider performing a recalibration. Follow the calibration steps outlined earlier in this article to readjust the LL100N and realign it for accurate measurements.
5. Error Messages: If your LL100N displays error messages during calibration, refer to the user manual for troubleshooting guidance. Error messages may indicate a specific issue with the unit, a battery problem, or other internal malfunctions. Follow the manufacturer’s instructions or contact customer support for assistance in resolving the error.
6. Excessive Ambient Light: In some cases, excessive ambient light may interfere with the visibility of the laser beam. If you are working in bright sunlight or an area with intense lighting, consider using a laser detector or target with a built-in detector to improve beam visibility.
If you encounter persistent issues or difficulties during calibration that cannot be resolved through troubleshooting, it is recommended to contact the manufacturer’s customer support for further assistance. They will be able to provide specific guidance related to your LL100N model and address any technical issues you may be experiencing.
By being aware of these common issues and implementing troubleshooting strategies, you can overcome challenges during the calibration process and ensure accurate and reliable measurements with your laser level LL100N.
Conclusion
Calibrating a laser level LL100N is a critical step in ensuring accurate and reliable measurements in construction and surveying projects. By following the proper calibration process, you can align the laser beam with the true level or plumb reference, resulting in precise measurements and enhanced project outcomes.
Throughout this article, we have explored the importance of calibrating a laser level LL100N, the necessary preparations, and the step-by-step process for calibration. We have also provided additional tips to optimize the calibration process and troubleshoot common issues that may arise.
Regular calibration of your LL100N is essential for maintaining accuracy, safety, and quality in your projects. It allows you to confidently align structures, install fixtures, and achieve precise elevations. Calibrated measurements not only save costs by avoiding rework but also enhance your professional reputation as a skilled and reliable contractor or DIY enthusiast.
Remember to clean the laser lens, use a stable mounting option, and perform calibration in a controlled environment. Keep a record of calibration results and periodically recheck the calibration to ensure ongoing accuracy. Should you encounter issues, refer to the troubleshooting tips provided or seek assistance from the manufacturer’s customer support.
By calibrating your laser level LL100N and consistently maintaining its accuracy, you can elevate the quality of your work, improve project efficiency, and achieve exceptional results. So, embrace the calibration process and unlock the full potential of your LL100N laser level. Happy calibrating!
Frequently Asked Questions about How To Calibrate Laser Level LL100N
Was this page helpful?
At Storables.com, we guarantee accurate and reliable information. Our content, validated by Expert Board Contributors, is crafted following stringent Editorial Policies. We're committed to providing you with well-researched, expert-backed insights for all your informational needs.


0 thoughts on “How To Calibrate Laser Level LL100N”