
Articles
How To Level Ceiling Joist With Laser Level
Modified: October 20, 2024
Learn how to level ceiling joists using a laser level in this informative article. Discover professional tips and techniques for a seamless ceiling renovation.
(Many of the links in this article redirect to a specific reviewed product. Your purchase of these products through affiliate links helps to generate commission for Storables.com, at no extra cost. Learn more)
Introduction
Ceiling joists play a crucial role in the stability and structural integrity of a building. Over time, these joists may become uneven or sag due to factors such as settling of the foundation or shifting of the structure. A sloping or uneven ceiling can not only be an eyesore but can also lead to various other issues, such as difficulty in hanging fixtures or cracks in the walls.
In the past, leveling ceiling joists required an extensive and labor-intensive process that often involved removing the existing materials and reconstructing the entire ceiling. However, with the advancements in technology, we now have a more efficient and accurate method of leveling ceiling joists – using a laser level.
In this article, we will guide you through the process of leveling ceiling joists with a laser level. We will cover the tools and materials needed, step-by-step instructions, and tips to ensure a successful outcome. By the end, you will have the knowledge and confidence to tackle this task and create a level and visually appealing ceiling in your space.
Key Takeaways:
- Leveling ceiling joists with a laser level offers a precise and efficient solution, eliminating the need for extensive reconstruction. This method saves time, effort, and ensures a visually appealing and stable ceiling.
- By following the step-by-step process of preparing the room, setting up the laser level, adjusting the joists, and securing them, DIY enthusiasts can achieve a level and structurally sound ceiling with confidence.
Read more: How To Use A Laser Level On Ceiling
Understanding Ceiling Joists
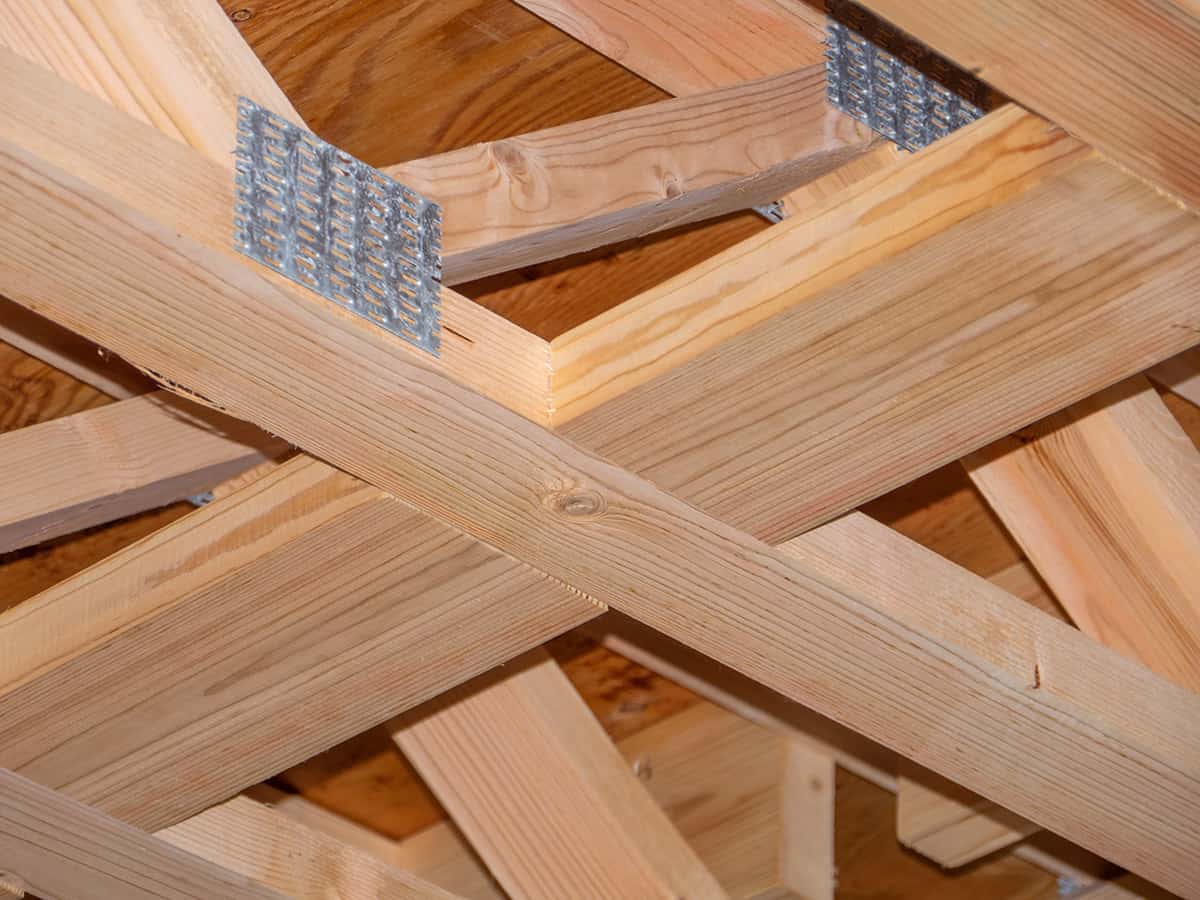
Ceiling joists are horizontal structural members that support the weight of the ceiling and any additional loads above, such as the roof. They are typically made of wood or steel and are spaced evenly across the span of the ceiling. These joists are crucial for maintaining the structural integrity of the building and ensuring that the ceiling remains stable and level.
Over time, ceiling joists can become uneven or sag due to a variety of factors. These factors may include settling of the foundation, changes in temperature and humidity, or poor construction practices. When ceiling joists are uneven, it can result in a sloping or uneven ceiling, which not only affects the aesthetics of the space but can also impact the stability of fixtures and lead to other issues.
Leveling ceiling joists is an essential step in ensuring a level and visually appealing ceiling. Traditionally, this process involved removing the existing materials, such as drywall or plaster, and manually adjusting or replacing the joists to achieve a level surface. However, this method can be time-consuming, labor-intensive, and may require the assistance of a professional.
Fortunately, advancements in technology have provided us with a more efficient and accurate method of leveling ceiling joists – using a laser level. A laser level is a device that projects a horizontal or vertical beam of light onto a surface, allowing for precise measurements and leveling. By utilizing a laser level, the process of leveling ceiling joists becomes much simpler and more accessible to DIY enthusiasts and homeowners.
In the following sections, we will discuss the tools and materials you will need for this project, as well as provide step-by-step instructions on how to level ceiling joists using a laser level. Let’s get started!
Tools and Materials Needed
Before you begin the process of leveling ceiling joists with a laser level, it is important to gather all the necessary tools and materials for the project. Having everything on hand will save you time and ensure a smooth workflow. Here are the tools and materials you will need:
- Laser Level: The most critical tool for this project is a laser level. Choose a laser level that offers both horizontal and vertical leveling capabilities for maximum accuracy.
- Measuring Tape: A measuring tape will be used to determine the distance between ceiling joists and make necessary adjustments.
- Pencil: A pencil will be used to mark the areas that require adjustments.
- Safety Gear: It is always important to prioritize safety. Wear protective gear, such as safety glasses and gloves, to protect yourself during the project.
- Step Stool or Ladder: Depending on the height of your ceiling, you may need a step stool or ladder to reach and adjust the joists.
- Fasteners: You may need screws or nails to secure the joists in their corrected positions.
- Optional: Leveling Compound or Shims: Depending on the severity of the joist deviation, you may need leveling compound or shims to achieve a perfectly level surface.
It is important to note that the specific tools and materials needed may vary based on the characteristics of your space and the severity of the joist deviation. Assess your situation and gather any additional tools or materials that you deem necessary.
Once you have collected all the required tools and materials, you are ready to proceed to the next steps of the process. In the following sections, we will guide you through the step-by-step instructions for leveling ceiling joists using a laser level.
Step 1: Preparing the Room
Before you begin leveling the ceiling joists, it is important to prepare the room to ensure a safe and efficient work environment. Follow these steps to properly prepare the room:
- Clear the Space: Remove any furniture, decorations, or obstacles from the area where you will be working. This will give you ample space to move around and work without any hindrances.
- Protect the Flooring: Use drop cloths or plastic sheets to cover the floor beneath the area you will be working in. This will protect the flooring from any potential damage or debris that may occur during the process.
- Turn Off Power: Switch off the power supply to any electrical fixtures or outlets that may be attached to the ceiling. This will prevent any accidents or electrical hazards while you work.
- Wear Safety Gear: Put on safety glasses, gloves, and any other protective gear that is appropriate for the task. Safety should always be a priority when working on any DIY project.
- Set Up Lighting: Ensure that the room is well-lit to provide clear visibility while you work. You may need to set up additional lighting sources, such as portable work lights or LED lamps, to ensure adequate illumination.
- Organize Tools and Materials: Arrange all the tools and materials you gathered in an easily accessible and organized manner. This will save you time and prevent any unnecessary delay or confusion during the process.
By following these steps, you will create a safe and efficient work environment, allowing you to focus on the task at hand – leveling the ceiling joists. Once you have prepared the room, you are ready to move onto the next step, which involves setting up the laser level.
Use a laser level to identify high and low spots in the ceiling joists. Shim the low spots with wood shims and sand down the high spots until the laser level shows a consistent, level surface.
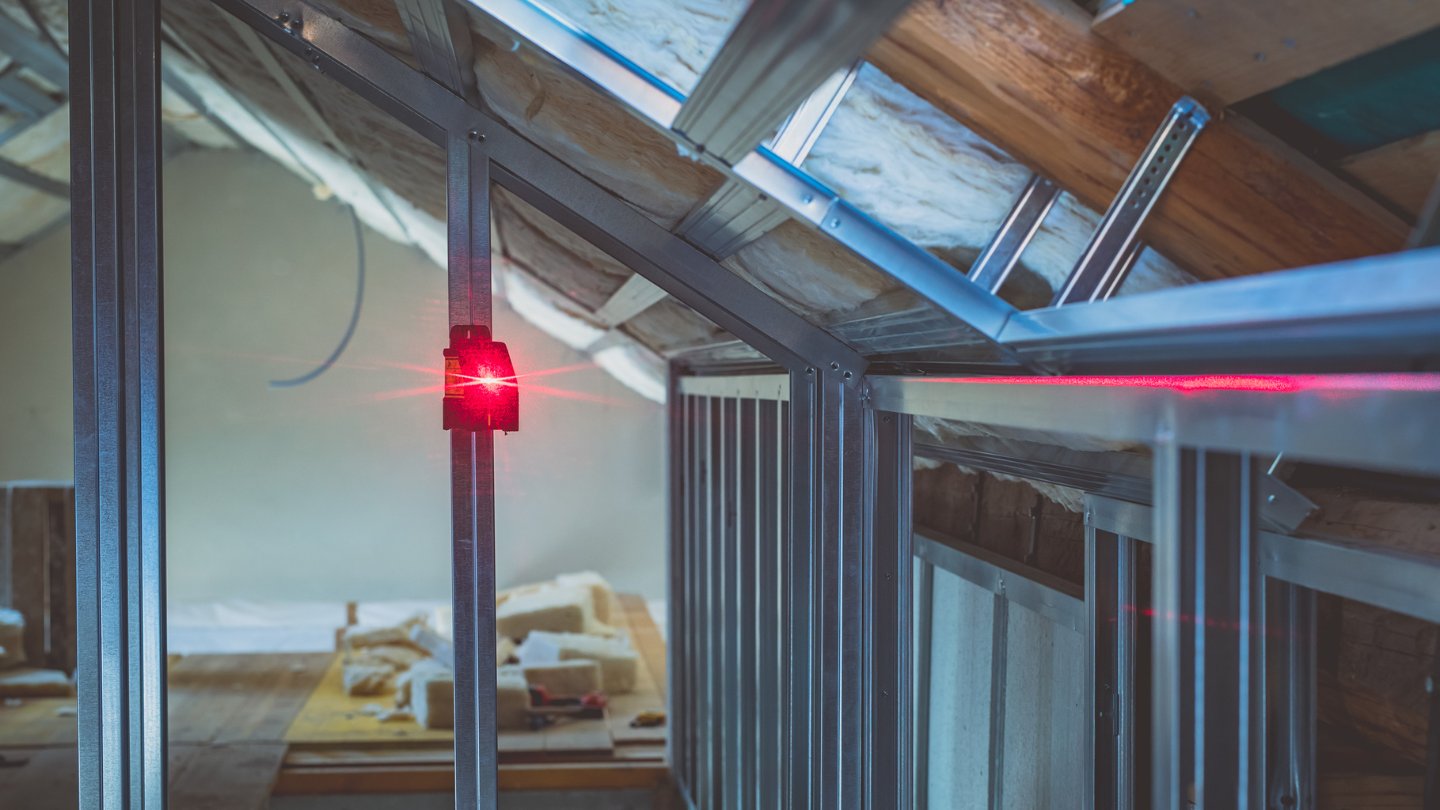
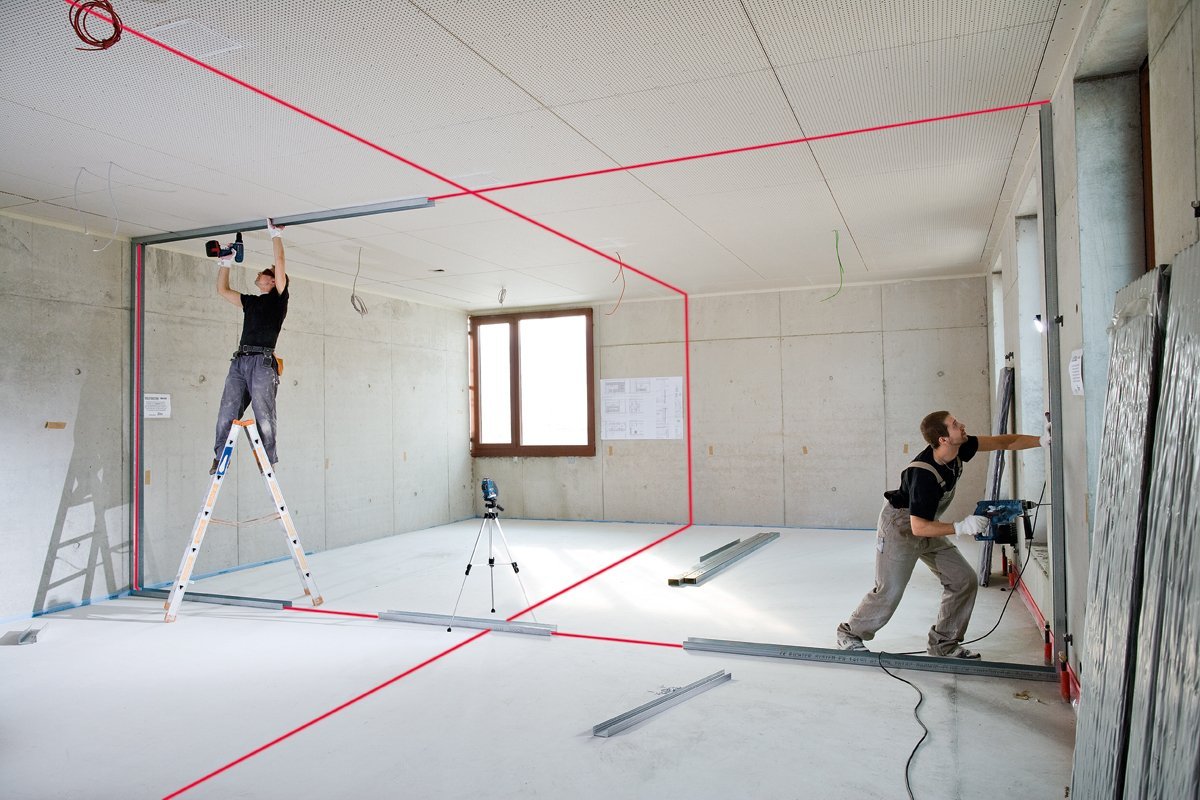
Step 2: Setting Up the Laser Level
Now that you have prepared the room, it’s time to set up the laser level. Follow these steps to properly set up the laser level for leveling the ceiling joists:
- Choose the Correct Laser Level: In order to accurately level the ceiling joists, you need to choose a laser level that offers both horizontal and vertical leveling capabilities. This will allow you to ensure that the ceiling joists are level in all directions.
- Position the Laser Level: Place the laser level on a stable surface, such as a tripod or a flat and steady platform. Ensure that the laser level is positioned at a suitable height so that the laser beam can reach the ceiling without any obstructions.
- Turn on the Laser Level: Activate the laser level and ensure that the laser beam is projected onto the ceiling. Adjust the laser level settings, such as the level of the beam and the rotation speed, as per the manufacturer’s instructions.
- Aim the Laser Level: Adjust the position of the laser level to align the laser beam with one of the ceiling joists. This will serve as a reference point for leveling the rest of the joists. Ensure that the laser beam is centered on the joist and covers its entire length.
- Secure the Laser Level: Once you have aligned the laser level and confirmed that the beam is positioned correctly, securely tighten the tripod or any other support mechanism to hold the laser level in place. This will prevent any movement or disruptions during the leveling process.
- Take Note of the Laser Level’s Location: Make a note of the laser level’s exact location, as you will need this reference point when adjusting and leveling the ceiling joists. You can mark the location on the floor or any nearby surface for easy identification.
By following these steps, you will effectively set up the laser level for leveling the ceiling joists. The laser beam will provide a visual guide for ensuring that the joists are level and aligned properly. With the laser level in place, you are now ready to move on to the next step of adjusting the ceiling joists.
Read also: 10 Amazing Ceiling Laser Level for 2025
Step 3: Adjusting the Ceiling Joists
With the laser level properly set up, it’s time to adjust the ceiling joists to achieve a level surface. Follow these steps to effectively adjust the ceiling joists:
- Identify the High and Low Points: Start by visually inspecting the ceiling and identifying any areas that appear higher or lower than the rest. These points will help you understand the extent of the deviation and guide your adjustment process.
- Focus on the Lowest Point: Begin the adjustment process by focusing on the lowest point of the ceiling. This is where you will primarily concentrate your efforts to level the joists.
- Measure the Deviation: Use a measuring tape to determine the distance between the laser beam and the lowest point of the ceiling. This measurement will help you evaluate the amount of adjustment needed to level the joists.
- Use Shims or Leveling Compound: Depending on the severity of the joist deviation, you may need to use shims or leveling compound to achieve a level surface. Shims are small wedges that can be placed between the joists and the ceiling to lift and level them. Leveling compound, on the other hand, is a self-leveling material that can be applied to the low areas to bring them up to the desired level.
- Make Adjustments: Start by inserting shims or applying leveling compound to the areas that require adjustment. Gradually build up the shims or apply the leveling compound until the laser beam aligns with the low point of the ceiling. This will indicate that the joist is now level in that area.
- Continue Adjusting: Move on to the next low point of the ceiling and repeat the process of adding shims or leveling compound to bring it up to the correct level. Continue this process until you have adjusted all the low points and achieved a level surface across the ceiling.
- Double-Check the Alignment: Once you have made the necessary adjustments, double-check the alignment of the laser beam with the ceiling joists. Ensure that the laser beam maintains a consistent level across the entire ceiling. Make any additional adjustments as needed.
By following these steps, you will effectively adjust the ceiling joists to achieve a level surface. Remember to work carefully and make precise adjustments to ensure the desired outcome. With the joists properly adjusted, you are now ready to move on to the next step of checking the level.
Step 4: Checking the Level
After adjusting the ceiling joists, it’s important to verify that you have achieved a level surface. Follow these steps to check the level and ensure that the joists are properly aligned:
- Inspect the Ceiling: Take a step back and visually inspect the ceiling to evaluate its overall appearance. Look for any obvious signs of sloping or unevenness. This initial inspection will give you a general idea of the levelness of the ceiling.
- Use a Level: Take a handheld level and place it against different areas of the ceiling to get more precise measurements. Use the level to check the levelness in multiple directions, including horizontally and vertically. This will confirm if the adjustments made to the ceiling joists have resulted in a level surface.
- Check with String or a Straight Edge: Another method to check the levelness of the ceiling is by using a taut string or a straight edge. Secure one end of the string or straight edge to the highest point of the ceiling, and allow it to naturally hang down. Observe if it touches any part of the adjusted joists. If the string or straight edge touches any part of the ceiling, it indicates areas that need further adjustment.
- Make Final Adjustments: If you find any areas that are still not level, make the necessary adjustments. This may involve adding or removing shims or applying additional leveling compound to bring those areas into alignment. Continue making adjustments until the entire ceiling is level.
- Recheck the Level: After making the final adjustments, recheck the levelness of the ceiling using the above methods. Take your time to ensure that every part of the ceiling is level and aligned properly.
- Take Note of Any Deviations: While checking the level, make note of any small deviations or imperfections that are difficult to correct. These minor imperfections can be addressed later during the finishing stage, such as by using joint compound to fill in any gaps or inconsistencies.
By following these steps, you will be able to thoroughly check the levelness of the ceiling and make any final adjustments if necessary. Taking the time to verify the level is crucial to ensure a visually appealing and structurally sound ceiling. Once you are satisfied with the levelness, you can move on to the final step of securing the leveled joists.
Step 5: Securing the Level Joists
After successfully leveling the ceiling joists, the final step is to secure them in their corrected positions. This step will ensure that the joists remain in place and maintain the level surface. Follow these steps to properly secure the level joists:
- Prepare Fasteners: Gather the appropriate fasteners, such as screws or nails, that are suitable for securing the type of joists you have. Ensure that the fasteners are long enough to penetrate the joists and provide a strong hold.
- Locate the Joist: Identify the centerline of each joist by using the reference point created by the laser level. This will help you accurately position the fasteners.
- Drive the Fasteners: Use a drill or a hammer to drive the fasteners through the ceiling material and into the joists. Place the fasteners at regular intervals along the length of the joists to ensure a secure attachment.
- Countersink the Fasteners: If desired, you can countersink the fasteners into the ceiling material. This will create a flush surface, allowing for smoother finishing and a cleaner appearance.
- Double-Check the Level: Once the joists are securely fastened, double-check the levelness of the ceiling using the methods mentioned in Step 4. Ensure that the adjustments made and the securing process have maintained a level surface.
- Clean Up: Remove any debris or leftover materials from the work area, and return any tools to their proper storage locations. Clean up the room to restore it to its original state.
By following these steps, you will effectively secure the level joists in their corrected positions. This will ensure that the ceiling remains level and stable for years to come. With the joists securely fastened, you can now proceed with the finishing touches, such as applying joint compound or installing new ceiling materials, to complete the project.
Congratulations! You have successfully learned how to level ceiling joists using a laser level. This technique not only saves time and effort but also provides precise and accurate results. Enjoy the benefits of a level and visually appealing ceiling in your space!
Just mastered leveling ceiling joists with a laser level? Continue enhancing your understanding by exploring our detailed guide on what ceiling joists are. Learn about their critical role in your home's structure and why ensuring they are perfectly level is essential for both safety and aesthetics.
Frequently Asked Questions about How To Level Ceiling Joist With Laser Level
Was this page helpful?
At Storables.com, we guarantee accurate and reliable information. Our content, validated by Expert Board Contributors, is crafted following stringent Editorial Policies. We're committed to providing you with well-researched, expert-backed insights for all your informational needs.


0 thoughts on “How To Level Ceiling Joist With Laser Level”