Articles
How To Clean Antifreeze Off The Driveway
Modified: August 27, 2024
Learn effective ways to remove antifreeze stains from your driveway. Our articles provide expert tips and tricks for a clean and spotless surface.
(Many of the links in this article redirect to a specific reviewed product. Your purchase of these products through affiliate links helps to generate commission for Storables.com, at no extra cost. Learn more)
Introduction
Welcome to our comprehensive guide on how to clean antifreeze off the driveway. Accidents happen, and if you’ve found yourself with a pesky antifreeze stain on your driveway, don’t worry – we’ve got you covered. Antifreeze spills can be a common occurrence, especially during car maintenance or winter months. However, it’s crucial to address these spills promptly, as antifreeze can leave stubborn stains and pose environmental risks. In this article, we’ll walk you through the process of safely and effectively cleaning antifreeze off your driveway.
Before we dive into the cleaning process, let’s take a moment to understand what antifreeze is and why it can be problematic. Antifreeze, also known as coolant, is a liquid substance used in vehicle engines to regulate temperature and prevent freezing or overheating. It typically consists of ethylene glycol or propylene glycol, which can be highly toxic when ingested by humans or animals.
When antifreeze is spilled on a driveway or any other surface, it not only creates an unsightly stain but also poses risks to the environment. Small amounts of antifreeze can contaminate groundwater or nearby bodies of water, potentially harming plants and wildlife. Therefore, it’s essential to clean up antifreeze spills promptly and properly to minimize these risks.
Safety should always be a priority when handling any potentially hazardous substances. Before we start cleaning the antifreeze stain from your driveway, let’s go over a few safety precautions:
- Put on protective gloves to prevent skin contact with antifreeze.
- Wear safety goggles to protect your eyes in case of splashes.
- Work in a well-ventilated area or open space to avoid inhaling fumes.
- Keep children and pets away from the cleaning area.
Now that we’ve covered the important safety measures, let’s move on to the step-by-step process of cleaning antifreeze off your driveway. By following these instructions, you’ll be able to restore the appearance of your driveway and minimize any potential harm to the environment. So, roll up your sleeves, grab your cleaning supplies, and let’s get started!
Key Takeaways:
- Promptly address antifreeze spills on your driveway to minimize environmental and health risks. Follow safety precautions, absorb excess antifreeze, dilute the stain, and scrub and rinse thoroughly for effective cleaning.
- Prevent future antifreeze stains by handling antifreeze with care, maintaining your vehicle, using drip pans, cleaning up spills immediately, and properly disposing of antifreeze. Prevention is key to a clean and pristine driveway.
Understanding Antifreeze
Before we delve into the process of cleaning antifreeze off the driveway, let’s take a closer look at what antifreeze is and why it is used in vehicles. Antifreeze, also known as coolant, is a liquid substance that plays a crucial role in maintaining the optimal temperature of a vehicle’s engine.
Antifreeze is typically made up of a mixture of water and either ethylene glycol or propylene glycol. These chemicals have a low freezing point and a high boiling point, allowing them to withstand extreme temperature conditions. When added to a vehicle’s cooling system, antifreeze helps to prevent the engine from freezing in cold weather and overheating in hot weather.
In addition to temperature regulation, antifreeze also serves other important purposes. It helps prevent corrosion within the engine, lubricates various parts, and improves heat transfer. By keeping the engine at the right temperature and ensuring its efficient operation, antifreeze plays a crucial role in maintaining the health and longevity of a vehicle.
It’s important to note that antifreeze is a toxic substance and should be handled with caution. Both ethylene glycol and propylene glycol can be harmful if ingested, even in small quantities. Ingesting antifreeze can lead to severe health issues, including organ damage and even death. Therefore, it’s essential to keep antifreeze out of reach of children and pets and to properly dispose of any unused or spilled antifreeze.
When an antifreeze spill occurs on a driveway or any other surface, it can leave behind a visible stain. Antifreeze stains can be challenging to remove, as they tend to penetrate porous materials such as concrete or asphalt. If left untreated, these stains can remain on the driveway for an extended period and may even require professional intervention to remove them completely.
In the next section, we will address the potential risks of antifreeze spills on your driveway and explain why it’s important to clean them up promptly.
Potential Risks of Antifreeze Spills on Driveway
Antifreeze spills on your driveway can pose several potential risks, both for the environment and for the safety of humans and animals. It’s important to understand these risks and take appropriate action to mitigate them.
1. Environmental Impact: Antifreeze contains toxic substances such as ethylene glycol, which can be harmful to plants, wildlife, and aquatic life. If the spilled antifreeze seeps into the ground or gets washed into storm drains, it can contaminate groundwater or nearby bodies of water. This contamination can have long-lasting effects on ecosystems, disrupting the balance and causing harm to the organisms that rely on clean water sources.
2. Health Hazards: Antifreeze is highly toxic when ingested by humans or animals. Even small amounts can be dangerous and can cause serious health issues. If a spill occurs on your driveway and you or your pets come into contact with the antifreeze, immediate action should be taken to minimize exposure. Ingesting or inhaling antifreeze fumes can result in symptoms such as dizziness, nausea, respiratory problems, and in severe cases, organ damage or death.
3. Slippery Surface: Spilled antifreeze can make your driveway slippery, posing a risk of accidents and falls. This is particularly dangerous during winter when antifreeze can freeze, creating an icy surface that can cause slips and injuries. Promptly cleaning up the spill will not only remove the potential environmental and health risks but also restore the traction and safety of your driveway.
By understanding the risks associated with antifreeze spills on your driveway, you can take the necessary precautions and address the situation promptly. In the next section, we will discuss the safety precautions you should follow when cleaning up antifreeze stains to protect yourself, others, and the environment.
Safety Precautions
Before you begin the process of cleaning up antifreeze stains from your driveway, it’s essential to take certain safety precautions to protect yourself, others, and the environment. Antifreeze contains toxic substances that can be harmful when exposed to the skin, ingested, or inhaled. Follow these safety guidelines to minimize any potential risks:
- Wear protective gloves: Put on a pair of protective gloves before handling any antifreeze or cleaning products. Gloves will help prevent direct skin contact and minimize the risk of absorption or irritation.
- Use safety goggles: Antifreeze can splash and potentially come into contact with your eyes. Protect your eyes by wearing safety goggles or eyewear throughout the cleaning process.
- Work in a well-ventilated area: Antifreeze fumes can be harmful when inhaled. Ensure you are working in a well-ventilated space or an open area to minimize exposure to these fumes. If necessary, use a fan or open windows to improve air circulation.
- Keep children and pets away: Antifreeze is toxic, and accidental ingestion can lead to serious health consequences. Make sure to keep children and pets away from the cleaning area to prevent any accidental contact or ingestion.
- Dispose of materials properly: After completing the cleaning process, dispose of any used cleaning materials, such as rags or sponges, in a sealed bag or container. Antifreeze should be disposed of according to local regulations, as it is considered a hazardous waste.
- Read and follow product instructions: If you choose to use commercial cleaning products, carefully read and follow the instructions provided by the manufacturer. Some products may have specific safety precautions or recommended dilution ratios that you need to adhere to.
By taking these safety precautions, you can minimize the risks associated with handling and cleaning up antifreeze spills. Remember, your safety, as well as the safety of others and the environment, is of utmost importance. Now that we’ve covered the safety measures, let’s move on to the step-by-step process of cleaning antifreeze off your driveway.
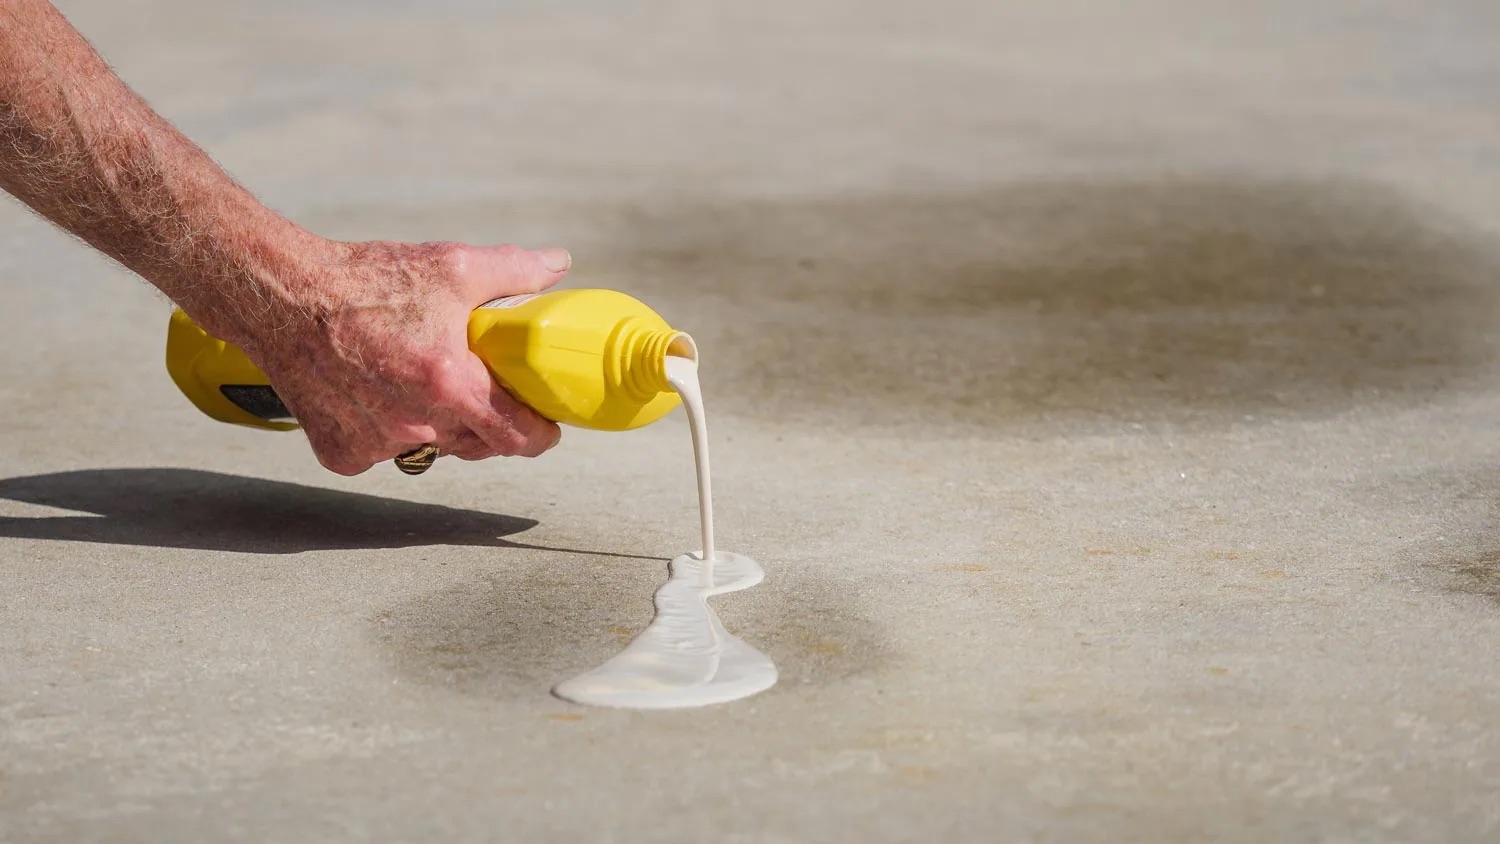
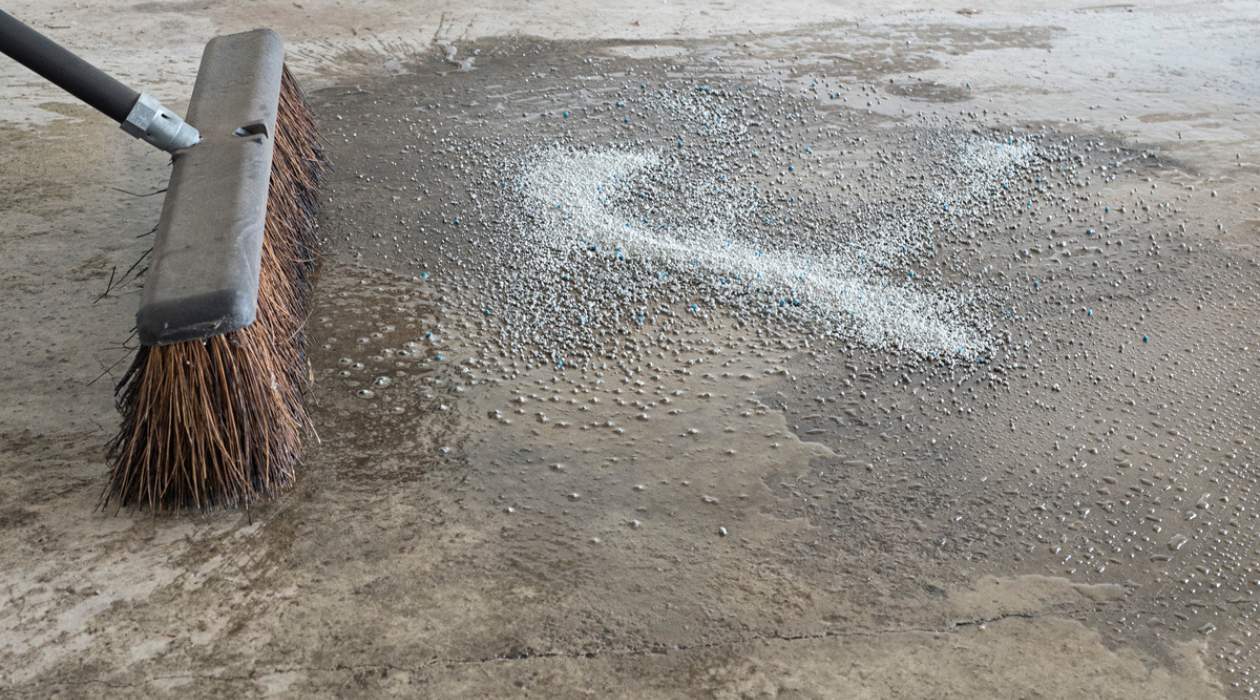
Step 1: Absorbing Excess Antifreeze
Once you’ve taken the necessary safety precautions, it’s time to start cleaning up the antifreeze stain on your driveway. The first step is to absorb any excess antifreeze to prevent further spreading and minimize the size of the stain. Here’s how to do it:
- Act quickly: The sooner you address the spill, the better chance you have of preventing it from seeping deeper into the driveway surface.
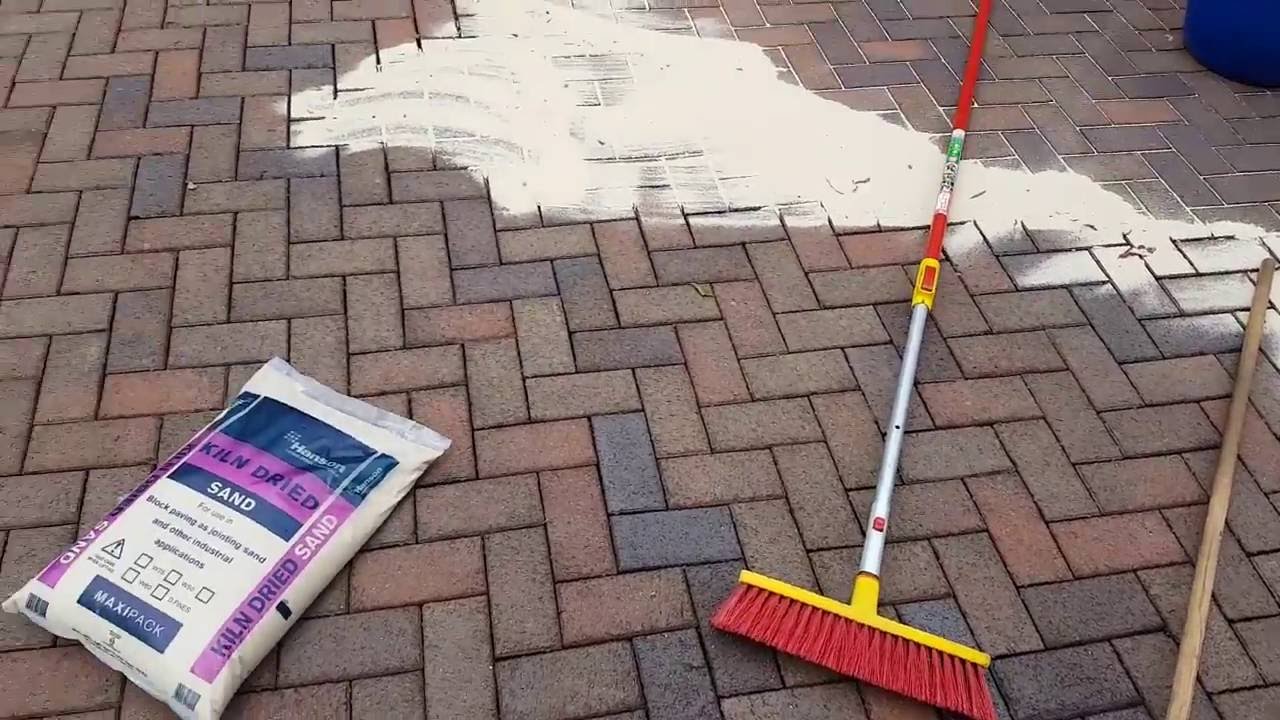
- Grab absorbent materials: Use absorbent materials such as cat litter, sawdust, or commercial absorbents specifically designed for oil and chemical spills. These materials are effective in soaking up liquids and can help pull the antifreeze from the surface.
- Spread the absorbent material: Sprinkle a generous amount of the absorbent material directly onto the antifreeze stain. If the stain is relatively large, make sure to cover the entire affected area.
- Gently press it down: Using a broom or a clean cloth, gently press down on the absorbent material to encourage absorption and ensure good contact with the antifreeze stain.
- Leave it to sit: Allow the absorbent material to sit on the stain for at least 30 minutes, or as recommended by the product instructions. During this time, the material will draw out the antifreeze, helping to minimize the size of the stain.
- Sweep or vacuum the residue: After the allotted time, use a broom or a vacuum cleaner equipped with a brush attachment to sweep or vacuum the absorbent material and residue. Be careful not to press down too hard, as this could spread the stain further.
Remember to dispose of the used absorbent material according to local regulations, as it may contain traces of antifreeze. By absorbing the excess antifreeze in this initial step, you’ll be well on your way to removing the stain from your driveway. Now that we’ve tackled the excess antifreeze, let’s move on to the next step: diluting the stain.
Read more: How To Get Tar Off A Driveway
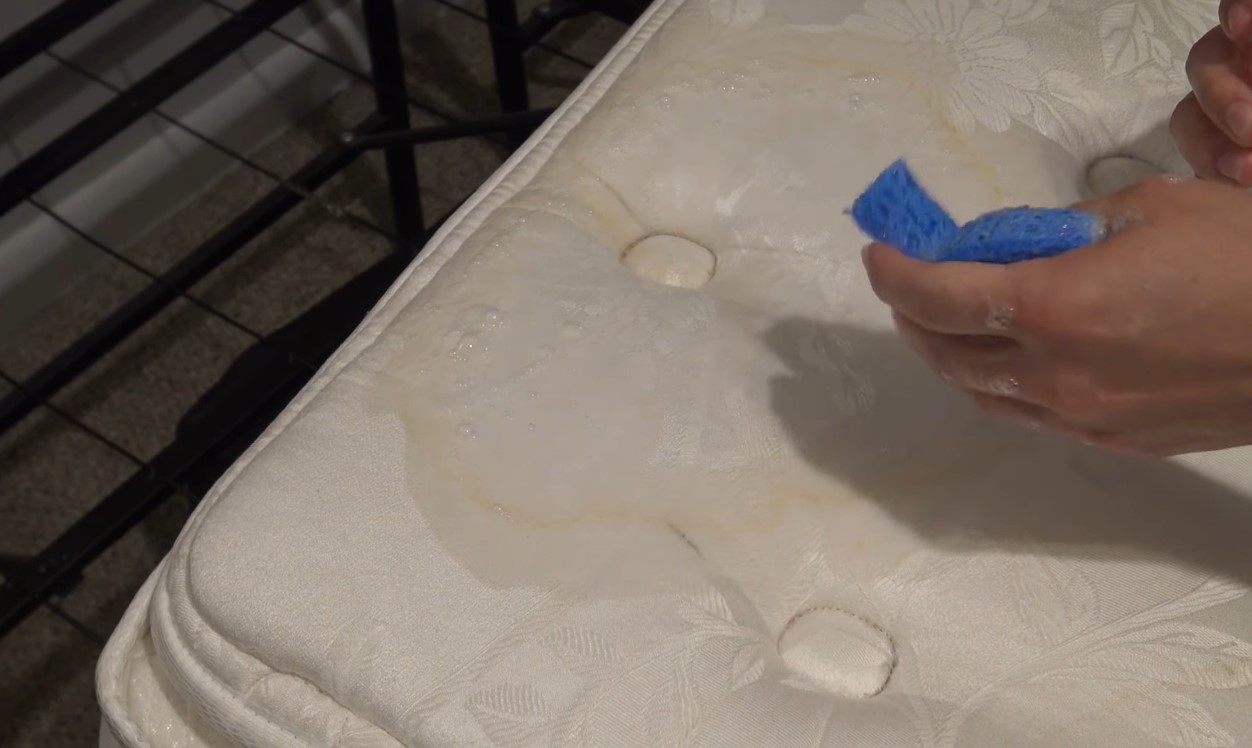
Step 2: Diluting the Stain
Once you’ve absorbed the excess antifreeze from the driveway, it’s time to move on to the next step: diluting the stain. Diluting the stain helps to break down the concentration of antifreeze and makes it easier to remove. Follow these steps to effectively dilute the stain:
- Gather your supplies: You’ll need a bucket, warm water, liquid dish soap, and a scrub brush or a stiff-bristle brush.
- Fill the bucket: Fill the bucket with warm water. Warm water helps to loosen the stain and facilitates the dilution process.
- Add dish soap: Add a few drops of liquid dish soap to the warm water. Dish soap is effective in breaking down grease and oil stains, including antifreeze stains.
- Mix well: Stir the water and dish soap mixture thoroughly to create a soapy solution.
- Wet the stain: Pour the soapy solution directly onto the antifreeze stain, ensuring that it covers the entire affected area.
- Let it sit: Allow the soapy solution to sit on the stain for about 10 to 15 minutes. This gives the solution time to penetrate and break down the antifreeze stain.
- Scrub the stain: After the soaking period, take the scrub brush or stiff-bristle brush and vigorously scrub the stain in a circular motion. Apply some pressure, but be careful not to damage the driveway surface.
- Rinse with water: Once you’ve scrubbed the stain thoroughly, rinse the area with clean water. This will remove the loosened stain and the soapy residue.
By diluting the antifreeze stain, you’re effectively reducing its concentration and making it less visible. However, if some remnants of the stain remain after this step, don’t worry. We’ll address them in the next steps. So, let’s move on to step 3: scrubbing the driveway to tackle those persistent stains.
To clean antifreeze off the driveway, sprinkle cat litter over the affected area to absorb the liquid. Let it sit for a few hours, then sweep it up and dispose of it properly. Finally, use a mixture of dish soap and hot water to scrub the remaining stain.
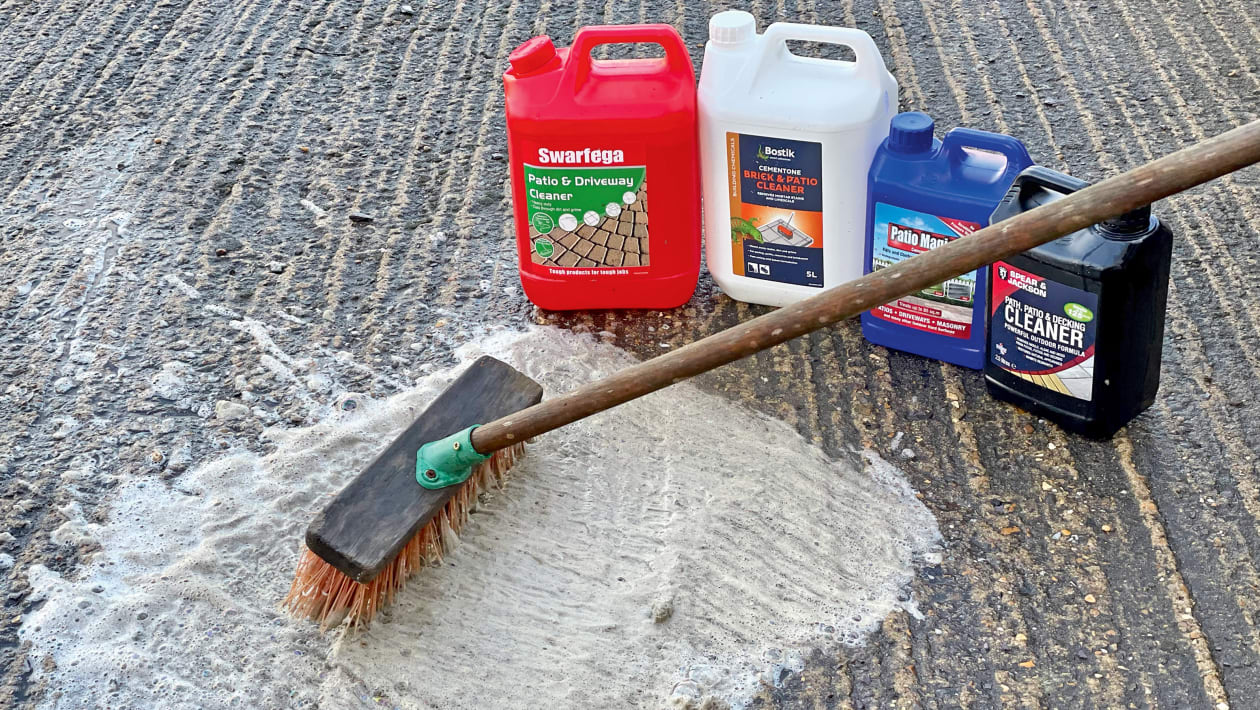
Step 3: Scrubbing the Driveway
Now that you have effectively diluted the antifreeze stain on your driveway, it’s time to move on to step 3: scrubbing the area to remove any remaining residue. This step requires a bit of elbow grease, but with the right tools and technique, you can tackle those persistent stains. Follow these steps to scrub the driveway effectively:
- Prepare your cleaning solution: Fill a bucket with warm water and add a mild detergent or concrete cleaner. Mix the solution well until it creates a soapy consistency.
- Wet the driveway: Use a hose or a watering can to wet the entire driveway surface. This will help loosen any remaining residue and prepare it for scrubbing.
- Dip the brush into the cleaning solution: Dip the scrub brush into the prepared cleaning solution and allow it to soak for a few seconds. This will help transfer the cleaning agents to the bristles.
- Scrub the stain: Starting at one end of the antifreeze stain, vigorously scrub the area using the soaked brush. Focus on the stained portion and scrub in a back-and-forth motion. Apply firm pressure to remove any stubborn residue. If necessary, you can use a circular motion for tougher stains.
- Move to adjacent areas: Once you’ve thoroughly scrubbed the stained area, continue scrubbing the surrounding areas to ensure a uniform appearance. This will help blend any remaining lighter spots with the rest of the driveway.
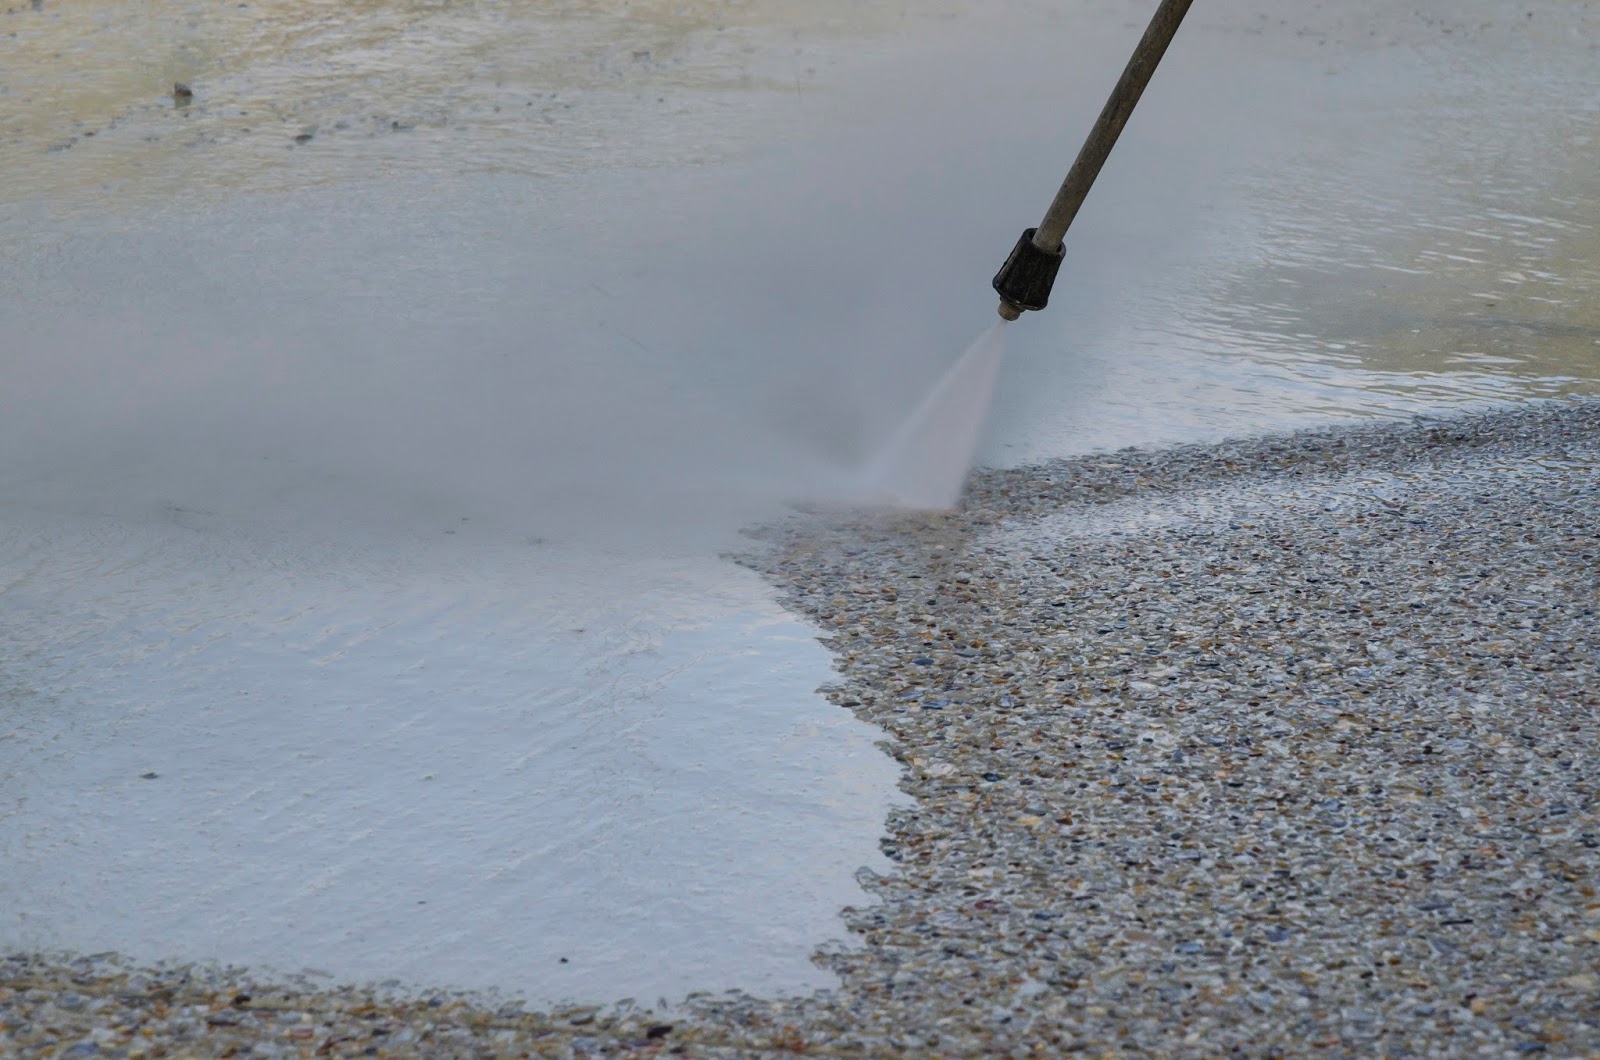
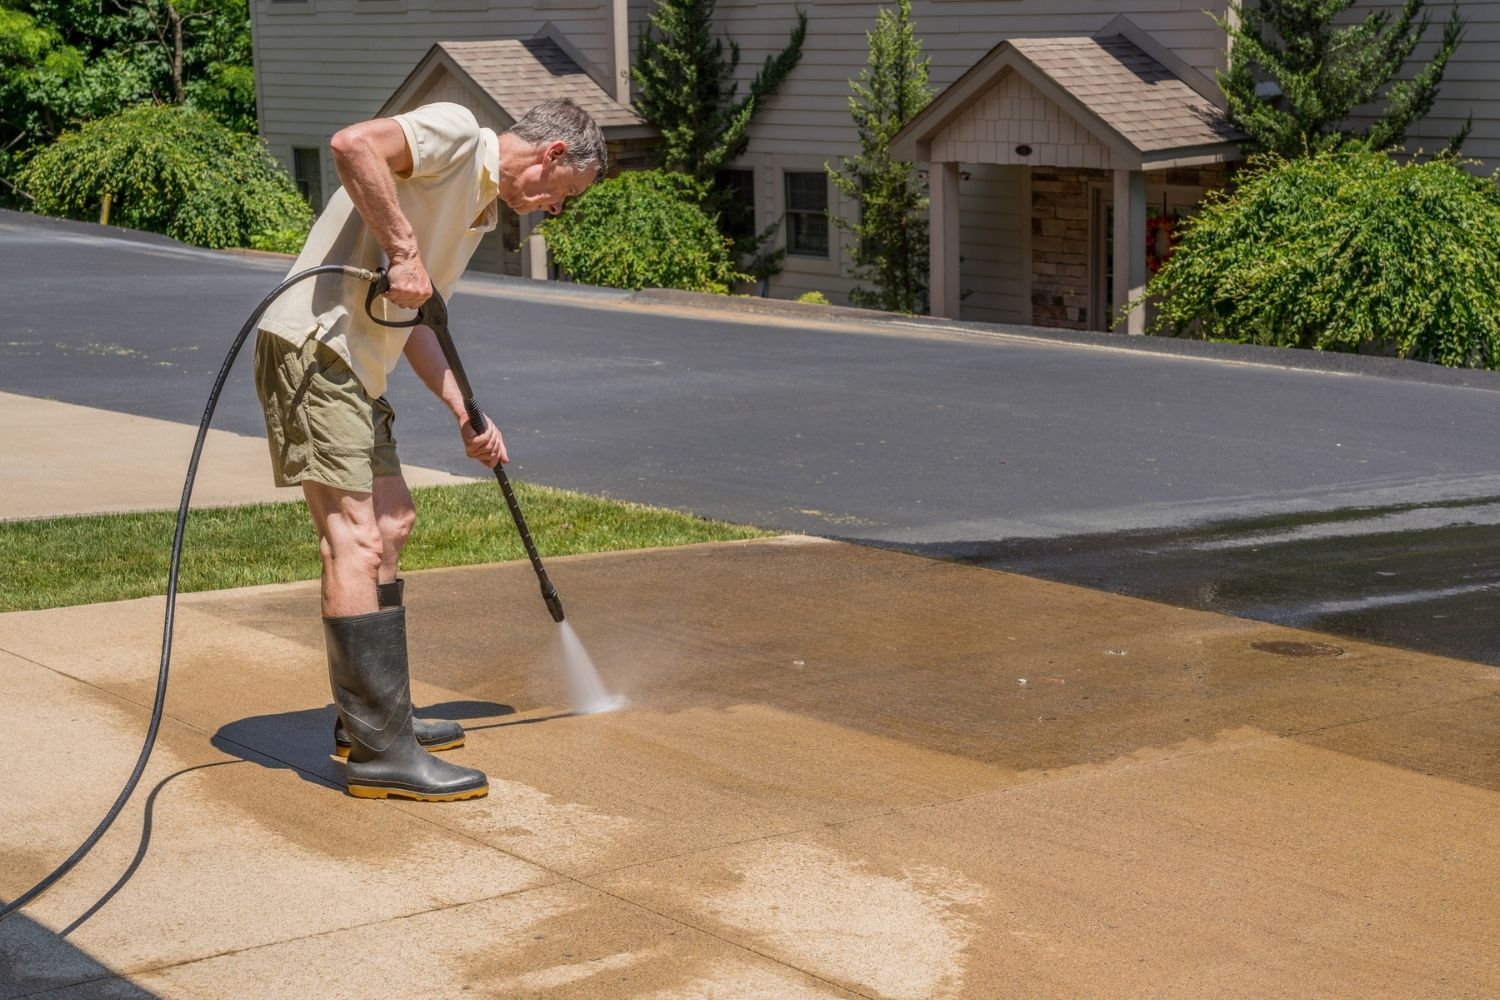
- Rinse with clean water: Use a hose or a pressure washer to rinse the driveway extensively. Make sure to remove all traces of the cleaning solution and any loosened residue. Pay attention to the edges and corners to ensure a thorough clean.
By scrubbing the driveway, you’re targeting the remaining traces of the antifreeze stain and working to eliminate them. However, if there are still some stubborn spots remaining, don’t worry – we have a solution for that in the next step. So, let’s continue to step 4: rinsing the driveway for a final touch.
Step 4: Rinsing the Driveway
After scrubbing the driveway and removing the majority of the antifreeze stain, it’s time to move on to step 4: rinsing the area to wash away any remaining residue. Rinsing is crucial as it helps to flush out the cleaning solution and leftover debris, leaving your driveway looking clean and refreshed. Follow these steps to properly rinse your driveway:
- Prepare your hose or pressure washer: Make sure your hose is connected to a water source or your pressure washer is ready for use.
- Start rinsing from one end: Begin at one end of the driveway and work your way towards the other end. This ensures that any remaining residue is pushed towards the drainage area.
- Use a sweeping motion: Hold the hose or pressure washer wand at a slight angle and move it in a sweeping motion back and forth across the driveway surface. This helps to cover a broader area and ensures an even rinse.
- Pay attention to corners and edges: Direct the water flow towards the corners and edges of the driveway, as these areas often accumulate more residue. Make sure to thoroughly rinse these areas to achieve a uniform cleaning result.
- Continue rinsing until clear: Keep rinsing the driveway until the water runs clear, indicating the removal of all cleaning solution and residue. Take your time and be thorough in your rinsing process.
After completing the rinsing step, take a moment to inspect the driveway for any remaining stains. If you notice any persistent spots, don’t worry – we have a solution for them in the next step. So, let’s move on to step 5: repeating the cleaning process, if necessary.
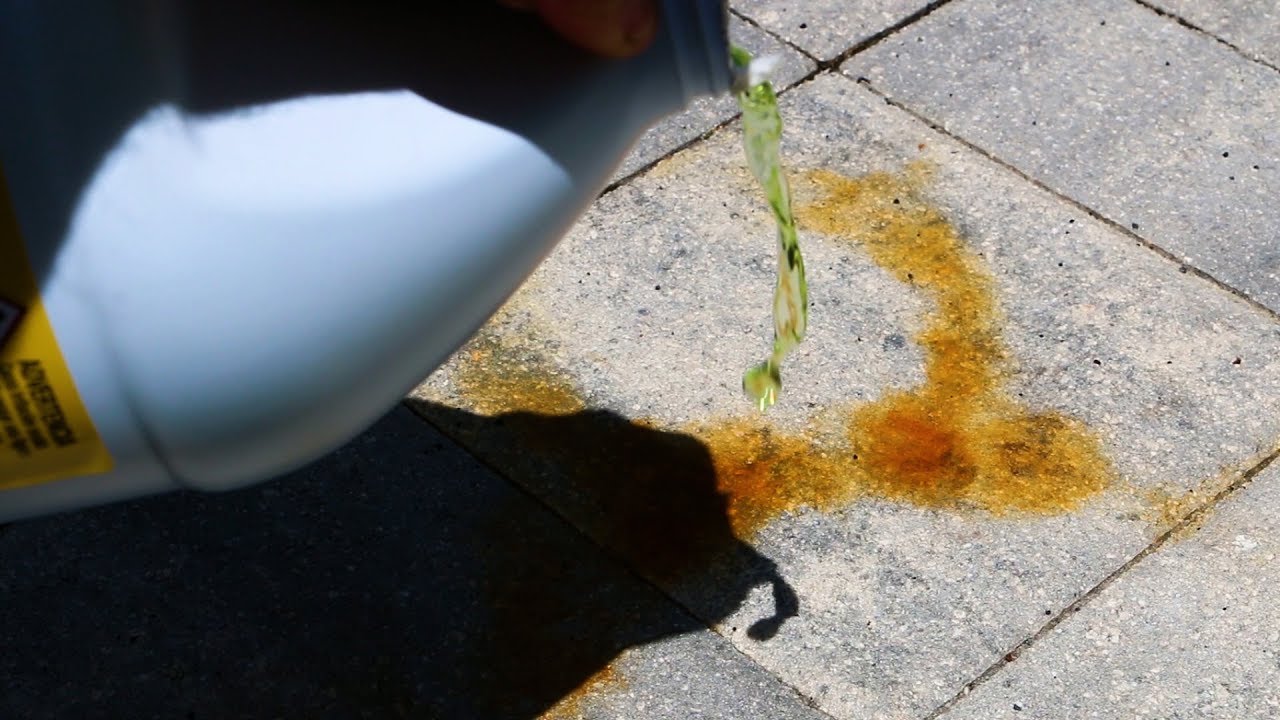
Step 5: Repeat if Necessary
If after rinsing the driveway, you still notice lingering antifreeze stains, don’t worry. In step 5, we’ll address those persistent spots by repeating the cleaning process. While the previous steps should have removed the majority of the stain, some particularly stubborn spots may require additional attention. Here’s what you can do:
- Identify remaining stains: Take a close look at the driveway surface and identify any areas where the antifreeze stain is still visible.
- Prepare a stronger cleaning solution: Mix a small amount of concentrated concrete cleaner or a specific stain remover designed for oil stains with water in a bucket. Follow the manufacturer’s instructions for dilution ratios.
- Apply the cleaning solution: Pour the cleaning solution directly onto the remaining stain, making sure to cover the entire affected area.
- Let it sit: Allow the cleaning solution to sit on the stain for the recommended amount of time specified by the product instructions. This will give it time to work its magic and break down the stubborn residue.
- Scrub the stain: Once the cleaning solution has had time to penetrate the stain, scrub the area again using a brush or a scrub pad. Apply firm pressure and use a back-and-forth or circular motion to agitate the spot.
- Rinse thoroughly: After scrubbing, rinse the area thoroughly with clean water to remove any residue from the cleaning solution.
- Repeat if necessary: If the stain persists, you may need to repeat this step or try a different stain removal method. Some particularly stubborn stains may require professional intervention.
Remember that different driveway surfaces may require different cleaning techniques. For example, concrete driveways may respond well to pressure washing, while asphalt driveways may benefit from specific oil stain removers. Adjust your approach accordingly and exercise caution to avoid damaging the driveway surface.
By repeating the cleaning process, you’ll give those stubborn antifreeze stains the extra attention they need. Once you’re satisfied with the outcome, it’s time to consider preventive measures in order to avoid future antifreeze spills and stains on your driveway.
Read more: How To Clean A Paver Driveway
Preventing Future Antifreeze Stains
Now that you’ve successfully cleaned up the antifreeze stain from your driveway, it’s important to take proactive measures to prevent future spills and stains. Here are some tips to help you avoid future antifreeze stains on your driveway:
- Handle antifreeze with care: When working with antifreeze, whether during vehicle maintenance or storage, be extra cautious to avoid spills. Use a funnel to pour antifreeze into the vehicle’s cooling system, and always tighten the cap securely.
- Regular vehicle maintenance: Keep your vehicle’s cooling system in good condition by following the manufacturer’s recommended maintenance schedule. Preventing leaks and addressing any issues promptly can minimize the chances of antifreeze spills on your driveway.
- Proper storage: Store antifreeze containers in a safe and secure place, away from children and pets. Ensure that the containers are tightly sealed to prevent any leaks or spills.
- Use drip pans or absorbent mats: Place a drip pan or absorbent mat underneath your vehicle when performing maintenance or when storing it for an extended period. These can catch any potential spills and prevent them from reaching the driveway.
- Clean up spills immediately: If an antifreeze spill does occur, whether on the driveway or in the garage, clean it up immediately. Prompt action can prevent the antifreeze from soaking into the surface and causing a stain.
- Proper disposal: Dispose of any unused or old antifreeze properly. Contact your local recycling center, hazardous waste facility, or auto parts store for guidance on how to dispose of antifreeze in an environmentally friendly manner.
By implementing these preventive measures, you can significantly reduce the risk of future antifreeze stains on your driveway. Remember, prevention is always better than having to deal with stubborn stains later on.
Now that you’re equipped with the knowledge and steps to clean and prevent antifreeze stains, you can confidently maintain a clean and stain-free driveway. However, if you encounter persistent or large stains that you’re unable to remove on your own, it’s advisable to seek professional assistance for proper and safe stain removal.
Remember to always prioritize safety and take precautionary measures when handling and cleaning up antifreeze. With care and regular maintenance, you can keep your driveway looking pristine and protect the environment from the potential hazards of antifreeze spills.
We hope this guide has been helpful in your journey to clean and maintain your driveway. Here’s to a clean and beautiful driveway for years to come!
Conclusion
Cleaning antifreeze off your driveway can be a challenging task, but with the right techniques and precautions, you can effectively remove stains and restore the appearance of your driveway. In this comprehensive guide, we’ve walked you through the step-by-step process of cleaning antifreeze stains and provided valuable tips to prevent future spills and stains.
It’s important to remember that antifreeze is a toxic substance, and spills can have potential risks for both the environment and our health. By promptly addressing antifreeze spills and following safety precautions, such as wearing protective gloves and working in well-ventilated areas, you can minimize these risks and ensure your safety throughout the cleaning process.
We’ve covered the importance of absorbing excess antifreeze, diluting the stain, scrubbing the driveway, and rinsing thoroughly to achieve a clean and stain-free surface. In cases of stubborn stains, we’ve suggested repeating the cleaning process or seeking professional assistance. Additionally, we’ve provided preventive measures to avoid future antifreeze spills, such as proper handling, regular vehicle maintenance, and safe disposal of antifreeze.
Maintaining a clean and stain-free driveway not only enhances the curb appeal of your home but also protects the environment from potential contamination. By implementing the tips and techniques outlined in this guide, you can confidently tackle antifreeze stains and maintain the pristine condition of your driveway for years to come.
Remember, safety should always be a top priority, and if you encounter a particularly challenging or stubborn stain, it’s advisable to consult professionals for assistance.
Thank you for joining us on this journey to learn how to clean antifreeze off your driveway. We hope this guide has been informative and helpful. Here’s to a clean, beautiful, and environmentally friendly driveway!
Now that you've tackled antifreeze stains, why not spruce up other areas of your home? For those pesky marks on your bathroom fixture, our guide on stain removal offers practical solutions. Regular home maintenance is key to keeping your space in top shape, and our comprehensive checklist ensures nothing is overlooked. Don't forget about one of the hardest-working appliances in your house! Our detailed cleaning tips will help you keep your refrigerator fresh and functional.
Frequently Asked Questions about How To Clean Antifreeze Off The Driveway
Was this page helpful?
At Storables.com, we guarantee accurate and reliable information. Our content, validated by Expert Board Contributors, is crafted following stringent Editorial Policies. We're committed to providing you with well-researched, expert-backed insights for all your informational needs.


0 thoughts on “How To Clean Antifreeze Off The Driveway”