Articles
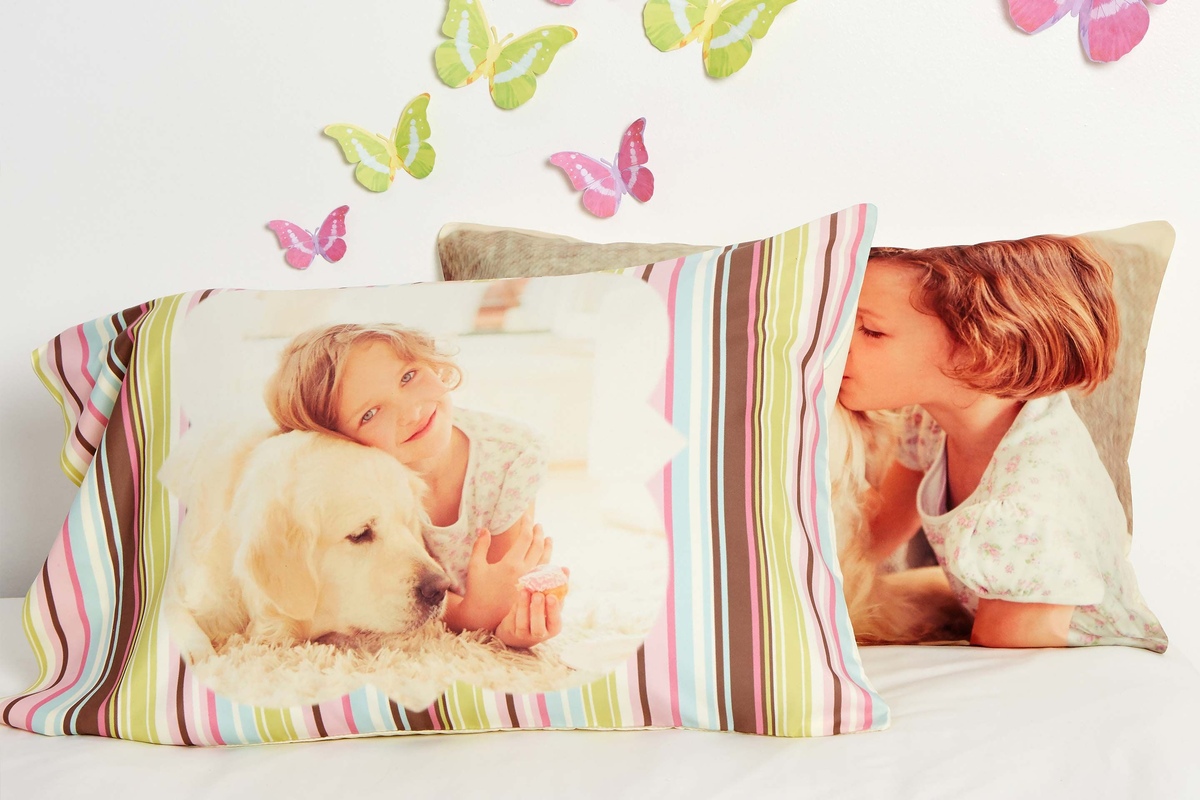
How To Create A Custom Picture Pillowcase
Modified: January 14, 2024
Learn how to create a personalized picture pillowcase with our step-by-step articles. Get creative with custom designs for a unique touch to your bedroom decor.
(Many of the links in this article redirect to a specific reviewed product. Your purchase of these products through affiliate links helps to generate commission for Storables.com, at no extra cost. Learn more)
Introduction
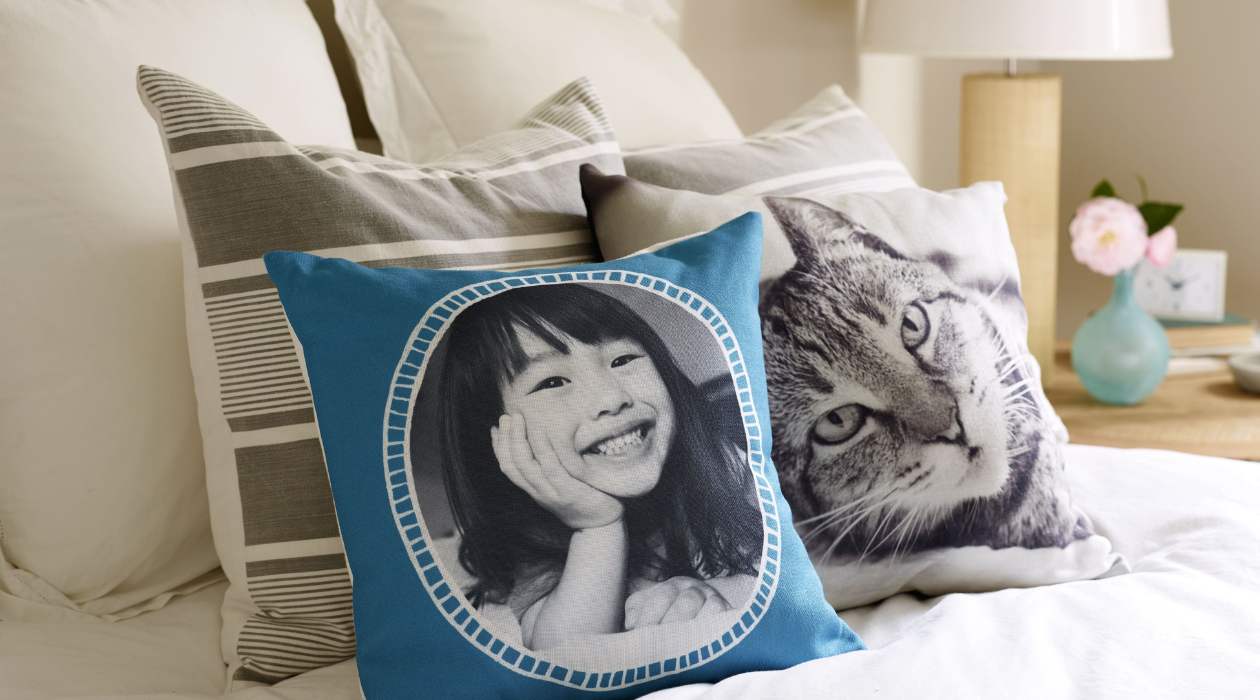
Welcome to the world of custom picture pillowcases, where you can turn your favorite memories into cozy and personalized home decor. Picture pillowcases are a unique and creative way to add a personal touch to your living space or give a heartfelt gift to someone special. Whether it’s a cherished family photo, a stunning landscape, or a precious moment captured in time, creating a custom picture pillowcase allows you to showcase your favorite images in a functional and decorative way.
In this article, we will guide you through the process of creating your very own custom picture pillowcase. From choosing the perfect picture to printing and preserving it, you’ll learn all the steps necessary to bring your vision to life. So, let’s dive in and explore the world of custom picture pillowcases!
Before we get started, let’s gather the materials you will need for this project:
Key Takeaways:
- Transform cherished memories into personalized home decor with custom picture pillowcases. Follow the step-by-step guide to create a unique and meaningful piece that adds warmth and personality to any living space.
- Carefully choose, prepare, and print your favorite images onto pillowcases to create heartfelt gifts or delightful additions to your home decor. Ensure longevity by following proper washing and drying instructions.
Read also: 13 Incredible Custom Pillowcase for 2024
Materials Needed:
- A high-quality digital image or photograph
- A computer with graphic editing software
- A printer with photo printing capabilities
- A blank pillowcase made of fabric suitable for printing
- An iron and ironing board
- T-shirt transfer paper
- An inkjet printer
- A pair of scissors
- Clear tape
- A washing machine and dryer
Key Takeaways:
- Transform cherished memories into personalized home decor with custom picture pillowcases. Follow the step-by-step guide to create a unique and meaningful piece that adds warmth and personality to any living space.
- Carefully choose, prepare, and print your favorite images onto pillowcases to create heartfelt gifts or delightful additions to your home decor. Ensure longevity by following proper washing and drying instructions.
Read also: 13 Incredible Custom Pillowcase for 2024
Materials Needed:
Before we begin the process of creating a custom picture pillowcase, let’s gather all the materials you will need for this project:
- A high-quality digital image or photograph: The first and most crucial material you will need is a high-resolution image that you want to use for your pillowcase. This could be a family photo, a breathtaking landscape, or any picture that holds special meaning to you. Make sure the image is clear and well-lit to ensure the best printing results.
- A computer with graphic editing software: To prepare and edit your chosen picture, you’ll need access to a computer or laptop. Make sure you have graphic editing software installed, such as Adobe Photoshop or GIMP, which will allow you to enhance, resize, and customize the image according to your preferences.
- A printer with photo printing capabilities: You will require a printer with the ability to print high-quality photos. An inkjet printer is commonly used for this purpose, as it provides vibrant colors and excellent detail.
- A blank pillowcase made of fabric suitable for printing: It’s important to choose a pillowcase made of fabric that can handle the image transfer process. Look for pillowcases made of 100% cotton or a cotton-polyester blend, as they tend to produce the best results.
- An iron and ironing board: The ironing process is crucial for transferring the image onto the pillowcase. Make sure you have a reliable iron and a sturdy ironing board to ensure the best imprint.
- T-shirt transfer paper: T-shirt transfer paper is specially designed for transferring images onto fabric. It usually comes in packs and can be found at craft stores or online. Choose transfer paper suitable for your printer type (inkjet or laserjet).
- An inkjet printer: If you don’t have an inkjet printer already, make sure to acquire one for this project. Inkjet printers are widely available and offer high-quality photo printing capabilities that are essential for this process.
- A pair of scissors: You will need a pair of sharp scissors to carefully cut out the printed image from the transfer paper. Make sure they are clean and precise for the best results.
- Clear tape: Clear tape will come in handy during the transfer process. It will help secure the image onto the pillowcase, ensuring it stays in place during ironing.
- A washing machine and dryer: Finally, you will need access to a washing machine and dryer for post-printing care. This will ensure that your custom picture pillowcase remains clean, vibrant, and ready for use.
With these materials gathered, you are now ready to embark on your custom picture pillowcase adventure. Let’s move on to the step-by-step process of creating your personalized home decor!
Step 1: Choosing the Picture
The first step in creating a custom picture pillowcase is to choose the perfect image that you want to showcase. This could be a family photo, a beautiful landscape, a beloved pet, or any image that holds sentimental value to you. Here are some tips to consider when selecting the picture:
- Choose a high-resolution image: To ensure the best printing results, select a high-resolution image with good clarity and sharpness. This will help to capture all the details and vibrant colors when transferring the image onto the pillowcase.
- Pick an image with the right dimensions: Consider the dimensions of your pillowcase and choose an image that will fit well. If needed, you can resize the image using graphic editing software before printing it.
- Opt for a meaningful image: Select an image that holds special meaning to you or the person you are creating the pillowcase for. Whether it’s a precious memory, a favorite vacation spot, or a beloved pet, choosing an image with sentimental value will make the pillowcase even more meaningful.
- Consider the color scheme: Take into account the color scheme of the room where the pillowcase will be displayed. Choose an image that complements the existing color palette or provides an interesting contrast.
- Edit the image if necessary: If needed, use graphic editing software to adjust the brightness, contrast, or color balance of the image. You can also add filters or effects to enhance the visual appeal.
Once you have chosen the perfect image, save it in a high-quality digital format, such as JPEG or PNG, on your computer. Remember to name the file accordingly, so it’s easy to locate when you’re ready to print.
The image you select will be the centerpiece of your custom picture pillowcase, so take your time in choosing something that brings joy, nostalgia, or a smile to your face. Now that you have the picture ready, let’s proceed to the next step: preparing the image for printing.
Step 2: Preparing the Picture
Now that you have chosen the perfect image for your custom picture pillowcase, it’s time to prepare the picture for printing. Follow these steps to ensure optimal results:
- Open the image in graphic editing software: Use a suitable graphic editing software such as Adobe Photoshop or GIMP to open the image on your computer. This will allow you to make any necessary adjustments or enhancements to the picture.
- Resize and crop the image: If needed, adjust the size of the image to match the dimensions of your pillowcase. Crop out any unwanted areas or objects that may interfere with the overall design.
- Adjust the image quality: Enhance the image’s quality by adjusting the brightness, contrast, saturation, or sharpness. Be careful not to overdo it and keep the modifications subtle for a natural-looking result.
- Add text or graphics: If you want to add text or graphics to your picture pillowcase, now is the time to do so. Personalize the image with names, dates, quotes, or any other elements that hold significance to you.
- Save the modified image: Once you are satisfied with the edits, save the modified image in a high-quality format, such as JPEG or PNG. Ensure that the file size is not too large as it needs to be manageable for printing.
It’s important to note that while graphic editing software can enhance the image, try to preserve the natural essence of the original picture. Avoid excessive editing that may distort or alter the image’s true essence.
By preparing and customizing the picture to your liking, you are one step closer to bringing your custom picture pillowcase to life. Next, we will move on to the crucial step of dimension and measurement before printing the picture onto the pillowcase.
When creating a custom picture pillowcase, be sure to use a high-resolution image for the best quality print. This will ensure that the picture looks clear and vibrant on the pillowcase.
Read also: 8 Amazing Custom Picture Frames for 2024
Step 3: Dimension and Measurement
Before printing your chosen image onto the pillowcase, it is important to consider the dimensions and measurements to ensure a perfect fit. Follow these steps to determine the appropriate size and position of the image:
- Measure the pillowcase: Take measurements of your pillowcase to determine the available printable area. This will help you understand the size limitations and avoid any potential issues during the printing process.
- Consider the aspect ratio: Preserve the aspect ratio (width to height ratio) of the image to avoid distortion. If the image dimensions do not match the pillowcase dimensions, you may need to resize the image or fill the remaining space with a complementary background color or design.
- Position the image: Decide where you want the image to be positioned on the pillowcase. Will it be centered or aligned to one side? Take into consideration any additional elements like text or graphics that you may have added to the image. Ensure that the positioning is visually pleasing and balanced.
- Leave margins: It’s generally recommended to leave a small margin around the image to prevent important details from being cut off during the printing and transferring process.
- Test the layout: Before printing on the actual pillowcase, consider printing a test layout on regular paper. This will give you a visual representation of how the image will appear on the pillowcase and allow you to make any necessary adjustments before the final printing.
By carefully considering the dimensions and measurements, you can ensure that your image fits perfectly on the pillowcase, creating a visually appealing and well-proportioned custom picture pillowcase.
With the dimensions and measurements sorted, it’s time to move on to the exciting step of printing the picture onto the pillowcase. Buckle up as we explore the next phase of this creative journey!
Step 4: Printing the Picture on the Pillowcase
Now comes the moment of truth – it’s time to print your carefully chosen and prepared image onto the pillowcase. Follow these steps to ensure a successful printing process:
- Load the transfer paper: Make sure your printer is ready and loaded with the appropriate type of transfer paper. Follow the manufacturer’s instructions for loading the paper correctly, ensuring that the printable side is facing up.
- Print a test page: Before printing on the actual pillowcase, it is a good practice to print a test page on regular paper. This will allow you to double-check the colors, positioning, and any other details before committing to the final print on the pillowcase.
- Prepare the iron and ironing board: Heat up an iron to the recommended temperature for the transfer paper. Place the ironing board on a stable surface and make sure it is clean and free from any debris that could transfer onto the pillowcase.
- Trim the transfer paper: Use a pair of scissors to carefully cut out the printed image from the transfer paper. Keep the edges clean and precise for a professional-looking result.
- Position the image on the pillowcase: Place the pillowcase on the ironing board, ensuring it is smooth and wrinkle-free. Position the trimmed image on the desired spot, taking into account the measurements and layout determined in previous steps.
- Secure the image with tape: Use small pieces of clear tape to secure the image in place on the pillowcase. This will prevent it from shifting or moving during the transfer process.
- Transfer the image with heat: Follow the instructions provided by the transfer paper manufacturer for applying heat. Gently press the iron over the image, exerting even pressure and moving it in a slow and steady motion. Be sure to cover the entire image area, paying extra attention to the corners and edges.
- Allow it to cool and remove the transfer paper: After transferring the image, let it cool on the pillowcase for a few minutes. Once it has cooled down, carefully peel off the transfer paper, starting from one corner and pulling it back slowly and evenly.
Be cautious while handling the transfer paper, as the image may smudge if touched before it has fully cooled and set on the pillowcase.
Voila! You have successfully printed your custom picture onto the pillowcase. Now, let’s move on to the final step of washing and drying to ensure your creation lasts for years to come.
Step 5: Washing and Drying
After successfully transferring the image onto your custom picture pillowcase, it’s important to take proper care of it to ensure its longevity and vibrancy. Follow these steps to wash and dry your pillowcase:
- Allow the image to set: After the transfer process, it’s recommended to let the pillowcase sit for at least 24 hours before washing. This will allow the image to fully set and adhere to the fabric.
- Machine wash: When it’s time to wash your custom picture pillowcase, turn it inside out to protect the image from any potential damage. Use a gentle cycle on your washing machine with cold water and a mild detergent. Avoid using bleach or harsh chemicals that may fade or discolor the image.
- Avoid fabric softener: Fabric softener can sometimes affect the transfer and cause it to fade over time. Therefore, it’s best to avoid using fabric softener when washing your custom picture pillowcase.
- Tumble dry on low heat or air dry: After washing, you can either tumble dry the pillowcase on a low heat setting or air dry it by laying it flat. Avoid high heat, as it may cause the image to crack or peel. If needed, you can iron the pillowcase on the reverse side using a low heat setting to remove any wrinkles.
- Avoid direct sunlight: To prevent the image from fading, avoid exposing the custom picture pillowcase to direct sunlight for extended periods.
By following these washing and drying instructions, you can maintain the quality and longevity of your custom picture pillowcase, allowing you to enjoy the personalized and meaningful design for years to come.
Congratulations! You have successfully completed the process of creating a custom picture pillowcase. Whether you’re keeping it for yourself or giving it as a personalized gift, it is sure to brighten up any space and bring joy to those who see it.
Remember, the steps outlined in this article provide a general guideline. The specific instructions may vary depending on the transfer paper and fabric used. Always refer to the manufacturer’s instructions for any specific guidelines and recommendations.
Now go ahead and proudly display your custom picture pillowcase, knowing that it’s a unique creation that holds special memories and adds a personal touch to your home decor!
HTML Encoding Validation:
<h2>Step 5: Washing and Drying</h2>
<p>After successfully transferring the image onto your custom picture pillowcase, it’s important to take proper care of it to ensure its longevity and vibrancy. Follow these steps to wash and dry your pillowcase:</p>
<ol>
<li><strong>Allow the image to set:</strong> After the transfer process, it’s recommended to let the pillowcase sit for at least 24 hours before washing. This will allow the image to fully set and adhere to the fabric.</li>
<li><strong>Machine wash:</strong> When it’s time to wash your custom picture pillowcase, turn it inside out to protect the image from any potential damage. Use a gentle cycle on your washing machine with cold water and a mild detergent. Avoid using bleach or harsh chemicals that may fade or discolor the image.</li>
<li><strong>Avoid fabric softener:</strong> Fabric softener can sometimes affect the transfer and cause it to fade over time. Therefore, it’s best to avoid using fabric softener when washing your custom picture pillowcase.</li>
<li><strong>Tumble dry on low heat or air dry:</strong> After washing, you can either tumble dry the pillowcase on a low heat setting or air dry it by laying it flat. Avoid high heat, as it may cause the image to crack or peel. If needed, you can iron the pillowcase on the reverse side using a low heat setting to remove any wrinkles.</li>
<li><strong>Avoid direct sunlight:</strong> To prevent the image from fading, avoid exposing the custom picture pillowcase to direct sunlight for extended periods.</li>
</ol>
– – – – – – – – – – – – – – – – – –
<p>By following these washing and drying instructions, you can maintain the quality and longevity of your custom picture pillowcase, allowing you to enjoy the personalized and meaningful design for years to come.</p>
<p>Congratulations! You have successfully completed the process of creating a custom picture pillowcase. Whether you’re keeping it for yourself or giving it as a personalized gift, it is sure to brighten up any space and bring joy to those who see it.</p>
<p>Remember, the steps outlined in this article provide a general guideline. The specific instructions may vary depending on the transfer paper and fabric used. Always refer to the manufacturer’s instructions for any specific guidelines and recommendations.</p>
<p>Now go ahead and proudly display your custom picture pillowcase, knowing that it’s a unique creation that holds special memories and adds a personal touch to your home decor!</p>
Conclusion
Congratulations on completing the process of creating your very own custom picture pillowcase! By following the steps outlined in this article, you have transformed a cherished image into a beautiful and personalized piece of home decor. Your custom picture pillowcase is not only a unique creation but also holds sentimental value that will make it a cherished item for years to come.
Throughout this journey, you learned how to choose the perfect picture, prepare it for printing, determine the dimensions and measurements, and successfully transfer the image onto the pillowcase. The careful consideration and attention to detail you put into each step ensure a high-quality and visually appealing result.
Remember, the possibilities for custom picture pillowcases are endless. You can create them as gifts for birthdays, anniversaries, or other special occasions. They also make for delightful personalized home decor items that add a touch of warmth and personality to your living space.
While creating your own custom picture pillowcase can be a rewarding experience, it’s important to note that it requires proper care to maintain the longevity and vibrancy of the image. Follow the washing and drying instructions provided in this article to ensure that your custom picture pillowcase remains in pristine condition.
Now, it’s time to proudly display your custom picture pillowcase and share its beauty with others. Whether it’s adorning your living room couch, bedroom, or gifted to a loved one, your custom picture pillowcase is a testament to your creativity and thoughtfulness.
Thank you for joining us on this creative journey and discovering the joy of creating personalized home decor. We hope that this article has provided you with the knowledge and inspiration to continue exploring new ways to showcase your cherished memories through custom picture pillowcases.
So go ahead, embrace your creativity, and enjoy the beauty and warmth that your custom picture pillowcase brings to your home!
Frequently Asked Questions about How To Create A Custom Picture Pillowcase
Was this page helpful?
At Storables.com, we guarantee accurate and reliable information. Our content, validated by Expert Board Contributors, is crafted following stringent Editorial Policies. We're committed to providing you with well-researched, expert-backed insights for all your informational needs.


0 thoughts on “How To Create A Custom Picture Pillowcase”