
Articles
How To Draw A Light Bulb
Modified: May 6, 2024
Learn step-by-step techniques and tips on drawing a light bulb with our informative articles. Perfect for beginners and art enthusiasts alike.
(Many of the links in this article redirect to a specific reviewed product. Your purchase of these products through affiliate links helps to generate commission for Storables.com, at no extra cost. Learn more)
Introduction
Have you ever wanted to learn how to draw a light bulb? Drawing a light bulb can be a fun and creative activity that allows you to showcase your artistic skills. Whether you are a beginner or have some drawing experience, this step-by-step guide will help you create a realistic and detailed representation of a light bulb.
Light bulbs are not only functional but also symbolize ideas, innovation, and creativity. By learning how to draw a light bulb, you can capture the essence of these concepts in your artwork. So grab your drawing materials and let’s get started on this illuminating journey!
Key Takeaways:
- Unleash Your Creativity: Learn how to draw a realistic light bulb and express your artistic skills. Capture the essence of ideas, innovation, and creativity through this illuminating drawing journey.
- Master the Art of Detail: From sketching the outline to adding shading and highlights, learn the step-by-step process to create a detailed and lifelike representation of a light bulb. Let your creativity shine!
Read more: How To Light A Light Bulb With A Potato
Materials Needed
Before we begin, let’s gather all the materials you will need to draw a light bulb:
- Drawing paper or sketchbook
- Pencil (preferably with a range of hardness, such as HB, 2B, 4B)
- Eraser
- Sharpener
- Ruler
- Black pen or fine-tip marker (optional for inking)
- Colored pencils or markers (optional for coloring)
Make sure to choose high-quality materials that suit your preferences and drawing style. Having all the necessary supplies at hand will ensure a smooth and enjoyable drawing process.
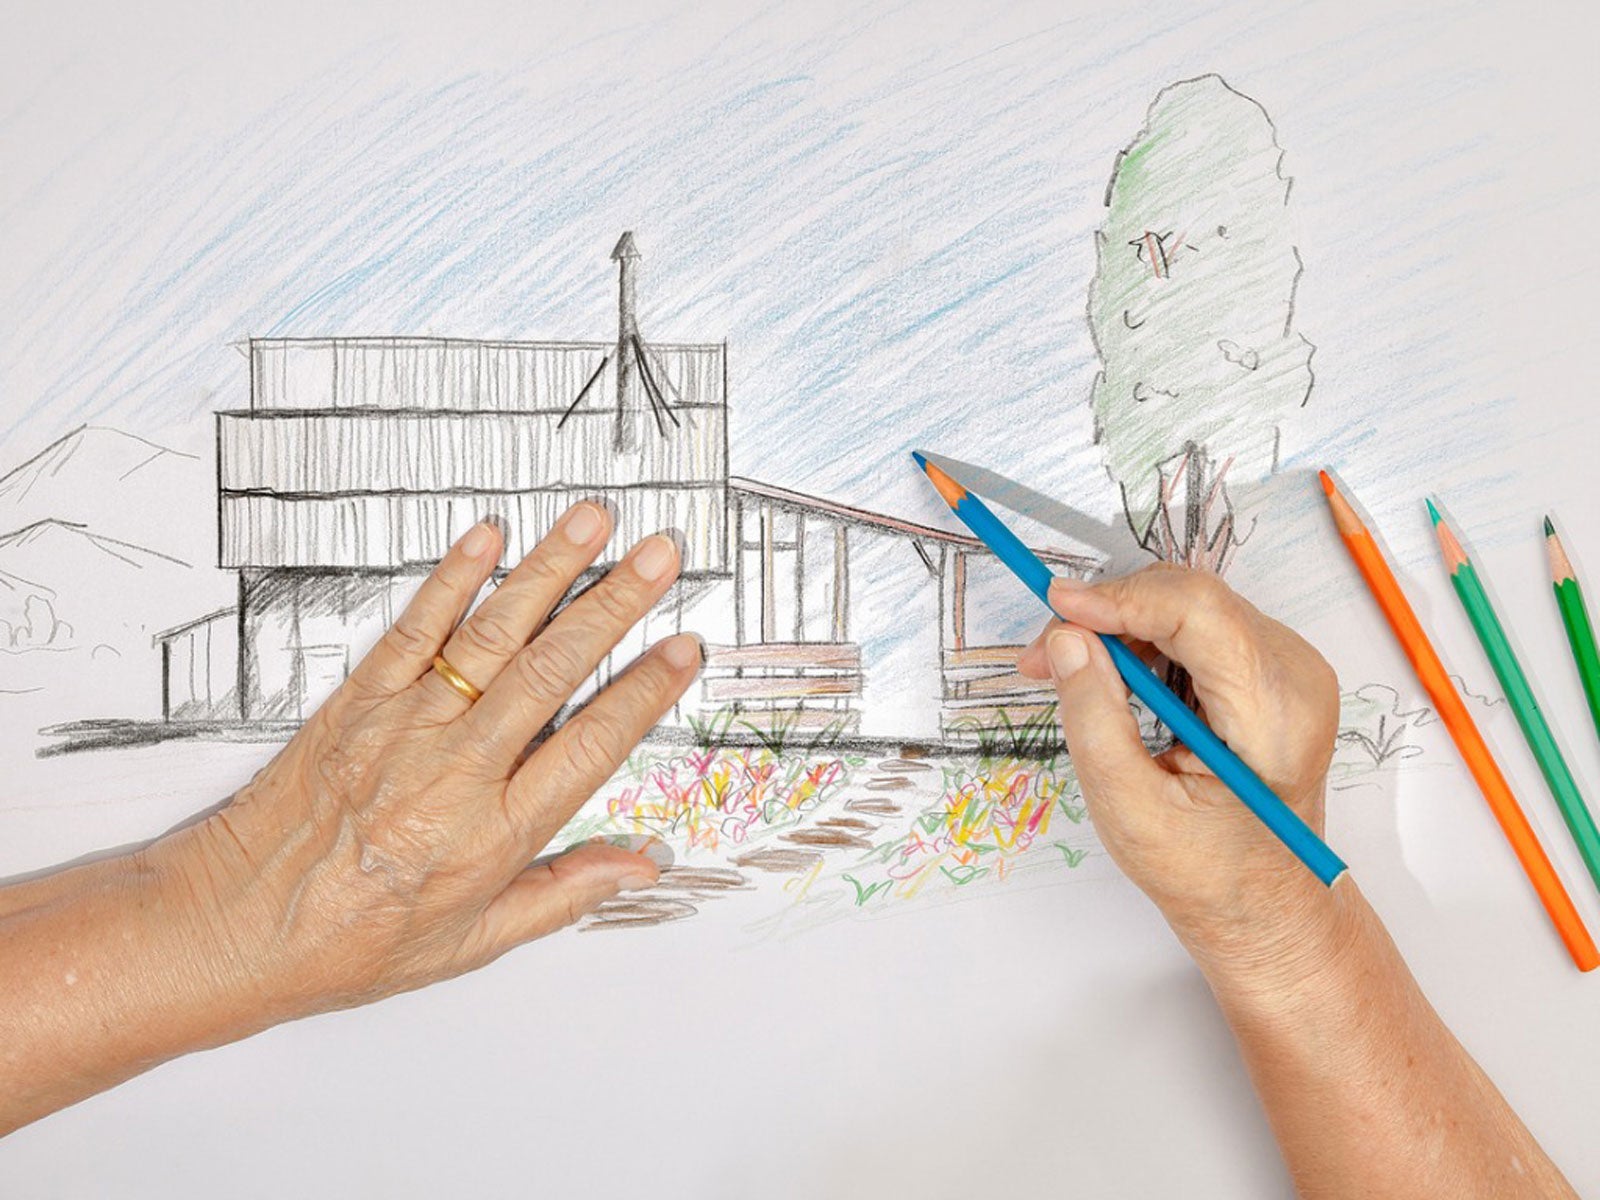
Step 1: Sketching the Outline
Start by drawing a light outline of the light bulb. Begin with a light pencil stroke to create the basic shape. Keep in mind that light bulbs come in different sizes and shapes, so you have the freedom to make yours unique.
First, draw a slightly elongated oval shape to represent the overall shape of the light bulb. This will serve as a guide for the rest of the drawing. Next, add a slightly curved line at the bottom of the oval to indicate the screw base of the bulb.
Once you have the basic outline, go back and refine it, adjusting the curves and proportions as needed. The outline should be light and easily erasable, as it will serve as a guideline for the more detailed steps to come.
Remember, don’t worry too much about perfection at this stage. It’s okay to make adjustments as you go along. The key is to establish a solid foundation for the rest of the drawing.
Take your time with this step to ensure that you are satisfied with the shape and proportions of your light bulb outline. Once you are, you can move on to the next step: drawing the filament.
Step 2: Drawing the Filament
Now it’s time to bring some light to your light bulb by drawing the filament inside. The filament is the glowing wire that emits light when the bulb is illuminated.
Start by drawing a curved line inside the bulb, following the outline you created in the previous step. This line represents the primary curve of the filament. Keep in mind that the filament is often coiled or twisted, so you can add some subtle bends or curves to make it more realistic.
Next, add smaller curved lines that connect to the primary curve. These lines represent the individual coils or segments of the filament. Make sure they follow the shape of the primary curve and vary in size and spacing. This will give your filament a more intricate and detailed look.
Take your time and focus on the details, as they contribute to the overall realism of the drawing. Use light and thin lines to create the filament, mimicking the delicate nature of the wire. Remember to keep the lines smooth and flowing.
Once you are satisfied with the filament, you can move on to the next step: adding the glass bulb.
Step 3: Adding the Glass Bulb
In this step, we will add the transparent glass bulb that surrounds the filament and protects it. The glass bulb is a defining feature of a light bulb and adds depth and dimension to your drawing.
Begin by carefully outlining the shape of the bulb around the filament. The shape should follow the general contour of the outline you drew in the first step, but with a slightly larger curve to indicate the thickness of the glass.
Next, add a few subtle lines within the bulb to represent the curved surface and reflections. These lines should follow the general form of the glass and can be lighter or darker, depending on the desired effect. Be careful not to overdo it, as it’s important to maintain the transparent and translucent quality of the glass.
Once you have the basic shape of the glass bulb, you can add shading to create depth and realism. Shade the area opposite the light source, as it will appear darker. Use light and smooth strokes to gradually build up the shading, creating a smooth transition from light to dark.
Keep in mind that glass is reflective, so you can include subtle highlights or reflections to enhance the realism of the bulb. Use a white pencil or eraser to gently lift off some graphite in small areas to create these highlights.
Take your time with this step to ensure that the glass bulb looks transparent and realistic. Once you are satisfied with the glass bulb, you can move on to the next step: adding shading and highlights to the overall drawing.
When drawing a light bulb, start by sketching the basic shape of the bulb and the filament inside. Then add in the details such as the screw base and any additional elements like a glow or reflection.
Read more: How To Store Light Bulbs
Step 4: Shading and Highlights
Shading and highlighting play a crucial role in adding depth and dimension to your light bulb drawing. In this step, we will focus on shading the different elements of the bulb while also adding highlights to create a more realistic effect.
Start by identifying the main light source in your drawing. This will determine where the shadows and highlights will fall. Typically, the light source is positioned above the light bulb, so the bottom and sides will be in shadow.
Using your pencil, shade the areas that are away from the light source, such as the bottom and sides of the bulb. Apply a light layer of graphite and gradually build up the darkness by adding more layers. Use a blending tool or your finger to smudge and blend the shading, creating a smooth transition from light to dark.
Next, focus on adding highlights to the areas that are directly facing the light source, such as the top and front of the bulb. Use an eraser to carefully lift off small sections of graphite to create these highlights. Start with gentle strokes and gradually build up the intensity until you achieve the desired effect.
Keep in mind that the highlights should be subtle and reflect the shape of the bulb. Follow the contours of the glass and filament to make them appear more realistic. Experiment with different erasers and techniques to achieve the desired level of brightness and realism.
Take your time with shading and highlighting to create a sense of depth and volume in your light bulb drawing. Once you are satisfied with the shading and highlights, you can move on to the next step: adding details and the screw base.
Step 5: Adding Details and Screw Base
Now that you have shaded and highlighted the main components of the light bulb, it’s time to add some details and the screw base, which will give your drawing a finished look.
Begin by adding small lines along the edges of the glass bulb to represent the subtle ridges or contours that are often found on light bulbs. These lines should follow the general shape of the glass and can be lighter or darker, depending on the shading and lighting.
Next, draw the screw base at the bottom of the light bulb. Start by placing a small circle or rectangle at the end of the curved line you drew in the first step. This will serve as the base for the screw. Then, add a series of small lines around the circle or rectangle to indicate the threads of the screw.
To add depth and realism to the screw base, shade the areas that are away from the light source, such as the top and sides of the base. Use light pencil strokes and gradually build up the darkness. Blend and smudge the shading to create a smooth transition.
Finally, you can add any additional details or embellishments to your light bulb drawing. This could include the brand logo or any other distinguishing features. Remember to keep the details subtle and in harmony with the overall drawing.
Once you are satisfied with the details and the screw base, you can move on to the final step: applying the finishing touches and erasing any guidelines.
Step 6: Final Touches and Erasing Guidelines
Congratulations! You’re almost done with your light bulb drawing. In this final step, we will focus on adding the finishing touches and erasing any remaining guidelines or stray pencil marks.
First, take a moment to evaluate your drawing and make any necessary adjustments. Check if any areas need additional shading, highlighting, or refining. Pay attention to the overall balance and composition of the drawing, making sure that all elements are visually appealing and harmonious.
Next, carefully erase any visible guidelines that may still be visible. Use a kneaded eraser or a soft vinyl eraser to gently remove the pencil marks without smudging or damaging the drawing. Take your time and erase with light, precise movements, making sure not to smudge or smudge the shading and details.
After erasing the guidelines, take a step back and observe your light bulb drawing as a whole. Make any final adjustments or additions to enhance the overall appearance and realism. This could include adding additional shading, refining details, or making any necessary touch-ups.
Once you are satisfied with the final touches, your light bulb drawing is complete! Take a moment to appreciate your creation and showcase your artwork to others. Consider signing and dating your drawing to mark its completion.
Remember, drawing is a skill that improves with practice, so don’t be discouraged if your first attempt doesn’t turn out exactly as you envisioned. The more you practice and explore different techniques, the better you will become at capturing the essence of a light bulb and other subjects in your drawings.
Keep exploring and experimenting, and most importantly, enjoy the creative process!
Conclusion
Congratulations on completing your journey of drawing a light bulb! Through the step-by-step process outlined in this guide, you have learned how to create a realistic and detailed representation of a light bulb. From sketching the outline to adding shading, highlights, and details, you have mastered the techniques necessary to bring your drawing to life.
Drawing a light bulb allows you to showcase your artistic skills while capturing the symbol of ideas, innovation, and creativity. By learning and practicing this skill, you have expanded your artistic repertoire and can create artwork that resonates with others.
Remember, drawing is not only about creating a realistic representation of an object, but also about expressing your own unique style and vision. Don’t be afraid to experiment, add your own personal touches, and let your creativity shine through.
Continue to hone your artistic skills by exploring other subjects and challenging yourself with different drawing techniques. The more you practice, the more you will improve and discover new ways to express yourself through your artwork.
So, grab your drawing materials, get inspired, and let your imagination illuminate your drawings. Drawing a light bulb is just the beginning of your artistic journey, so keep exploring and creating masterpieces that leave a lasting impression.
Good luck and happy drawing!
Now that you've mastered drawing a light bulb, why not bring that light into your home in style? Our next feature showcases stylish LED mirrors that aren't just functional but also serve as striking decor pieces. Whether you're applying makeup, styling your hair, or just want to brighten up your space, these mirrors combine utility with elegance, ensuring your interiors shine as brightly as your artistic skills. Don't miss out on finding the perfect addition to your well-lit home!
Frequently Asked Questions about How To Draw A Light Bulb
Was this page helpful?
At Storables.com, we guarantee accurate and reliable information. Our content, validated by Expert Board Contributors, is crafted following stringent Editorial Policies. We're committed to providing you with well-researched, expert-backed insights for all your informational needs.


0 thoughts on “How To Draw A Light Bulb”