Articles
How To Hang Christmas Lights From The Ceiling
Modified: October 19, 2024
Learn how to hang Christmas lights from the ceiling with our helpful articles. Find step-by-step guides, tips, and inspiration for a festive holiday display.
(Many of the links in this article redirect to a specific reviewed product. Your purchase of these products through affiliate links helps to generate commission for Storables.com, at no extra cost. Learn more)
Introduction
The holiday season is just around the corner, and one of the best ways to create a festive atmosphere in your home is by hanging Christmas lights from the ceiling. Whether you’re hosting a holiday party or simply want to add some cheer to your living space, stringing lights from the ceiling can instantly transform any room into a winter wonderland. In this article, we will guide you through the process of hanging Christmas lights from the ceiling, step by step.
Not only will you bring a warm and inviting ambiance to your home, but it’s also a great opportunity to let your creativity shine. With a little planning and some basic materials, you can create a stunning display that will impress your friends and family. So, grab your toolbox and let’s get started on this exciting holiday DIY project!
Key Takeaways:
- Transform any room into a winter wonderland by following our step-by-step guide to hanging Christmas lights from the ceiling. Create a stunning display that impresses friends and family while bringing warmth and cheer to your home.
- Ensure a visually stunning outcome by preparing the ceiling, gathering necessary supplies, and carefully positioning the lights. Test and adjust the lights to achieve a polished and captivating display that captures the spirit of the holiday season.
Read more: How To Hang Christmas Lights On Brick
Materials Needed
Before you begin hanging Christmas lights from the ceiling, you’ll need to gather a few essential materials. Here’s a list of what you’ll need to ensure a successful and safe installation:
- Christmas Lights: Choose a strand of lights that is long enough to cover the desired area. Opt for LED lights, as they consume less energy and produce less heat.
- Command Hooks: These adhesive hooks are designed specifically for temporary use and won’t damage your ceiling. Make sure to choose hooks that can hold the weight of your lights.
- Measuring Tape: Use a measuring tape to determine the length and height of the area where you plan to hang the lights.
- Ladder or Step Stool: Depending on the height of your ceiling, you may need a ladder or a step stool to reach the installation area.
- Extension Cord: If your lights are not long enough to reach the nearest power outlet, you’ll need an extension cord to bridge the gap.
- Optional: Zip Ties or Twist Ties – These can be helpful for securing the lights in place, especially if you’re creating intricate patterns.
Make sure to gather all of the necessary materials before you begin the installation process. This will prevent any unnecessary interruptions and ensure a smoother experience while hanging your Christmas lights from the ceiling.
Step 1: Measure and Plan
Before you start hanging the Christmas lights from the ceiling, it’s important to measure the area where you want to install them. Use a measuring tape to determine the length and height of the space. By doing this, you’ll have a better understanding of how many lights you’ll need and how to position them effectively.
Consider the overall theme or design you want to achieve. Will you be creating a straight line of lights or a more elaborate pattern? Visualize how the lights will enhance the ambiance of the room and plan accordingly.
When measuring, keep in mind the location of the nearest power outlet. You’ll want to make sure that the lights can reach the outlet without needing excessive extension cords. If necessary, rearrange furniture or decorations to accommodate the lights and ensure a neat and tidy appearance.
Once you have a clear plan in mind and the measurements in hand, it’s time to move on to the next step: gathering the supplies you’ll need for the installation process.
Step 2: Gather the Supplies
Now that you have a plan in place, it’s time to gather all the supplies you’ll need for hanging the Christmas lights from the ceiling. Here’s a checklist of the necessary items:
- Christmas lights: Choose lights that are suitable for indoor use and have a length that matches your measurements.
- Command hooks: These adhesive hooks are perfect for temporary installations and won’t cause any damage to your ceiling.
- Measuring tape: You’ll need a measuring tape to ensure accurate placement of the command hooks.
- Ladder or step stool: Depending on the height of your ceiling, you may need a ladder or step stool to reach the installation area.
- Extension cord: If your lights don’t reach the nearest power outlet, make sure to have an extension cord on hand.
- Optional: Zip ties or twist ties: These can be useful for securing the lights in place, especially if you’re creating intricate patterns.
Take the time to gather all the supplies before you start the installation process. This will ensure a smooth and uninterrupted workflow, allowing you to hang the lights efficiently and effectively.
Step 3: Prepare the Ceiling
Before you begin hanging your Christmas lights from the ceiling, it’s important to prepare the surface to ensure a secure and lasting installation. Follow these steps to prepare the ceiling:
- Clean the ceiling: Use a clean cloth or sponge and a mild cleaning solution to wipe down the area where you’ll be attaching the command hooks. Remove any dust, dirt, or greasy residue that may hinder the adhesive’s effectiveness.
- Allow the ceiling to dry: Make sure the ceiling is completely dry before moving on to the next step. This will enhance the adhesive’s grip on the surface.
- Mark the placement of the command hooks: With a pencil or marker, mark the spots where you want to attach the command hooks. Ensure that the marks align with your planned pattern or design.
By cleaning the ceiling and marking the placement of the command hooks, you’ll create an optimal surface for attaching the hooks securely. This will prevent them from falling or causing damage to the ceiling.
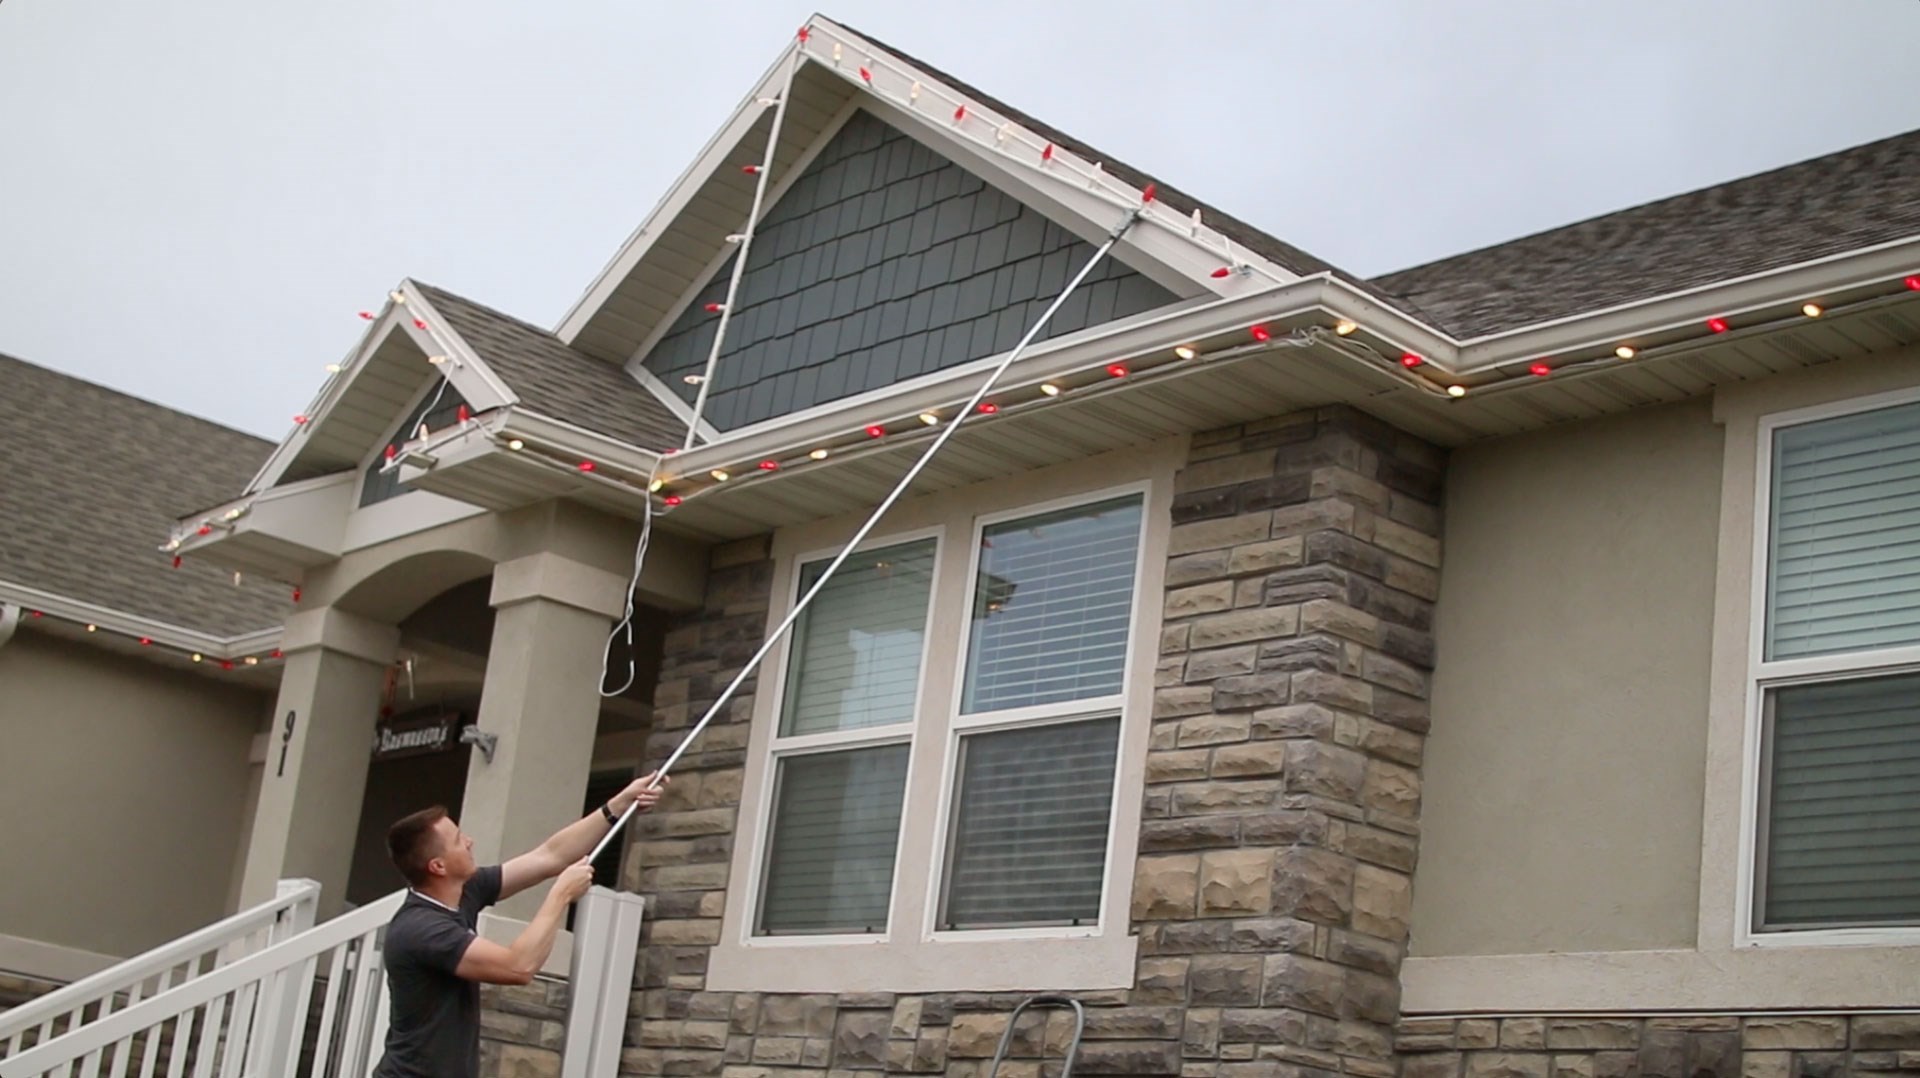
Use adhesive hooks or clips to hang Christmas lights from the ceiling. Plan your layout beforehand and measure the length of lights needed to avoid excess.
Read more: How To Hang Christmas Lights On Siding
Step 4: Attach Command Hooks
Now that the ceiling is prepared, it’s time to attach the command hooks where you marked the spots. Follow these steps to securely attach the hooks:
- Pick up a command hook and remove the backing from the adhesive strip. Ensure that the adhesive side is facing towards you.
- Position the hook at the marked spot on the ceiling and press firmly against the surface. Hold it in place for a few seconds to allow the adhesive to bond.
- Repeat the process for each marked spot, ensuring equal spacing between the hooks.
When attaching the command hooks, make sure to follow the instructions provided by the manufacturer. Some hooks may require additional steps or specific techniques for optimum adhesion.
It’s important to note that command hooks are designed for temporary use and can be easily removed without damaging the ceiling. If you need to reposition a hook or take them down after the holiday season, simply follow the removal instructions provided by the manufacturer.
By securely attaching the command hooks, you’ll have a stable foundation for hanging your Christmas lights from the ceiling.
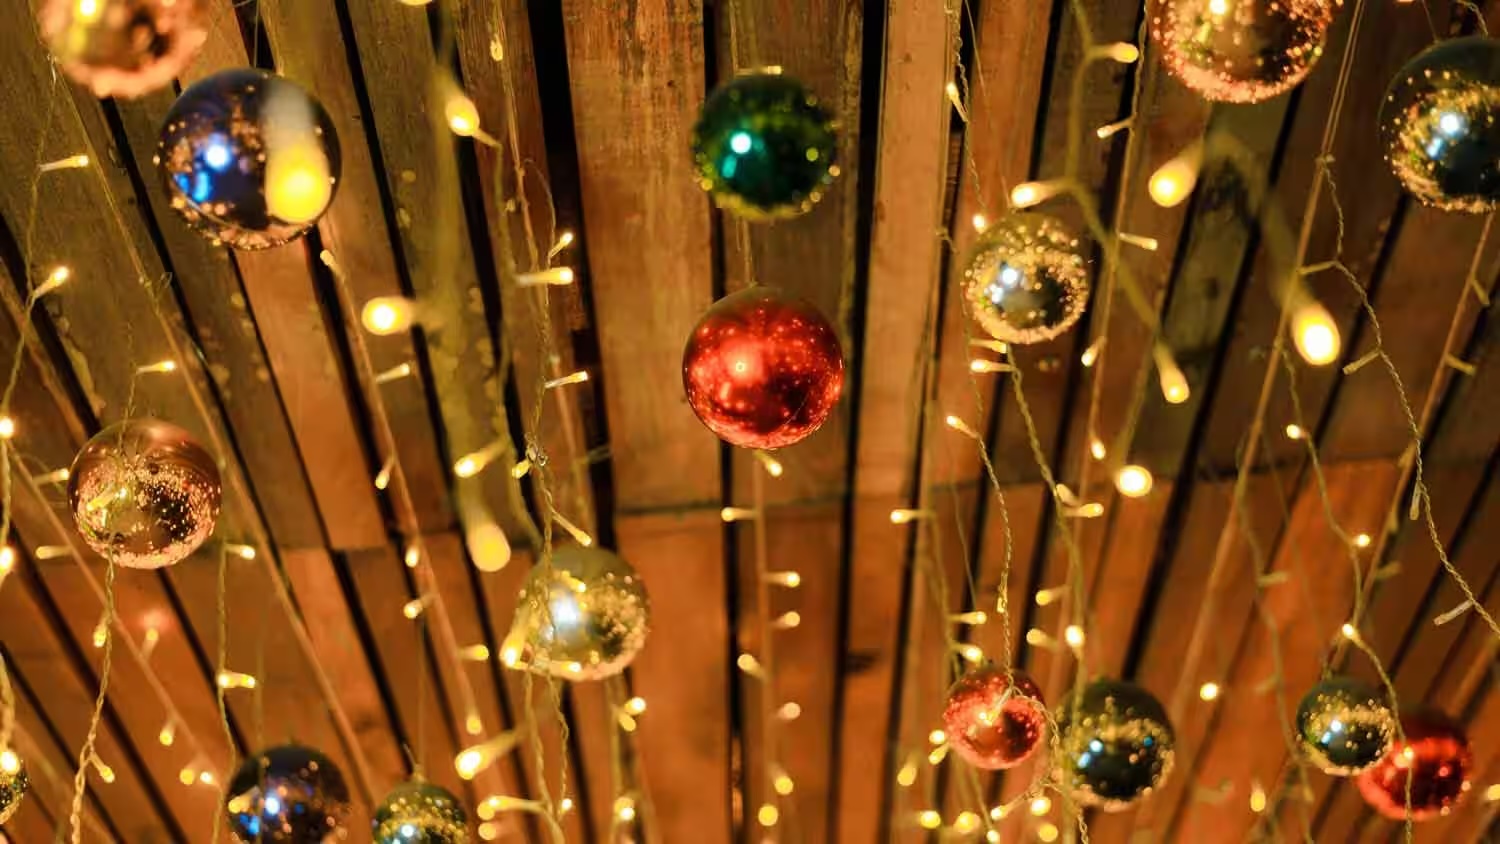
Step 5: Hang the Lights
With the command hooks in place, it’s time to hang the Christmas lights from the ceiling. Follow these steps to ensure a beautiful and balanced display:
- Starting at one end of the room, unravel the string of lights and carefully drape them across the ceiling. If you’re creating a straight line, ensure that the lights are evenly spaced and aligned with the command hooks.
- If you’re opting for a more elaborate pattern or design, strategically drape the lights in the desired arrangement. You can create curves, zig-zags, or even spell out words with the lights.
- As you hang the lights, step back occasionally to ensure that they are evenly distributed and visually appealing. Make adjustments as needed to achieve the desired look.
Keep in mind that the weight of the lights may cause them to sag over time. To prevent this, consider using small adhesive hooks or tape along the ceiling to provide additional support and keep the lights in place.
While hanging the lights, be mindful of any obstacles such as ceiling fans, light fixtures, or vents. Avoid wrapping the lights around these structures to prevent any damage or safety hazards.
Once you’ve hung all the lights and are happy with the overall appearance, move on to the next step: securing the lights in place.
Step 6: Secure the Lights
To ensure that your Christmas lights stay in place and maintain their desired arrangement, it’s important to secure them properly. Follow these steps to securely fasten the lights to the ceiling:
- If you’re using a straight line of lights, gently press each bulb into the hook on the command hooks. This will help keep the lights taut and prevent them from sagging.
- If you’re creating a pattern or design, use small adhesive hooks or tape to hold the lights in place along the ceiling. This will provide extra support and prevent any accidental drooping or movement.
- For added stability, consider using zip ties or twist ties to secure the lights at regular intervals. This is especially helpful if you’ve created intricate patterns or designs that require extra reinforcement.
Take your time when securing the lights and make sure they are aligned and evenly spaced. This will create a polished and professional-looking installation.
If you’re using tape to secure the lights, make sure to use a tape that is gentle on the ceiling surface and won’t leave any sticky residue once removed. Additionally, avoid using tape on painted surfaces to prevent any damage to the paint.
By properly securing the lights, you’ll ensure that they stay in place throughout the holiday season and maintain their intended design.
Step 7: Test and Adjust
Now that you’ve hung and secured the lights, it’s time to test their functionality and make any necessary adjustments. Follow these steps to ensure that your Christmas lights are perfect before showcasing them to friends and family:
- Plug in the lights and check if they all illuminate properly. If you notice any bulbs that are not working, replace them with new ones to maintain the continuity of the light display.
- Step back and take a look at the overall appearance of the lights. Make any adjustments if needed, such as straightening out any sagging sections or repositioning any lights that may be out of place.
While making adjustments, consider the overall aesthetic and balance of the lights. Ensure that they are evenly spaced and visually appealing. This is your opportunity to fine-tune the display and truly bring your vision to life.
Don’t forget to take some time to admire your handiwork and appreciate the warm glow that the Christmas lights bring to your space. Your hard work and attention to detail will surely create a magical and festive atmosphere for you and your loved ones to enjoy throughout the holiday season.
With the lights tested, adjusted, and shining brightly, it’s time to step back and admire your beautiful ceiling display. Congratulations on successfully hanging Christmas lights from the ceiling and creating a stunning holiday ambiance in your home!
Read more: How To Hang Christmas Lights To Stucco
Conclusion
Hanging Christmas lights from the ceiling is a delightful way to add a festive touch to your home during the holiday season. By following the step-by-step guide outlined in this article, you can create a beautiful and enchanting display that will bring joy and warmth to your space.
From measuring and planning to attaching command hooks, hanging the lights, and securing them in place, each step is essential for a successful installation. Taking the time to prepare the ceiling, gather the necessary supplies, and carefully position the lights will ensure a visually stunning outcome.
Remember to test the lights and make any necessary adjustments before showcasing your creation to family and friends. By addressing any faulty bulbs or making minor tweaks, you can achieve a polished and captivating display that will delight all who see it.
As you admire your handiwork, take a moment to appreciate the festive atmosphere you have created. The warm glow of the Christmas lights from the ceiling will create a cozy and magical ambiance that captures the spirit of the holiday season.
So, grab your materials, channel your creativity, and enjoy the process of hanging Christmas lights from the ceiling. Let your home shine with the warmth and joy of the holiday season, creating lasting memories for you and your loved ones.
Frequently Asked Questions about How To Hang Christmas Lights From The Ceiling
Was this page helpful?
At Storables.com, we guarantee accurate and reliable information. Our content, validated by Expert Board Contributors, is crafted following stringent Editorial Policies. We're committed to providing you with well-researched, expert-backed insights for all your informational needs.


0 thoughts on “How To Hang Christmas Lights From The Ceiling”