Articles
How To Hang Surfboard From The Ceiling
Modified: October 20, 2024
Learn how to hang a surfboard from the ceiling with these easy-to-follow articles. Maximize your space and keep your surfboard safe and secure.
(Many of the links in this article redirect to a specific reviewed product. Your purchase of these products through affiliate links helps to generate commission for Storables.com, at no extra cost. Learn more)
Introduction
Surfing is not just a sport; it’s a way of life. The feeling of gliding through the waves, the connection with nature, and the sense of freedom it brings are unparalleled. As a surfer, you know that your surfboard is more than just a piece of equipment. It’s your most treasured possession, encapsulating memories and adventures.
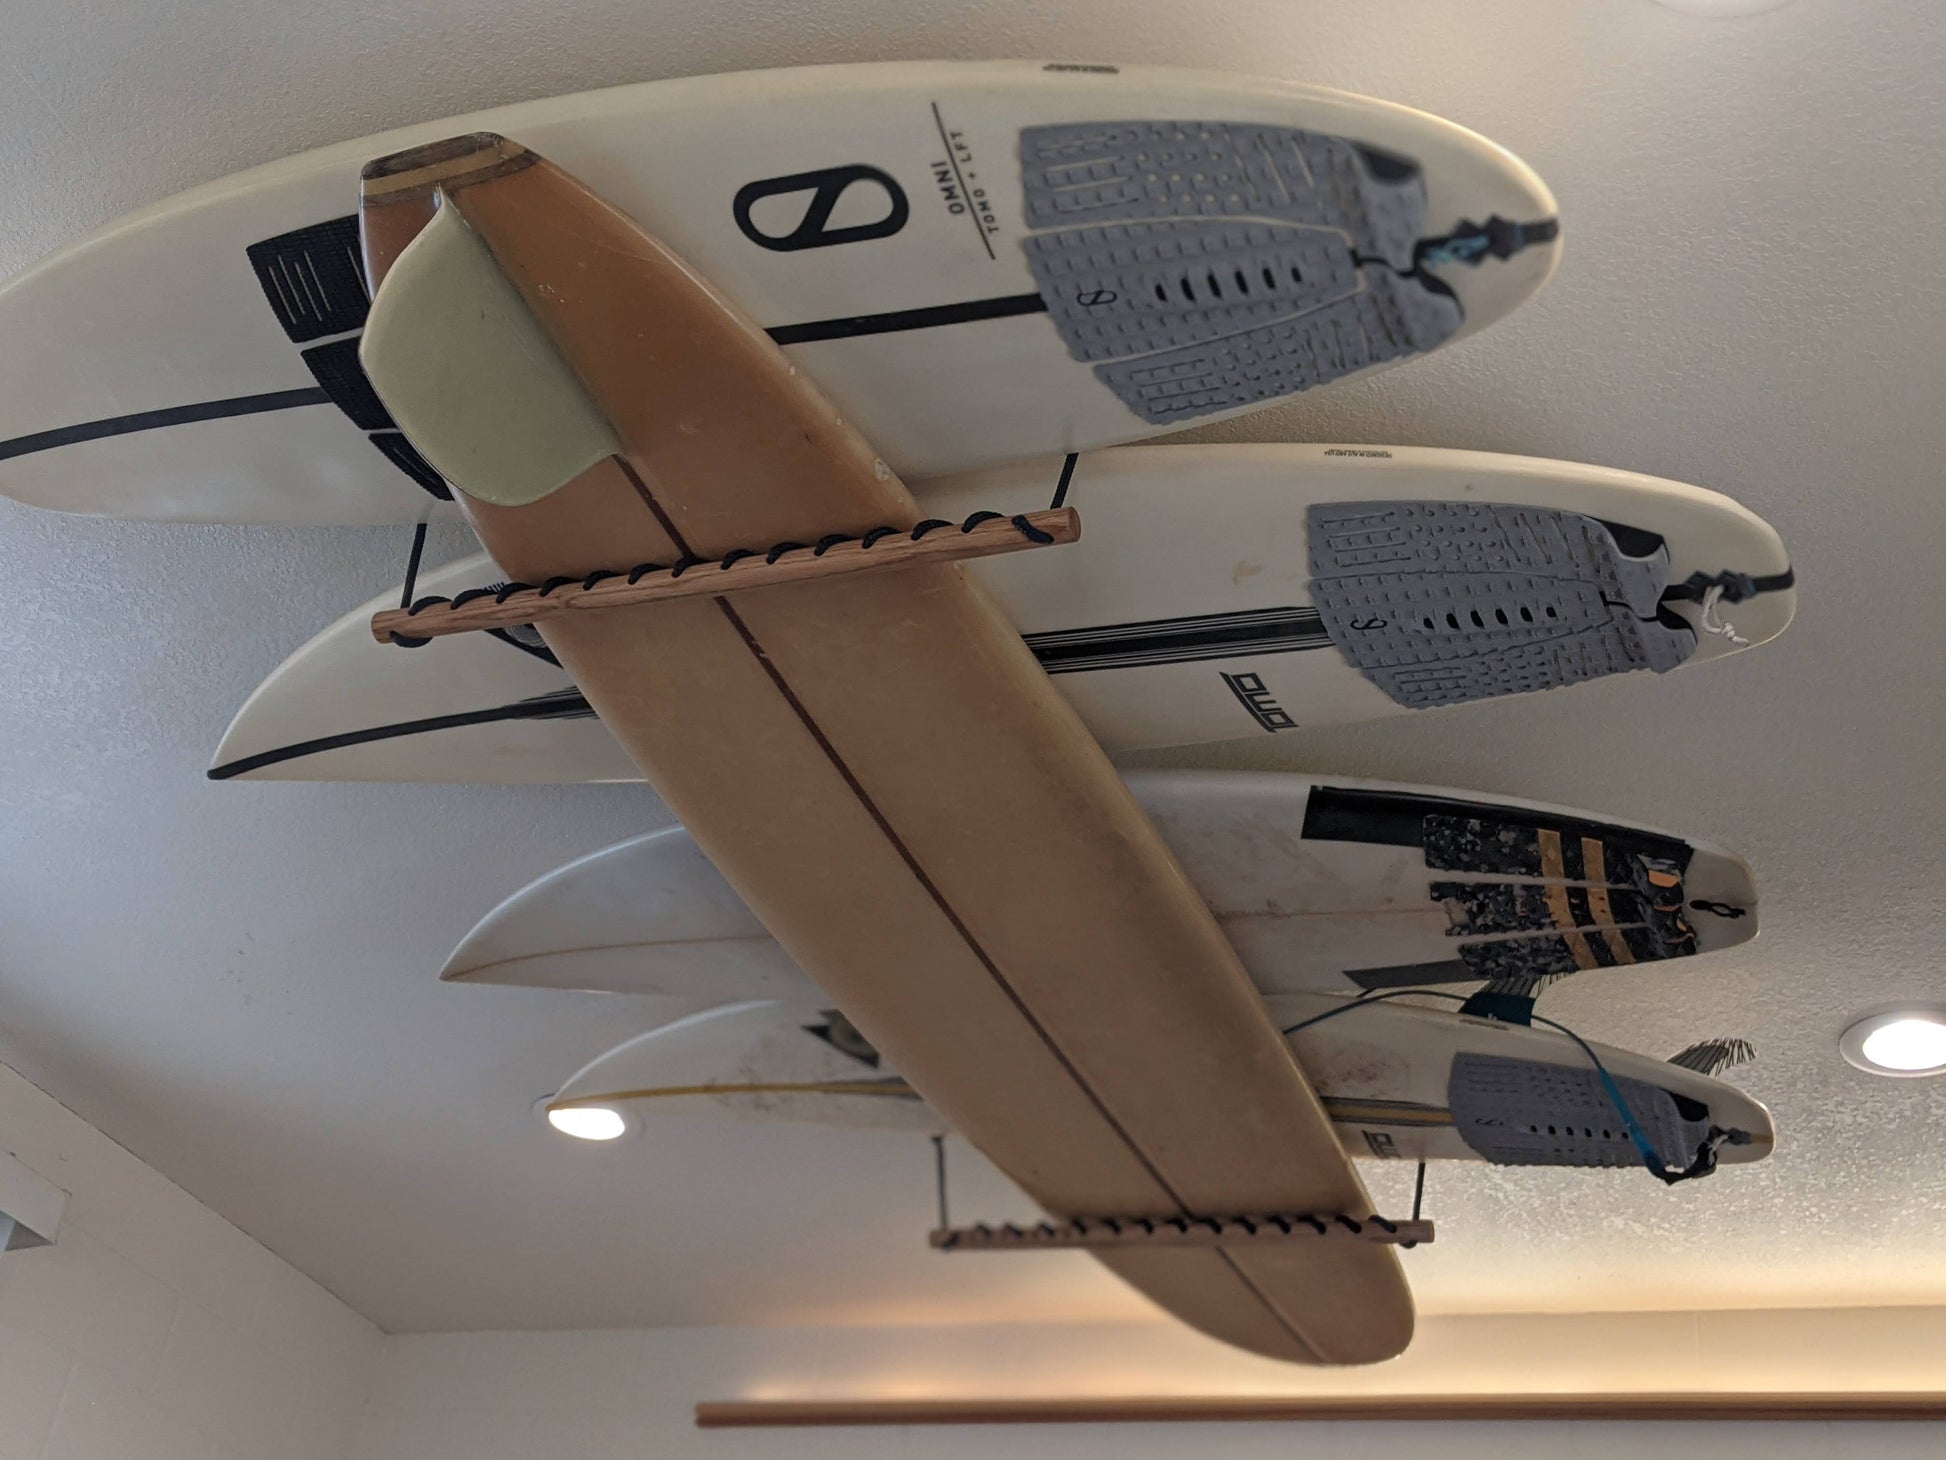
When you’re not out on the waves, it’s important to store your surfboard properly to ensure its longevity and keep it out of harm’s way. One popular method is hanging your surfboard from the ceiling. This not only saves space but also adds a unique and eye-catching element to your home or surf shop.
In this article, we will guide you step-by-step on how to hang your surfboard from the ceiling, ensuring it is secure and well-displayed. By following these instructions, you’ll have your surfboard showcased in no time, ready to inspire and remind you of your passion for riding the waves.
Key Takeaways:
- Securely hang your surfboard from the ceiling by following step-by-step instructions, ensuring a visually appealing display while keeping your treasured possession out of harm’s way.
- Create a stunning and functional display for your surfboard, showcasing your love for surfing and turning it into a captivating piece of art that symbolizes your adventurous spirit.
Read more: How To Hang Unistrut From The Ceiling
Materials Needed
Before you begin, gather the following materials:
- A sturdy ladder or step stool
- Tape measure
- Pencil or marker
- Stud finder
- Drill
- Pilot drill bit
- Mounting hooks or brackets
- Screwdriver
- Anchors (if needed)
- Surfboard ceiling rack or straps
Make sure you have all these materials on hand before you get started. Having everything ready will make the process smoother and more efficient.
Step 1: Determine the ideal location
The first step in hanging your surfboard from the ceiling is to determine the ideal location for display. Consider the following factors:
- Space: Choose a location that has enough vertical clearance to accommodate the length of your surfboard without it touching the floor or any other objects. Make sure there’s also enough space around the surfboard for easy access.
- Visibility: Select a spot where your surfboard can be easily seen and admired. It could be in your living room, bedroom, garage, or even a dedicated surf room.
- Stability: Look for a ceiling beam or stud where you can securely mount the surfboard hooks or brackets. Avoid areas with weak or unsupported ceilings, as they may not be able to handle the weight of the surfboard.
Use a ladder or step stool to get a closer look at different areas of your ceiling. Use a tape measure to ensure there’s enough clearance for your surfboard. Mark the potential location with a pencil or marker.
If you’re unsure about the stability of your ceiling or are unable to find a suitable spot, it’s advisable to consult a professional or use an alternative mounting method that doesn’t require drilling into your ceiling.
Once you’ve determined the ideal location, you’re ready to move on to the next step: preparing the mounting hardware.
Step 2: Prepare the mounting hardware
Now that you’ve identified the ideal location, it’s time to prepare the mounting hardware for hanging your surfboard from the ceiling. Follow these steps:
- Find ceiling beams or studs: Use a stud finder to locate the ceiling beams or studs where you’ll be mounting the hooks or brackets. These are the strong structures that will provide the necessary support for your surfboard.
- Choose the right hooks or brackets: Select mounting hooks or brackets that are specifically designed for surfboards. These are typically made of durable materials like steel or stainless steel to ensure they can handle the weight of the surfboard. Consider the weight of your surfboard and choose hooks or brackets with an appropriate weight capacity.
- Measure and mark the mounting points: Measure the distance between the hooks or brackets and mark the corresponding spots on the ceiling. Use a tape measure and a pencil or marker for accurate measurements.
- Consider safety and aesthetics: Before proceeding, make sure the hooks or brackets are positioned in a way that ensures the surfboard will be securely mounted and displayed in a visually pleasing manner. Adjust the positioning if necessary.
Preparing the mounting hardware is an essential step to ensure a secure and attractive display for your surfboard. With the hardware ready, you can move on to the next step of marking the ceiling for mounting.
Step 3: Mark the ceiling for mounting
With your mounting hardware prepared, it’s time to mark the ceiling for mounting your surfboard. This step will ensure precise placement and alignment of the hooks or brackets. Follow these instructions:
- Position the ladder or step stool: Place the ladder or step stool beneath the marked location for easy access to the ceiling.
- Hold the hooks or brackets in place: Hold the hooks or brackets against the ceiling, aligning them with the marked spots. Make any necessary adjustments to ensure they are level.
- Use a pencil to mark the screw holes: Once the hooks or brackets are aligned, use a pencil or marker to mark the positions of the screw holes on the ceiling. These marks will serve as a guide for drilling the pilot holes.
- Double-check the positioning: Before proceeding to the next step, double-check the positioning of the hooks or brackets to ensure they are still level and aligned with the marked spots. This will help avoid any issues when drilling the pilot holes.
Taking the time to accurately mark the screw hole positions will make the installation process much smoother. It will also ensure that the hooks or brackets are properly aligned and securely mounted, providing a stable and visually appealing display for your surfboard.
Once you have marked the ceiling, you’re ready to move on to the next step: drilling pilot holes.
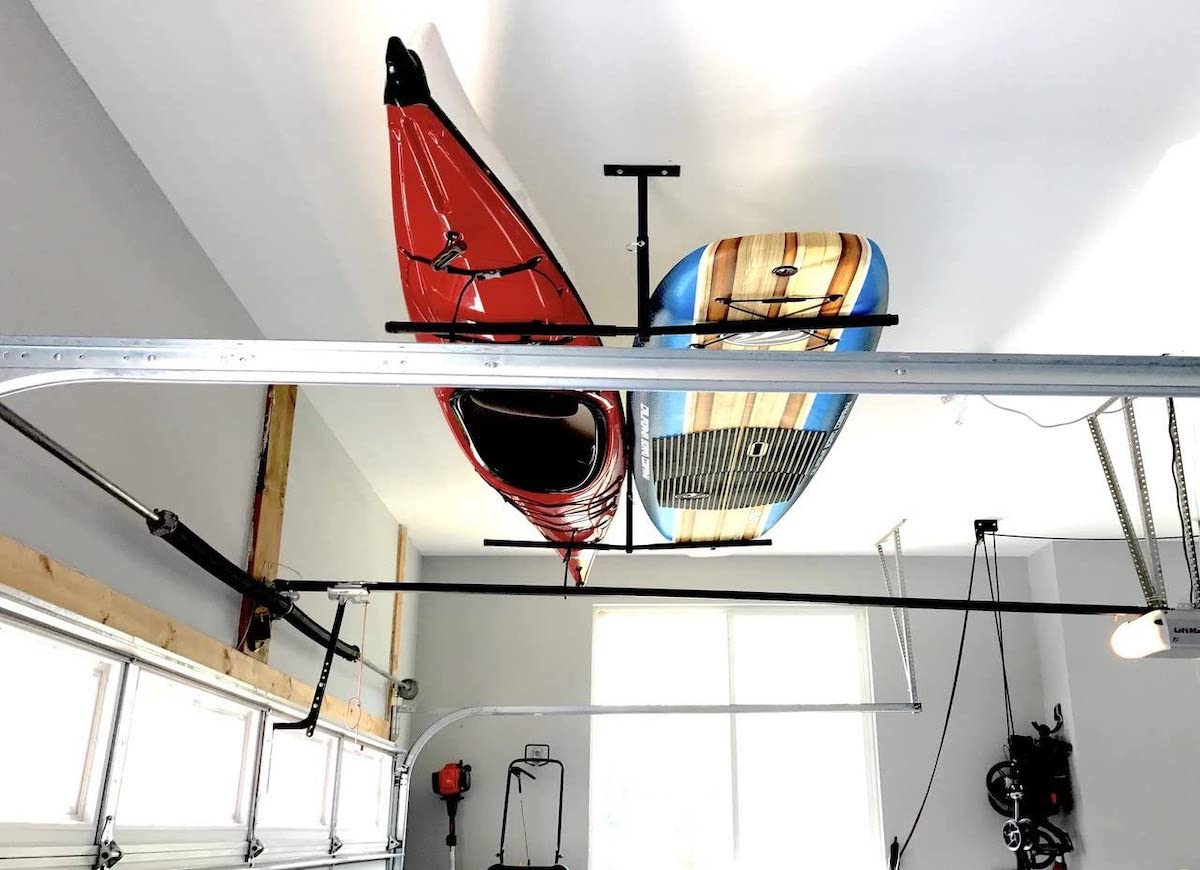
Use heavy-duty ceiling hooks and strong nylon straps to hang your surfboard from the ceiling. Make sure to secure the straps to the board’s fins for stability.
Read more: How To Hang Tablecloths From The Ceiling
Step 4: Drill pilot holes
Now that you have marked the positions for mounting your surfboard hooks or brackets, it’s time to drill pilot holes in the ceiling. This step will ensure that the screws go in smoothly and securely. Follow these instructions to drill pilot holes:
- Prepare your drill: Fit your drill with a pilot drill bit of an appropriate size. The size of the pilot drill bit should be slightly smaller than the screws that came with your hooks or brackets.
- Position the drill: Position the drill over the marked screw hole and hold it steady. Make sure the drill is perpendicular to the ceiling surface for accurate drilling.
- Start drilling: Gently apply pressure and start drilling into the marked spot. Begin with a slow speed to ensure better control and accuracy.
- Drill to the correct depth: Drill to a depth that is slightly shorter than the length of the screws. This will ensure that the screws can penetrate the ceiling beams or studs for proper support.
- Repeat for all marked spots: Repeat the drilling process for all the marked screw hole positions. Take your time and work methodically to ensure consistent and precise pilot holes.
By drilling pilot holes, you’re creating a guide for the screws to follow. This will prevent any splitting or damage to the ceiling material and ensure a secure and stable installation. Once you have completed drilling the pilot holes, you’re ready to move on to the next step: installing the mounting hooks or brackets.
Step 5: Install the mounting hooks or brackets
With the pilot holes drilled, it’s time to install the mounting hooks or brackets to securely hang your surfboard from the ceiling. Follow these steps to ensure proper installation:
- Align the hooks or brackets: Place the hooks or brackets over the drilled pilot holes, aligning them with the screw holes.
- Insert the screws: Insert the screws provided with the hooks or brackets into the screw holes. Start by hand to ensure they are aligned properly.
- Tighten with a screwdriver: Using a screwdriver, tighten the screws into the pilot holes. Make sure not to overtighten, as this could damage the ceiling or compromise the integrity of the hooks or brackets.
- Double-check the stability: Once all the screws are securely tightened, give the hooks or brackets a gentle tug to ensure they are firmly in place and can support the weight of your surfboard.
It’s crucial to install the hooks or brackets securely to prevent any accidents or damage to your surfboard. Take your time to align them properly and use the appropriate tools to tighten the screws. This will ensure a stable and safe installation.
Now that the hooks or brackets are securely installed, you’re ready to move on to the next step: hanging your surfboard from the ceiling.
Step 6: Hang the surfboard from the ceiling
With the mounting hooks or brackets securely installed, it’s time to hang your surfboard from the ceiling. Follow these steps to ensure a smooth and safe hanging process:
- Prepare the surfboard: Before hanging the surfboard, make sure it is clean and free from any sand or debris. This will help maintain its condition and prevent any scratching or damage during the hanging process.
- Attach the surfboard rack or straps (if applicable): If you’re using a surfboard rack or straps to hang your board, follow the manufacturer’s instructions to attach them securely to the hooks or brackets. Make sure the rack or straps are properly aligned and can support the weight of your surfboard.
- Position the surfboard: Carefully position the surfboard against the hooks or straps, ensuring it is centered and balanced. Take your time to find the perfect placement before lifting the board.
- Lift and hang: With a firm grip on the surfboard, lift it slightly off the ground and position it onto the hooks or straps. Take caution and lift with your legs to avoid strain or injury. Ensure that the surfboard is securely supported by the hooks or straps.
- Adjust the position: Step back and assess the positioning of the surfboard. Make any necessary adjustments to ensure it is level and visually appealing. Take your time to find the perfect angle and placement for display.
By following these steps, you’ll have your surfboard securely hanging from the ceiling, ready to be admired and showcased. Take a moment to appreciate your handiwork, and get ready to secure the surfboard in place in the next step.
Step 7: Secure the surfboard in place
Now that your surfboard is hanging from the ceiling, it’s important to take a few extra steps to ensure it is securely in place. Follow these instructions to properly secure your surfboard:
- Use additional straps or bungee cords (optional): If you want extra security, consider using additional straps or bungee cords to further secure the surfboard to the hooks or straps. This can provide added peace of mind, especially if you live in an area prone to earthquakes or if the surfboard will be exposed to high levels of movement.
- Check the stability: Give the surfboard a gentle push to ensure it is securely held by the hooks or straps. It should not wobble or easily come off the mounting hardware. If you notice any instability, double-check the installation of the hooks or brackets, and make any necessary adjustments.
- Regularly inspect the setup: Periodically check the hooks or straps, as well as the surfboard, to ensure everything remains secure over time. This is especially important if the surfboard is regularly moved or if any changes are made to the ceiling structure or hardware.
By taking these extra precautions, you can have peace of mind knowing that your surfboard is safely and securely displayed from the ceiling. Regularly inspecting and maintaining the setup will help prolong the life of your surfboard and ensure its continued safety.
Congratulations! You have successfully hung your surfboard from the ceiling, showcasing it in a unique and visually appealing way. Now, you can enjoy the beauty of your surfboard even when you’re not riding the waves.
Read more: How To Hang Swing From The Ceiling
Conclusion
Hanging your surfboard from the ceiling is a fantastic way to showcase your passion for surfing while also saving space. By following these step-by-step instructions, you can safely and securely display your surfboard in a visually appealing manner. Not only does this keep your surfboard out of harm’s way, but it also adds a touch of style and personality to your living space or surf shop.
Remember to carefully choose the ideal location for hanging your surfboard, ensuring there is enough space and stability. Prepare the mounting hardware by finding ceiling beams or studs and selecting appropriate hooks or brackets. Mark the ceiling for drilling pilot holes and install the hooks or brackets securely.
Once the mounting hardware is in place, you can hang your surfboard from the ceiling. Take care to position the surfboard properly, lift it with caution, and adjust the placement until you are satisfied with the display. Finally, secure the surfboard in place, taking additional precautions if necessary and regularly inspecting the setup for stability.
By following these steps, you can create a stunning and functional display for your surfboard, turning it into a captivating piece of art. Take pride in showcasing your love for surfing and let your surfboard become a symbol of your adventurous spirit.
Now, sit back, admire your handiwork, and let your surfboard serve as a constant reminder of the thrill and joy that awaits you on the waves.
Frequently Asked Questions about How To Hang Surfboard From The Ceiling
Was this page helpful?
At Storables.com, we guarantee accurate and reliable information. Our content, validated by Expert Board Contributors, is crafted following stringent Editorial Policies. We're committed to providing you with well-researched, expert-backed insights for all your informational needs.


0 thoughts on “How To Hang Surfboard From The Ceiling”