
Articles
How To Hang A Chandelier From The Ceiling
Modified: August 28, 2024
Learn how to hang a chandelier from the ceiling with our informative articles. Expert tips and step-by-step instructions ensure a successful installation.
(Many of the links in this article redirect to a specific reviewed product. Your purchase of these products through affiliate links helps to generate commission for Storables.com, at no extra cost. Learn more)
Introduction
Adding a chandelier to your home can instantly elevate the style and ambiance of any room. Whether you’re looking to create a dramatic statement piece or simply want to brighten up your space, hanging a chandelier from the ceiling can make a significant impact. While the task may seem daunting at first, with the right tools and a little know-how, you can successfully install a chandelier that will become the centerpiece of your room.
In this guide, we will walk you through each step of the process, from gathering the necessary tools and materials to hanging and securing your chandelier. We’ll also provide tips and insights along the way to ensure a successful installation. So roll up your sleeves and get ready to transform your space with a stunning chandelier!
Key Takeaways:
- Elevate your space with a stunning chandelier by following a step-by-step guide to confidently and precisely install this transformative lighting fixture. Safety, precision, and creativity are key to success.
- Transform any room with the elegance and sophistication of a chandelier. From gathering tools to testing functionality, this guide provides the knowledge and skills to bring captivating beauty into your home.
Read more: How To Hang A Chandelier On A Sloped Ceiling
Step 1: Gather the necessary tools and materials
Before you begin the installation process, it’s essential to gather all the tools and materials you’ll need. Having everything on hand will not only make the process smoother but also save you time and prevent any interruptions. Here’s a list of the essential tools and materials you’ll need:
- Chandelier: Choose a chandelier that fits your style and complements the room’s decor. Make sure it comes with all the necessary components, including a mounting bracket, chain, and canopy.
- Step ladder: A sturdy step ladder will provide the necessary height and stability to reach the ceiling and install the chandelier.
- Screwdriver set: A set of screwdrivers, both flathead and Phillips, will be needed to loosen and tighten screws.
- Wire strippers: Wire strippers are essential for removing the insulation from the electrical wires, ensuring a clean and secure connection.
- Wire nuts: Wire nuts are used to connect and secure the electrical wires together.
- Voltage tester: A voltage tester is crucial for verifying that the power is turned off before beginning any work on the electrical connections.
- Electrical tape: Electrical tape helps insulate and protect the electrical connections.
- Ceiling medallion (optional): If you want to add a decorative touch, a ceiling medallion can be installed between the chandelier and the ceiling.
- Stud finder: A stud finder will help you locate the ceiling joists for secure installation.
- Drill and drill bits: A drill will be needed to create pilot holes and secure the support bracket.
- Anchors and screws: Depending on your ceiling type, you may need anchors and screws to secure the support bracket to the ceiling.
Ensure that you have all the necessary tools and materials before starting the installation process. This will save you time and make the process much more efficient. Now that you have everything ready, you’re prepared to move on to the next step: turning off the power.
Step 2: Turn off the power
Safety should always be a top priority when working with electrical installations. Before you begin any work on the chandelier, it’s important to turn off the power to the room.
Start by locating the circuit breaker or fuse box. Depending on your electrical system, you may have a dedicated circuit for the light fixture or a main circuit that powers multiple areas of your home.
If you have a dedicated circuit, simply locate the corresponding breaker and switch it to the “off” position. If you have a main circuit, you’ll need to identify the breaker that controls the specific part of the house where the chandelier is located.
To ensure that the power is truly off, use a voltage tester. Carefully touch the tester to the exposed wires or the chandelier’s electrical connections. If the tester doesn’t indicate any voltage, it’s safe to proceed with the installation. However, if there is voltage detected, double-check the breaker or fuse and try again.
Remember, working with live electrical connections can be extremely dangerous. If you are unsure or uncomfortable working with electrical systems, it’s recommended to hire a licensed electrician to ensure a safe and proper installation.
With the power turned off and confirmed, you can now move on to the next step: measuring and marking the hanging location.
Step 3: Measure and mark the hanging location
Properly positioning your chandelier is crucial for achieving the desired aesthetic and ensuring safe installation. Before you begin the actual hanging process, take the time to measure and mark the hanging location on the ceiling.
First, decide on the height at which you want your chandelier to hang. Consider the dimensions of the room, the furniture below, and any other factors that may affect the chandelier’s placement. Typically, chandeliers are hung around 30-36 inches above a table or surface.
Once you have determined the height, it’s time to measure. Measure the distance from the ceiling down to where the bottom of the chandelier will hang. Mark this measurement on the ceiling using a pencil or chalk. This will serve as your reference point for installation.
Next, if your chandelier has multiple arms or branches, you may want to mark the center point of the chandelier on the ceiling using a measuring tape and a pencil. This will help you align the chandelier accurately during installation.
If you plan to install a ceiling medallion, now is the time to mark its position on the ceiling as well. Measure the diameter of the medallion and use a pencil to mark its center point on the ceiling.
Finally, double-check your measurements and marks to ensure accuracy. Adjust as necessary to perfectly align your chandelier with your vision.
With the hanging location properly measured and marked, you’re ready to move on to the next step: locating and reinforcing the ceiling joist.
Step 4: Locate and reinforce the ceiling joist
Before hanging a chandelier, it’s essential to ensure that you have a secure and stable support structure. Most chandeliers are heavy and require proper reinforcement to prevent accidents or damage to your ceiling. Follow these steps to locate and reinforce the ceiling joist:
- Start by using a stud finder to locate the nearby ceiling joists. Slide the stud finder along the ceiling surface until you find the location where it indicates the presence of a joist.
- Once you’ve located a joist, mark its position on the ceiling using a pencil or masking tape.
- If your chandelier comes with a mounting bracket that spans two joists, position the bracket over the marked joist and mark the screw holes on the ceiling. If the bracket only spans one joist, center it over the marked joist.
- Next, using a drill and an appropriately sized drill bit, create pilot holes at the marked screw hole locations. This will make it easier to drive in the screws and prevent any potential splitting of the wood.
- If your chandelier does not come with a mounting bracket or needs additional reinforcement, you can install a piece of wood blocking between the joists. Measure and cut a piece of 2×4 or similar-sized lumber to fit securely between the joists at the marked location. Secure the blocking to the joists using screws.
Reinforcing the ceiling joist or installing wood blocking provides a strong and sturdy foundation for your chandelier. It ensures that the weight of the chandelier is evenly distributed and reduces the risk of the fixture coming loose or causing damage to the ceiling.
With the ceiling joist located and reinforced, you’re ready to move on to the next step: installing a ceiling medallion (optional).
Read more: How To Hang Unistrut From The Ceiling
Step 5: Install a ceiling medallion (optional)
A ceiling medallion can add an extra touch of elegance and visual appeal to your chandelier installation. While it is an optional step, installing a ceiling medallion can enhance the aesthetic impact of your chandelier. Here’s how you can install a ceiling medallion:
- Choose a ceiling medallion that complements the style and size of your chandelier. Ensure that the diameter of the medallion is suitable for the size of your chandelier and the available ceiling space.
- Prepare the area by cleaning the ceiling surface and removing any dust or debris.
- Hold the medallion against the ceiling, aligning it with the marked center point.
- Using a pencil, trace the outline of the medallion onto the ceiling.
- Apply a suitable adhesive, such as construction adhesive or a strong adhesive caulk, to the back of the medallion.
- Position the medallion carefully and press it firmly against the ceiling, following the traced outline.
- Hold the medallion in place for a few moments to allow the adhesive to set.
- Secure the medallion further by driving screws into the ceiling through pre-drilled holes in the medallion. Ensure that the screws go into the ceiling joist or wood blocking for maximum stability.
- Wipe away any excess adhesive or caulking that may have squeezed out during installation.
Installing a ceiling medallion not only adds a decorative element but also provides additional support for the chandelier. It distributes the weight of the fixture and helps to protect the ceiling surface.
With the optional installation of a ceiling medallion complete, you’re now ready to move on to the next step: installing a support bracket for the chandelier.
When hanging a chandelier from the ceiling, always make sure to use a secure ceiling hook or mounting bracket that can support the weight of the fixture. It’s important to follow the manufacturer’s instructions and use the appropriate hardware for installation.
Step 6: Install a support bracket
Installing a support bracket is an important step in hanging a chandelier. The support bracket provides a stable anchor point for the chandelier and ensures its secure attachment to the ceiling. Follow these steps to install a support bracket:
- Refer to the manufacturer’s instructions for your specific chandelier to determine the appropriate location and method for installing the support bracket.
- Hold the support bracket against the ceiling, aligning it with the marked screw holes or designated installation area. Ensure that the bracket is positioned over the reinforced ceiling joist or wood blocking.
- Using a pencil or marker, mark the screw hole locations on the ceiling.
- Using a drill and an appropriately sized drill bit, create pilot holes at the marked screw hole locations.
- Place the support bracket back against the ceiling and align the pilot holes with the holes on the bracket.
- Insert screws into the pilot holes on the bracket and drive them securely into the ceiling, ensuring a tight fit.
- Verify that the support bracket is firmly attached to the ceiling and can support the weight of the chandelier.
- Double-check the position and alignment of the support bracket to ensure that it is level and centered.
The support bracket is a critical component for safely hanging a chandelier. It provides the necessary stability and support to ensure that your chandelier hangs securely from the ceiling. With the support bracket installed, you’re ready to move on to the next step: connecting the wiring.
Step 7: Connect the wiring
Connecting the wiring is a crucial step in hanging a chandelier. Properly wiring the chandelier ensures that it is safely and correctly powered. Follow these steps to connect the wiring:
- Start by carefully unpacking the chandelier and locating the wires. Most chandeliers will have a black wire (hot wire), a white wire (neutral wire), and a ground wire (typically green or copper).
- Strip approximately ½ inch of insulation from the end of each wire using wire strippers. Make sure to expose enough wire for a secure connection.
- If your chandelier came with a plastic or cardboard insulator sleeve, slide it over the chandelier’s chain to cover the wiring.
- Connect the chandelier’s wires to the corresponding wires in the electrical box. Twist the exposed ends of the black wires together and secure them with a wire nut. Do the same for the white wires and the ground wires.
- Tightly wrap electrical tape around the wire nuts to provide an extra layer of protection and secure them in place.
- Carefully tuck the connected wires and wire nuts into the electrical box, ensuring that they are not pinched or touching any other components.
- If your chandelier has additional decorative elements, such as crystal or glass pendants, follow the manufacturer’s instructions to attach them securely.
Always remember to follow electrical safety precautions when working with wiring. If you are unsure or uncomfortable with electrical work, it is best to consult a licensed electrician for assistance.
With the wiring properly connected, you’re one step closer to hanging your chandelier. The next step is to hang the chandelier itself.
Step 8: Hang the chandelier
Now that you have prepared the necessary components and connected the wiring, it’s time to hang the chandelier. Follow these steps to safely and securely hang your chandelier:
- Locate the mounting strap or hook on the chandelier, which is typically located at the top of the fixture.
- Ensure that the chandelier’s mounting strap or hook is securely attached to the support bracket installed in Step 6.
- If your chandelier has a chain, attach it to the mounting strap or hook, making sure that it is properly aligned and securely fastened.
- Gently lift the chandelier, making sure to support its weight from the bottom, and hang it on the mounting strap or hook. Take care to align any decorative elements or arms of the chandelier as desired.
- If necessary, adjust the length of the chain to achieve the desired height of the chandelier. Use pliers or wire cutters to remove any excess chain links, ensuring that the chain is securely fastened and properly supported.
It’s important to note that chandeliers are often heavy and delicate, so exercise caution while handling and hanging the fixture. Enlist the help of a partner if needed to ensure a safe and secure installation.
With the chandelier successfully hung, you’re almost finished. The next step is to secure the chandelier and make any necessary height adjustments.
Read more: How To Hang Surfboard From The Ceiling
Step 9: Secure the chandelier and adjust height
After hanging the chandelier, it’s important to ensure that it is securely fastened and properly adjusted to achieve the desired height. Follow these steps to secure the chandelier and make any necessary height adjustments:
- Check that the chandelier is securely attached to the mounting strap or hook by giving it a gentle shake. If it feels loose or wobbly, adjust the attachment point or tighten any screws or hardware as needed.
- Use a level to ensure that the chandelier is hanging straight and aligned with the room. Adjust the position of the chandelier and the length of the chain if necessary.
- With the chandelier in the desired position, secure the chain to the support bracket or locking mechanism. Use pliers or a wrench to tighten any nuts or bolts that hold the chain in place.
- Double-check that all electrical connections are securely fastened, and ensure that there are no exposed wires or loose connections.
- Test the stability of the chandelier by gently tugging on it to ensure that it is properly secured to the ceiling and support bracket. It should not move or sway.
Take a step back and visually inspect the chandelier to ensure that it is level, secure, and at the desired height. Make any additional adjustments as needed to achieve the perfect balance and aesthetic appeal.
With the chandelier securely fastened and properly adjusted, you’re ready for the final step: restoring power and testing the chandelier.
Step 10: Restore power and test the chandelier
After completing the installation and ensuring that the chandelier is securely hung and adjusted, it’s time to restore power and test the functionality of the fixture. Follow these steps to restore power and test your chandelier:
- Double-check that all the electrical connections are secure and properly insulated.
- Go to the circuit breaker or fuse box and flip the corresponding breaker back to the “on” position or replace the fuse.
- Stand at a safe distance and turn on the light switch connected to the chandelier. The chandelier should light up, indicating that the power has been successfully restored.
- Observe the chandelier for any signs of flickering, dimming, or other electrical issues. If you notice any abnormalities, turn off the power immediately and consult a licensed electrician to inspect and troubleshoot the problem.
- Check that all bulbs are functioning properly. Replace any burnt-out bulbs as necessary.
- If you have installed a chandelier with adjustable elements, such as rotating arms or dimmer switches, test these features to ensure they are working correctly.
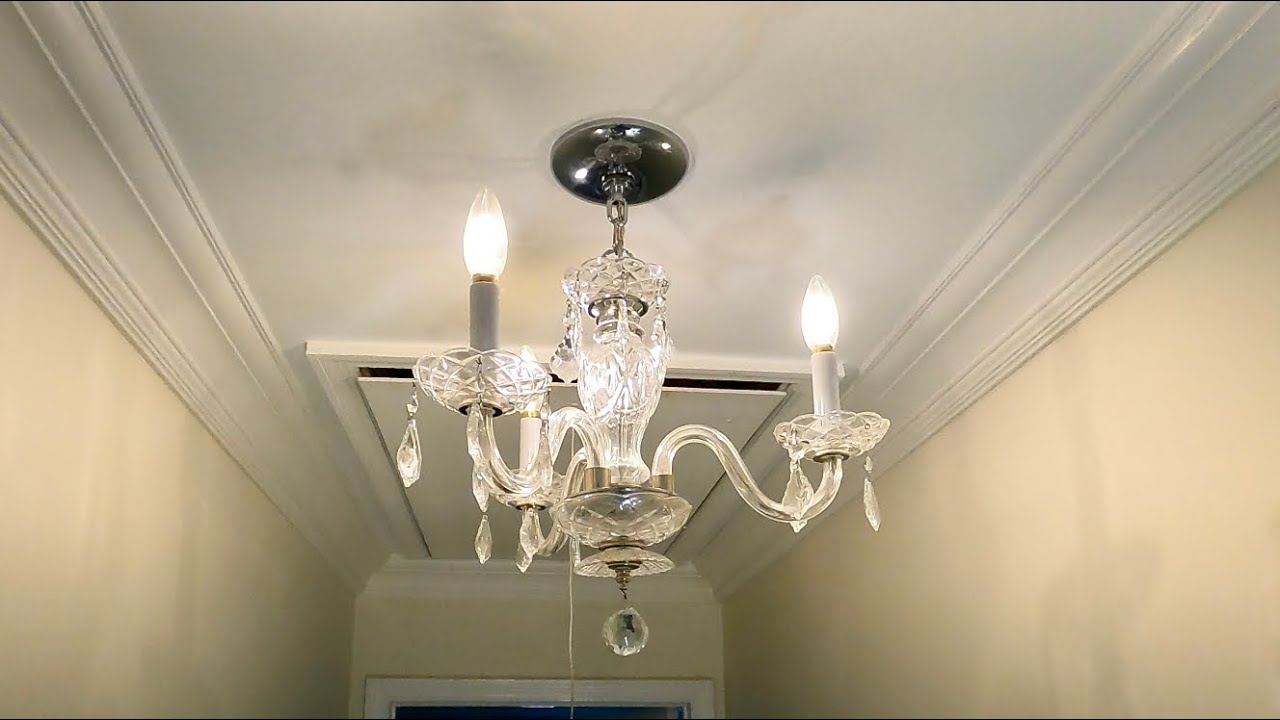
Once you have confirmed that the chandelier is functioning properly and all electrical components are in order, you can enjoy the breathtaking beauty and illumination it brings to your space.
Remember, it’s important to periodically inspect your chandelier to ensure that it remains secure, stable, and safe. Regular cleaning and maintenance will help preserve its beauty and extend its lifespan.
Congratulations on successfully hanging and testing your chandelier! Now sit back, relax, and bask in the captivating glow and elegance it adds to your home.
Conclusion
Hanging a chandelier from the ceiling can be a rewarding and transformative project that brings a touch of sophistication and beauty to any room. By following the step-by-step guide provided in this article, you have learned how to successfully install a chandelier with confidence and precision.
Throughout the installation process, we discussed the importance of gathering the necessary tools and materials, turning off the power, measuring and marking the hanging location, locating and reinforcing the ceiling joist, and optionally installing a ceiling medallion. We then covered how to install a support bracket, connect the wiring, hang the chandelier, secure it, and make height adjustments. Finally, we emphasized the significance of restoring power and testing the chandelier to ensure its functionality and safety.
Remember, safety should always be a top priority when working with electrical installations. If you are unsure or uncomfortable with any step of the process, it is advisable to consult a licensed electrician for assistance.
Now armed with the knowledge and skills to hang a chandelier, you can channel your creativity and style to elevate the ambiance of your living space. Whether it’s a dazzling centerpiece in the dining room or a luxurious addition to your bedroom, a well-placed and impeccably installed chandelier will surely captivate and impress.
So go ahead, bring the allure of a chandelier into your home and enjoy the warm glow and exquisite charm it brings.
Frequently Asked Questions about How To Hang A Chandelier From The Ceiling
Was this page helpful?
At Storables.com, we guarantee accurate and reliable information. Our content, validated by Expert Board Contributors, is crafted following stringent Editorial Policies. We're committed to providing you with well-researched, expert-backed insights for all your informational needs.


0 thoughts on “How To Hang A Chandelier From The Ceiling”