Articles
How To Hang Unistrut From The Ceiling
Modified: October 19, 2024
Learn how to hang Unistrut from the ceiling with this detailed step-by-step guide. Read our informative articles for expert advice and tips.
(Many of the links in this article redirect to a specific reviewed product. Your purchase of these products through affiliate links helps to generate commission for Storables.com, at no extra cost. Learn more)
Introduction
When it comes to hanging heavy objects from the ceiling, Unistrut is a popular choice. Unistrut is a versatile framing system made of steel that allows for easy installation and adjustment. Whether you need to mount lights, HVAC equipment, electrical conduits, or other heavy objects, Unistrut provides a sturdy and reliable solution.
In this article, we will guide you through the steps to hang Unistrut from the ceiling. We will discuss the materials needed, the process of identifying ceiling anchors, measuring and marking the installation points, installing the ceiling anchors, attaching the Unistrut channels, securing the Unistrut to the ceiling anchors, and testing and adjusting the installation. By following these steps, you will be able to safely and effectively hang Unistrut from your ceiling.
Before we dive into the details, let’s take a look at the materials you will need for this project.
Key Takeaways:
- Securely hang Unistrut from the ceiling by identifying, measuring, and installing the necessary components. Prioritize safety, proper alignment, and thorough testing for a reliable and customizable hanging solution.
- Gather essential materials and follow step-by-step instructions to effectively hang Unistrut from the ceiling. Ensure secure fastenings, proper alignment, and thorough testing for a sturdy and versatile installation.
Read more: How To Hang Surfboard From The Ceiling
Materials Needed
Before you begin the process of hanging Unistrut from the ceiling, gather the following materials:
- Unistrut Channels: These are the main components of the Unistrut system, often made of galvanized steel.
- Ceiling Anchors: Depending on your specific needs, you may choose different types of anchors such as toggle bolts, concrete anchors, or expansion anchors.
- Drill: A drill will be required to create the necessary holes for the ceiling anchors.
- Screwdriver: You will need a screwdriver to attach the Unistrut to the ceiling anchors.
- Level: To ensure a straight and even installation, a level is essential for accurate measurements.
- Measuring Tape: Use a measuring tape to determine the distance between the installation points and ensure proper alignment.
- Pencil or Marker: These will be used to mark the installation points on the ceiling.
- Safety Equipment: Always prioritize safety by wearing protective gear such as safety glasses and gloves.
Having these materials ready before you begin will make the installation process smoother and more efficient.
Step 1: Identify the Ceiling Anchors
The first step in hanging Unistrut from the ceiling is to identify the appropriate locations for the ceiling anchors. The type of ceiling and the weight of the objects you intend to hang will determine the type of anchors you’ll need.
If you have a suspended or drop ceiling, you can typically use toggle bolts or drop-in anchors. These anchors are designed to attach to the metal grid or support beams behind the ceiling tiles. If you have a concrete or solid ceiling, you will need to use concrete anchors or expansion bolts.
Start by examining the ceiling and locating the support beams or metal grid. Use a stud finder or tap on the ceiling to identify the solid areas. It’s crucial to ensure that the anchors are attached to stable structures to provide proper support for the weight.
Once you have identified the appropriate locations for the ceiling anchors, use a pencil or marker to mark them on the ceiling. These marks will serve as your guide during the installation process.
Take note of the recommended spacing between the anchors based on the size and weight of the objects you’ll be hanging. It’s important to distribute the weight evenly across the ceiling to avoid overloading a single anchor point.
With the ceiling anchors identified and marked, you are now ready to move on to the next step: measuring and marking the installation points.
Step 2: Measure and Mark the Installation Points
After identifying the ceiling anchors, the next step is to measure and mark the installation points on the ceiling. This step is crucial to ensure accuracy and proper alignment of the Unistrut channels.
Start by measuring the distance between the identified ceiling anchors. Use a measuring tape to determine the length of the Unistrut channels and add a few inches on each side for flexibility and adjustments. This will help ensure that the objects you intend to hang will be properly supported by the Unistrut.
Using a pencil or marker, make marks on the ceiling to indicate the exact points where the Unistrut channels will be installed. It’s essential to keep the marks straight and evenly spaced to maintain a professional and aesthetically pleasing installation.
Using a level, ensure that the marks are perfectly horizontal or level. This will prevent any issues with the alignment of the Unistrut channels and ensure a secure installation.
Double-check your measurements and marks to ensure accuracy before moving on to the next step. It’s always better to take the time to measure and mark correctly rather than rushing through and ending up with an improper installation.
With the installation points measured and marked on the ceiling, you are now ready to proceed with the installation of the ceiling anchors.
Step 3: Install the Ceiling Anchors
With the installation points measured and marked on the ceiling, it’s time to proceed with installing the ceiling anchors. The type of anchors you will use depends on the specific requirements of your ceiling and the weight of the objects to be hung.
If you have a suspended or drop ceiling, you can typically use toggle bolts or drop-in anchors. Follow the manufacturer’s instructions to install these anchors by inserting them through the holes in the ceiling grid or support beams and securing them in place.
For concrete or solid ceilings, you will need to use concrete anchors or expansion bolts. Begin by drilling holes into the marked installation points using a drill and the appropriate drill bit size for your anchors. Make sure to follow the recommended drill bit size specified by the manufacturer.
After drilling the holes, insert the anchors into the holes, ensuring they are snugly fit. Use a hammer or a wrench, depending on the type of anchor, to secure them in place. It’s essential to make sure the anchors are installed properly, as they will be the primary support for the Unistrut channels and the objects being hung.
Repeat this process for each marked installation point, ensuring that all anchors are securely and evenly placed.
Once all the ceiling anchors are installed, give them a gentle tug to confirm that they are firmly in place. If any anchors feel loose or unstable, remove and reinstall them to ensure a secure installation.
Now that the ceiling anchors are in place, you are ready to move on to the next step: attaching the Unistrut channels.
When hanging Unistrut from the ceiling, be sure to use appropriate hardware such as beam clamps or ceiling flanges to securely attach the Unistrut to the ceiling structure. Always follow manufacturer’s guidelines for weight capacity and installation.
Read more: How To Hang Tablecloths From The Ceiling
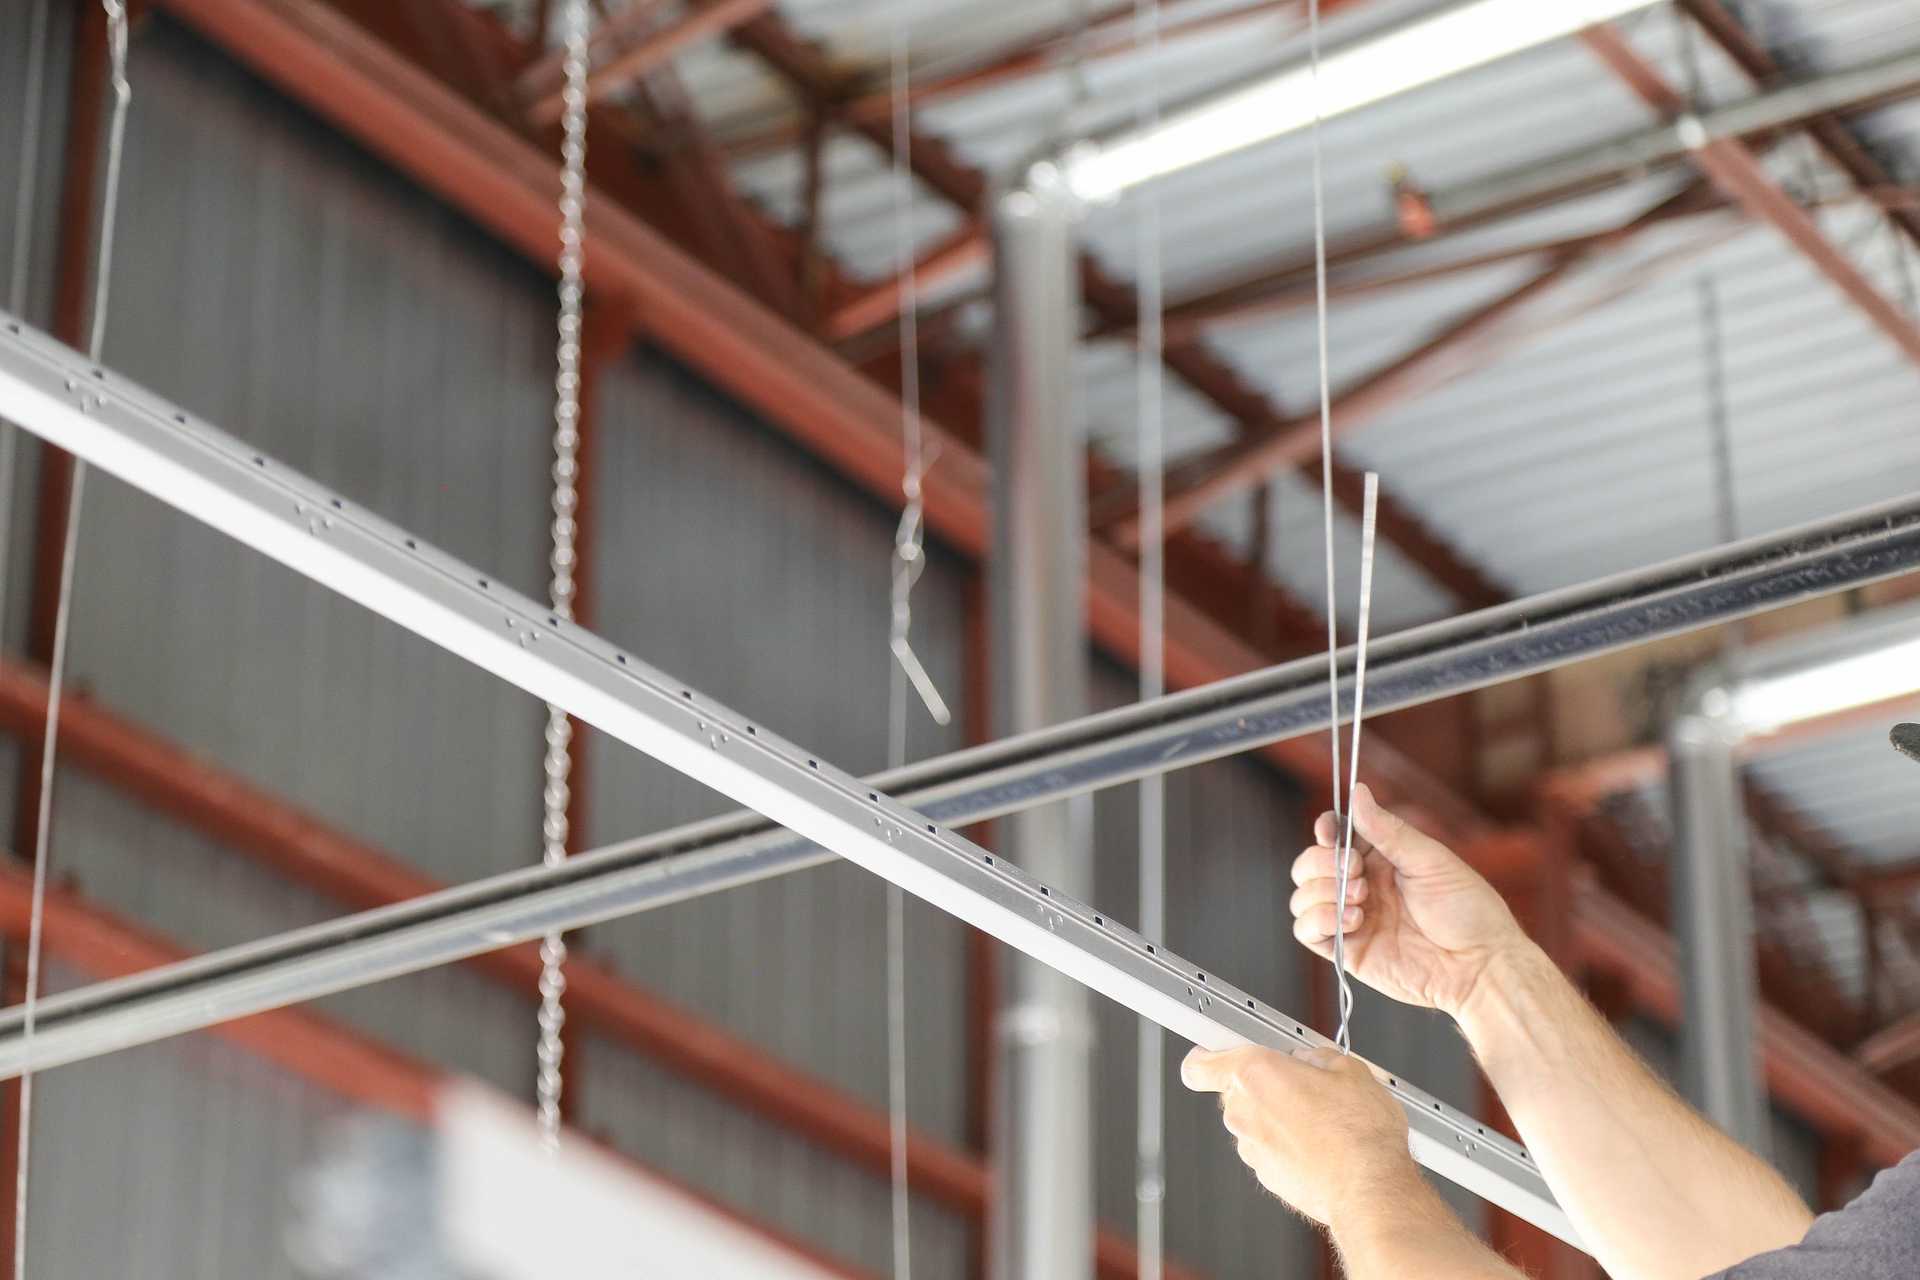
Step 4: Attach the Unistrut Channels
After installing the ceiling anchors, it’s time to attach the Unistrut channels to provide a solid framework for hanging your objects. The Unistrut channels are the main components that will support the weight and ensure stability.
Begin by measuring and cutting the Unistrut channels to the desired length. Use a cutting tool appropriate for the type of Unistrut you have, ensuring clean and precise cuts.
Once you have the Unistrut channels cut to size, position them on the ceiling between the installed ceiling anchors. Align the channels with the marked installation points to ensure proper placement.
Using screws or bolts, attach the Unistrut channels to the ceiling anchors. Make sure to use the appropriate fasteners that are suitable for the type of Unistrut channels and ceiling anchors you are working with.
Start by securing one end of the Unistrut channel to the corresponding ceiling anchor, and then work your way along the channel, attaching it to each anchor point. Ensure that the Unistrut channels are straight and level as you secure them in place.
For added stability, it’s recommended to use washers between the screws or bolts and the Unistrut channels. This will help distribute the load evenly and prevent the channels from slipping or coming loose over time.
Repeat this process for each Unistrut channel, ensuring that they are securely attached to the ceiling anchors and properly aligned.
Once all the Unistrut channels are attached, give them a gentle shake or tug to check their stability. If any channels feel loose, tighten the screws or bolts to ensure a secure and stable installation.
With the Unistrut channels securely attached, you are ready to move on to the next step: securing the Unistrut to the ceiling anchors.
Step 5: Secure the Unistrut to the Ceiling Anchors
With the Unistrut channels properly attached to the ceiling anchors, the next step is to secure the Unistrut to ensure a sturdy and reliable installation.
Start by double-checking the alignment and levelness of the Unistrut channels. Use a level to ensure that they are straight and even. Making any necessary adjustments at this stage will help avoid issues later on.
Once you are satisfied with the alignment, use a screwdriver or a socket wrench to tighten the screws or bolts that connect the Unistrut channels to the ceiling anchors. Make sure to tighten them securely, but be cautious not to overtighten and risk damaging the Unistrut or ceiling anchors.
It’s essential to ensure that each connection point is properly tightened and secure. Go through each screw or bolt, checking for tightness and stability. Additionally, make sure to check the connections at the ends of the Unistrut channels to ensure they are securely fastened.
If you notice any areas that feel loose or unstable, tighten the corresponding screws or bolts until they are secure. This step is crucial to ensure that the Unistrut channels can effectively support the weight of the objects you intend to hang from the ceiling.
After securing all the connections, give the Unistrut channels a gentle shake or tug to test their stability. If any part feels unstable or moves excessively, inspect the connections and make any necessary adjustments or tightenings.
Once the Unistrut channels are securely fastened, you have completed the process of securing the Unistrut to the ceiling anchors. The next step is to test and adjust the Unistrut installation before finalizing the project.
Step 6: Test and Adjust the Unistrut Installation
After securing the Unistrut to the ceiling anchors, it’s important to test and adjust the installation to ensure its stability and effectiveness. This step will help verify that the Unistrut can safely support the weight of the objects you plan to hang from the ceiling.
Start by visually inspecting the Unistrut installation to ensure that all components are securely fastened and aligned. Look for any signs of misalignment, loose fasteners, or areas of concern.
Next, carefully test the stability of the Unistrut by giving it a gentle shake or applying light pressure. Observe if there is any excessive movement or instability. If you notice any issues, such as sagging or movement, you may need to reinforce the installation or make adjustments.
If reinforcement is needed, consider adding additional screws or bolts at strategic points along the Unistrut channels to provide extra support. Ensure that these additional fasteners are compatible with the Unistrut system and properly tighten them to prevent any potential issues.
Additionally, if you plan to hang heavy objects from the Unistrut, it’s recommended to perform a load test. Gradually apply weight to the system, starting with lighter objects, and monitor the performance. This will help you identify any weak points or areas that require reinforcement before hanging more substantial objects.
During the load test, pay attention to any signs of strain, excessive deflection, or unexpected movement. If you encounter any of these issues, you may need to consult with a professional or make further adjustments to ensure the stability and safety of the installation.
Remember, safety should always be a priority, so it’s crucial to conduct thorough testing and adjustments before finalizing the Unistrut installation.
Once you are satisfied with the stability and performance of the installation, you have successfully completed the process of hanging Unistrut from the ceiling. Congratulations!
Conclusion
Hanging Unistrut from the ceiling can provide a reliable and versatile solution for mounting heavy objects. By following the steps outlined in this article, you can ensure a secure and stable installation that meets your specific needs.
Throughout the process, it is important to properly identify the ceiling anchors, measure and mark the installation points, install the anchors securely, attach the Unistrut channels, and secure them to the ceiling anchors. Additionally, testing and adjusting the installation will help verify its stability and make any necessary reinforcements.
Always prioritize safety and follow manufacturer guidelines and recommendations when it comes to the type of Unistrut, ceiling anchors, and hardware you use. Proper alignment, secure fastenings, and periodic inspections are vital to maintaining the integrity and safety of the installation.
Remember, if you are unsure about any step or encounter unexpected challenges, it is advisable to consult with a professional or seek guidance from experts in the field to ensure a successful and safe outcome.
By having the necessary materials, carefully following the steps, and conducting proper testing and adjustments, you can confidently hang Unistrut from the ceiling and enjoy the benefits of a reliable and customizable hanging system for your heavy objects.
So go ahead, get started, and transform your space with the versatility and strength of Unistrut!
Frequently Asked Questions about How To Hang Unistrut From The Ceiling
Was this page helpful?
At Storables.com, we guarantee accurate and reliable information. Our content, validated by Expert Board Contributors, is crafted following stringent Editorial Policies. We're committed to providing you with well-researched, expert-backed insights for all your informational needs.


0 thoughts on “How To Hang Unistrut From The Ceiling”