Articles
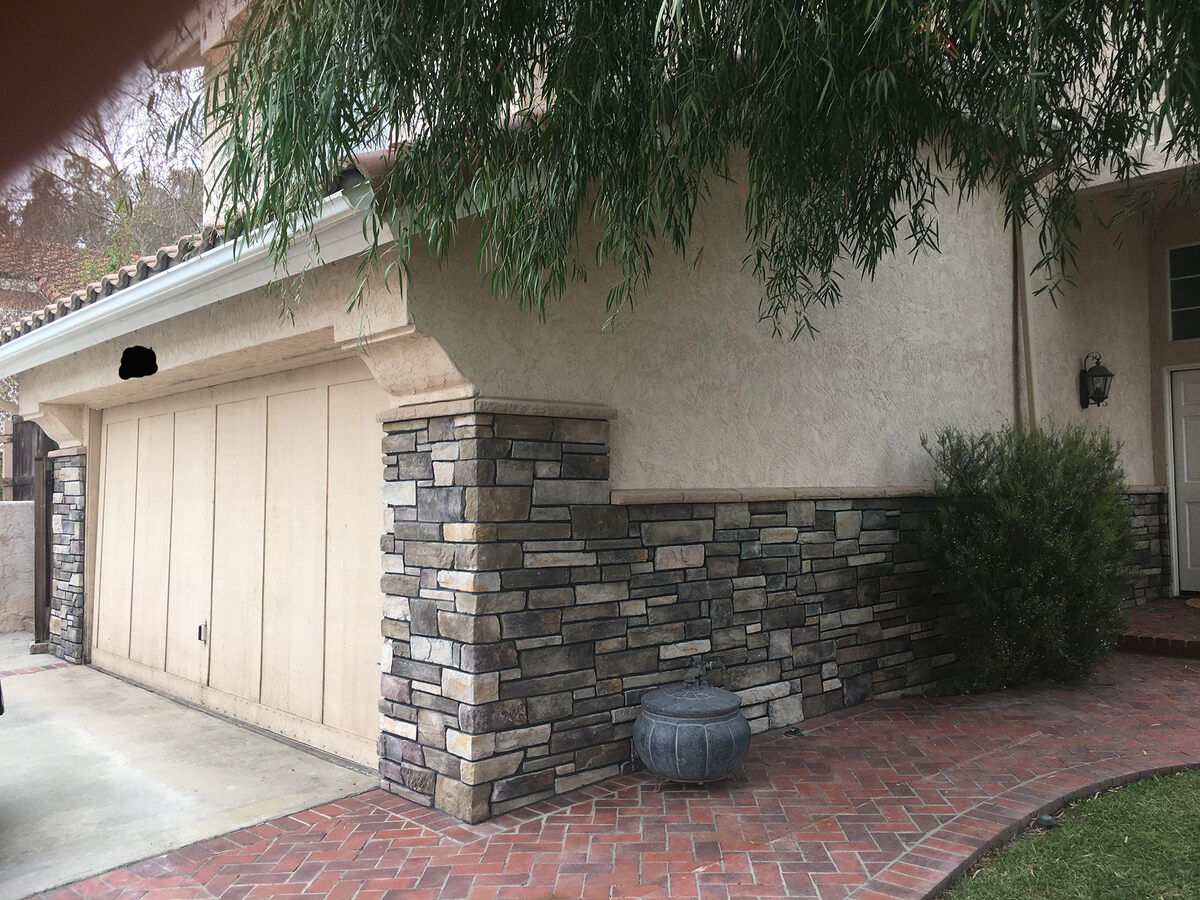
How To Install A Stucco Fireplace
Modified: November 2, 2024
Learn how to stucco a fireplace with these informative articles. Enhance the look of your home and create a beautiful centerpiece for your living space.
(Many of the links in this article redirect to a specific reviewed product. Your purchase of these products through affiliate links helps to generate commission for Storables.com, at no extra cost. Learn more)
Introduction
Stucco fireplaces are not only a beautiful addition to any home, but they also provide an extra layer of insulation and protection. Stucco is a durable material that can withstand heat and cold, making it an ideal choice for fireplace exteriors. If you’re looking to enhance the aesthetics of your fireplace and give it a fresh new look, stucco is the perfect solution.
In this article, we will guide you through the step-by-step process of stuccoing your fireplace. Whether you’re a seasoned DIY enthusiast or a beginner looking to take on a new project, you’re in the right place. We’ll cover everything from preparation to finishing touches, ensuring that you have all the information needed to achieve a professional and elegant result.
Before we dive into the specifics, it’s important to note that stuccoing a fireplace requires some basic tools and supplies. You’ll need a trowel, wire brush, sandpaper, a bucket, water, stucco mix, and a paintbrush or sprayer for the final coat. Additionally, ensure you have protective gear such as gloves and safety glasses to keep yourself safe during the process.
Now, let’s get started on transforming that plain fireplace into a stunning focal point in your home!
Key Takeaways:
- Transform your fireplace into a stunning focal point with durable and visually appealing stucco. Follow step-by-step instructions for a professional result that complements your home’s decor.
- Ensure a successful stuccoing project by prioritizing safety, proper preparation, and attention to detail. Create a captivating and long-lasting stuccoed fireplace that adds warmth and style to your home.
Read more: How To Stucco A Brick Fireplace
Step 1: Preparation
Before you begin stuccoing your fireplace, it’s essential to prepare the area to ensure a smooth and successful application. Follow these steps to get started:
- Cover the surrounding area: Protect the surrounding surfaces, such as the floor and adjacent walls, by covering them with drop cloths or plastic sheets. This will prevent accidental spills or splatters from ruining your furniture or flooring.
- Remove any obstacles: Clear the area around the fireplace of any obstacles, such as furniture or decorations, to give yourself ample space to work and avoid any hindrances.
- Clean the existing surface: Use a wire brush to remove any loose debris, dirt, or dust from the surface of the fireplace. This step is crucial to ensure that the stucco adheres properly and creates a strong bond.
- Sand the surface: After cleaning the surface, use sandpaper to lightly sand it. This step will help roughen up the surface and create a better bonding surface for the stucco.
- Protect the surrounding fixtures: If your fireplace has fixtures such as glass doors or metal trim that you don’t want to get stucco on, cover them with masking tape or painter’s tape. This will protect them during the stuccoing process and make cleanup easier.
Once you’ve completed these preparation steps, you’re ready to move on to the next phase of the project – removing the old stucco.
Step 2: Removing old stucco
If your fireplace already has existing stucco that needs to be removed or repaired, follow these steps to ensure a clean and even surface:
- Inspect the old stucco: Begin by carefully examining the existing stucco to determine its condition. Look for any cracks, chips, or areas that are loose or damaged. These areas will need to be repaired or removed before proceeding.
- Use a chisel or scraper: Depending on the thickness of the old stucco, you can use a chisel or scraper to gently chip away the damaged sections. Be careful not to damage the underlying surface or brickwork.
- Remove loose debris: Once you’ve removed the damaged stucco, clean the area by using a wire brush or vacuum to remove any loose debris or dust. This will ensure a clean and smooth surface for the new stucco application.
- Repair any cracks: If you come across any cracks or gaps in the fireplace’s surface, it’s important to repair them before applying the new stucco. Use a stucco patching compound or mix to fill in the cracks and create a seamless surface.
- Allow for drying time: After repairing any cracks, allow the patching compound to dry according to the manufacturer’s instructions. This drying time will ensure a strong and durable surface for the new stucco application.
By properly removing and repairing the old stucco, you’ll create a solid foundation for the new stucco, ensuring a professional-looking finish and improved longevity. With the old stucco removed, it’s time to move on to the next step: cleaning the surface.
Step 3: Cleaning the surface
Before you can apply the new stucco, it’s crucial to thoroughly clean the surface to remove any dirt, dust, or residue. Follow these steps to ensure a clean and well-prepared surface:
- Wet the surface: Use a hose or a spray bottle filled with water to wet the surface of the fireplace. This will help loosen any dirt or debris and make it easier to clean.
- Scrub the surface: Use a stiff-bristle brush or a sponge to scrub the wet surface, removing any dirt or stains. Pay close attention to any areas with stubborn residue or buildup, such as smoke stains. You can use a mild detergent mixed with water for extra cleaning power if needed.
- Rinse the surface: Once you’ve thoroughly scrubbed the surface, use clean water to rinse off any remaining dirt or cleaning solution. Ensure that all soap or detergent residue is completely removed.
- Dry the surface: Allow the surface to dry completely before proceeding to the next step. Depending on the weather and humidity levels, this may take a few hours or longer. Ensure that the surface is completely dry to ensure proper adhesion of the stucco.
Cleaning the surface is a vital step in the stuccoing process as it ensures a clean and smooth base for the new stucco application. Once the surface is thoroughly cleaned and dried, it’s time to move on to the next step: applying the scratch coat.
Step 4: Applying the scratch coat
The scratch coat is the first layer of stucco that provides a foundation for the subsequent layers. Follow these steps to apply the scratch coat to your fireplace:
- Mix the stucco: Follow the manufacturer’s instructions to mix the stucco mix with water in a bucket. Use a drill with a mixing attachment to ensure a smooth and consistent mixture.
- Dampen the surface: Before applying the scratch coat, dampen the cleaned surface with water. This will help create a stronger bond between the stucco and the surface.
- Apply the scratch coat: Using a trowel, spread a thin layer of stucco onto the dampened surface. Start at the bottom and work your way up, overlapping each section slightly to ensure a uniform application. Make sure the layer is about 1/4 to 1/2 inch thick.
- Create scratch marks: While the scratch coat is still wet, use a scratch comb or a notched trowel to create horizontal lines or scratches on the surface. This will provide a better grip for the subsequent layers of stucco.
- Allow for drying time: After applying the scratch coat, allow it to dry for at least 24 to 48 hours. This drying time is essential to ensure that the scratch coat develops strength and stability.
Applying the scratch coat is a crucial step in the stuccoing process, as it creates a solid base for the subsequent layers. Once the scratch coat has dried, you can move on to the next step: applying the brown coat.
Before applying stucco to a fireplace, make sure to clean the surface thoroughly and apply a bonding agent to ensure the stucco adheres properly. This will help create a smooth and durable finish.
Read more: How To Install A Fireplace
Step 5: Applying the brown coat
The brown coat is the second layer of stucco that provides thickness and strength to the fireplace surface. Follow these steps to apply the brown coat to your fireplace:
- Mix the stucco: Mix the stucco mix with water according to the manufacturer’s instructions. Use the drill with a mixing attachment to achieve a smooth and consistent mixture.
- Dampen the scratch coat: Before applying the brown coat, dampen the surface of the scratch coat with water. This will create a strong bond between the layers of stucco.
- Apply the brown coat: Using a trowel, spread a thicker layer of stucco onto the dampened scratch coat. Start at the bottom and work your way up, ensuring an even application. The brown coat should be about 3/8 to 1/2 inch thick.
- Smooth the surface: Once the brown coat is applied, use the trowel to smooth the surface, removing any excess stucco and creating an even finish. This step is crucial to ensure a visually appealing final result.
- Allow for drying time: After applying the brown coat, allow it to dry for at least 24 to 48 hours. This drying time is necessary to allow the stucco to cure and develop strength.
Applying the brown coat is a significant step that adds thickness and durability to the stuccoed fireplace surface. Once the brown coat has dried, you can proceed to the next step: adding texture to the surface.
Step 6: Adding texture
Adding texture to the stuccoed surface of your fireplace is an important step in creating a visually appealing and unique finish. Follow these steps to add texture to your stuccoed fireplace:
- Mist the surface: Before adding texture, mist the dried brown coat with water using a spray bottle. This will keep the stucco moist and workable during the texture application.
- Select a texture technique: There are various techniques you can use to create texture on the stuccoed surface. Some popular options include skip trowel, slap brush, or sponge. Choose the technique that best suits your desired outcome.
- Apply the texture: Use the chosen technique to manipulate the stucco and create the desired texture. For example, if using the skip trowel technique, use a trowel to make sweeping motions and create a textured pattern. If using a slap brush, slap or dab the brush onto the stuccoed surface to create a textured effect.
- Work in small sections: It’s best to work in small sections at a time to ensure the stucco remains moist and workable. This will allow you to achieve consistent and cohesive texture throughout the entire surface.
- Allow for drying time: After adding texture to the surface, allow the stucco to dry completely. This drying time can vary depending on the climate and humidity levels. Ensure the texture is completely dry before proceeding to the next step.
Adding texture to your stuccoed fireplace is a creative process that allows you to personalize the look and feel of your fireplace. Once the texture has dried, you’re ready for the final step: adding the finishing touches.
Step 7: Finishing touches
Adding the finishing touches to your stuccoed fireplace will give it the polished look and protection it deserves. Follow these steps to complete the project:
- Inspect the surface: Before applying the final coat, inspect the surface to ensure that it is clean and free from any debris or imperfections. Use a brush or a vacuum to remove any loose dirt or dust.
- Mix the final coat: Mix the final coat stucco according to the manufacturer’s instructions. The final coat is typically a thinner consistency compared to the previous coats.
- Apply the final coat: Using a trowel or a sprayer, apply the final coat of stucco to the surface of the fireplace. Ensure an even and smooth application, covering the entire surface. This final coat will provide a protective layer and enhance the appearance of the stuccoed fireplace.
- Create desired texture: If you want to add more texture or character to the fireplace, you can manipulate the final coat with various techniques. This can include using a trowel, brush, or sponge to create patterns or texture as desired.
- Allow for curing time: After applying the final coat, allow it to cure and dry according to the manufacturer’s instructions. This curing time will ensure that the stucco becomes hard and durable.
- Optional: Paint or seal the stucco: If you desire a different color or additional protection, you can choose to paint or seal the stuccoed fireplace. Follow the manufacturer’s instructions for the chosen paint or sealer and allow it to dry completely.
- Clean up: Once the stucco and any additional coatings are fully dry, remove any protective coverings and clean up the surrounding area. Dispose of any waste materials properly.
With the finishing touches complete, step back and admire your beautifully stuccoed fireplace. It’s now ready to be showcased as a stunning centerpiece in your home!
Remember, proper maintenance and occasional cleaning will help keep your stuccoed fireplace looking fresh and vibrant for years to come.
Conclusion
Stuccoing a fireplace can transform it from a plain and ordinary feature into a captivating focal point in your home. With the right tools, materials, and techniques, you can achieve a professional-looking stuccoed fireplace that adds both beauty and functionality to your living space.
Throughout this article, we have walked you through the step-by-step process of stuccoing a fireplace, from the initial preparation to the finishing touches. By following these steps, you can create a durable and visually appealing stuccoed fireplace that complements your home’s decor.
Remember, proper preparation is key to ensure a successful stuccoing project. Take the time to clean the surface, remove any old stucco, and create a solid base with the scratch and brown coats. Adding texture and applying the final coat will give your fireplace its unique character and protection.
Don’t forget about the importance of safety during the process. Always wear protective gear, such as gloves and safety glasses, and handle tools and materials with caution.
Now that you have the knowledge and understanding of how to stucco a fireplace, it’s time to embark on your own stuccoing adventure. Impress yourself and your guests with a beautifully stuccoed fireplace that adds warmth and style to your home.
Enjoy the process, and may your stuccoed fireplace be a source of joy and admiration for years to come!
Frequently Asked Questions about How To Install A Stucco Fireplace
Was this page helpful?
At Storables.com, we guarantee accurate and reliable information. Our content, validated by Expert Board Contributors, is crafted following stringent Editorial Policies. We're committed to providing you with well-researched, expert-backed insights for all your informational needs.


0 thoughts on “How To Install A Stucco Fireplace”