
Articles
How To Install Gutters On Metal Roof
Modified: October 18, 2024
Learn how to install gutters on a metal roof with our informative articles. Gain useful insights and step-by-step guides for a successful installation.
(Many of the links in this article redirect to a specific reviewed product. Your purchase of these products through affiliate links helps to generate commission for Storables.com, at no extra cost. Learn more)
Introduction
Welcome to our comprehensive guide on how to install gutters on a metal roof. Gutters play a crucial role in protecting your home from water damage by channeling rainwater away from the roof and foundation. Installing gutters on a metal roof requires careful planning, precise measurements, and proper techniques to ensure a secure and efficient gutter system.
In this article, we will take you step by step through the process of installing gutters on a metal roof. We will cover everything from preparing the necessary tools and materials to testing the gutter system for proper functioning. By following these instructions, you can successfully install gutters and enjoy the benefits of a well-maintained and protected home.
Before diving into the installation process, it is important to note that working on a metal roof can be challenging. Make sure to take the necessary safety precautions, such as using a sturdy ladder, wearing non-slip shoes, and working with a partner if needed. Additionally, if you are not comfortable working at heights or do not have the required skills, it is recommended to consult a professional gutter installer.
Now, let’s begin with step one – preparing the necessary tools and materials.
Key Takeaways:
- Proper installation of gutters on a metal roof requires precise measurements, secure attachment, and regular maintenance to ensure effective water diversion and protection against potential damage to your home.
- Prioritize safety, gather necessary tools and materials, and follow step-by-step instructions to successfully install gutters on a metal roof. Regularly test and maintain the gutter system to ensure optimal functionality and protection for your home.
Read more: How To Install Gutters On A Metal Building
Step 1: Prepare the necessary tools and materials
Before you start installing gutters on your metal roof, it is essential to gather all the tools and materials you will need for the project. Having everything ready beforehand will make the installation process smoother and more efficient.
Here is a list of tools and materials you will need:
- Gutter sections: Measure the length needed and choose the appropriate size and style for your home.
- Gutter brackets: These will secure the gutter sections to the roof. Ensure they are designed specifically for metal roofs.
- Gutter end caps: These caps will seal the ends of the gutters.
- Downspouts: Determine the number and placement of downspouts based on the size of your roof and local regulations.
- Gutter screws: These screws are specially designed to withstand the elements and secure the gutter brackets to the roof.
- Power drill with drill bits: You will need a drill to create holes for the gutter screws.
- Tape measure: This will help you accurately measure the length and placement of the gutters.
- Chalk line: Use a chalk line to mark the gutter placement on the roof for precise installation.
- Hacksaw or tin snips: You may need these tools to cut the gutter sections to the desired length.
- Caulk gun and sealant: A caulk gun and appropriate sealant will be necessary to seal any gaps or joints in the gutter system.
- Ladder: Use a sturdy ladder with rubber feet to safely access and work on your roof.
- Protective gear: Don’t forget to wear gloves, safety glasses, and other necessary protective gear to ensure your safety during the installation process.
Take the time to gather all the tools and materials before you begin the installation. This will save you time and frustration by having everything within reach as you progress through the steps.
Now that you have all the necessary tools and materials, we can move on to step two – measuring and marking the gutter placement.
Step 2: Measure and mark the gutter placement
Accurate measurements and proper placement of the gutters are crucial for a successful installation. Before you start attaching the gutter brackets, it is important to measure and mark the precise location where the gutters will be placed on your metal roof.
Follow these steps to measure and mark the gutter placement:
- Start by measuring the length of the roofline where the gutters will be installed. Use a tape measure to get an accurate measurement.
- Based on the measurement, determine the number of gutter sections needed and their lengths. It is better to have slightly longer gutter sections and trim them if necessary.
- Using a chalk line, mark the placement of the gutters on the roof. Make sure the line is level and straight. This will serve as a guide for installing the gutter brackets.
- If your metal roof has an overhang, measure the distance from the edge of the roof to the chalk line. This will help you determine the position of the gutter brackets.
- Mark the placement of the gutter brackets on the metal roof. Typically, brackets are placed every 24-36 inches along the length of the gutter.
- Double-check the measurements and marks to ensure accuracy before moving on to the next step.
Accurately measuring and marking the gutter placement will ensure that the gutters are installed in the correct position. This will help optimize their functionality in effectively channeling water away from your roof and foundation.
Now that you have measured and marked the gutter placement, you are ready to move on to step three – installing the gutter brackets on the metal roof.
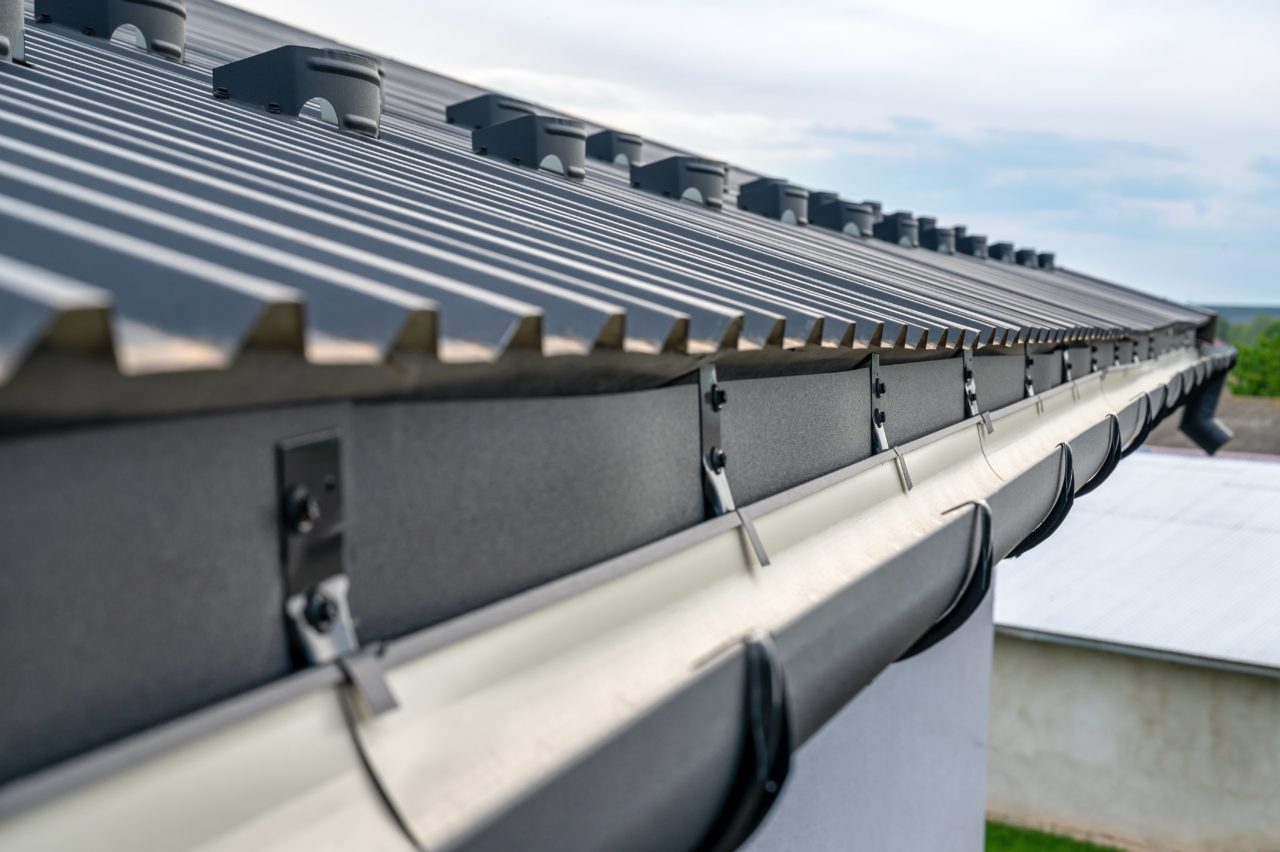
Step 3: Install the gutter brackets on the metal roof
Installing gutter brackets is a crucial step in securing the gutters to your metal roof. These brackets provide stability and support, ensuring that the gutter system withstands the weight of rainwater and remains securely attached.
Follow these steps to install the gutter brackets on your metal roof:
- Place the first gutter bracket at one end of the marked line. Make sure it aligns with the chalk line and sits flush against the metal roof.
- Using a power drill with an appropriate drill bit, create pilot holes through the screw holes in the bracket and into the roof.
- Insert the gutter screws into the pilot holes and tighten them with a power drill. Be careful not to overtighten, as it may damage the bracket or roof.
- Repeat the process for the remaining gutter brackets, evenly spacing them along the marked line on the roof.
Ensure that the gutter brackets are securely attached to the metal roof and aligned properly with the chalk line. This will provide a stable foundation for the gutter sections.
Once all the gutter brackets are installed, it’s time to move on to step four – attaching the gutter sections.
Step 4: Attach the gutter sections
With the gutter brackets securely in place, it’s time to attach the gutter sections to create a continuous channel for guiding rainwater away from your roof. This step requires careful handling and proper alignment to ensure a watertight and functional gutter system.
Follow these steps to attach the gutter sections:
- Start at one end of the gutter system and position the first section against the gutter brackets. Make sure it is aligned and sits securely within the brackets.
- Using gutter screws, secure the gutter section to the brackets by driving the screws through the pre-drilled holes in the brackets and into the gutter lip. Make sure to space the screws evenly along the length of the gutter section.
- If the gutter section is longer than the desired length, use a hacksaw or tin snips to trim it to size. Ensure a clean and straight cut.
- Continue attaching subsequent gutter sections in the same manner, overlapping the edges of the sections by approximately 1 inch. This overlap will create a watertight seal.
- If necessary, use a connector piece to join two gutter sections together. Apply sealant to the connector piece before attaching it to ensure a secure and watertight connection.
As you attach the gutter sections, periodically check for proper alignment and levelness. Adjust as needed to ensure a smooth and uniform flow of water through the gutters.
Now that the gutter sections are securely attached, it’s time to move on to step five – securing the gutter ends and corners.
When installing gutters on a metal roof, make sure to use specialized gutter hangers that are designed to attach to the metal roof without causing damage. This will ensure a secure and long-lasting installation.
Read more: How To Install A Metal Roof On A Shed
Step 5: Secure the gutter ends and corners
To ensure proper functionality and prevent water leakage, it is important to secure the ends and corners of the gutter system. This step involves sealing the joints, reinforcing the stability, and enhancing the durability of the gutters.
Follow these steps to secure the gutter ends and corners:
- Install gutter end caps on each end of the gutter system. These end caps will seal off the ends, preventing water from escaping.
- Apply a generous amount of sealant to the inside of the end cap and press it firmly onto the end of the gutter section. Make sure it is aligned and securely attached.
- If you have any gutter corners, install corner pieces to redirect the flow of water. Apply sealant to the inside of the corner pieces before attaching them to the gutter sections.
- Using gutter screws, secure the corner pieces to the gutter sections, ensuring a tight and secure connection.
- Inspect the gutter ends and corners for any gaps or areas that may require additional sealant. Apply sealant as needed to create a watertight seal.
Properly securing the gutter ends and corners will prevent water from escaping and ensure that your gutter system functions effectively. It will also enhance the overall appearance and longevity of your gutters.
With the gutter ends and corners secured, it’s time to move on to step six – installing downspouts.
Step 6: Install downspouts
Downspouts are an essential component of a gutter system as they direct the collected rainwater down and away from your home’s foundation. Installing downspouts will ensure proper drainage and help prevent water damage to your property.
Follow these steps to install downspouts:
- Determine the number and placement of downspouts based on the size of your roof and local regulations. It is recommended to have at least one downspout for every 40 feet of gutter.
- Measure and mark the desired location for each downspout on the exterior wall of your home. Ensure the downspout will divert water away from entryways, windows, and any vulnerable areas.
- Using a power drill, create a hole on the marked location for each downspout. The hole should be slightly larger than the downspout diameter.
- Attach a downspout outlet to the hole on the gutter. This outlet will connect the gutter to the downspout.
- Attach the downspout to the downspout outlet, ensuring a secure and tight connection. Use screws or brackets to secure the downspout to the exterior wall.
- For multi-story homes or areas with heavy rainfall, consider using downspout extensions to further divert the water away from the foundation.
- Inspect the downspouts for any gaps or joints that may require additional sealant. Apply sealant as needed to prevent water leakage.
Installing downspouts will complete the gutter system and ensure the proper collection and diversion of rainwater. It is important to regularly inspect and maintain the downspouts to ensure they remain clear and free of debris.
With the downspouts installed, it’s time to move on to the final step – testing the gutter system for proper functioning.
Step 7: Test the gutter system for proper functioning
Testing the gutter system is the final step in the installation process. It is crucial to ensure that the gutters are functioning properly, directing water away from your roof and foundation, and preventing any potential water damage.
Follow these steps to test the gutter system for proper functioning:
- Wait for a rainy day or use a garden hose to simulate rainfall.
- Observe the water flow as it enters the gutters. Ensure that the water is being effectively collected and directed along the gutter system.
- Check for any leaks or overflow along the gutters, corners, and downspouts. If you notice any leaks, make sure to identify the source and address it promptly.
- Inspect the downspouts to ensure that water is properly flowing through them and being directed away from your home’s foundation.
- Walk around your property and examine the area around the foundation. Ensure that no excessive pooling or water accumulation is occurring, indicating improper drainage.
- If any issues are identified during the testing process, make the necessary adjustments and repairs to ensure the proper functioning of the gutter system.
Regularly inspecting and maintaining your gutter system is essential to prevent clogs, leaks, and other potential issues. Clean the gutters and downspouts periodically to remove any debris that may obstruct the flow of water.
By testing your gutter system and addressing any issues promptly, you can ensure the longevity and effectiveness of your gutters in protecting your home from water damage.
With that, you have successfully completed the installation of gutters on your metal roof. Congratulations on a job well done!
If you encounter any difficulties during the installation process or prefer professional assistance, do not hesitate to consult a gutter installation expert.
Thank you for following our step-by-step guide. We hope this article has been helpful in guiding you through the process of installing gutters on a metal roof. Enjoy the benefits of a well-functioning gutter system and a protected home!
Conclusion
Installing gutters on a metal roof is a crucial step in protecting your home from water damage. By effectively channeling rainwater away from the roof and foundation, gutters help maintain the structural integrity of your property and prevent costly repairs.
In this comprehensive guide, we have covered each step of the gutter installation process, from preparing the necessary tools and materials to testing the gutter system for proper functioning. By following these steps and taking the time to ensure accuracy and precision, you can successfully install gutters on your metal roof.
Remember to prioritize safety throughout the installation process and seek professional assistance if needed. Working on a metal roof requires caution and awareness of potential risks.
Regular maintenance and inspection of your gutter system are essential for optimal performance. Ensure the gutters and downspouts are free from debris to prevent clogs and blockages. Additionally, monitor the system for any signs of leaks, damage, or improper water flow. Addressing issues promptly can help extend the lifespan of your gutters and protect your home.
Whether you choose to install gutters on your own or hire a professional, a well-maintained and properly functioning gutter system will provide peace of mind, knowing that your home is protected from excess water and potential damage.
Thank you for following this guide on how to install gutters on a metal roof. We hope this information has been valuable to you, and we wish you success in your gutter installation project!
Curious about who can handle gutter installation efficiently? Our next guide walks you through selecting skilled professionals for this critical task. Understanding different options and what to expect from service providers can save you time and headaches. Don’t miss out on expert advice that ensures your gutter system is installed perfectly and functions flawlessly for years.
Frequently Asked Questions about How To Install Gutters On Metal Roof
Was this page helpful?
At Storables.com, we guarantee accurate and reliable information. Our content, validated by Expert Board Contributors, is crafted following stringent Editorial Policies. We're committed to providing you with well-researched, expert-backed insights for all your informational needs.


0 thoughts on “How To Install Gutters On Metal Roof”