Articles
How To Light A Camper Stove Top
Modified: August 17, 2024
Learn how to light a camper stove top with our informative articles. Get step-by-step instructions and expert tips for a hassle-free camping experience.
(Many of the links in this article redirect to a specific reviewed product. Your purchase of these products through affiliate links helps to generate commission for Storables.com, at no extra cost. Learn more)
Introduction
Lighting a camper stove top may seem like a straightforward task, but it’s important to approach it with caution and proper technique to ensure safety and efficiency. Whether you’re a seasoned camper or new to the world of camping, understanding how to safely and effectively light your camper stove top is essential for a successful outdoor cooking experience. In this article, we will walk you through the step-by-step process to light a camper stove top and provide valuable tips to optimize the lighting process.
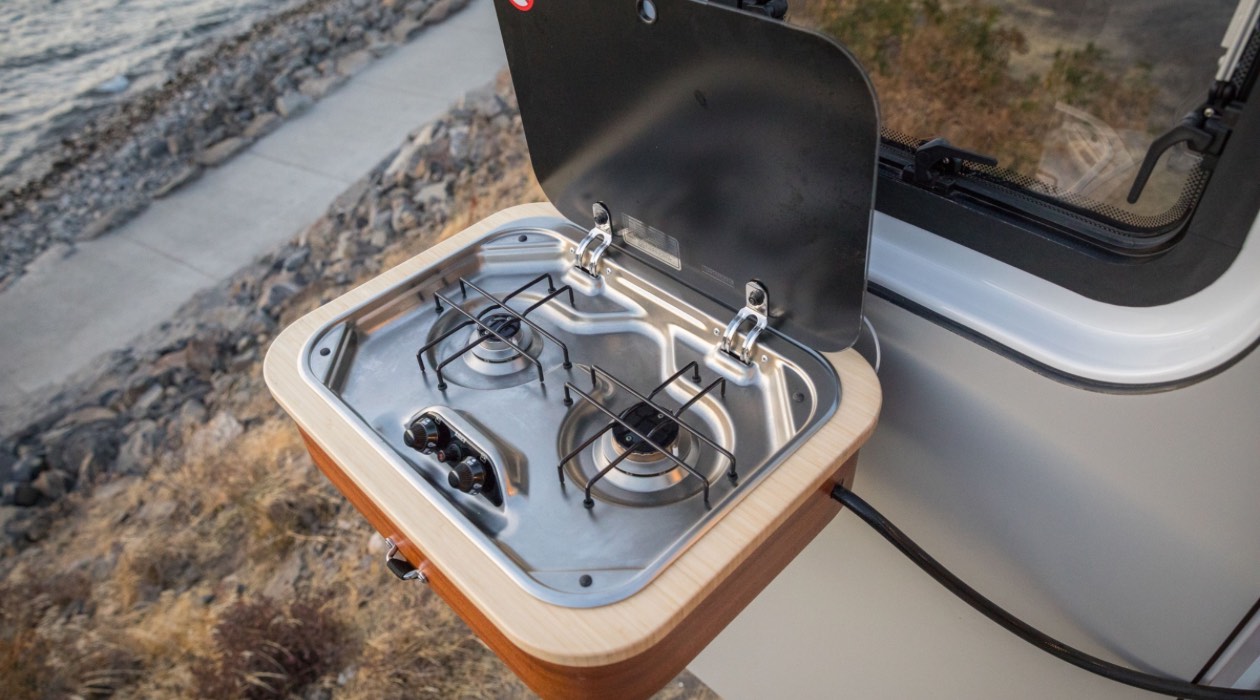
Having a reliable source of heat for cooking while camping is crucial. The camper stove top serves as a central hub for preparing meals, boiling water, and more. It offers the convenience of a kitchen stove in a compact and portable design. However, improper lighting or handling of the stove can lead to accidents, injuries, or even fire hazards.
Therefore, before diving into the lighting process, it’s important to emphasize the significance of proper stove lighting and highlight the safety precautions you should take. By following these guidelines, you can ensure a safe and enjoyable cooking experience during your camping adventures.
Key Takeaways:
- Prioritize safety and efficiency by following proper camper stove lighting techniques, including checking for leaks, ensuring ventilation, and adjusting the flame for optimal cooking conditions.
- Regular monitoring and maintenance of your camper stove will ensure safe and efficient operation, prolonging its lifespan for future outdoor cooking adventures.
Read more: How To Hang Lights On A Camper Awning
Importance of Proper Lighting
Properly lighting your camper stove top is not only essential for cooking but also for your safety and the safety of those around you. Here are a few key reasons why proper lighting is crucial:
- Safety: When a camper stove top is not lit correctly, it can result in gas leaks, flare-ups, or even explosions. By following the correct lighting procedure, you can minimize the risk of accidents and ensure the well-being of everyone nearby.
- Efficiency: A properly lit stove top will provide an optimal flame, which is vital for efficient cooking. By lighting your stove correctly, you can ensure that your food is cooked evenly and that you’re utilizing the heat efficiently.
- Conservation of Resources: When a stove top is not lit properly, precious resources such as fuel or propane can be wasted. By understanding how to light your camper stove top correctly, you can conserve resources and extend the lifespan of your fuel supply.
- Environmental Impact: Properly lit stoves produce cleaner and more efficient combustion, resulting in reduced emissions and a smaller environmental footprint. By lighting your stove correctly, you can contribute to a healthier and more sustainable camping experience.
By recognizing the importance of proper lighting, you can approach the process with the necessary care and attention. This will not only enhance your safety and efficiency but also contribute to a positive camping experience overall.
Safety Precautions
Before you begin the process of lighting your camper stove top, it’s important to take certain safety precautions to ensure a safe and risk-free cooking experience. Here are some essential safety measures to keep in mind:
- Read the Manual: Familiarize yourself with the manufacturer’s instructions and guidelines for your specific camper stove. Each stove may have its own unique requirements, so understanding the specific safety precautions is crucial.
- Inspect for Damage: Before lighting the stove, carefully inspect it for any visible damage, such as cracks or leaks. If you notice any issues, do not attempt to light the stove and have it inspected or repaired by a professional.
- Check for Ventilation: Ensure that the area where you plan to use the stove is well-ventilated. This will help prevent the buildup of potentially harmful gases and reduce the risk of carbon monoxide poisoning. If you’re using the stove inside a camper or tent, make sure the windows or vents are open to allow proper airflow.
- Keep Flammable Materials Away: Keep flammable materials, such as paper towels, plastic containers, or curtains, away from the stove and its surroundings. This will reduce the risk of accidental fires or flare-ups.
- Have a Fire Extinguisher Nearby: Always have a fire extinguisher readily available in case of emergencies. Familiarize yourself with its operation and make sure it’s in good working condition.
- Practice Basic Fire Safety: Know how to properly extinguish a fire and familiarize yourself with basic fire safety measures. This includes knowing how to turn off the gas supply and safely handling any potential stove-related accidents.
By adhering to these safety precautions, you can minimize the risk of accidents, protect yourself and those around you, and create a safe cooking environment during your camping trips.
Step 1: Check for Leaks
Before lighting your camper stove top, it’s crucial to check for any gas leaks to ensure your safety. Here’s how to do it:
- Turn Off Valves: Ensure that all the gas valves on the stove and the propane tank are securely turned off.
- Create a Soapy Water Solution: Mix a solution of soapy water in a spray bottle. Make sure the concentration of soap is sufficient to create visible bubbles when applied.
- Apply the Solution: Spray the soapy water solution onto the connections and hoses of the stove, including the valve connections and the regulator hose. Be thorough in applying the solution, ensuring all potential leak points are covered.
- Inspect for Bubbles: Carefully examine the sprayed areas for any bubble formations. If you notice bubbles, it indicates a gas leak. In such cases, do not proceed with lighting the stove and address the leak before usage.
- Retest if Necessary: If you notice a leak, tighten any loose connections and reapply the soapy water solution to check if the issue has been resolved. If the leak persists, it’s recommended to consult a professional for further assistance.
Remember, gas leaks can be extremely dangerous, so it’s important to take the necessary precautions and ensure there are no leaks before proceeding to light your camper stove top.
Step 2: Ensure Proper Ventilation
Proper ventilation is essential when using a camper stove top to prevent the buildup of harmful gases and ensure a safe cooking environment. Follow these steps to ensure proper ventilation:
- Choose a Well-Ventilated Area: Position your camper stove top in an area with good airflow, such as near an open window or outside in a well-ventilated space. This will help circulate air and prevent the accumulation of gas fumes.
- Keep Vents Open: If you’re using the stove inside a camper or tent, ensure that windows, vents, or doors are open to allow fresh air to enter and facilitate proper air circulation.
- Check for Obstructions: Before lighting the stove, make sure there are no obstructions around the burners or ventilation vents. Clear away any debris or objects that could block the flow of air.
- Monitor for Adequate Airflow: While cooking, pay attention to the flame on the burner. If you notice the flame flickering or behaving abnormally, it may indicate insufficient ventilation. Adjust the stove’s position or increase airflow to ensure proper combustion.
- Install a Carbon Monoxide Detector: Consider installing a carbon monoxide detector in your camper or cooking area. This will provide an extra level of safety by alerting you to the presence of potentially harmful gases.
Proper ventilation plays a vital role in preventing the buildup of carbon monoxide and other potentially dangerous gases. By ensuring good airflow, you can cook with peace of mind and minimize health risks associated with poor ventilation.
Before lighting a camper stove top, ensure the area is well-ventilated and free from any flammable materials. Use a long-reach lighter or matches to ignite the burner, and always follow the manufacturer’s instructions for your specific stove model.
Read more: How To Make A Stove Top Distiller
Step 3: Prepare the Stove
Before igniting your camper stove top, it’s important to properly prepare the stove for lighting. Follow these steps to ensure a smooth and safe lighting process:
- Clean the Stove: Remove any debris, dirt, or leftover food particles from the stove’s burners and cooking surfaces. A clean stove will ensure better performance and reduce the risk of flare-ups.
- Check Fuel Levels: Ensure that you have an adequate supply of fuel for your camper stove. Whether you’re using propane canisters or liquid fuel, make sure you have enough to sustain your cooking needs.
- Inspect and Secure Connections: Check all the connections between the stove and the fuel source. Ensure that they are tightly secured and free from damage or leaks. Tighten any loose connections if necessary.
- Position the Stove: Place the stove on a sturdy, flat surface that is heat-resistant and away from any flammable materials or obstructions.
- Remove Protective Covers: If your camper stove has removable covers or caps on the burners, make sure to remove them before attempting to light the stove. These covers are designed to protect the burners during transportation or storage and should not be left on while cooking.
Taking the time to properly prepare your camper stove will ensure that it is in optimal condition for lighting and cooking. By following these steps, you can minimize the risk of accidents and maintain the longevity of your stove.
Step 4: Ignite the Stove
Now that you have prepared your camper stove, it’s time to ignite the stove and bring the cooking flame to life. Follow these steps to safely ignite your camper stove top:
- Turn On the Gas: Depending on your stove model, locate the gas control knob or valve and turn it on in a slow and controlled manner. You may need to turn the knob counterclockwise or slide the valve open.
- Use the Igniter: Many camper stoves come equipped with a built-in igniter. To use it, press the igniter button or switch, usually located near the gas control knob. This will produce a spark to ignite the gas.
- Use a Flame Source: If your camper stove does not have a built-in igniter, you can use a long-reach lighter or a long match to ignite the gas. Hold the flame near the burner while turning on the gas. Once the flame catches, remove the lighter or match.
- Observe the Burner: After igniting the stove, observe the burner to ensure that the flame is steady and even. Adjust the gas flow if needed to achieve a blue and stable flame. A yellow or flickering flame may indicate an issue with the fuel mixture and should be addressed before proceeding.
It’s important to exercise caution when igniting the stove and to be aware of your surroundings. Avoid leaning over the stove during the ignition process to prevent the risk of burns or accidents. By following these steps, you can safely ignite your camper stove and start enjoying your outdoor cooking experience.
Step 5: Adjust the Flame
Once you have successfully ignited your camper stove, it’s important to adjust the flame to the desired level for optimal cooking. Follow these steps to adjust the flame on your camper stove top:
- Start with a Medium Flame: Begin by setting the gas control knob to a medium flame. This will provide a good starting point for most cooking tasks.
- Observe the Flame: Take a close look at the burner flame. A properly adjusted flame should be blue and steady. A yellow or flickering flame may indicate an issue with the fuel or air mixture and may need to be addressed.
- Slowly Increase or Decrease the Flame: If you need more heat, gradually increase the flame by turning the gas control knob slightly clockwise. For less heat, decrease the flame by turning the knob slightly counterclockwise.
- Monitor the Temperature: While adjusting the flame, closely monitor the temperature of your cooking surface. This will help you determine if the flame is providing the desired level of heat for your specific cooking needs.
- Make Fine Adjustments: If you need to make precise adjustments to the flame, turn the gas control knob in small increments until you achieve the desired level of heat.
It’s essential to have control over the flame on your camper stove top to ensure that your food is cooked evenly and to prevent any accidental flare-ups. By following these steps, you can easily adjust the flame to meet your cooking requirements and enjoy a successful outdoor cooking experience.
Step 6: Monitoring and Maintenance
Once your camper stove is lit and adjusted to the desired flame, it’s important to continuously monitor its performance and practice regular maintenance. Follow these steps to ensure the safe and efficient operation of your camper stove:
- Stay Alert: When using the stove, remain attentive and monitor the flame at all times. This will allow you to quickly address any irregularities or issues that may arise.
- Prevent Food Spills: Take precautions to prevent food or liquids from spilling onto the burners or near the flame. Clean up any spills promptly to avoid flare-ups or damage to the stove.
- Regularly Clean and Maintain: After each use, clean the stove thoroughly, removing any grease or debris from the burners, grates, and cooking surfaces. Regular maintenance will prevent buildup and ensure optimal performance.
- Check for Leaks: Regularly inspect the connections and hoses for any signs of gas leaks. Use the soapy water method mentioned earlier to verify that there are no leaks. If you notice any issues, consult a professional for repairs.
- Replace Parts as Needed: Over time, certain parts of your camper stove may wear out or become damaged. Be prepared to replace worn-out parts, such as valves, regulators, or burners, to maintain the efficiency and safety of your stove.
- Store Properly: When not in use, store your camper stove in a clean and dry location, protected from the elements. Follow the manufacturer’s instructions for proper storage to prolong the lifespan of your stove.
By monitoring your camper stove’s performance and practicing regular maintenance, you can ensure that it continues to function safely and efficiently for your future outdoor cooking adventures.
Read more: How To Clean A Smooth Top Range Or Cooktop
Conclusion
Properly lighting a camper stove top is essential for safe and enjoyable outdoor cooking experiences. By following the steps outlined in this article, you can ensure a smooth and efficient lighting process while prioritizing your safety and the well-being of those around you.
We emphasized the importance of proper lighting and highlighted the significance of safety precautions to be taken before lighting the stove. Checking for gas leaks, ensuring proper ventilation, and practicing basic fire safety measures are crucial steps to minimize risks and create a safe cooking environment.
We provided step-by-step instructions on preparing the stove, igniting the flame, adjusting the heat level, and monitoring the stove’s performance. These steps will help you achieve ideal cooking conditions and optimize fuel efficiency during your camping adventures.
Lastly, we emphasized the importance of regular monitoring and maintenance to keep your camper stove in optimal condition. By staying attentive, practicing proper cleaning and maintenance, and addressing any issues promptly, you can ensure the long-lasting performance and safety of your stove.
Remember, outdoor cooking is a delightful experience, but it should always be accompanied by caution and responsibility. Prioritize safety, understand your equipment, and follow the manufacturer’s instructions for the best results.
Now that you are equipped with the knowledge and steps to safely light a camper stove top, you can confidently embark on your camping trips, creating delicious meals and memories in the great outdoors.
Frequently Asked Questions about How To Light A Camper Stove Top
Was this page helpful?
At Storables.com, we guarantee accurate and reliable information. Our content, validated by Expert Board Contributors, is crafted following stringent Editorial Policies. We're committed to providing you with well-researched, expert-backed insights for all your informational needs.


0 thoughts on “How To Light A Camper Stove Top”