Articles
How To Make A Doll Toilet Paper Holder
Modified: August 16, 2024
Learn how to make a cute and practical doll toilet paper holder with this step-by-step guide. Perfect for craft lovers and DIY enthusiasts.
(Many of the links in this article redirect to a specific reviewed product. Your purchase of these products through affiliate links helps to generate commission for Storables.com, at no extra cost. Learn more)
Introduction
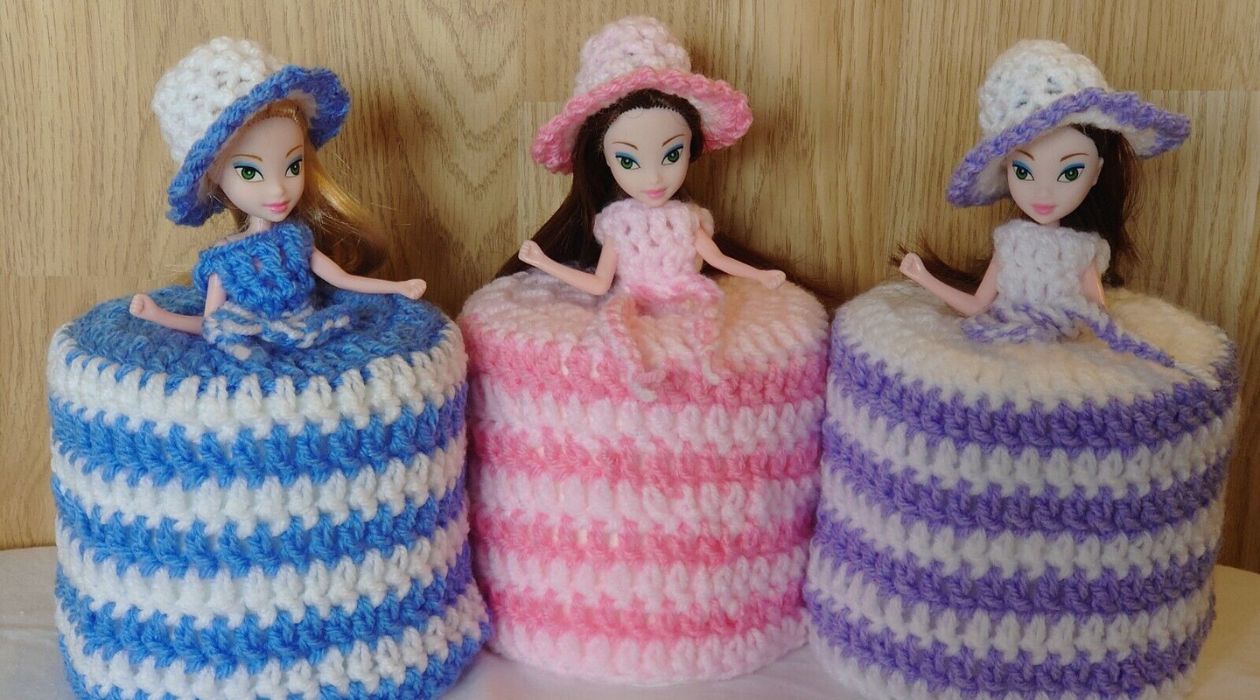
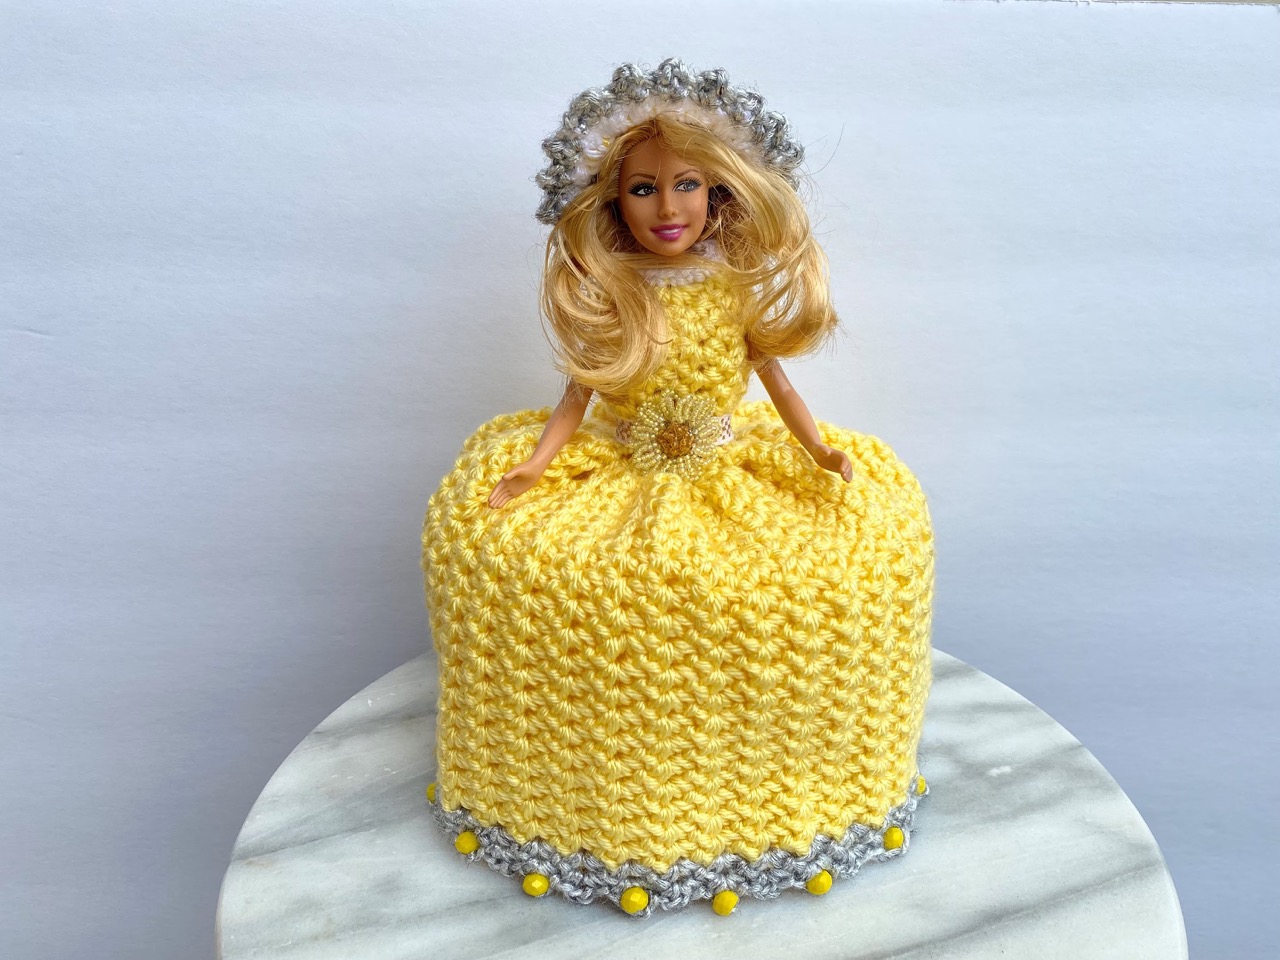
Welcome to the world of creative crafting! In this article, we will explore how to make a charming and adorable doll toilet paper holder. This DIY project is perfect for adding a touch of whimsy to your bathroom decor or for creating a fun and unique gift for a friend or loved one.
The doll toilet paper holder is not only functional but also a delightful addition to any bathroom. Whether you have a little one who loves playing with dolls or simply want to bring a touch of personality to your space, this project is sure to be a hit.
In this step-by-step guide, we will walk you through the process of creating the doll toilet paper holder from start to finish. You don’t need to be a crafting expert to tackle this project – just a bit of time, patience, and a few basic materials.
So, let’s gather our supplies and get started on this exciting and rewarding DIY endeavor!
Key Takeaways:
- Create a whimsical and functional doll toilet paper holder using simple materials and step-by-step crafting techniques. Add personality to your bathroom decor or surprise a loved one with this charming DIY project.
- Embrace creativity and customization to craft a unique doll toilet paper holder that brings joy and laughter to any space. From preparing the rolls to adding final touches, enjoy the rewarding journey of creating personalized bathroom decor.
Read more: How To Make A Toilet Paper Holder
Materials Needed
Before diving into the crafting process, let’s gather all the necessary materials. Here’s what you’ll need to create your own doll toilet paper holder:
- Empty toilet paper rolls (the number will depend on how many dolls you want to make)
- Construction paper or cardstock in various colors
- Scissors
- Glue or tape
- Markers or colored pencils
- Ribbon or yarn
- Fabric scraps
- Small buttons or beads
- Googly eyes
- Optional: sequins, stickers, or any other embellishments you’d like to add
These materials are readily available at most craft stores or can be easily sourced online. Feel free to get creative with your choices – mix and match different colors and patterns to make your doll toilet paper holder truly unique.
Once you’ve gathered all your materials, find a comfortable and well-lit workspace where you can easily work on your craft. Now that we have everything we need, let’s move on to the next step in creating our adorable doll toilet paper holder.
Step 1: Preparing the Toilet Paper Rolls
The first step in creating your doll toilet paper holder is to prepare the toilet paper rolls. Start by ensuring that the rolls are clean and empty. You can also choose to cover them with colored paper or paint them to match the theme of your doll.
If you decide to cover the rolls, simply measure the length of the roll and cut a piece of construction paper or cardstock to fit around it. Secure the paper with glue or tape, making sure to smooth out any wrinkles or bubbles.
Once your rolls are covered, you can choose to decorate them further if desired. Add glitter, stickers, or any other embellishments that match your doll’s personality or the overall theme you have in mind.
It’s essential to let the rolls dry completely before proceeding to the next step. This will ensure that your doll toilet paper holder looks neat and polished.
Now that the rolls are prepared, set them aside and get ready to bring your doll to life in the next step.
Step 2: Creating the Doll Body
Now that the toilet paper rolls are ready, it’s time to create the body of your doll toilet paper holder. This step will involve crafting a doll-shaped form that will fit around the rolls.
To create the doll body, start by taking a piece of construction paper or cardstock and rolling it into a cylinder. Secure the edges with glue or tape, creating a tube-shaped structure.
Next, fold the top and bottom ends of the tube inward to create the head and feet of the doll. You can adjust the size of the head and feet to your preference, ensuring they are proportionate to the size of the toilet paper roll.
Once the basic shape is formed, you can begin adding details to the doll’s body. Use markers or colored pencils to draw a face on the head, including eyes, a nose, and a mouth. You can also give your doll some hair by cutting out strips of colored paper and attaching them to the top of the head.
Now it’s time to dress up your doll! Cut out a small piece of fabric and wrap it around the body, creating a simple dress or outfit. Secure the fabric with glue or tape, making sure it is snug but not too tight to fit around the toilet paper roll.
Don’t forget to add any other details you desire. You can use buttons or beads for buttons, create a belt with a strip of paper, or even add accessories like a bow or a necklace.
Take your time with this step to ensure that your doll body is crafted with care and attention to detail. Once you are satisfied with the appearance, set the doll body aside and move on to the next step of creating the doll clothes.
When making a doll toilet paper holder, be sure to use strong and durable materials to ensure it can hold the weight of the toilet paper roll without tipping over.
Step 3: Making the Doll Clothes
Now that the doll body is complete, it’s time to add some stylish clothes to your doll toilet paper holder. This step will allow you to customize the look of your doll and add a touch of personality.
Start by selecting your desired fabric or paper scraps for the doll’s clothes. Cut out shapes that will fit around the body to create a top, skirt, or pants. You can use different colors and patterns to add visual interest and make your doll truly unique.
Attach the clothes to the doll body using glue or tape. Make sure the clothes are secure and well-fitted, but leave enough space for the toilet paper roll to slide in easily.
Now comes the fun part – decorating the doll’s clothes! Use markers, colored pencils, or fabric paint to add patterns, designs, or buttons to the clothes. You can also use sequins, stickers, or any other embellishments to add extra flair to the doll’s outfit. Let your creativity shine through as you bring your doll’s clothes to life.
Once you are satisfied with the appearance of the doll’s clothes, set it aside and get ready for the next step.
Note: If you’re feeling particularly crafty, you can even create multiple sets of clothes for your doll toilet paper holder. This way, you can change the doll’s outfit whenever you like, adding a fresh and fun element to your bathroom decor.
Now that the doll’s clothes are complete, it’s time to attach the doll to the toilet paper holder. Let’s move on to the next step and bring everything together.
Read more: How To Make Pipe Toilet Paper Holder
Step 4: Attaching the Doll to the Toilet Paper Holder
Now that your doll is complete with its fashionable clothes, it’s time to attach it to the toilet paper holder. This step will ensure that your doll toilet paper holder is functional and ready to adorn your bathroom.
To attach the doll to the toilet paper holder, start by positioning the doll body around the toilet paper roll. The head of the doll should be on top of the roll, and the feet should be at the bottom.
Secure the doll body to the toilet paper roll using tape, glue, or even a small rubber band. This will ensure that the doll stays in place while allowing easy access to the toilet paper.
Make sure to adjust the doll’s clothes if necessary, ensuring they look neat and properly fit around the toilet paper roll. You can also adjust the position of the doll’s arms and hands to add more personality and charm.
Take a step back and admire your creation! Your doll toilet paper holder is starting to take shape and is ready to bring a smile to everyone who sees it.
Now, let’s add some final touches to make your doll toilet paper holder truly stand out.
Now that the doll is securely attached to the toilet paper roll, it’s time to add those finishing touches to make your creation truly shine.
Now that the doll is securely attached to the toilet paper roll, it’s time to add those final touches to make your creation truly shine.
Step 5: Adding Final Touches
Congratulations! You’re in the home stretch of creating your very own doll toilet paper holder. In this final step, we will add some extra details and finishing touches to make your creation even more delightful.
First, let’s focus on the face of the doll. If you haven’t already done so, you can attach a pair of googly eyes to give your doll a whimsical and lifelike appearance. Use a small dab of glue to secure the eyes in place.
Next, whether you drew a mouth on the face or left it blank, you can add a smile or other facial expression using markers or colored pencils. This will add a touch of personality and charm to your doll.
Now, let’s move on to the hair. If your doll has paper hair, you can use scissors to give it some texture by creating small cuts or waves. Alternatively, you can use yarn or ribbon to create different hairstyles. Attach the hair to the head using glue or tape, and arrange it in a style that complements the doll’s overall look.
Once the face and hair are complete, you may want to add some extra embellishments to the doll’s outfit. This could include bows, ribbons, sequins, or any other decorative elements you desire. Let your creativity run wild, keeping in mind your doll’s personality and the overall aesthetic you want to achieve.
Finally, take a few moments to step back and assess your finished doll toilet paper holder. Make any necessary adjustments or additions to ensure that every detail is just as you envisioned it.
Congratulations! You have successfully completed your very own doll toilet paper holder. It’s now time to find the perfect spot in your bathroom to showcase your creation.
This charming and functional piece of decor is sure to bring a smile to your face and add a whimsical touch to your space. Whether you keep it for yourself or gift it to someone special, your doll toilet paper holder will be a delightful addition to any bathroom.
Enjoy the creative journey and the joy that comes with crafting something unique and beautiful! Happy crafting!
Conclusion
Creating a doll toilet paper holder is a fun and creative DIY project that allows you to add a touch of whimsy and charm to your bathroom. By following the step-by-step guide outlined in this article, you can craft your very own adorable and personalized doll toilet paper holder.
Throughout the process, we explored how to prepare the toilet paper rolls, create the doll body, make the doll clothes, attach the doll to the toilet paper holder, and add those final touches that bring your creation to life. Each step involved a variety of materials and techniques to build a unique and eye-catching piece of decor.
Remember, don’t be afraid to let your creativity shine as you customize your doll’s appearance and style. Experiment with different colors, patterns, and embellishments to make your doll truly unique.
Whether you choose to keep your doll toilet paper holder for yourself or give it as a gift, it will undoubtedly bring joy and laughter to anyone who sees it. This DIY project is a fantastic way to put your crafting skills to use and add a personal touch to your bathroom decor.
We hope that this guide has inspired you to embark on your own doll toilet paper holder creation. So gather your materials, find a comfortable workspace, and let your imagination run wild. Happy crafting!
Now that you've mastered creating a charming doll toilet paper holder, why not consider upgrading your bathroom storage solutions overall? Our next guide on stylish and efficient toilet paper storage options for 2024 has got you sorted. From sleek hidden compartments to adorable stand-alone units, find the perfect way to keep your bathroom organized and your essentials within easy reach. Dive into our comprehensive guide and transform your bathroom with flair!
Frequently Asked Questions about How To Make A Doll Toilet Paper Holder
Was this page helpful?
At Storables.com, we guarantee accurate and reliable information. Our content, validated by Expert Board Contributors, is crafted following stringent Editorial Policies. We're committed to providing you with well-researched, expert-backed insights for all your informational needs.


0 thoughts on “How To Make A Doll Toilet Paper Holder”