Articles
How To Make A Memory Quilt Out Of Clothes
Modified: December 7, 2023
Learn how to make a memory quilt out of clothes with our informative articles. Discover step-by-step instructions and creative ideas to preserve cherished memories.
(Many of the links in this article redirect to a specific reviewed product. Your purchase of these products through affiliate links helps to generate commission for Storables.com, at no extra cost. Learn more)
Introduction
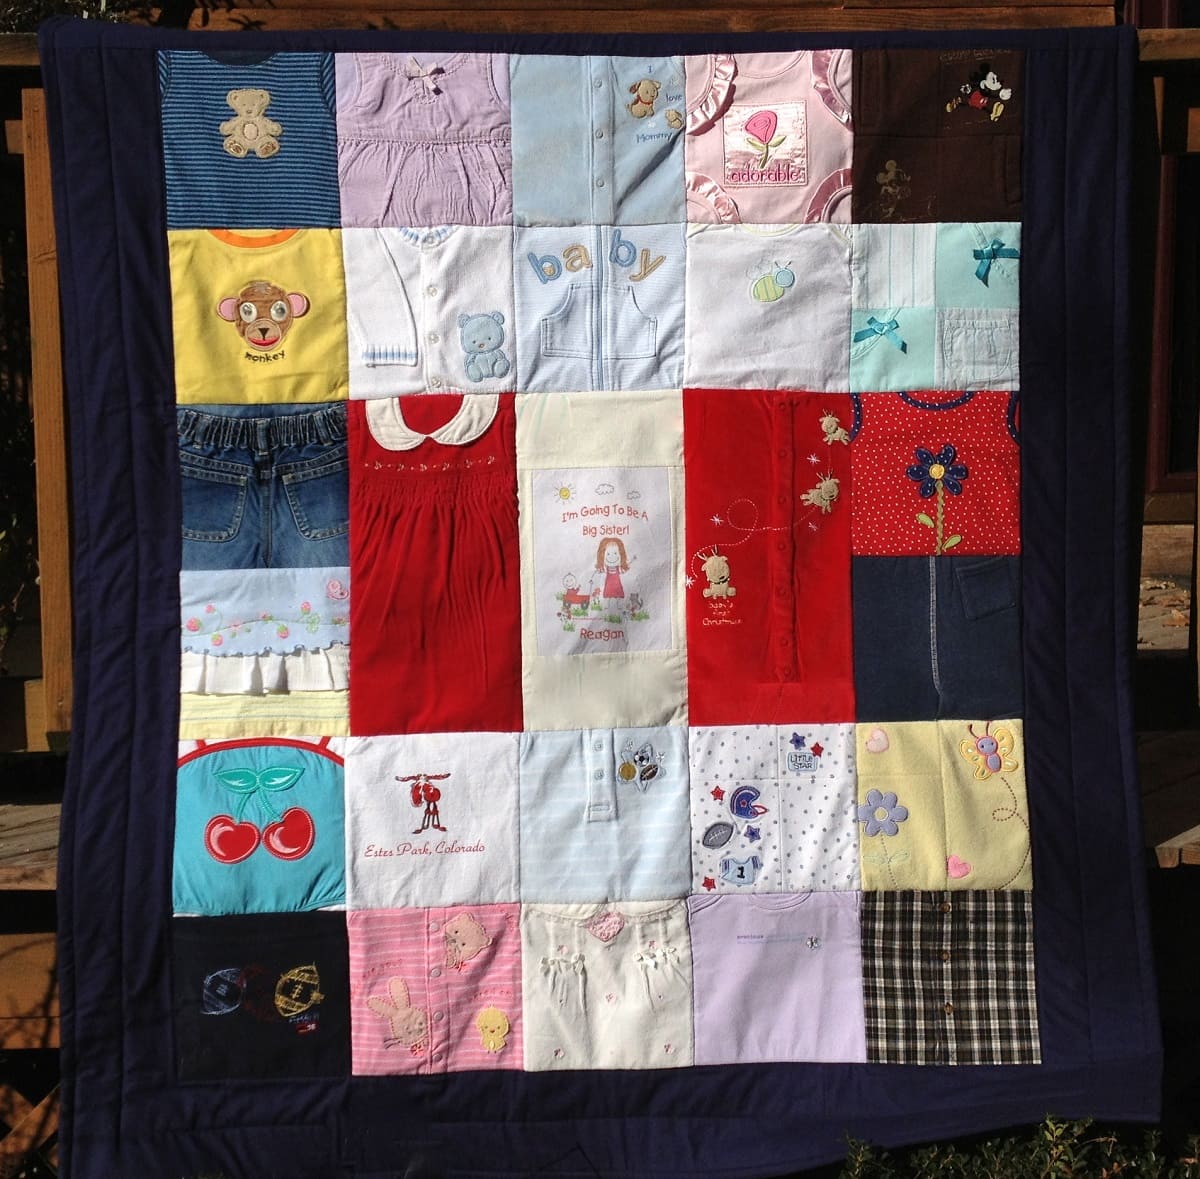
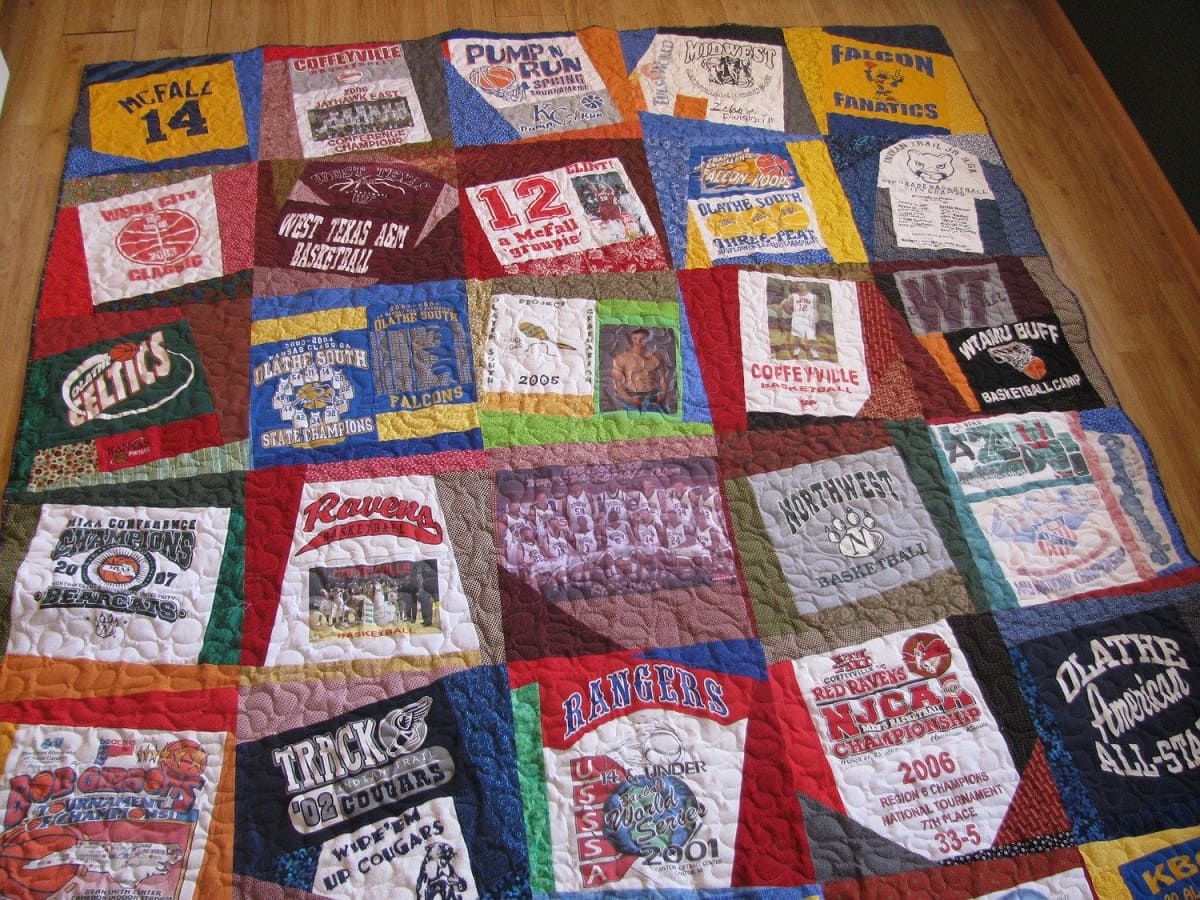
Welcome to the world of memory quilts! If you’re looking for a unique and sentimental way to preserve cherished memories, making a memory quilt out of clothes can be a great option. These quilts not only provide warmth and comfort but also serve as a visual reminder of moments and milestones in your life or the life of someone special. Whether it’s a collection of baby clothes, sentimental t-shirts, or garments from a loved one who has passed away, turning them into a quilt can be a meaningful and creative project.
Memory quilts are not only a beautiful keepsake but also a way to repurpose clothing items that may hold sentimental value. Instead of letting those clothes sit in a box or closet, you can transform them into a tangible piece of art that you can cherish for years to come. Additionally, creating a memory quilt allows you to showcase and celebrate the unique stories behind each fabric square, providing a sense of connection and nostalgia.
If you’re new to quilting, fear not! This article will guide you through the process of making a memory quilt out of clothes, from gathering the materials to adding the finishing touches. While it may seem intimidating at first, with a little patience and creativity, you’ll be able to create a beautiful and personalized quilt that holds countless memories.
Before we dive into the steps, it’s important to note that the techniques and methods described here are just one way to make a memory quilt. Feel free to adapt and modify them according to your preferences and the materials you have on hand.
Now, without further ado, let’s get started on this memorable journey of creating a memory quilt out of clothes!
Key Takeaways:
- Transforming cherished clothes into a memory quilt is a labor of love, creativity, and reflection. Each fabric square holds a unique story, making the quilt a tangible connection to special memories and moments.
- The process of making a memory quilt involves more than stitching fabric; it’s a journey of preserving emotions and nostalgia. From designing the pattern to adding finishing touches, every step contributes to creating a personalized masterpiece.
Read more: How Do You Make A Memory Quilt
Getting Started
Before you begin making your memory quilt out of clothes, it’s essential to gather the necessary tools and equipment. Here’s a list of what you’ll need:
- Fabric scissors
- Quilting ruler
- Cutting mat
- Pins
- Sewing machine
- Thread
- Iron
- Fabric marking pen or tailor’s chalk
- Batting (for the quilt’s filling)
- Backing fabric
- Binding fabric
Once you have all the necessary supplies, you’re ready to start transforming your clothes into a quilt!
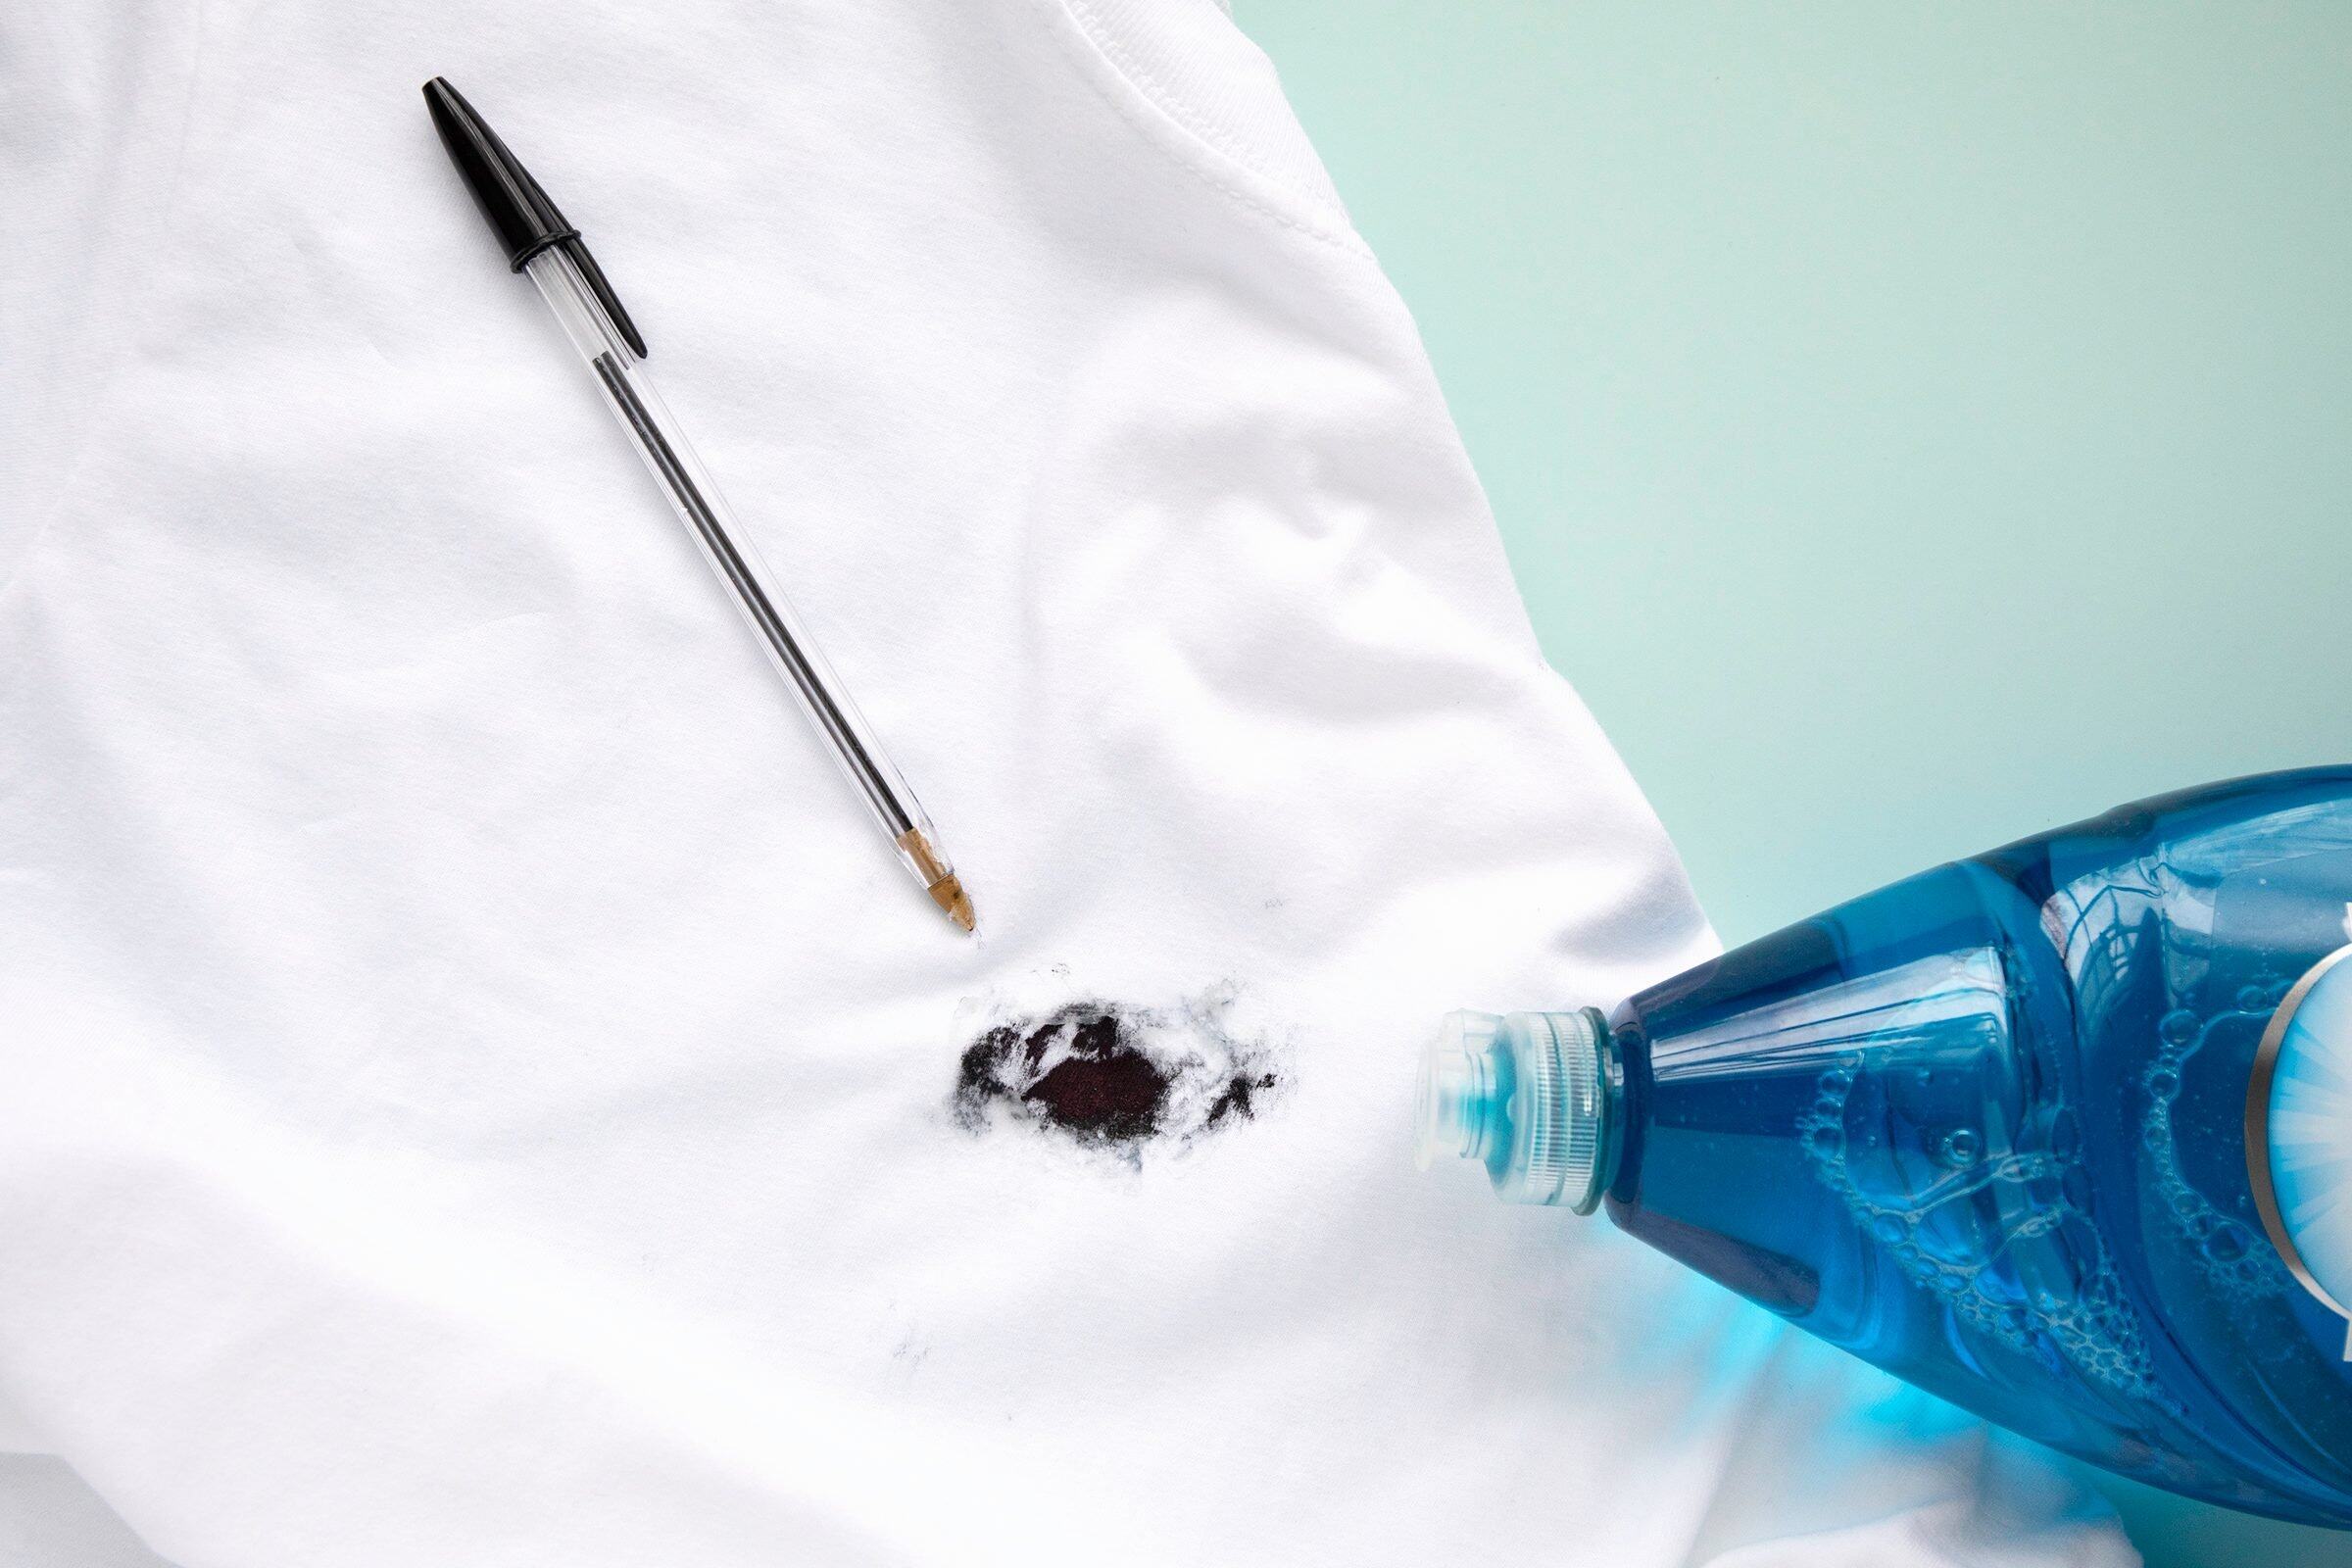
Note: It’s important to ensure that the clothes you plan to use for your memory quilt are clean and in good condition. If needed, gently wash or dry clean the garments before proceeding with the project. Also, consider the sentimental value of the clothes and be prepared to make some cuts or alterations to fit them into the quilt design.
Now that you have your tools and clean clothes, the next step is to gather all the clothes and other fabric items you want to include in your memory quilt. This can include t-shirts, baby clothes, uniforms, or any other fabric pieces that hold significant memories for you or the person the quilt is intended for.
As you gather the clothes, take some time to reflect on the memories associated with each item. This will help you in designing the quilt pattern and arranging the pieces in a way that tells a story or represents a specific theme. For example, if you’re making a memory quilt for a child, you might want to include clothes from various stages of their growth, capturing their journey from infancy to childhood.
With your materials and memories in hand, you’re now ready to move on to the next step: preparing the clothes for the quilting process.
Gathering Materials
When it comes to making a memory quilt out of clothes, the fabric you choose plays a crucial role in preserving and showcasing the memories associated with each garment. Here are some key considerations for gathering the materials:
- Clothes: Start by selecting the clothes that hold the most sentimental value. These can be baby clothes, t-shirts, dresses, or any other garments that carry memories or have special significance. Make sure to choose items that are in good condition and can be cut into fabric squares.
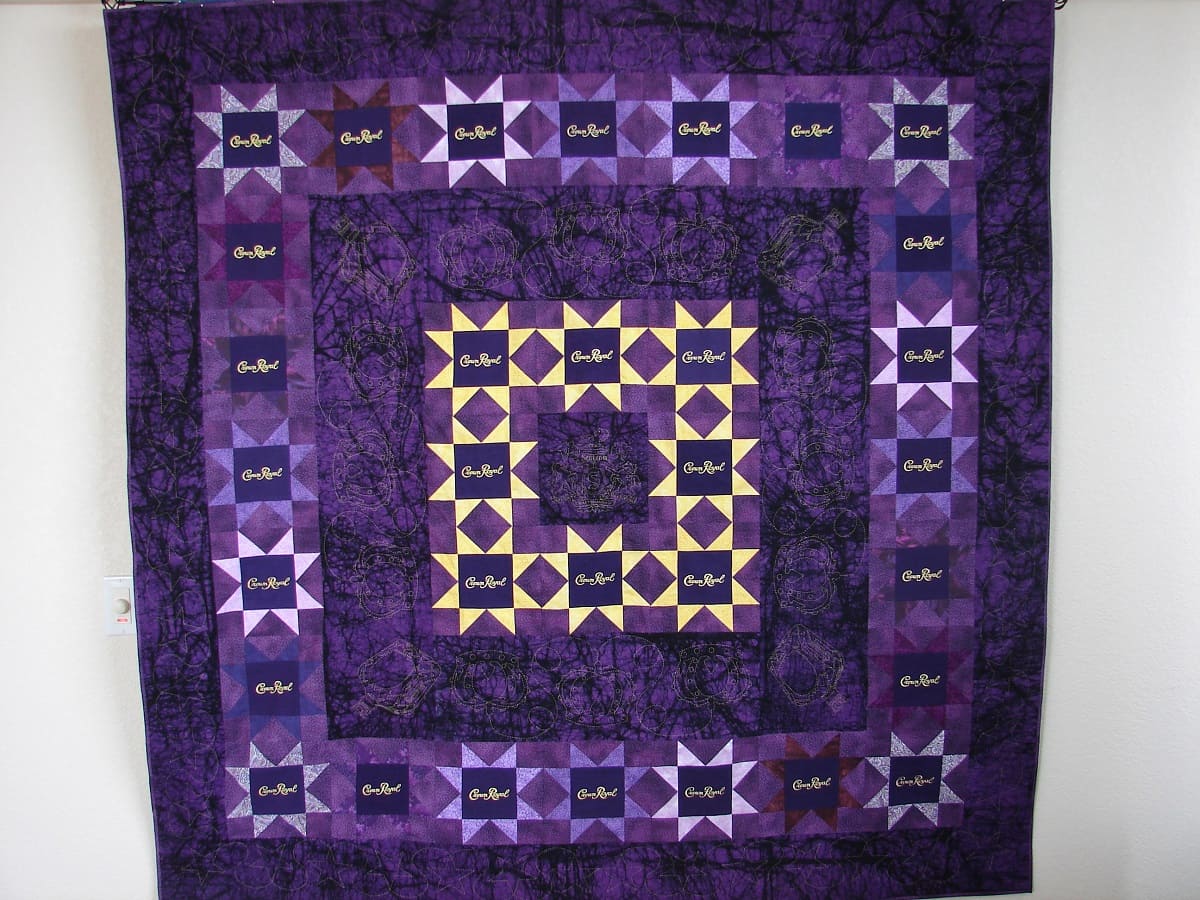
- Additional Fabric: In addition to the clothes, you may want to incorporate other fabrics into the quilt. Consider using complementary fabrics, such as solid colors or patterns, to enhance the overall design. You can purchase these fabrics from a fabric store or repurpose old bedsheets, blankets, or curtains.
- Embellishments: Depending on your personal preference and the stories you want to tell, you can also gather embellishments such as buttons, ribbons, patches, or embroidery pieces. These can be used to add extra detail and symbolism to the quilt.
When gathering the materials, try to strike a balance between sentimental value, color coordination, and durability. It’s important to choose materials that will withstand the test of time and retain their appearance even after multiple washes.
Remember, the purpose of a memory quilt is to celebrate memories and create a visually appealing piece that tells a story. Consider the overall theme or narrative you want to convey through the quilt. This can help guide your choices when selecting the materials.
Once you have gathered all the necessary clothes, fabrics, and embellishments, it’s time to move on to the next step: preparing the clothes for the quilting process.
Preparing the Clothes
Before you can start cutting and sewing the clothes for your memory quilt, it’s important to properly prepare them. This will ensure that the fabric is in the best condition and ready to be incorporated into the quilt. Here are some steps to follow when preparing the clothes:
- Wash and Dry: If the clothes you’re using are dirty or have been stored for a long time, it’s a good idea to give them a gentle wash. Follow the care instructions on the labels to ensure proper cleaning. After washing, dry the clothes thoroughly, either by air-drying or using a dryer, based on the fabric’s requirements.
- Iron: Once the clothes are dry, iron them to remove any wrinkles or creases. This will make it easier to cut and work with the fabric. Use the appropriate heat settings for the fabric type to avoid damaging it.
- Stabilize Stretchy Fabrics: If you’re working with stretchy fabrics like t-shirts or knits, consider stabilizing them before cutting. This can prevent the fabric from stretching or distorting during the quilting process. You can use a lightweight fusible interfacing or a stabilizer fabric to reinforce the stretchy areas.
- Remove Buttons and Zippers: If the clothes have buttons, zippers, or other embellishments that may interfere with the quilting process, remove them. This will ensure a smooth and even surface when cutting and sewing the fabric squares.
- Trim Seam Allowances: If the clothes have bulky seam allowances, consider trimming them down to reduce bulk in the quilt. This will make the quilting process easier and result in a flatter and more professional-looking finished quilt.
By properly preparing the clothes, you’ll ensure that they are clean, wrinkle-free, and ready to be transformed into fabric squares for your memory quilt. Taking the time to prepare the fabric will contribute to the overall quality and longevity of your quilt.
With the clothes now prepared, you’re ready to move on to the next step: designing the quilt pattern.
Designing the Quilt Pattern
The design of your memory quilt pattern is where your creativity truly comes into play. This is your opportunity to tell a story through the arrangement of fabric squares and create a visually appealing composition. Here are some steps to help you design the quilt pattern:
- Sketch or Digital Software: Begin by sketching out your quilt design on paper or using digital design software. This will give you a visual representation of how the fabric squares will be arranged. Consider factors such as color placement, size variations, and any additional design elements you may want to incorporate.
- Block or Random Layout: Decide whether you want a block layout, where each fabric square is the same size and the pattern is repeated across the quilt, or if you prefer a random layout, where the fabric squares are different sizes and arranged in an organic pattern.
- Theme and Storyline: Consider the memories and stories associated with each fabric square. You may want to organize the squares in a way that tells a chronological or thematic story. For example, if you’re creating a quilt to commemorate a loved one’s life, you can arrange the fabric squares based on significant events or milestones.
- Color and Contrast: Think about the color scheme you want to achieve in your quilt. Choose colors that work well together and create a visually pleasing contrast. You can group similar colors or create a gradient effect. Experiment with different combinations to find the one that resonates with you.
- Consider Embellishments: If you gathered any embellishments such as buttons or patches, incorporate them into the design. They can be strategically placed to add interest and texture to the quilt.
Remember, there is no right or wrong way to design your memory quilt pattern. It’s a personal and creative endeavor, so go with what feels right to you. Trust your instincts and let your imagination guide you in creating a pattern that truly represents the memories and emotions you want to capture.
Once you have finalized the quilt pattern design, you’re ready to move on to the next step: cutting the clothes into fabric squares.
Read more: How To Make A Memory Quilt Using Photos
Cutting the Clothes
Now that you have designed your quilt pattern, it’s time to start cutting the clothes into fabric squares. This step is crucial for creating uniform pieces that can be easily sewn together. Here’s how you can approach cutting the clothes:
- Measure and Mark: First, decide on the desired size of your fabric squares. Common sizes range from 4 inches to 12 inches, but you can choose any size that fits your design. Use a quilting ruler and a fabric marking pen or tailor’s chalk to measure and mark the fabric squares’ dimensions on the clothes.
- Cut Carefully: Once the squares are marked, use sharp fabric scissors to carefully cut along the marked lines. Take your time to ensure clean and precise cuts. If you’re cutting through multiple layers, be extra cautious to maintain consistency in size and shape.
- Save Excess Fabric: As you cut the fabric squares, set aside any excess fabric that can be repurposed for other parts of the quilt or used for future projects. It’s always good to have some extra fabric on hand.
- Organize and Label: As you cut the fabric squares, it’s helpful to organize them and label them based on their position in the quilt pattern. This will make it easier to assemble the quilt top later on.
Be mindful of the fabric’s pattern and orientation while cutting. Consider which direction you want the pattern to face in the final quilt and make cuts accordingly. Also, if you’re cutting clothes with sentimental graphics or images, make sure to center them within the fabric square to showcase their significance.
As you progress through the cutting process, take breaks to assess your progress and ensure that you have enough fabric squares to complete your design. It’s better to have a few extra fabric squares than to run short during the assembly stage.
With the clothes now transformed into fabric squares, you’re ready to move on to the next step: arranging the pieces to bring your quilt pattern to life.
Arranging the Pieces
Now that you have your fabric squares, it’s time to bring your quilt pattern to life by arranging the pieces in a visually pleasing and meaningful way. This step allows you to see your design taking shape and ensures that the memories and stories behind each fabric square are celebrated. Here’s how you can approach arranging the pieces:
- Lay Out the Design: Begin by clearing a large, flat surface like a table or the floor. Refer to your quilt pattern design and lay out the fabric squares accordingly, following the color placement and story elements you defined.
- Experiment with Placement: This is the time to play around with different arrangements and see what works best for your quilt. Consider the balance of colors, patterns, and memories as you move the pieces around. Take photos or make sketches of the different arrangements to help you decide on the final arrangement.
- Avoid Clustering Similar Fabrics: To enhance the visual appeal of your quilt and create a balanced composition, try to avoid clustering fabrics of the same color or pattern. Instead, distribute them throughout the quilt or intersperse them with contrasting fabrics.
- Consider the Flow: Pay attention to how fabrics transition from one color or pattern to another. Aim for a smooth flow and consider using solid or neutral fabrics as transitional elements to create a cohesive design.
- Step Back and Assess: As you arrange the pieces, step back and take a look from a distance to see how the overall placement looks. This will give you a different perspective and help you make any necessary adjustments.
Remember, there is no right or wrong way to arrange the fabric squares. It’s a personal and artistic process, so trust your intuition and create an arrangement that resonates with you and the memories you’re commemorating.
Once you’re satisfied with the arrangement, it’s time to move on to the next step: sewing the quilt top to bring your design to life.
When making a memory quilt out of clothes, be sure to use interfacing on the back of stretchy or delicate fabrics to stabilize them and prevent stretching or distortion during quilting.
Sewing the Quilt Top
With the fabric squares arranged beautifully, it’s time to sew them together to create the quilt top. This step will bring your design to life and form the foundation of your memory quilt. Here’s how you can approach sewing the quilt top:
- Gather the Sewing Supplies: Before you begin sewing, make sure you have your sewing machine, thread, pins, and any other necessary tools within reach.
- Start Sewing Rows: Begin by sewing the fabric squares together row by row. Place the right sides of the fabric squares together and align the edges. Use pins to secure them in place, making sure they lie flat. Then, sew a straight seam along the edges, using a ¼-inch seam allowance.
- Press the Seams: After sewing each row, press the seam allowances with an iron. This will help the quilt top lie flat and make it easier to sew additional rows.
- Join the Rows: Once all the rows are sewn, you can start joining them together. Place the right sides of two rows together, aligning the seams. Pin them in place, ensuring the fabric squares match up. Then, sew a straight seam along the edges, again using a ¼-inch seam allowance. Repeat this process until all the rows are joined together.
- Press and Trim: Press the seam allowances after joining each row to keep the quilt top neat and flat. Trim any excess threads or fabric edges for a clean finish.
Throughout the sewing process, take your time to ensure precise and accurate stitching. If necessary, refer to your quilt pattern design to make sure you’re following the correct sequence and maintaining the integrity of the layout.
Keep in mind that sewing the quilt top is just one part of the overall quilting process. It’s important to consider the other layers and finishing touches that will be added later on.
With the quilt top sewn together, you’re now ready to move on to the next step: adding the quilt backing.
Adding the Quilt Backing
With the quilt top complete, the next step in making your memory quilt is adding the quilt backing. The backing fabric serves as the foundation and provides stability to the quilt. Here’s how you can add the quilt backing:
- Choose the Backing Fabric: Select a fabric for the backing that complements the quilt top. You can choose a solid color, a patterned fabric, or even repurpose a bedsheet or fabric you already have. Make sure the fabric is at least a few inches larger on all sides compared to the quilt top to allow for seam allowances.
- Prepare the Backing Fabric: Begin by washing, drying, and ironing the backing fabric to ensure it’s clean and wrinkle-free. Lay it flat on your work surface.
- Layer the Quilt: Place the quilt top on top of the backing fabric with right sides facing each other. Ensure the edges of the quilt top and backing fabric are aligned.
- Pin and Mark: Pin the layers together, starting from the center and working your way outwards. This will help prevent shifting during the sewing process. Optionally, you can use fabric marking tools to create quilting guidelines on the backing fabric.
- Sew the Layers: Begin sewing around the edges of the quilt, leaving a gap of a few inches for turning the quilt right side out. Use a ¼-inch seam allowance and reinforce the starting and ending stitches. This will secure the layers together. Backstitch at the beginning and end to ensure the stitches don’t unravel.
- Trim Excess Fabric: Trim the excess backing fabric and batting around the edges, leaving a ¼-inch seam allowance. It’s important to remove bulk to achieve a smooth and flat finish.
Once you have added the quilt backing, you’re ready to move on to the next step in the quilting process: layering and quilting.
Adding the quilt backing not only provides support but also adds a complementary element to the overall design. Choose a fabric that enhances the quilt’s aesthetic appeal and complements the colors and patterns used in the quilt top.
With the quilt backing in place, you’re well on your way to completing your memory quilt. The next steps will involve layering the quilt and stitching it together through the quilting process.
Read more: How To Make A Quilt Out Of Sweaters
Layering and Quilting
Layering and quilting are fundamental steps in the process of making a memory quilt. Layering involves sandwiching the quilt top, batting, and backing fabric together, while quilting refers to stitching these layers to create a cohesive and durable quilt. Here’s how you can approach layering and quilting:
- Prepare the Batting: Begin by cutting the batting to the same size as the quilt top. Make sure it lies flat and smooth, without any wrinkles or folds.
- Layer the Quilt: Lay the backing fabric on a clean and flat surface, wrong side up. Smooth it out to remove any creases. Place the batting on top of the backing fabric, followed by the quilt top, right side up. Ensure all layers are aligned and centered.
- Baste the Layers: To hold the layers together while quilting, use safety pins or basting spray to secure them. Start from the center and work your way outwards, spacing the pins or applying the spray evenly across the quilt surface.
- Choose a Quilting Technique: Decide on the quilting technique you want to use to stitch the layers together. This can include hand quilting, machine quilting, or a combination of both. Consider the complexity of your quilt design and your quilting skills when making this decision.
- Quilt the Layers: Using your chosen quilting technique, stitch through all layers of the quilt, following the quilting guidelines you marked earlier. Take your time and ensure even and precise stitching. You can quilt along straight lines, create geometric patterns, or even add free-motion quilting designs to enhance the overall aesthetics.
- Secure and Knot: After completing the quilting stitches, secure the thread ends and knot them to prevent unraveling. Trim any excess threads.
Quilting not only adds visual interest to your memory quilt but also ensures that the layers are securely held together. Choose a quilting style and patterns that enhance the overall design and complement the theme or story behind your quilt.
Remember to take breaks and pace yourself while quilting, as it can be a time-consuming process. Quilting is an opportunity to add your personal touch and creativity to the memory quilt, so enjoy the journey as you bring your quilt to life.
Once the quilting is complete, it’s time to add the finishing touch to your memory quilt through binding.
Binding the Quilt
Binding is the final step in completing your memory quilt. It not only provides a finished look but also serves as a protective and durable edge for your quilt. Here’s how you can approach binding the quilt:
- Select Binding Fabric: Choose a fabric that complements the colors and design of your quilt. Cut the fabric into strips, 2.5 inches wide, and join them together to create one long continuous strip. Alternatively, you can purchase pre-made binding strips.
- Prepare the Binding: Fold the binding strip in half lengthwise, wrong sides together, and press it with an iron to create a crease. This will make it easier to attach the binding to the quilt.
- Attach the Binding: Starting on one side of the quilt, align the raw edges of the binding strip with the raw edges of the quilt front. Leave a few inches of binding unstitched at the beginning. Use pins to secure the binding in place, easing it around the corners.
- Sew the Binding: Using a ¼-inch seam allowance, stitch along the creased folded edge of the binding, securing it to the quilt front. Continue sewing all the way around the quilt, mitering the corners by folding them neatly and stitching diagonally.
- Join the Binding Ends: When you reach the starting point, stop stitching a few inches before the end of the binding strip. Trim the excess binding, leaving a small overhang. Fold the end of the binding strip back, tucking it inside the beginning of the strip to create a clean and seamless join. Finish sewing the binding to the quilt to secure the join.
- Secure the Binding: Flip the binding over to the back of the quilt and carefully hand-stitch it in place, using a slip stitch or blind hem stitch. Take your time to ensure the stitches are invisible on the front side.
Binding adds a professional and polished finish to your memory quilt, while also protecting the quilt edges and ensuring longevity. It’s an opportunity to add another touch of creativity by selecting a fabric that complements or contrasts with the quilt design.
Remember to enjoy the process of binding your quilt. Take your time and sew with care to achieve a clean and professional look. Once the binding is complete, your memory quilt will be ready for the final touches.
With the binding in place, you’re now ready to add the finishing touches to your memory quilt and prepare it for display or use.
Finishing Touches
With the binding securely attached, your memory quilt is almost complete! However, there are a few finishing touches you can add to make your quilt truly special. Here are some ideas to consider:
- Label the Quilt: Create a personalized label to attach to the back of the quilt. This label can include information about the quilt’s purpose, its recipient, and the date it was made. You can hand embroider the label or use fabric markers to write the details.
- Add Embroidery or Appliqué: Consider adding meaningful embroidery or appliqué designs to the quilt top or borders. This can be initials, names, symbols, or even additional images that hold sentimental value. Hand-stitch these details using embroidery floss or machine appliqué for a unique and personal touch.
- Quilt Label Sleeve: If you plan to display your quilt on a wall, attaching a sleeve to the back allows for easy hanging. Simply create a fabric tube and sew it to the back of the quilt, leaving an opening for a dowel or rod to slide through.
- Quilt Binding Embellishments: Enhance the visual appeal of your quilt by adding decorative elements to the binding. This can be a contrasting border, lace trim, or even fabric-covered piping. Experiment with different ideas to achieve the desired look.
- Quilt Care Instructions: Include a small note or card with care instructions for the quilt. This will help the recipient or future generations take care of the quilt and ensure its longevity.
Remember, the finishing touches are all about adding those final details that make your memory quilt unique to you or the person it’s intended for. These personalizations can further enhance the sentimental value and story behind the quilt.
Once you’ve added the finishing touches, step back and admire your completed memory quilt. Take pride in the hard work and creativity that went into making it, and cherish the memories it represents.
With the final touches complete, your memory quilt is ready to be displayed, gifted, or cherished for years to come.
Conclusion
Congratulations on completing your memory quilt! Through careful selection, cutting, sewing, and quilting, you have transformed cherished clothes into a beautiful and meaningful quilt that preserves the memories and stories associated with each fabric square. The process of creating a memory quilt is not only a labor of love but also an opportunity to express your creativity and capture the essence of special moments in a tangible and lasting form.
The journey of making a memory quilt out of clothes involves more than just stitching fabrics together. It is a journey of reflection, nostalgia, and connecting with the memories that each fabric carries. From designing the quilt pattern to arranging the pieces, sewing the quilt top, adding the backing, layering and quilting, binding, and adding the finishing touches, every step has contributed to the transformation of your clothes into a personalized masterpiece.
As you wrap yourself or a loved one in the warmth of the memory quilt, remember the stories and memories embedded within each fabric square. Let the quilt be a source of comfort, joy, and a tangible connection to the past.
Don’t forget to share the story behind your memory quilt with others. Tell them about the significance of the fabric squares, the design choices you made, and the emotions that went into creating this unique piece. Your memory quilt can inspire others to embark on their own creative journey of transforming clothes into cherished quilts.
Always remember that the beauty of a memory quilt lies not only in the fabric and stitch but also in the memories and emotions it represents. It is a symbol of love, warmth, and the power of preservation. Whether you are keeping the quilt for yourself or gifting it to someone special, it will serve as a constant reminder of the special moments that have shaped your life or the life of a loved one.
So, take a moment to embrace the accomplishment of completing your memory quilt. Celebrate the memories preserved within its stitches and the joy it brings. Your memory quilt is a testament to your creativity, patience, and dedication, and it will serve as a cherished heirloom for generations to come.
Now, go ahead and display your memory quilt proudly, wrap yourself in its warmth, and relish in the memories it holds. Happy quilting!
Frequently Asked Questions about How To Make A Memory Quilt Out Of Clothes
Was this page helpful?
At Storables.com, we guarantee accurate and reliable information. Our content, validated by Expert Board Contributors, is crafted following stringent Editorial Policies. We're committed to providing you with well-researched, expert-backed insights for all your informational needs.


0 thoughts on “How To Make A Memory Quilt Out Of Clothes”