Articles
How To Make A Kantha Quilt
Modified: February 24, 2024
Learn how to make a beautiful Kantha quilt with our informative articles. Discover tips, techniques, and step-by-step tutorials for creating your own unique masterpiece.
(Many of the links in this article redirect to a specific reviewed product. Your purchase of these products through affiliate links helps to generate commission for Storables.com, at no extra cost. Learn more)
Introduction
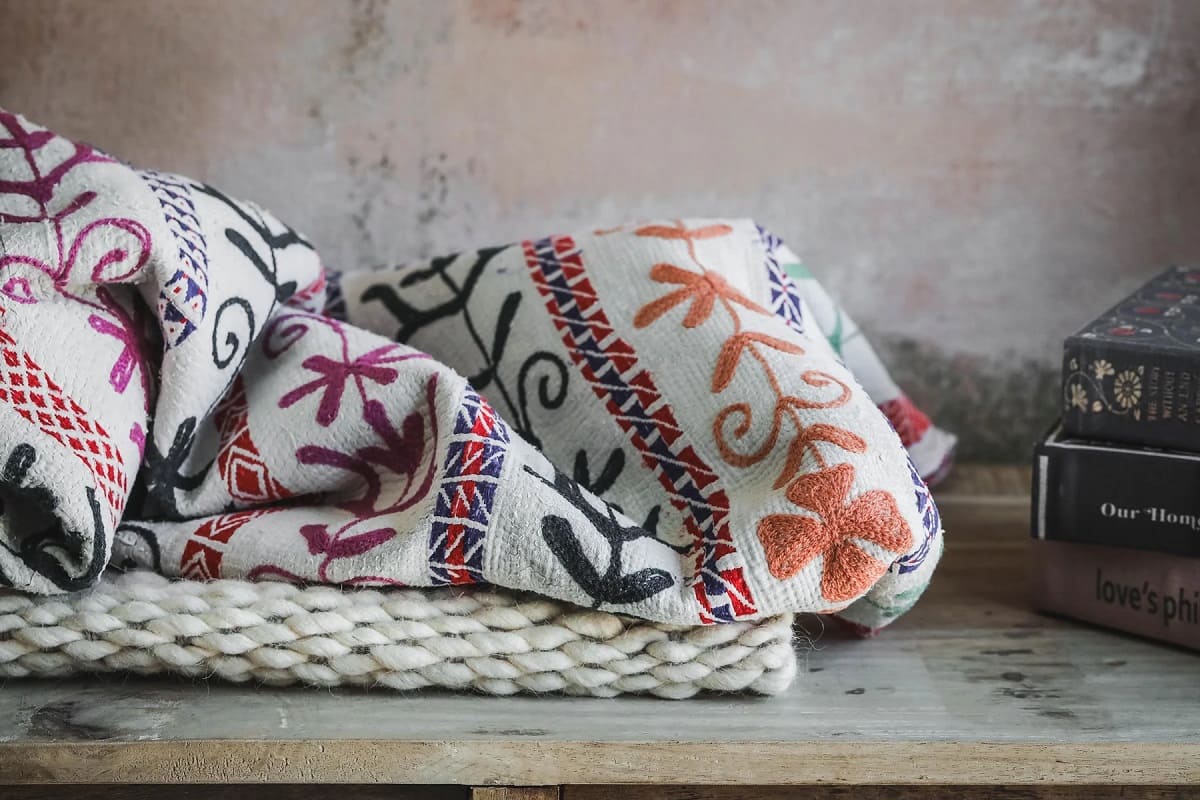
Quilting is a timeless art form that has been practiced for centuries. Among the various types of quilts, the Kantha quilt holds a special place. Originating from the Indian subcontinent, Kantha quilts have gained popularity around the world for their exquisite craftsmanship and intricate designs. These quilts are not only visually stunning but also have a rich cultural significance.
In this article, we will guide you on how to make a Kantha quilt of your own. Whether you are a beginner or have some quilting experience, creating a Kantha quilt can be a rewarding and enjoyable project. By following the steps outlined below, you will be able to make a beautiful and unique piece of art that you can cherish for years to come.
Before we delve into the process of making a Kantha quilt, let’s gather the materials you will need to get started.
Key Takeaways:
- Embrace the Timeless Art of Kantha Quilting
From selecting the base fabric to adding finishing touches, creating a Kantha quilt is a labor of love that celebrates tradition, creativity, and craftsmanship. Enjoy the meditative rhythm of stitching and let your imagination guide you as you embark on this quilting adventure. - Infuse Your Kantha Quilt with Personal Meaning
Incorporate meaningful symbols, explore new designs, and add your unique style to your Kantha quilt. Let your creation carry a piece of your heart and soul within its stitches, making it a cherished piece of art that brings warmth, beauty, and comfort to your life and the lives of those who admire it.
Read also: 14 Amazing Kantha Quilt for 2024
Materials Needed
Making a Kantha quilt requires a few essential materials. Here is a list of what you will need:
- Base Fabric: Choose a fabric that is suitable for quilting, such as cotton or linen. The size of the fabric will depend on how big you want your quilt to be.
- Backing Fabric: This will be the fabric that goes on the back of the quilt. Again, choose a fabric that complements the design and color scheme of your quilt.
- Thread: Select thread in various colors to match your design. Traditional Kantha quilting uses six-strand embroidery floss, but you can also use regular sewing thread.
- Needles: You will need hand-sewing needles that are suitable for quilting. Choose needles with a sharp point and a large eye to accommodate the thread.
- Fabric Marking Tool: Use a fabric marking tool, such as washable fabric pens or chalk, to draw your stitching lines on the fabric.
- Scissors: Make sure you have a good pair of fabric scissors for cutting the fabric and thread.
- Quilting Hoop or Frame: A hoop or frame will help keep your fabric taut and make it easier to stitch.
- Pins or Clips: These will be used to secure the layers of fabric together while stitching.
- Thimble: A thimble can be handy to protect your finger while pushing the needle through the layers of fabric.
- Iron and Ironing Board: An iron will be used to press the fabric and ensure crisp, neat stitches.
Once you have gathered all the necessary materials, you are ready to start making your Kantha quilt. In the following steps, we will guide you through the process, from choosing the base fabric to completing the quilt.
Step 1: Choosing the Base Fabric
The base fabric of your Kantha quilt will be the foundation for your design and stitching. When selecting a base fabric, consider the following factors:
- Type of Fabric: Choose a fabric that is suitable for quilting, such as cotton or linen. These fabrics are easy to work with and provide a good base for the Kantha stitching.
- Color and Design: Decide on the color scheme and design you want for your quilt. Consider whether you prefer a solid-colored fabric or one with a pattern or print.
- Size: Determine the desired size of your Kantha quilt. Consider whether you want to make a small lap quilt, a bed-sized quilt, or something in between.
Once you have made these decisions, it’s time to choose the actual fabric. Visit a fabric store or explore online fabric retailers to find a fabric that meets your criteria. Feel the fabric, examine its texture, and visualize how it will look as a quilt.
Remember that the base fabric will be the canvas for your Kantha stitching, so choose a fabric that complements the design you have in mind. It’s always a good idea to bring swatches of fabric home to see how they look in different lighting and against other fabrics you plan to use.
Keep in mind that Kantha stitching creates texture, so a slightly heavier fabric may be recommended. However, if you prefer a lightweight quilt, opt for a lighter fabric. Ultimately, the choice will depend on your personal preference and the effect you want to achieve with your Kantha quilt.
Once you have selected your base fabric, purchase enough fabric to cover the desired size of your quilt. It’s always better to have a little more fabric than you think you’ll need, as it’s easier to trim down the excess later rather than running out of fabric mid-project.
With the base fabric chosen and ready, you are now prepared to move on to the next step: selecting the Kantha designs for your quilt.
Step 2: Selecting the Kantha Designs
One of the defining features of a Kantha quilt is the intricate stitching patterns that adorn the fabric. These designs can range from simple geometric shapes to elaborate motifs inspired by nature, animals, or traditional symbols. Choosing the right designs for your Kantha quilt will add a unique touch and make it truly personalized.
Here are a few tips to help you select the Kantha designs for your quilt:
- Determine the Theme: Think about the theme or concept you want your quilt to portray. Consider whether you want to create a quilt with a specific color scheme, a nature-inspired design, or something more abstract.
- Research Traditional Kantha Designs: Explore traditional Kantha quilts to get inspiration for your own designs. Look for common motifs and patterns used in Kantha stitching, such as flowers, birds, paisley, or geometric shapes.
- Personalize with Meaningful Symbols: Incorporate symbols or images that hold personal significance to you or the person you are making the quilt for. It could be initials, meaningful words, or symbols representing important aspects of your life or culture.
- Create Original Designs: If you have a flair for drawing or enjoy creative expression, consider designing your own Kantha patterns. Sketch your ideas on paper and experiment with different combinations and arrangements.
- Consider the Quilt Size: Keep in mind the size of your quilt and scale the designs accordingly. Larger quilts may accommodate more complex or detailed designs, while smaller quilts may require simplified motifs.
Remember that the beauty of a Kantha quilt lies in the individuality and creativity of the designs. Feel free to mix different styles and create a pattern that truly reflects your personal taste and aesthetic.
Once you have finalized your Kantha designs, it’s time to move on to preparing the base fabric for stitching. This entails washing and ironing the fabric to ensure a smooth and clean surface for your Kantha quilt.
Step 3: Preparing the Base Fabric
Before you start stitching your Kantha quilt, it’s important to properly prepare the base fabric. This step involves washing and ironing the fabric to ensure that it is clean, free of any residues, and smooth for stitching.
Follow these steps to prepare your base fabric:
- Wash the Fabric: Machine wash the fabric using a mild detergent. This will remove any dirt, chemicals, or starches that may be present in the fabric. Be sure to check and follow the manufacturer’s washing instructions for the specific fabric you are using.
- Dry the Fabric: After washing, tumble dry the fabric on a low or medium heat setting, or air-dry it if preferred. Avoid using high heat, as it can shrink or damage the fabric.
- Iron the Fabric: Once dry, iron the fabric to remove any wrinkles or creases. Set the iron to the appropriate temperature for the fabric type, and iron on the wrong side of the fabric to prevent any shine or damage to the fabric surface.
- Smooth out the Fabric: Lay the ironed fabric on a clean, flat surface. Gently stretch and smooth out any remaining wrinkles or folds. This will ensure that your fabric is ready for the next step of marking and stitching.
By properly preparing your base fabric, you are creating an optimal foundation for your Kantha stitching. A clean and smooth fabric surface will make it easier to mark and stitch your designs accurately.
With your base fabric prepared, it’s time to move on to the next step: creating the Kantha stitching pattern. This entails marking the fabric with guidelines for your stitching and ensuring that your designs are symmetrical and well-placed.
Read more: How To Make A Quilt
Step 4: Creating the Kantha Stitching Pattern
Creating a Kantha stitching pattern is an essential step in making a Kantha quilt. This pattern will serve as a guide for your stitching, ensuring that your designs are symmetrical and evenly spaced. Here’s how you can create the Kantha stitching pattern:
- Measure and Mark: Use a fabric marking tool, such as washable fabric pens or chalk, to mark your stitching lines on the base fabric. Measure and mark straight lines or grids for geometric designs, or sketch freehand for more organic or abstract patterns.
- Consider Spacing: Determine the spacing between your stitching lines or motifs. This can vary depending on the size of your quilt and the complexity of the design. Consider leaving enough space between the lines for the thickness of the stitches and the desired texture.
- Ensure Symmetry: If you are creating symmetrical designs, start by marking the center lines and work outward. Use a ruler or straight edge to ensure that your lines are straight and aligned properly.
- Experiment with Designs: Feel free to experiment with different designs and patterns. You can create unique combinations of lines, curves, and motifs to achieve the desired visual impact. Sketch your ideas on paper before marking them on the fabric.
- Keep it Balanced: Pay attention to the overall balance and composition of your design. Make sure that the motifs or elements are evenly distributed across the fabric and create a harmonious visual effect.
It’s important to note that Kantha stitching allows for flexibility and creativity. You can modify your pattern as you stitch, adding additional motifs or adjusting the spacing to enhance the overall look of the quilt.
Once you have created the Kantha stitching pattern on your base fabric, it’s time to start the exciting process of stitching. In the next step, we will guide you on how to begin the Kantha stitching on your quilt.
When making a Kantha quilt, be sure to use a running stitch to secure the layers of fabric together. This traditional stitching technique adds strength and durability to the quilt while also creating beautiful patterns on the fabric.
Step 5: Starting the Kantha Stitching
Now that you have your Kantha stitching pattern marked on the base fabric, it’s time to begin the actual stitching process. The Kantha stitch is a simple and running stitch that is repeated to create intricate and beautiful designs.
- Select the Thread: Choose the thread color that matches or complements your design. You can use traditional six-strand embroidery floss or regular sewing thread, depending on your preference.
- Thread the Needle: Thread your needle with a length of thread that is comfortable for you to work with. You can double the thread for added strength and stability.
- Tie a Knot: Tie a small knot at the end of the thread to secure it. This will prevent the thread from pulling through the fabric as you stitch.
- Start Stitching: Begin stitching along one of the marked lines or motifs. Insert the needle from the backside of the fabric and bring it up through the front, leaving a small tail at the back.
- Make Running Stitches: Make small running stitches along the marked lines, keeping them evenly spaced and of equal length. For a traditional Kantha look, use stitches that are about 1/4 to 1/2 inch in length.
- Continue Stitching: Follow the pattern and stitch along the marked lines or motifs, working your way across the fabric. As you reach the end of a thread, tie it off securely and start a new thread.
- Secure Loose Ends: As you stitch, periodically check the backside of the fabric to ensure that the threads are secure. If any loose ends are found, tie them off and trim the excess thread.
As you stitch, maintain a relaxed and rhythmic pace to ensure smooth and even stitches. Take breaks if needed, as this can be a time-consuming process. Enjoy the meditative nature of Kantha stitching and let your creativity flow.
Remember to periodically check the front of the fabric to ensure that the stitches are consistent in length and tension. If you make a mistake or dislike a particular stitch, simply remove it by pulling the thread out gently.
In the next step, we will guide you on how to continue the Kantha stitching to cover the entire quilt surface.
Step 6: Continuing the Stitching
Once you have started the Kantha stitching on your quilt, the next step is to continue the stitching process to cover the entire fabric surface. This step requires patience and attention to detail as you work your way through the design.
- Work in Sections: To manage the stitching more easily, divide your quilt into manageable sections. Focus on one section at a time, gradually moving across the fabric.
- Alternate Stitching Lines: As you stitch, alternate between stitching lines or motifs to maintain balance and symmetry in your design. This will ensure that the quilt looks consistent and visually appealing.
- Blend Thread Colors: If you want to create a gradient effect or blend different thread colors, transition smoothly between colors as you move from one section to another. This can add depth and dimension to your quilting.
- Experiment with Stitch Lengths: Feel free to vary the length of your stitches to create different textures and effects within your design. Consider using shorter stitches for more detailed areas and longer stitches for larger open spaces.
- Regularly Check the Tension: Ensure that your stitches are consistent in tension and not too tight or loose. Regularly check both the front and back of the fabric as you stitch, adjusting the tension as needed.
- Take Breaks and Rest: Kantha stitching is a time-consuming process, so it’s important to take breaks and rest your hands and eyes when needed. This will help prevent fatigue and maintain the quality of your stitching.
- Enjoy the Process: Kantha stitching is an art form that allows for creativity and self-expression. Enjoy the process of stitching, let your designs evolve, and embrace any imperfections as part of the unique beauty of your quilt.
Remember, Kantha quilting is a labor of love that requires time and dedication. The repetitive and rhythmic nature of stitching can be a serene and therapeutic experience. Embrace the journey and let your creativity shine through as you continue stitching your Kantha quilt.
In the next step, we will guide you on completing the Kantha quilt and adding the finishing touches.
Step 7: Completing the Kantha Quilt
As you approach the final stages of creating your Kantha quilt, it’s time to complete the stitching and add the finishing touches. This step will bring your quilt one step closer to becoming a beautiful and functional work of art.
- Finish the Stitching: Continue stitching until you have covered the entire fabric surface or have achieved your desired level of stitching. Take care to maintain consistency in your stitches and ensure that all the marked lines or motifs are completed.
- Tie Off Loose Threads: Once you have finished the stitching, take the time to tie off any loose threads and secure them to the fabric. This will ensure that your stitches remain intact even with regular use and washing.
- Trim Excess Fabric: Use fabric scissors to trim any excess fabric along the edges of your quilt. Make sure to leave a small allowance for binding or hemming if you choose to finish the edges.
- Press the Quilt: Iron the entire quilt to give it a smooth and polished appearance. Use a low to medium heat setting and press gently to avoid crushing the stitches. Take extra care when ironing over bulky or raised areas of stitching.
- Consider Quilt Binding: If desired, trim the edges of your quilt and sew on a fabric binding to give it a neat and finished look. Binding can be added using traditional quilting methods or with a decorative stitch that complements your Kantha design.
- Make a Quilt Sandwich: To give your quilt added structure and warmth, consider making a quilt sandwich by layering a backing fabric and batting between the stitched top and a fabric backing. Secure the layers together with pins or basting stitches.
- Quilt the Layers: If you choose to make a quilt sandwich, secure the layers together by quilting them. This can be done by stitching-in-the-ditch along the Kantha stitching lines or adding additional quilting designs to enhance the overall texture and durability.
- Bind the Quilt: Once your quilt is fully prepared, it’s time to bind the edges. Fold and press the binding fabric in half lengthwise, then sew it to the edges of the quilt, enclosing the raw edges. You can hand-stitch the binding for a traditional finish or use a sewing machine for a quicker option.
Completing the Kantha quilt involves attention to detail and care in the final steps. Take your time and make sure everything is to your satisfaction before moving on to adding any final decorative touches.
In the next and final step, we will guide you on adding the finishing touches to your Kantha quilt.
Read more: How To Make A Quilt Larger
Step 8: Finishing Touches
Congratulations! You’ve come to the final step in creating your beautiful Kantha quilt. Adding the finishing touches will give your quilt that extra touch of uniqueness and personalization.
- Embellish with Embroidery: Consider adding additional embroidery or decorative stitches to enhance your Kantha quilt. You can incorporate intricate patterns, words, or motifs to make your quilt truly one-of-a-kind.
- Attach Labels or Tags: Personalize your quilt by attaching labels or tags that contain your name, the date, or any special message. This will add a personal touch and make your quilt an heirloom piece.
- Try Quilt Binding Embellishments: You can add a decorative touch to your quilt binding by incorporating trim or lace along the edges. These embellishments can add a pop of color or texture to your finished quilt.
- Add Quilt Hanging Sleeve: If you plan to display your Kantha quilt on a wall, consider adding a hanging sleeve to the back. This will allow you to easily hang and showcase your quilt.
- Label Your Quilt: Don’t forget to label your quilt with a fabric pen or label maker. Include the name of the quilt, your name, and any relevant details about the quilt’s creation. This will help preserve its history and make it a cherished keepsake.
- Finish the Backing: If you have chosen a fabric for the backing that will be visible, make sure to finish it neatly. Trim any excess fabric, fold and press the edges, and secure them with a machine or hand stitch.
- Inspect and Mend: Before considering your quilt complete, carefully inspect it for any loose threads, missed stitches, or areas that may require repair. Mend any imperfections to ensure the longevity of your quilt.
By adding these finishing touches, you are not only enhancing the overall appearance but also making your quilt truly unique and special. Take pride in the hard work and craftsmanship that you have put into creating your very own Kantha quilt.
Remember to document your quilting journey through photographs or a journal to capture the memories and creative process behind your quilt. Share your masterpiece with others or pass it down as a treasured family heirloom.
With the finishing touches complete, your Kantha quilt is ready to be enjoyed and admired. Congratulations on completing your handmade quilt, and may it bring warmth, beauty, and joy for many years to come.
Thank you for following this step-by-step guide on how to make a Kantha quilt. We hope you have found it helpful and are inspired to embark on your own quilting adventure. Happy quilting!
Conclusion
Making a Kantha quilt is a labor of love that combines tradition, creativity, and craftsmanship. From choosing the base fabric to completing the final stitches, every step in the process contributes to the beauty and uniqueness of the quilt. By following this step-by-step guide, you have learned how to create a stunning Kantha quilt that reflects your personal style and artistic flair.
Throughout this journey, you have discovered the importance of selecting the right materials, designing the Kantha patterns, and preparing the base fabric. You have also honed your stitching skills, learning the art of the Kantha stitch and its variations.
The process of creating a Kantha quilt is not just about the end result; it is about the joy that comes from the act of stitching, the meditative rhythm of the needle and thread, and the excitement of watching your design come to life. It is a celebration of creativity, culture, and the beauty of handmade artistry.
As you embark on your Kantha quilting adventure, don’t be afraid to experiment, explore new designs, and add your own personal touches. Let your imagination guide you as you create intricate patterns, incorporate meaningful symbols, and infuse the quilt with your unique style.
Whether you choose to display your Kantha quilt on a wall, use it as a cozy blanket, or gift it to a loved one, your creation will carry a piece of your heart and soul within its stitches. It will be a testament to your dedication and passion for the art of quilting.
So gather your materials, embrace the rhythm of the stitching, and embark on the journey of creating your own Kantha quilt. Let your creativity soar and watch as your quilt becomes a cherished piece of art that brings warmth, beauty, and comfort to your life and the lives of those who admire it.
Thank you for joining us on this Kantha quilting adventure. Happy stitching!
Frequently Asked Questions about How To Make A Kantha Quilt
Was this page helpful?
At Storables.com, we guarantee accurate and reliable information. Our content, validated by Expert Board Contributors, is crafted following stringent Editorial Policies. We're committed to providing you with well-researched, expert-backed insights for all your informational needs.


0 thoughts on “How To Make A Kantha Quilt”