
Articles
How To Make A Rag Quilt
Modified: August 27, 2024
Learn how to make a cozy rag quilt with this step-by-step guide. Discover tips and tricks in our collection of informative articles.
(Many of the links in this article redirect to a specific reviewed product. Your purchase of these products through affiliate links helps to generate commission for Storables.com, at no extra cost. Learn more)
Introduction
Welcome to the world of rag quilting! If you’re a craft enthusiast or just someone looking for a creative and cozy project, then making a rag quilt is the perfect endeavor for you. Rag quilts are not only beautiful and unique, but they’re also incredibly soft and warm, making them ideal for snuggling up on cold winter nights.
In this article, we’ll guide you through the process of creating your own rag quilt from start to finish. Whether you’re a beginner or an experienced quilter, you’ll find helpful tips and step-by-step instructions to help you along the way.
But first, let’s talk a little bit about what exactly a rag quilt is. Unlike traditional quilts that have batting and intricate piecing, rag quilts are known for their exposed seams and frayed edges, giving them a charming rustic look. They’re made by sewing together fabric squares or blocks and then clipping the seams to create the ragged effect.
What sets rag quilts apart is not only their unique appearance but also the soft and cozy texture they provide. The clipped seams and fraying of the fabric create a plush, plushy feel that is perfect for cuddling up with. Plus, the frayed edges add an extra touch of charm and character to the finished quilt.
Now that you’re familiar with what a rag quilt is, let’s gather the materials we’ll need for this project. With just a few items, you’ll be well on your way to creating a beautiful and cozy rag quilt. So, let’s dive in!
Key Takeaways:
- Dive into the world of rag quilting to create a cozy masterpiece with exposed seams and frayed edges, adding rustic charm and warmth to any space.
- Unleash your creativity and passion for crafting as you embark on the fulfilling journey of rag quilting, expressing love and beauty with every stitch.
Read more: How To Make A Denim Rag Quilt
Materials Needed
Before we begin creating our rag quilt, let’s gather all the necessary materials. Here’s a list of what you’ll need:
- Fabric: Choose a variety of fabrics in different colors and patterns. You can opt for flannel, cotton, or a combination of both. The amount of fabric you’ll need depends on the size of your quilt, so calculate accordingly.
- Rotary Cutter and Mat: These tools will make cutting the fabric much easier and more precise.
- Ruler: A clear quilting ruler will help you measure and cut fabric accurately.
- Scissors: You’ll need a pair of scissors for trimming threads and clipping the seams.
- Sewing Machine: A sewing machine is essential for piecing the fabric squares together.
- Thread: Use a sturdy thread that matches your fabric for sewing the quilt top and the seams.
- Batting: Choose a high-quality cotton batting to provide warmth and structure for your quilt.
- Pins: Use quilting pins to hold the layers together while sewing.
- Snippers: These small scissors or snippers are perfect for clipping the seams to create the ragged edges.
- Iron: An iron comes in handy for pressing the fabric and achieving neat seams.
Now that you have all the necessary materials, let’s move on to the next step: cutting the fabric!
Step 1: Cutting the Fabric
The first step in creating your rag quilt is to cut the fabric into squares or blocks. These blocks will serve as the building blocks for your quilt. Here’s how you can do it:
- Choose the size of the blocks: Decide on the desired size of your fabric blocks. Common sizes for rag quilts are 6 inches or 8 inches square, but you can choose any size that suits your preference.
- Measure and mark: Use a ruler and a fabric marker to measure and mark the dimensions of the blocks on the wrong side of the fabric. Make sure to add an extra half inch to each side of the block for the seam allowance.
- Cut the fabric: Once you have marked the dimensions, use a rotary cutter and mat to cut along the marked lines. Take your time and make sure your cuts are as straight and accurate as possible.
- Repeat for all fabrics: Repeat the measuring and cutting process for all the fabrics you have chosen for your rag quilt. Remember to cut an equal number of blocks from each fabric to ensure a balanced design.
As you cut the fabric, make sure to keep the fabric squares organized and separated according to their design or color. This will help you in the later steps when it’s time to arrange the blocks.
And there you have it! You’ve successfully completed the first step in creating your rag quilt. Now, let’s move on to preparing the blocks in step 2.
Step 2: Preparing the Blocks
Now that you have your fabric blocks cut, it’s time to prepare them for piecing together. This step involves folding, pressing, and trimming the blocks to ensure they are uniform in size and ready for sewing. Follow these steps:
- Fold the edges: Take each fabric block and fold the edges towards the wrong side, creating a seam allowance of about half an inch on all sides. Use an iron to press the folds and create crisp lines.
- Check the measurements: Measure the size of each folded fabric block to ensure they are consistent and equal in size. Trim any excess fabric if necessary, but be careful not to cut too much and compromise the integrity of the block.
- Clip the corners: If your fabric blocks have square corners, you can trim them diagonally to reduce bulk when sewing the blocks together. This will help create smoother and neater seams once the quilt is assembled.
Once you have prepared all the fabric blocks, take a moment to double-check their measurements and ensure they are all uniform. This will make the next steps much easier and will result in a more polished finished quilt.
With the blocks prepared, it’s time to move on to the exciting part: arranging the blocks in step 3. Stay tuned!
Step 3: Arranging the Blocks
Now that your fabric blocks are prepared, it’s time to get creative and arrange them in a visually pleasing pattern. This step allows you to play with colors, prints, and layouts to design a unique rag quilt. Follow these steps to arrange your blocks:
- Clear a large, flat surface: Find a clean and spacious area where you can lay out your fabric blocks. A table or a clean floor works well for this purpose.
- Experiment with different layouts: Start by placing the blocks randomly or in a pattern that appeals to you. Play around with different combinations and rearrange the blocks until you’re satisfied with the overall design.
- Consider color and pattern distribution: Pay attention to the distribution of colors and patterns across the quilt. Aim for a balanced distribution to create a harmonious and visually appealing final product.
- Take a photo or make notes: Once you’re happy with the arrangement, consider taking a photo or making notes to remember the layout. This will be helpful in case you accidentally move the blocks while sewing.
Remember, this step is all about your personal preference and creativity. Have fun with it and don’t be afraid to experiment with different arrangements until you find one that speaks to you.
With your fabric blocks arranged just the way you like, it’s time to move on to step 4: sewing the blocks together. Stay tuned for the next instructions!
When making a rag quilt, be sure to use a high-quality flannel or cotton fabric for the best results. Cheaper fabrics may not hold up as well after washing and fraying.
Read more: How To Make A Strip Rag Quilt
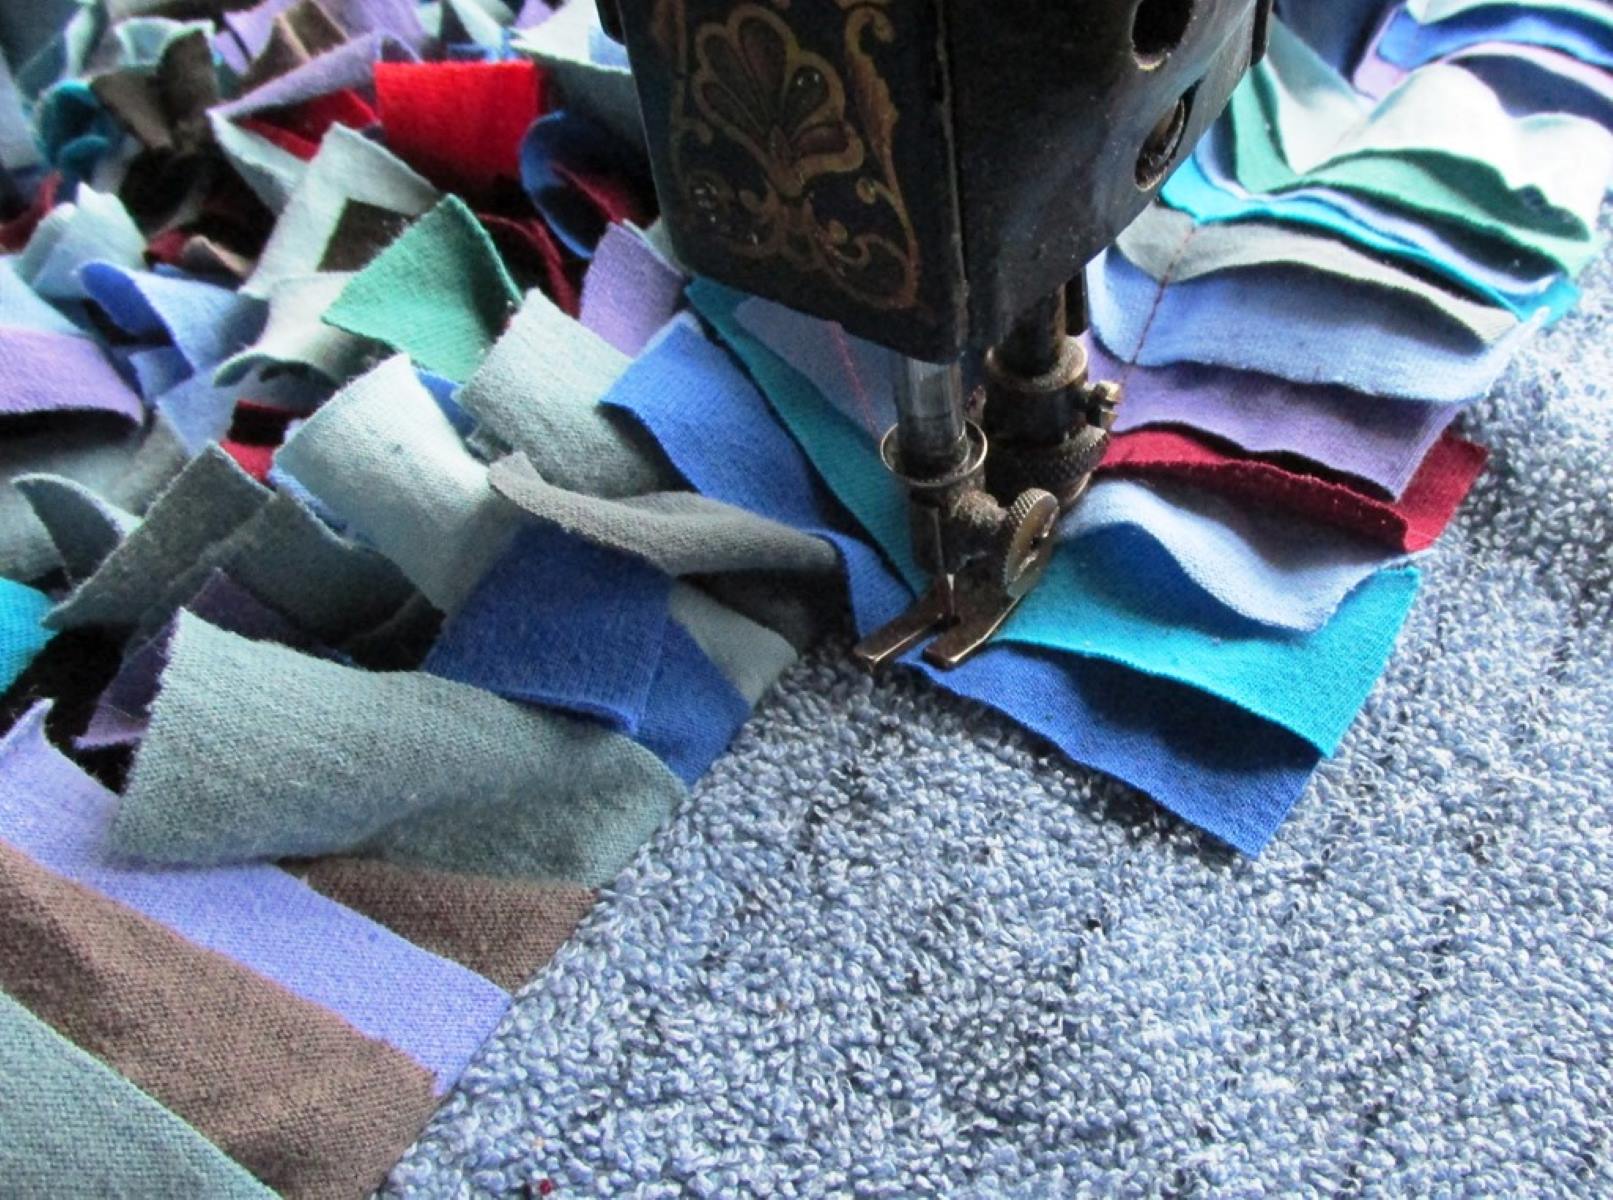
Step 4: Sewing the Blocks Together
Now that you have your fabric blocks arranged in your desired pattern, it’s time to sew them together to create the quilt top. Follow these steps to sew the blocks together:
- Prepare your sewing machine: Set up your sewing machine with a coordinating thread color and attach a ¼-inch quilting foot if you have one. This foot will help you achieve consistent seam allowances.
- Choose the placement of the blocks: Start by taking the first two fabric blocks that are adjacent to each other in your design layout. Place them right sides together, aligning the edges that will be sewn.
- Sew the blocks: With the fabric blocks aligned, start sewing a ¼-inch seam along the edges. Backstitch at the beginning and end to secure the stitches. Continue sewing the adjacent blocks in the same manner until the row is complete.
- Press the seams: Once the row is sewn together, use an iron to press the seam allowances to one side. This will help the blocks lay flat and create a smooth appearance.
- Repeat for all rows: Repeat the process of sewing and pressing for each row of fabric blocks until all the rows are complete.
- Join the rows: With each row pressed, it’s time to join them together. Take the first two rows and place them right sides together, aligning the seam allowances. Sew a ¼-inch seam along the edges to join the rows. Continue joining all the rows in the same manner.
- Press the final seams: Once all the rows are joined together, use an iron to press the final seam allowances to one side. This will ensure that the quilt top lies flat and looks polished.
As you sew the blocks together, make sure to double-check that they are aligned and the seams are straight. This will help maintain a consistent and professional appearance for your rag quilt top.
With the blocks sewn together, you’re ready to move on to step 5: adding the batting. Stay tuned for the next set of instructions!
Step 5: Adding the Batting
Now that your quilt top is complete, it’s time to add the batting layer to provide warmth and structure. The batting is the insulation layer that goes between the quilt top and the backing fabric. Follow these steps to add the batting:
- Lay out the backing fabric: Start by laying out your backing fabric on a large, flat surface, right side down. Smooth out any wrinkles or creases to ensure a clean and even surface.
- Position the batting: Place your batting on top of the backing fabric, aligning the edges. Smooth out any wrinkles or air pockets, ensuring that the batting lies flat and covers the entire quilt top area.
- Place the quilt top: Take your completed quilt top and position it on top of the batting, right side up. Make sure the edges align with the backing fabric and the batting.
- Secure the layers: To hold the layers together while sewing, use quilting pins to secure the quilt top, batting, and backing fabric. Place the pins along the edges and at regular intervals throughout the quilt top.
When pinning, make sure to avoid placing the pins too close to the area where you will be sewing, as they may interfere with the sewing machine foot. Adjust the pins as needed to ensure smooth sewing.
With the layers securely pinned together, you’re ready to move on to step 6: tying the layers. Stay tuned as we guide you through the next phase of completing your rag quilt!
Step 6: Tying the Layers
Now that you have your quilt top, batting, and backing fabric securely layered together, it’s time to tie the layers to create a quilted effect. Tying the layers not only adds decorative elements to your rag quilt, but it also helps keep the layers in place. Follow these steps to tie the layers:
- Choose your tie-off method: There are various ways to tie the layers together, including using embroidery floss, yarn, or even strips of fabric. Choose a method that suits your style and the overall aesthetic of your quilt.
- Prepare the ties: Cut your chosen tie-off material into equal lengths, typically 6 to 8 inches long. The number of ties you’ll need depends on the size of your quilt and your desired spacing between each tie-off point.
- Secure the ties: With a tie-off point in mind, push one end of each tie through all the layers of the quilt, making sure to leave a loop on the quilt’s top side. Pull the remaining end through the loop and tighten it, securing the layers together.
- Space the ties evenly: Repeat the process of securing ties throughout the entirety of the quilt, ensuring an even distribution across the top surface. You can create a pattern or random placement according to your preference.
As you tie the layers together, make sure not to pull the ties too tightly to avoid distorting the fabric or causing uneven tension. Maintain a consistent level of tension to ensure a neat and uniform appearance.
With the layers effectively tied together, you’re ready to move on to the final step: finishing the edges. Stay tuned for the last set of instructions to complete your beautiful rag quilt!
Step 7: Finishing the Edges
Congratulations! You’ve made it to the final step of creating your rag quilt. Now, it’s time to give your quilt a polished and professional finish by addressing the edges. Follow these steps to complete the edge finishing:
- Trim the excess: Start by trimming any excess batting and backing fabric that extends beyond the edge of the quilt top. Use scissors or a rotary cutter to achieve clean, straight edges.
- Create a border: If you want to add a border to your quilt, choose a coordinating fabric and cut strips to the desired width. Sew the border strips to the edges of the quilt, making sure to miter the corners for a clean finish.
- Fold and press: Fold the raw edges of the quilt top, batting, and backing fabric towards the back of the quilt. Use an iron to press the folded edges, keeping them in place.
- Sew the binding: Cut strips of fabric for the binding, making sure they are long enough to cover the perimeter of your quilt. Fold the binding in half lengthwise and press it. Align the raw edges of the binding with the raw edges of the quilt, starting on one side. Sew the binding in place, leaving a small tail at the beginning.
- Miters and corners: When you reach a corner, miter it by folding the binding strip diagonally and then folding it back over itself to create a neat 45-degree angle. Continue sewing along the next edge, repeating the process for each corner.
- Joining the ends: When you reach the starting point, carefully trim the binding to overlap the beginning tail. Fold the end of the binding under to create a clean finish and sew the ends together to join them.
- Secure the binding: Fold the binding over to the back of the quilt and hand-stitch it in place using a blind stitch or a whipstitch. Make sure your stitches are invisible from the front and secure the binding firmly to the quilt.
Once you finish securing the binding, your rag quilt is complete! Take a moment to admire your handiwork and enjoy the cozy and beautiful quilt you’ve created.
Remember, this is just one method of finishing the edges. Feel free to explore different binding techniques or even leave the edges raw, depending on the style you want to achieve for your rag quilt.
With the edges finished, your rag quilt is ready to be used or gifted to bring warmth and comfort to its lucky recipient. Happy quilting!
Read more: How To Make Gypsy Rag Curtains
Conclusion
Congratulations on completing your rag quilt! As you can see, rag quilting is a wonderful and fulfilling craft that allows you to create a cozy and unique masterpiece. Throughout the process, you’ve learned how to cut the fabric, prepare and arrange the blocks, sew them together, add the batting, tie the layers, finish the edges, and create a beautiful quilt from start to finish.
By following these step-by-step instructions and using your own creativity, you’ve successfully created a rag quilt that not only provides warmth but also adds a touch of charm to any space. The exposed seams and frayed edges give it a rustic and inviting look that will make it a cherished piece for years to come.
Remember, the possibilities with rag quilting are endless. You can experiment with different fabric combinations, block sizes, and patterns to create a design that is truly unique to your personal style. Whether you’re making a quilt for yourself, a loved one, or even for charitable purposes, the process of rag quilting allows you to express your creativity and passion for crafting.
We hope that this article has provided you with the guidance and inspiration you need to embark on your rag quilting journey. As you continue to hone your skills and explore new techniques, your quilting abilities will grow, and your creations will become even more exceptional.
So go ahead, gather your materials, and let your creativity soar as you dive into the world of rag quilting. And remember, with each stitch, you’re not just creating a quilt, but also weaving love, warmth, and beauty into every thread.
Frequently Asked Questions about How To Make A Rag Quilt
Was this page helpful?
At Storables.com, we guarantee accurate and reliable information. Our content, validated by Expert Board Contributors, is crafted following stringent Editorial Policies. We're committed to providing you with well-researched, expert-backed insights for all your informational needs.


0 thoughts on “How To Make A Rag Quilt”