Articles
How To Make A Quilt Out Of Crown Royal Bags
Modified: October 18, 2024
Learn how to make a unique and creative quilt using Crown Royal bags. Our articles provide step-by-step instructions and tips for a stunning result.
(Many of the links in this article redirect to a specific reviewed product. Your purchase of these products through affiliate links helps to generate commission for Storables.com, at no extra cost. Learn more)
Introduction
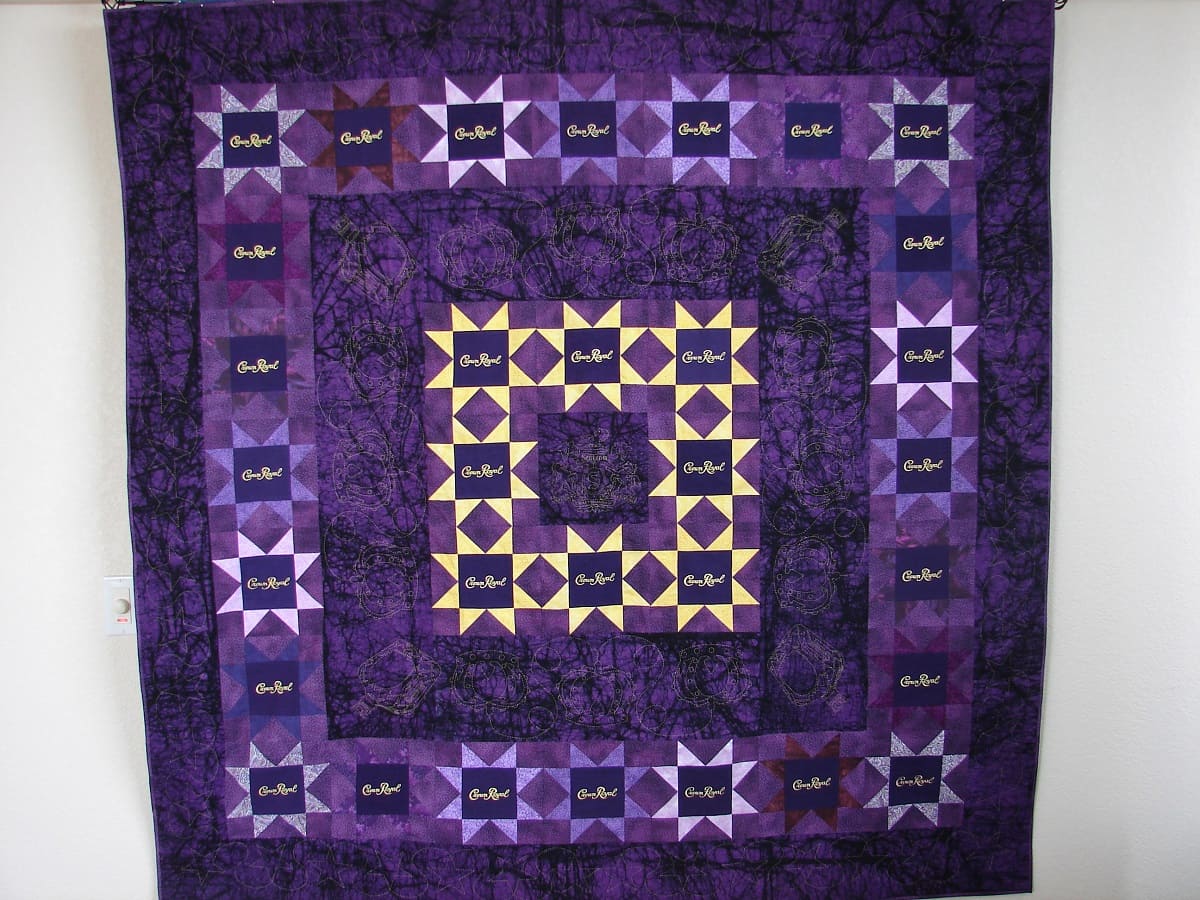
Welcome to the world of creative quilting! If you’re looking for a unique and eye-catching project, making a quilt out of Crown Royal bags is the perfect choice. Not only does it provide a fun and creative way to repurpose those iconic purple bags, but it also gives you a chance to showcase your quilting skills and create a one-of-a-kind masterpiece.
Quilting has a rich history and has been enjoyed by generations of crafters. It’s a craft that combines artistry and functionality, resulting in beautiful and cozy blankets that can be cherished for years to come. By using Crown Royal bags as the fabric for your quilt, you add a touch of nostalgia and create a conversation piece that will surely capture the attention of anyone who sees it.
Before we get started, let’s go over the materials you’ll need for this project:
Read more: How To Store Crown Royal
Materials Needed:
- Crown Royal bags (at least 50 bags for a lap-sized quilt)
- Scissors or rotary cutter
- Quilting ruler
- Sewing machine
- Thread
- Backing fabric
- Batting
- Binding fabric
- Pins
- Iron
- Ironing board
- Quilting pins or clips
Now that you have your materials gathered, let’s dive into the process of making a quilt out of Crown Royal bags. We’ll start by preparing the bags and cutting them into usable pieces.
Remember, it’s important to have fun and enjoy the process. Quilting is a labor of love, and each stitch tells a story. So grab your Crown Royal bags, put on your creative hat, and let’s get quilting!
Key Takeaways:
- Transform iconic Crown Royal bags into a unique quilt, showcasing creativity and quilting skills. Repurpose, sew, and quilt to create a conversation piece that captures attention and preserves memories.
- Embrace the warmth and beauty of your Crown Royal bag quilt. Share your story, display or gift your masterpiece, and follow care instructions for longevity. Enjoy the comfort and joy it brings!
Materials Needed
To create your Crown Royal bag quilt, you’ll need a few essential materials. Gathering these items before you start will ensure a smooth and enjoyable quilting process. Here’s a list of what you’ll need:
- Crown Royal bags: You’ll want to collect enough Crown Royal bags to create the desired size of your quilt. For a lap-sized quilt, you’ll need at least 50 bags. Make sure the bags are clean and in good condition before using them for your project.
- Scissors or rotary cutter: These tools will be used for cutting the bags into usable pieces. A rotary cutter is recommended for precise and efficient cutting, but scissors will work just fine if that’s what you have on hand.
- Quilting ruler: A quilting ruler is an essential tool for measuring and cutting fabric accurately. Make sure you have a ruler that is at least 6 inches wide and 24 inches long.
- Sewing machine: A sewing machine will make the construction of your quilt much faster and more efficient. Ideally, you’ll want a machine that has a quilting foot and adjustable stitch length for quilting purposes.
- Thread: Choose a high-quality thread in a color that complements your Crown Royal bags. Polyester or cotton thread is recommended for durability and ease of sewing.
- Backing fabric: You’ll need a separate fabric for the back of your quilt. Choose a fabric that coordinates well with the colors and theme of your Crown Royal bags. The size of the backing fabric should be larger than your quilt top to allow for seam allowances.
- Batting: Batting is the layer of insulation that goes between the quilt top and backing fabric. There are various types of batting available, including cotton, polyester, and blends. Choose one that suits your desired level of warmth and loft for the finished quilt.
- Binding fabric: The binding fabric is used to finish the edges of the quilt. You can choose a fabric that matches or complements the colors in your Crown Royal bags. The width of the binding strips should be at least 2.5 inches.
- Pins: Straight pins will be used for holding fabric layers together during the quilting process. Opt for quilting pins or safety pins that are long enough to securely hold the layers without causing any damage.
- Iron: An iron is essential for pressing fabric and seams throughout the quilting process. Make sure you have a functioning iron and ironing board to ensure neat and professional results.
- Ironing board: A sturdy ironing board will provide a smooth surface for pressing your fabric. Ensure that it is clean and in good condition before starting your quilting project.
- Quilting pins or clips: Quilting pins or clips will hold the layers of your quilt together as you work. These are especially useful when sandwiching the Crown Royal bags, batting, and backing fabric.
Gather these materials before you begin your Crown Royal bag quilt project to ensure a smooth and enjoyable quilting experience. With everything in hand, you’re ready to move on to the next step: preparing the Crown Royal bags for quilting.
Preparing the Crown Royal Bags
Before you can start cutting and sewing the Crown Royal bags, it’s important to prepare them properly. This process will ensure that your bags are clean, free of any labels or residue, and ready to be transformed into fabric for your quilt. Here’s how to prepare the Crown Royal bags:
- Clean the bags: Begin by emptying and cleaning each Crown Royal bag. Remove any leftover contents, such as bottle caps or stickers, and give the bags a thorough cleaning. You can hand wash them with mild soap and warm water or use a gentle cycle in your washing machine. Make sure to air dry them completely before moving on to the next step.
- Remove labels and glue: Most Crown Royal bags come with labels and glue residue on them. Carefully peel off any labels and gently scrub away any glue residue using a mildly abrasive sponge or cloth. Be cautious not to damage the fabric while doing so.
- Iron the bags: Once the bags are clean and label-free, it’s time to give them a smooth, wrinkle-free look. Lay each bag flat and use a warm iron (without steam) to press out any wrinkles and folds. Make sure to iron both the front and back of the bags.
Remember, taking the time to properly prepare your Crown Royal bags will result in a professional-looking quilt without any unwanted debris or marks. It’s worth the extra effort to ensure that your bags are in the best condition possible before they become part of your quilt.
Now that your Crown Royal bags are clean, label-free, and wrinkle-free, it’s time to cut them into usable pieces. Let’s move on to the next step: cutting the bags.
Cutting the Bags
Now that your Crown Royal bags are prepared and ready to go, it’s time to cut them into usable pieces for your quilt. The cutting process will transform the bags into fabric squares or rectangles that will be sewn together to create your quilt top. Here’s how to cut the bags:
- Decide on a size: Determine the desired size of each fabric piece based on the design you have in mind for your quilt. The most common size is a 6-inch square, but you can adjust the size to suit your preferences. Use a quilting ruler and marker to measure and mark the size you want on the bags.
- Cut the bags: Lay the Crown Royal bag flat on your cutting surface and align the quilting ruler with the marked measurements. Carefully cut along the edge of the ruler with either scissors or a rotary cutter. Repeat this process for each bag until you have the desired number of fabric pieces.
- Organize the pieces: As you cut the bags, keep the fabric pieces organized. You can separate them into stacks based on their color or patterns to make it easier to design your quilt later on.
- Save the drawstrings: If you like, you can save the drawstrings from the bags for future projects or as embellishments for your quilt. Simply cut them off and set them aside in a safe place.
Depending on the size of your quilt and the number of bags you have, the cutting process may take some time. But with each bag you cut, you’re one step closer to creating your Crown Royal bag quilt masterpiece.
Now that you have a stack of fabric pieces ready to go, it’s time to start sewing them together. In the next step, we’ll cover the process of sewing the Crown Royal bags into a quilt top.
Read more: How To Make A Bag Out Of A Pillowcase
Sewing the Bags Together
Now that you have your Crown Royal bags cut into fabric pieces, it’s time to start sewing them together to create your quilt top. This is where you can unleash your creativity and design a unique pattern using the bag pieces. Here’s how to sew the bags together:
- Arrange the fabric pieces: Lay out your fabric pieces on a large flat surface, such as a design wall or a cleared section of the floor. Experiment with different arrangements until you find a pattern that you like. You can create a random layout or arrange the bags in a specific order to achieve a particular design.
- Sew the rows: Start by sewing the bags together in rows. Take the first two fabric pieces and place them right sides together, aligning the edges. Sew a ¼-inch seam along the edge, backstitching at the beginning and end of each row to secure the stitches. Repeat this process until each row is complete.
- Press the seams: Once each row is sewn, carefully press the seams open or to one side. This will help reduce bulk and create a flat surface for the next step.
- Sew the rows together: Now it’s time to sew the rows together. Take the first two rows and place them right sides together, aligning the seams. Pin or clip the seams together to ensure they don’t shift while sewing. Sew a ¼-inch seam along the edges, backstitching at the beginning and end of each seam. Continue sewing the rows together until your quilt top is fully assembled.
- Press the quilt top: Once you have sewn all the rows together, give the quilt top a final press to set the seams and create a neat appearance. Use a warm iron and press gently, taking care not to stretch or distort the fabric.
As you sew the bags together, take breaks to step back and assess the overall design. You can make adjustments to the placement of the bags or add additional fabric pieces if desired. Remember, the goal is to create a quilt top that reflects your personal style and showcases the unique Crown Royal bags.
With the bags sewn together, your quilt top is starting to take shape. The next step is creating the quilt pattern by adding batting and a backing fabric. We’ll cover this in the following section.
Creating the Quilt Pattern
Now that you have your Crown Royal bag quilt top sewn together, it’s time to create the quilt pattern by adding batting and a backing fabric. The pattern will give your quilt structure, warmth, and a finished look. Here’s how you can create the quilt pattern:
- Choose the batting: Select a batting that suits your desired level of warmth and loft for the finished quilt. Batting comes in different materials, such as cotton, polyester, and blends. Lay the batting flat on a clean surface and trim it to the size of your quilt top, leaving a little extra on all sides to account for any shifting during the quilting process.
- Prepare the backing fabric: The backing fabric is the fabric that will be the underside of your quilt. It should be larger than your quilt top to allow for seam allowances. Lay the backing fabric flat, right side down, on a clean surface. Smooth out any wrinkles or creases and press it with an iron if necessary.
- Layer the quilt sandwich: To create the quilt sandwich, lay the backing fabric down first, right side down. Place the batting on top of the backing fabric, followed by your quilt top, right side up. Make sure all the edges align and there are no wrinkles or folds in the layers.
- Secure the layers: Pin or use quilting clips to secure the layers together. Start at the center and work your way out, placing pins or clips every few inches to ensure the layers stay in place during quilting. Be careful not to stretch or distort the fabric as you pin or clip.
- Baste the layers: Once the layers are securely pinned or clipped together, it’s time to baste them. Basting is the process of temporarily securing the layers to prevent them from shifting while quilting. You can baste by hand using large, loose stitches or use a basting spray or adhesive designed for quilting. Choose the method that works best for you.
Creating the quilt pattern by layering the batting and backing fabric with your quilt top is an essential step in the quilting process. It provides durability and stability, ensuring that your quilt will withstand washing and use.
With the quilt pattern established, it’s time to move on to the exciting part – quilting! In the next section, we’ll cover the process of quilting your Crown Royal bag quilt.
When making a quilt out of Crown Royal bags, be sure to thoroughly clean and iron the bags before sewing them together. This will ensure a smooth and professional-looking finished product.
Layering and Quilting the Crown Royal Bag Quilt
Now that you have your quilt sandwich created, it’s time to layer and quilt your Crown Royal bag quilt. The quilting process involves stitching through all three layers to secure them together and add decorative patterns. Here’s how you can layer and quilt your quilt:
- Select a quilting design: Decide on the quilting design you want to use for your Crown Royal bag quilt. There are numerous options to choose from, such as straight lines, free-motion quilting, or using a quilting template. You can also consider quilting around the specific design or logo on each Crown Royal bag for added visual interest.
- Prepare your sewing machine: Set up your sewing machine for quilting. Attach a walking foot or quilting foot if you have one to help feed all layers evenly. Choose a thread color that complements your quilt top and wind a bobbin with matching thread.
- Start quilting: Begin quilting by stitching along the design lines you have chosen. Take your time and work methodically, ensuring your stitches are even and secure. You can use a ruler or quilting guides to help you maintain straight lines or create intricate patterns.
- Continue quilting: As you quilt, progress from one section to another, securing your layers together. Be mindful of any intricate or delicate areas on the Crown Royal bags and adjust your quilting accordingly. Consider mixing quilting techniques and designs to add texture and visual interest to your quilt.
- Trim any excess batting and backing: Once you have finished quilting, trim any excess batting and backing fabric, ensuring that the edges of your quilt are straight and even.
Quilting is the process that brings your Crown Royal bag quilt to life. It not only secures the layers together but also adds texture and enhances the overall design. Take your time and enjoy the process of transforming your quilt top into a finished quilt.
Next, let’s move on to the final steps of completing your Crown Royal bag quilt – adding a backing fabric and binding.
Adding a Backing Fabric
Adding a backing fabric to your Crown Royal bag quilt serves multiple purposes. It provides a clean and finished look to the back of your quilt, adds an extra layer of durability, and helps protect the quilt’s stitching. Here’s how you can add a backing fabric to your quilt:
- Prepare the backing fabric: Ensure your backing fabric is clean, pressed, and larger than your quilt top. Lay it flat, right side down, on a clean surface. Smooth out any wrinkles or creases.
- Layer the backing fabric: Place your quilt top, right side up, on top of the backing fabric. Align the edges of the two layers and ensure they are evenly centered.
- Pin or clip the layers: Pin or use quilting clips to secure the backing fabric and quilt top together. Start at the center and work your way out, placing pins or clips every few inches to keep the layers from shifting during the next steps.
- Trim the excess backing fabric: With the quilt top and backing fabric secured, trim the excess backing fabric so that it aligns with the edges of the quilt top. Use a ruler and rotary cutter or scissors to achieve a clean and straight edge.
Adding a backing fabric completes the quilt sandwich, which consists of the quilt top, batting, and backing fabric. This layered structure provides stability and durability to your Crown Royal bag quilt.
With the backing fabric in place, it’s time to move on to the final step – binding the quilt. The binding not only gives your quilt a polished look but also serves as a protective edge. We’ll cover this in the next section.
Read more: How To Make A Quilt Out Of Sweaters
Binding the Quilt
Binding is the final step in completing your Crown Royal bag quilt. The binding not only adds a decorative edge but also provides stability and durability to your quilt. Here’s how you can bind your quilt:
- Prepare the binding fabric: Cut your binding fabric into strips that are 2.5 inches wide and long enough to go around the entire perimeter of your quilt. Join the strips together using diagonal seams to create one continuous strip.
- Prepare the quilt edges: Trim the excess batting and backing fabric so that all three layers of the quilt are even and aligned. Press the raw edges of the quilt top and backing fabric towards the batting.
- Attach the binding: Starting on one side of the quilt, fold the raw edge of the binding fabric in about ¼ inch and press. Place the folded edge of the binding fabric along the quilt’s raw edges, aligning the raw edges. Pin or clip the binding in place.
- Sew the binding: Using a ¼-inch seam allowance, sew the binding to the quilt, starting a few inches away from the edge. Sew all the way around the perimeter, stopping a few inches before reaching the starting point. Backstitch to secure the stitching.
- Join the binding ends: To create a seamless finish, join the ends of the binding fabric together. Trim one end of the binding fabric, leaving a ¼-inch overhang. Fold the other end of the binding fabric and tuck it into the trimmed end. Pin or clip the ends together and sew across the fold to secure them.
- Finish the binding: Fold the binding fabric over the raw edges of the quilt and press. Then, fold it over the quilt’s edge and onto the backside, making sure the binding is even and snug. Pin or clip the binding in place.
- Hand or machine sew the binding: You can choose to hand stitch or machine stitch the binding to the backside of the quilt. If hand stitching, use a blind stitch or whip stitch to secure the binding. If machine stitching, use a straight stitch close to the edge of the binding.
Binding adds the final touch to your Crown Royal bag quilt, giving it a clean and professional finish. Take your time and ensure your binding is securely attached and evenly sewn. Once the binding is complete, your quilt is ready to be enjoyed or gifted.
Remember, adding binding to your quilt is a meticulous process that requires patience and attention to detail. But the result is well worth the effort, as it completes your Crown Royal bag quilt and adds a beautiful finishing touch.
With the binding in place, your Crown Royal bag quilt is now finished! In the next section, we’ll cover some final touches and provide care instructions to keep your quilt looking its best.
Final Touches and Care Instructions
Congratulations on completing your Crown Royal bag quilt! Before you start enjoying your creation, there are a few final touches to consider and some care instructions to keep your quilt looking its best. Here’s what you can do to add some final touches and ensure the longevity of your quilt:
- Trim any loose threads: Take a close look at your quilt and trim any loose threads that may be sticking out. This will give your quilt a clean and polished appearance.
- Give it a final press: Use a warm iron to give your quilt a gentle press, taking care not to flatten the quilting stitches. Pressing the quilt one last time will help set the stitches and create a smooth finish.
- Add a label: Consider adding a fabric label to the back of your quilt. A label can include details such as your name, the date of completion, or any special message you want to include. It’s a beautiful way to personalize your quilt and make it truly unique.
- Display or gift your quilt: Find the perfect spot to display your Crown Royal bag quilt, whether it’s a prominent place in your home or gifted to someone special. Ensure it receives the attention it deserves and adds warmth and beauty to any space.
- Follow proper care instructions: To maintain the beauty and integrity of your quilt, it’s crucial to follow proper care instructions. While specific care requirements may vary based on the materials used, here are some general guidelines:
- Machine wash on a gentle cycle with cold water and mild detergent, if the quilt can be washed. Avoid using harsh chemicals or bleach.
- Use a low heat setting on the dryer or lay flat to air dry. Avoid hanging the quilt, as it may stretch or distort.
- Consider periodically airing out the quilt by placing it in a well-ventilated area.
- Avoid exposing the quilt to direct sunlight for extended periods, as this can fade the fabric over time.
- If necessary, spot clean any stains using a gentle fabric cleaner and a soft cloth.
By following these final touches and care instructions, you’ll ensure that your Crown Royal bag quilt remains a treasured keepsake for years to come.
Now it’s time to embrace the warmth and beauty of your Crown Royal bag quilt. Whether it’s draped over a couch, used on a cozy night, or proudly displayed, your quilt is a testament to your creativity and craftsmanship. Enjoy the comfort and joy it brings!
Disclaimer: The use of Crown Royal bags in quilting is a creative endeavor and is not associated with the Crown Royal brand or its endorsements.
Remember to have fun, be creative, and enjoy the process of making a quilt out of Crown Royal bags!
Conclusion
Congratulations on completing your Crown Royal bag quilt! You’ve taken those iconic purple bags and transformed them into a unique and eye-catching quilt that showcases your creativity and quilting skills. By repurposing these bags, you’ve created a conversation piece that will undoubtedly capture the attention of anyone who sees it.
Throughout the process, you put time and effort into preparing the bags, cutting them into usable pieces, sewing them together, creating the quilt pattern, layering and quilting, adding a backing fabric, and binding the quilt. Each step brought you closer to the finished masterpiece that is now your Crown Royal bag quilt.
As you find the perfect spot to display your quilt or gift it to someone special, take a moment to appreciate the intricate details, the beautiful patterns of the Crown Royal bags, and the craftsmanship that went into its creation. The quilt not only exudes warmth and beauty but also tells a story of repurposing and creativity.
Remember to follow the care instructions to ensure the longevity of your quilt. Treat it with love and care, and it will continue to bring comfort and joy for many years to come.
Creating a quilt out of Crown Royal bags was a labor of love, a testament to your dedication and passion for quilting. It was a journey of transforming ordinary materials into something extraordinary. Your Crown Royal bag quilt is not just a blanket, but a work of art that preserves memories and tells a unique story.
So, embrace the warmth and beauty of your Crown Royal bag quilt. Snuggle up under it on chilly evenings, admire its intricate patterns, and share your story of creating a quilt out of Crown Royal bags with friends and family. Your quilt is a testament to creativity, resourcefulness, and the joy of quilting.
Disclaimer: The use of Crown Royal bags in quilting is a creative endeavor and is not associated with the Crown Royal brand or its endorsements.
Now, go ahead and enjoy your Crown Royal bag quilt – a true masterpiece that exemplifies your creativity and quilting skills!
Frequently Asked Questions about How To Make A Quilt Out Of Crown Royal Bags
Was this page helpful?
At Storables.com, we guarantee accurate and reliable information. Our content, validated by Expert Board Contributors, is crafted following stringent Editorial Policies. We're committed to providing you with well-researched, expert-backed insights for all your informational needs.


0 thoughts on “How To Make A Quilt Out Of Crown Royal Bags”