Articles
How To Make A Taggie Blanket For A Baby
Modified: October 20, 2024
Learn how to make a taggie blanket for your baby with our informative articles. Find step-by-step guides, tips, and tricks for creating a personalized and comforting blanket.
(Many of the links in this article redirect to a specific reviewed product. Your purchase of these products through affiliate links helps to generate commission for Storables.com, at no extra cost. Learn more)
Introduction
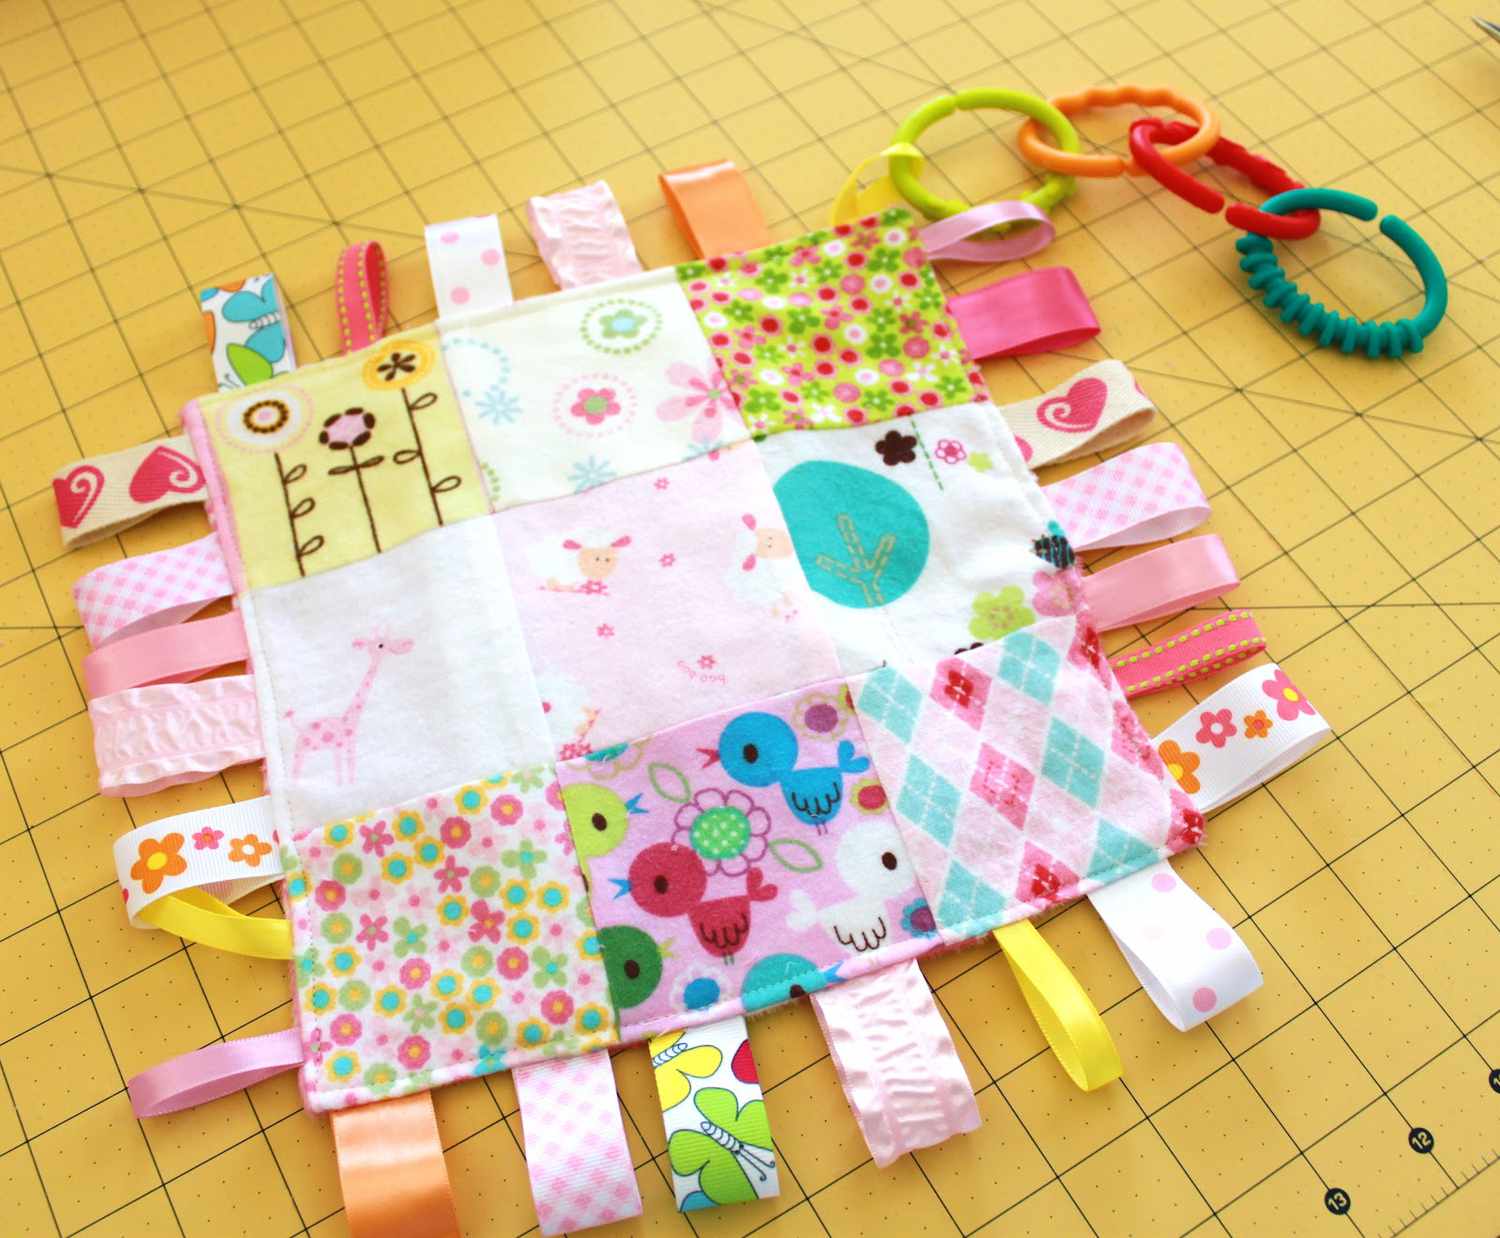
Welcome to the world of DIY baby crafts! Making a taggie blanket for a baby is a creative and practical project that not only provides a cozy and comforting item for the little one, but also stimulates their sensory development. Taggie blankets, also known as sensory blankets or loveys, are soft and colorful blankets with small fabric loops or tags attached around the edges. These tags allow babies to explore different textures and shapes, promoting their fine motor skills and sensory exploration.
In this article, we will guide you through the step-by-step process of making your own taggie blanket for a baby. Whether you are a seasoned crafter or a beginner, this project is perfect for anyone looking to add a personal touch to a baby’s world.
Before we dive into the crafting process, let’s go over the materials you will need to complete this project.
Key Takeaways:
- Dive into the world of DIY baby crafts with a personalized taggie blanket, stimulating sensory development and providing comfort for little ones. Get creative with fabric, tags, and embellishments for a unique touch!
- Create a thoughtful and practical gift by crafting a taggie blanket for a baby. Explore different fabrics, add colorful tags, and personalize with appliques to make each blanket a cherished sensory experience.
Read more: How To Make A Baby Blanket
Materials Needed
Before you get started, gather the following materials:
- Soft and durable fabric of your choice – approximately 1 yard
- Assorted ribbon, twill tape, or trim for tags – at least 10-12 pieces, each measuring around 4-5 inches
- Coordinating thread
- A pair of fabric scissors
- Sewing machine or needle and thread for hand sewing
- Sewing pins or clips
- Measuring tape or ruler
- Fabric marking pen or chalk
- Iron and ironing board
- Optional: embellishments like appliques or patches to personalize the blanket
These materials can easily be found at a local fabric store or online. Choose fabrics and ribbons that are safe for babies, free of small or sharp parts that could pose a choking hazard. It’s also a good idea to prewash your fabric to avoid any shrinkage after sewing.
Step 1: Choosing Fabric
The first step in making a taggie blanket is selecting the perfect fabric. Since this blanket will be used by a baby, it’s important to choose a fabric that is soft, durable, and gentle against their delicate skin.
You can opt for cozy flannel, soft minky fabric, or even organic cotton. These fabrics are widely available and come in a variety of colors and patterns, allowing you to customize the blanket to your liking.
Consider the theme or color scheme you have in mind for the blanket. For a classic look, choose solid colors or simple prints. If you prefer a more playful and vibrant design, go for patterns such as polka dots, animals, or floral prints.
When selecting the fabric, keep in mind that the taggie blanket will be used and washed frequently, so it’s best to choose a fabric that is machine washable and can withstand regular use.
Once you have chosen your fabric, make sure to wash and iron it before starting the sewing process. This will remove any wrinkles and ensure that the fabric is clean and ready to be transformed into a beautiful taggie blanket.
Now that you have your fabric ready, let’s move on to cutting it into the desired size and shape.
Step 2: Cutting the Fabric
Now that you have selected your fabric, it’s time to cut it into the desired size and shape for your taggie blanket.
Start by measuring and marking the dimensions of your blanket on the fabric. A square or rectangular shape is commonly used for taggie blankets, but you can get creative and choose a different shape if you prefer.
For a standard size taggie blanket, a 20×20 inch square is a good starting point. However, you can adjust the size according to your preference.
Using fabric scissors, carefully cut along the marked lines. Take your time to ensure that the edges are straight and clean.
Once you have cut the main piece of fabric, it’s time to prepare for sewing the blanket.
If you want to add a personal touch, you can also cut out additional shapes from contrasting or coordinating fabrics, such as letters, animals, or other fun designs. These can be appliquéd onto the blanket later on.
Now that your fabric is cut and ready, let’s move on to the next step – sewing the taggie blanket!
When making a taggie blanket for a baby, be sure to use a variety of textures and colors for the tags to stimulate their senses and encourage exploration.
Step 3: Sewing the Blanket
With your fabric cut to the desired size, it’s time to sew the taggie blanket together. Follow these steps to ensure a sturdy and professional-looking finish:
- Place the fabric right sides together, with any additional appliqué pieces sandwiched between the layers if desired.
- Pin or clip the edges together to secure them in place.
- Using a sewing machine or needle and thread, start sewing around the edges of the fabric, leaving a 1/4 inch seam allowance. Begin sewing about 2 inches away from one corner.
- Sew along each side, backstitching at the beginning and end to reinforce the stitches.
- Stop sewing about 2 inches away from the same corner where you started.
- Trim any excess thread and remove the pins or clips.
Now, turn the blanket right side out through the opening. Use a pencil or chopstick to gently push out the corners, ensuring they are nice and crisp.
Next, fold in the raw edges of the opening and press them with an iron to create a neat appearance.
To close the opening, you can either hand sew it closed using a ladder stitch or topstitch along the entire edge of the blanket, which will also add a decorative touch.
Once the blanket is sewn together, it’s time to add the tags that make it a taggie blanket. Let’s move on to the next step!
Read more: How To Store Baby Blankets
Step 4: Adding Tags
Adding tags is the highlight of making a taggie blanket. These fabric loops or tags provide tactile stimulation and sensory exploration for babies. Here’s how you can add the tags:
- Cut your ribbon, twill tape, or trim into pieces that measure around 4-5 inches each. Make sure to have at least 10-12 pieces.
- Fold each piece of ribbon or trim in half to create a loop.
- Place the looped end of the ribbon or trim between the two layers of fabric, with the raw ends sticking out. Position them evenly along the edges of the blanket, spacing them about an inch apart.
- Pin or clip the loops in place to secure them.
- Using a sewing machine or needle and thread, stitch over the loops several times to secure them firmly to the fabric. You can sew a straight line or an “X” pattern for added strength.
- Trim any excess thread and remove the pins or clips.
Make sure to sew the loops securely to prevent them from coming loose during use. Test the strength of the loops by giving them a gentle tug to ensure they are firmly attached.
Adding tags to the blanket not only creates sensory interest but also adds a decorative element. You can use a variety of ribbons or trims with different textures, colors, and patterns to make the taggie blanket visually appealing.
Now that your tags are securely attached, let’s move on to the final step – adding the finishing touches to the taggie blanket!
Step 5: Finishing Touches
With the tags sewn in place, your taggie blanket is almost complete. Here are a few final touches you can add to make it even more special:
- If you want to personalize the blanket, you can add appliques or patches. Cut out the desired shape from a contrasting fabric, and sew it onto the blanket using a straight stitch or a decorative stitch.
- Consider adding a satin or silk binding to the edges of the blanket to give it a polished and professional look. You can either use pre-made binding or make your own by cutting strips of fabric on the bias and sewing them around the perimeter of the blanket.
- Once all the embellishments are in place, give the blanket a final press with an iron. This will smooth out any wrinkles and give the blanket a neat appearance.
- Inspect your finished taggie blanket to ensure that all the tags, appliques, and bindings are securely attached. Reinforce any loose stitches if needed.
And there you have it! Your very own homemade taggie blanket is now ready to be enjoyed by a lucky baby. It’s a thoughtful and personalized gift that will provide comfort and sensory stimulation for years to come.
Remember, as with any baby item, it’s essential to regularly inspect the taggie blanket for any signs of wear and tear. If any tags become loose or show signs of damage, remove or repair them to ensure the safety of the baby.
Now that you have mastered the art of making a taggie blanket, feel free to experiment with different fabrics, patterns, and designs. Add your own creative flair to make each blanket unique and special.
Enjoy the process of making these delightful blankets, and don’t forget to share your creations with friends and family. Happy crafting!
Conclusion
Congratulations on completing your DIY taggie blanket! By following the step-by-step instructions in this article, you have created a beautiful and functional blanket that will provide comfort and sensory stimulation to a lucky baby.
Making a taggie blanket is not only a rewarding craft project but also a meaningful gift. Each time the baby snuggles up with their taggie blanket, they will explore the different textures and shapes of the tags, stimulating their senses and promoting their development.
Remember to choose fabrics and materials that are safe for babies and to regularly inspect the blanket for any signs of wear. Always prioritize the baby’s safety while using the taggie blanket.
Now that you have the skills to make a taggie blanket, feel free to get creative and personalize each blanket you make. Experiment with different fabrics, colors, and patterns to create unique designs that reflect your personal style or match the baby’s nursery theme.
Whether you are making a taggie blanket for your own little one, a friend’s baby shower, or to donate to a charitable cause, your handmade creation is sure to be cherished and loved.
So gather your materials, unleash your creativity, and start making taggie blankets that will bring joy and comfort to babies everywhere. Happy crafting!
Frequently Asked Questions about How To Make A Taggie Blanket For A Baby
Was this page helpful?
At Storables.com, we guarantee accurate and reliable information. Our content, validated by Expert Board Contributors, is crafted following stringent Editorial Policies. We're committed to providing you with well-researched, expert-backed insights for all your informational needs.
0 thoughts on “How To Make A Taggie Blanket For A Baby”