Articles
How To Make Cookies On Stove Top
Modified: January 20, 2024
Learn how to make delicious cookies on your stove top with our step-by-step articles. Impress everyone with your baking skills today!
(Many of the links in this article redirect to a specific reviewed product. Your purchase of these products through affiliate links helps to generate commission for Storables.com, at no extra cost. Learn more)
Introduction
Making cookies is a delightful pastime that brings joy to both bakers and cookie enthusiasts. While most people prefer to bake cookies in the oven, there is an alternative method that can be equally satisfying – making cookies on the stovetop.
Whether you don’t have access to an oven or simply want to try something different, stovetop cookies are a fantastic option. They allow you to enjoy the aroma and taste of freshly baked cookies without the need for specialized baking equipment.
In this article, we will guide you through the process of making cookies on the stovetop. From the ingredients you’ll need to the step-by-step instructions, we’ll ensure you have all the information necessary to create delicious stovetop cookies.
So, grab your apron and get ready to embark on a stovetop baking adventure!
Key Takeaways:
- Enjoy the aroma and taste of freshly baked cookies without an oven by mastering the art of making stovetop cookies. Get creative with flavors, mix-ins, and shapes for a unique homemade treat!
- Embrace the joy and satisfaction of creating homemade stovetop cookies. Experiment with different variations, from flavors to shapes, and savor the delightful aroma and burst of flavors with each bite.
Read more: How To Make A Stove Top Distiller
Ingredients
Before you begin making stovetop cookies, gather the following ingredients:
- 1 1/2 cups all-purpose flour
- 1/2 teaspoon baking soda
- 1/4 teaspoon salt
- 1/2 cup unsalted butter, softened
- 1/2 cup granulated sugar
- 1/2 cup packed brown sugar
- 1 large egg
- 1 teaspoon vanilla extract
- 1 cup chocolate chips (or any other desired mix-ins)
Note: Feel free to personalize your cookie recipe by adding nuts, dried fruits, or other flavorings to suit your preferences.
Equipment Needed
To make stovetop cookies, you will need the following equipment:
- Medium-sized mixing bowl
- Whisk or spoon for mixing
- Stovetop skillet or frying pan
- Spatula
- Cooling rack
- Parchment paper or non-stick cooking spray
Ensure that all equipment is clean and ready for use before you start making your stovetop cookies. Having everything prepared will make the process smoother and more enjoyable.
Step 1: Preparing the Dough
The first step in making stovetop cookies is preparing the dough. Follow these instructions:
- In a medium-sized mixing bowl, whisk together the all-purpose flour, baking soda, and salt. Set aside.
- In a separate bowl, cream together the softened unsalted butter, granulated sugar, and brown sugar until light and fluffy.
- Add the egg and vanilla extract to the butter-sugar mixture and mix until well combined.
- Gradually add the dry ingredients to the wet ingredients, mixing until a thick cookie dough forms.
- If desired, fold in chocolate chips or any other mix-ins to add additional flavor and texture.
Note: Take care not to overmix the dough, as this can lead to tough cookies. Mix until just combined.
Once the dough is prepared, you are ready to move on to shaping the cookies and cooking them on the stovetop.
Step 2: Shaping the Cookies
Now that you have your cookie dough ready, it’s time to shape the cookies. Follow these steps:
- Take about a tablespoon-sized portion of dough and roll it between your palms to form a round ball. Repeat with the remaining dough.
- If desired, you can also flatten the dough balls slightly to create a more uniform shape.
- Place the shaped dough balls onto a plate or baking sheet lined with parchment paper or coated with non-stick cooking spray. Leave some space between the cookies to allow for expansion while cooking.
Depending on the size of your skillet or frying pan, you may need to cook the cookies in batches. Make sure to shape all the dough before moving on to the cooking step.
With the cookies shaped and ready to go, it’s time to move on to the stovetop cooking process.
Read more: How To Make Bread On Stove Top
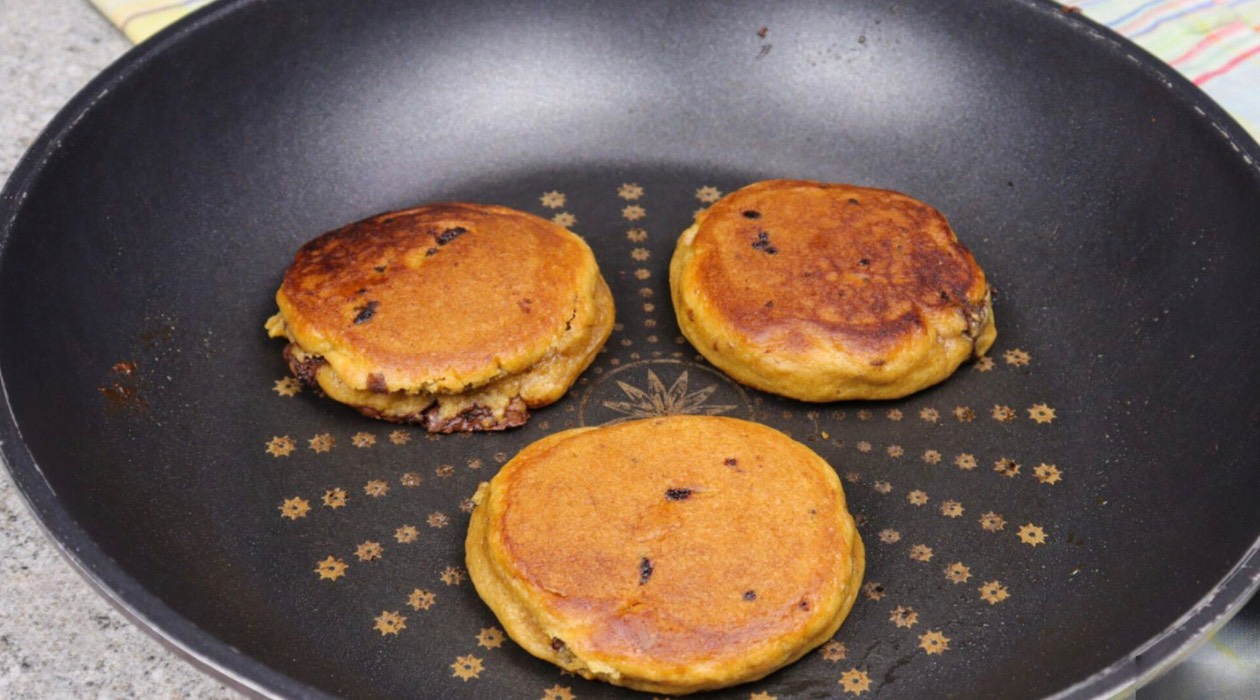
Step 3: Cooking on the Stove Top
Now comes the exciting part – cooking the cookies on the stovetop! Follow these instructions to achieve perfectly cooked stovetop cookies:
- Place a skillet or frying pan on the stovetop over medium-low heat. Allow the pan to heat up for a minute or two.
- Once the pan is hot, carefully place a few cookie dough balls onto the pan, leaving ample space between each cookie. Remember that the cookies will spread while cooking.
- Cook the cookies on one side for about 2-3 minutes, or until the bottom is golden brown. Avoid turning up the heat too high, as this can result in overly browned or burnt cookies.
- While the first batch of cookies is cooking, continue shaping the remaining dough balls for the next round.
Keep a close eye on the cookies as they cook, adjusting the heat if necessary to prevent burning. The cooking time may vary depending on the size and thickness of the cookies.
Once the bottoms of the cookies are nicely browned, it’s time to flip them over to cook the other side.
Use a heavy-bottomed pan to prevent burning. Keep the heat low and stir constantly to ensure even cooking. Watch for the edges to turn golden brown before flipping.
Step 4: Flipping the Cookies
Now that one side of the cookies is cooked to perfection, it’s time to flip them to ensure even cooking. Follow these steps:
- Using a spatula, gently lift each cookie and carefully flip it over in the pan. Take care not to squish or break the cookies during the flipping process.
- Cook the flipped cookies for an additional 2-3 minutes, or until the other side is golden brown.
- Continue flipping the cookies until both sides are evenly cooked.
- Once all the cookies are cooked and beautifully browned on both sides, remove them from the heat.
Flipping the cookies ensures that they cook evenly and achieve that perfect golden-brown color on both sides. Be gentle while flipping to maintain the round shape of the cookies and prevent them from falling apart.
With the flipping done, it’s time to move on to the final step – removing the cookies from the heat.
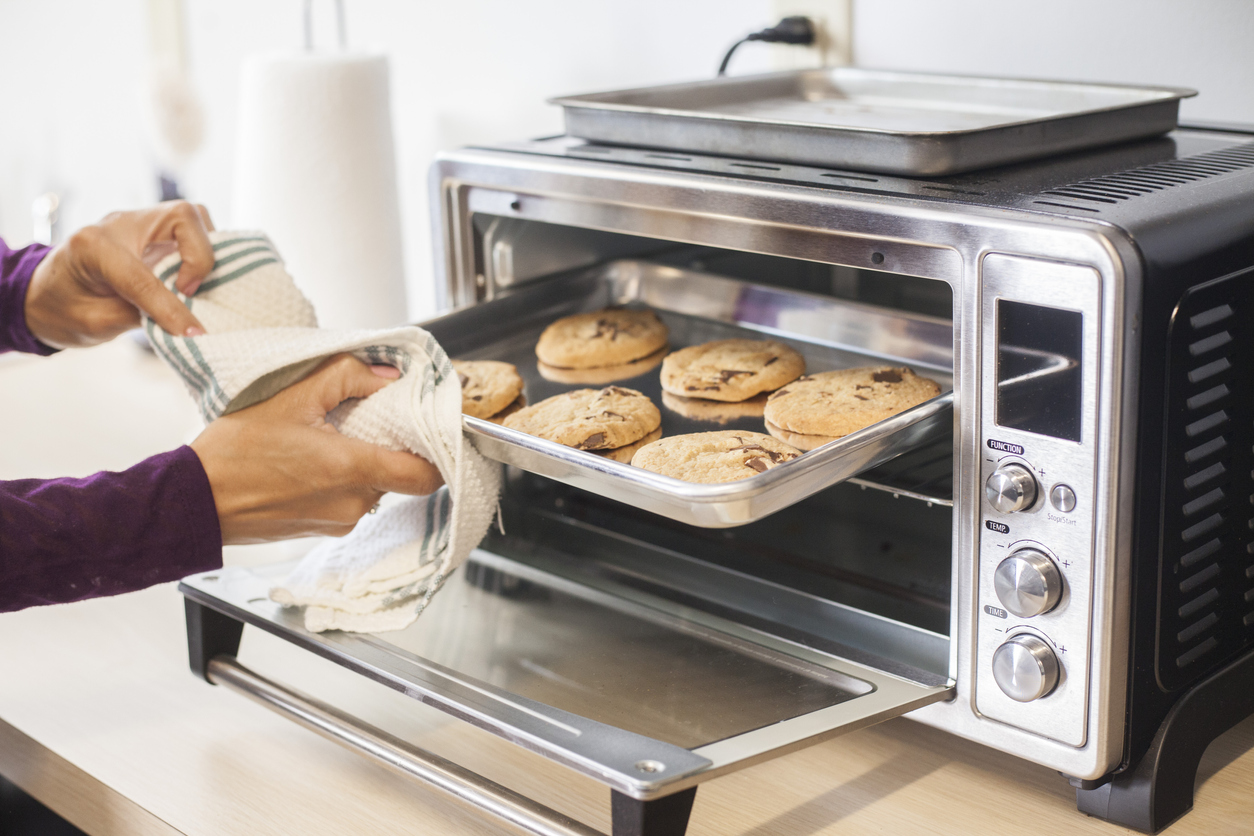
Step 5: Removing from Heat
After the cookies have cooked on both sides and have reached a lovely golden-brown color, it’s time to remove them from the heat. Follow these instructions:
- Turn off the stove and carefully transfer the cooked cookies from the skillet or frying pan onto a cooling rack.
- Allow the cookies to cool on the rack for a few minutes. This will help them firm up and retain their shape.
- Avoid stacking the cookies while they are still warm, as this can cause them to become soft and lose their crispness.
Once the stovetop cookies have cooled down slightly, they are ready to be enjoyed. The aroma of freshly cooked cookies will fill the air, inviting you to take a bite and savor their deliciousness.
Now that the cookies are cooling, prepare yourself for the final step – tasting and serving your homemade stovetop cookies.
Step 6: Cooling and Serving
After the stovetop cookies have cooled down, it’s time to indulge in the delectable treats you’ve just created. Follow these steps to properly cool and serve your cookies:
- Allow the cookies to cool completely on the cooling rack. This will ensure they firm up and develop a satisfying texture.
- Once cooled, transfer the cookies to a serving plate or store them in an airtight container to maintain their freshness.
- Stovetop cookies can be enjoyed on their own, or you can pair them with a glass of milk, a scoop of ice cream, or your favorite hot beverage.
- Get creative with presentation by arranging the cookies in an appealing way or adding a dusting of powdered sugar on top.
Now, sit back, relax, and relish the fruits of your stovetop baking labor. Each bite of these homemade cookies will reward you with a burst of flavor and a satisfying crunch.
Remember to store any leftover cookies in an airtight container to keep them fresh for a few days. They make for a delightful sweet treat to enjoy later.
Congratulations! You have successfully made and served your very own stovetop cookies. Now, it’s time to share your delicious creation with family and friends!
Read more: How To Make Espresso With Stove Top
Tips and Variations
Here are some helpful tips and variations to consider when making stovetop cookies:
- Experiment with different flavors: While chocolate chip cookies are a classic favorite, don’t be afraid to get creative. Add chopped nuts, dried fruits, or even a sprinkle of cinnamon for added flavor.
- Adjust the cooking time: The cooking time may vary depending on the thickness and size of the cookies. Keep an eye on them and adjust the cooking time accordingly to achieve your desired level of crispness.
- Use parchment paper or non-stick spray: To prevent the cookies from sticking to the pan, line it with parchment paper or use a non-stick cooking spray. This will make it easier to flip and remove the cookies from the pan.
- Get creative with shapes: Instead of rolling the dough into traditional round balls, try shaping them into squares, hearts, or other fun shapes using cookie cutters. Kids will especially enjoy these whimsical variations.
- Add a sprinkle of sea salt: For a delightful sweet-salty combination, sprinkle a touch of coarse sea salt on top of each cookie before cooking.
- Experiment with different mix-ins: While chocolate chips are popular, feel free to try other mix-ins such as butterscotch chips, shredded coconut, or even crushed candy bars. The possibilities are endless!
Remember, baking is all about experimenting and making the recipe your own. Have fun, and don’t be afraid to try new flavors and techniques to create unique stovetop cookie creations.
Now that you have these tips and variations in mind, go ahead and unleash your creativity in the kitchen!
Conclusion
Congratulations! You have successfully learned how to make delicious cookies on the stovetop. This alternative baking method opens up a world of possibilities, allowing you to enjoy the aroma and taste of freshly baked cookies without an oven.
From preparing the dough to shaping the cookies, cooking them on the stovetop, and finally savoring the finished treats, each step is an opportunity to express your culinary creativity and satisfy your sweet tooth.
Remember to gather all the necessary ingredients and equipment, and follow the step-by-step instructions closely. Additionally, don’t be afraid to experiment with different flavors, mix-ins, and shapes to create your own unique stovetop cookie variations.
Whether you’re making these cookies for yourself, your family, or to impress guests, the joy and satisfaction that come from creating something homemade are truly special. So, roll up your sleeves, preheat that stovetop skillet, and embark on your delicious stovetop cookie baking adventure.
Enjoy the process, indulge in the delightful aroma, and savor each bite of these homemade treats. The crispy edges, chewy centers, and bursts of flavor will transport you to a blissful world of cookie perfection.
So go ahead, master the art of stovetop cookie-making, and let your taste buds experience the magic of homemade cookies created with love in your very own kitchen.
Frequently Asked Questions about How To Make Cookies On Stove Top
Was this page helpful?
At Storables.com, we guarantee accurate and reliable information. Our content, validated by Expert Board Contributors, is crafted following stringent Editorial Policies. We're committed to providing you with well-researched, expert-backed insights for all your informational needs.

0 thoughts on “How To Make Cookies On Stove Top”