Articles
How To Use A Stove Top Espresso Maker
Modified: January 6, 2024
Learn how to use a stove top espresso maker in this detailed guide. Read articles and tips on making delicious espresso at home.
(Many of the links in this article redirect to a specific reviewed product. Your purchase of these products through affiliate links helps to generate commission for Storables.com, at no extra cost. Learn more)
Introduction
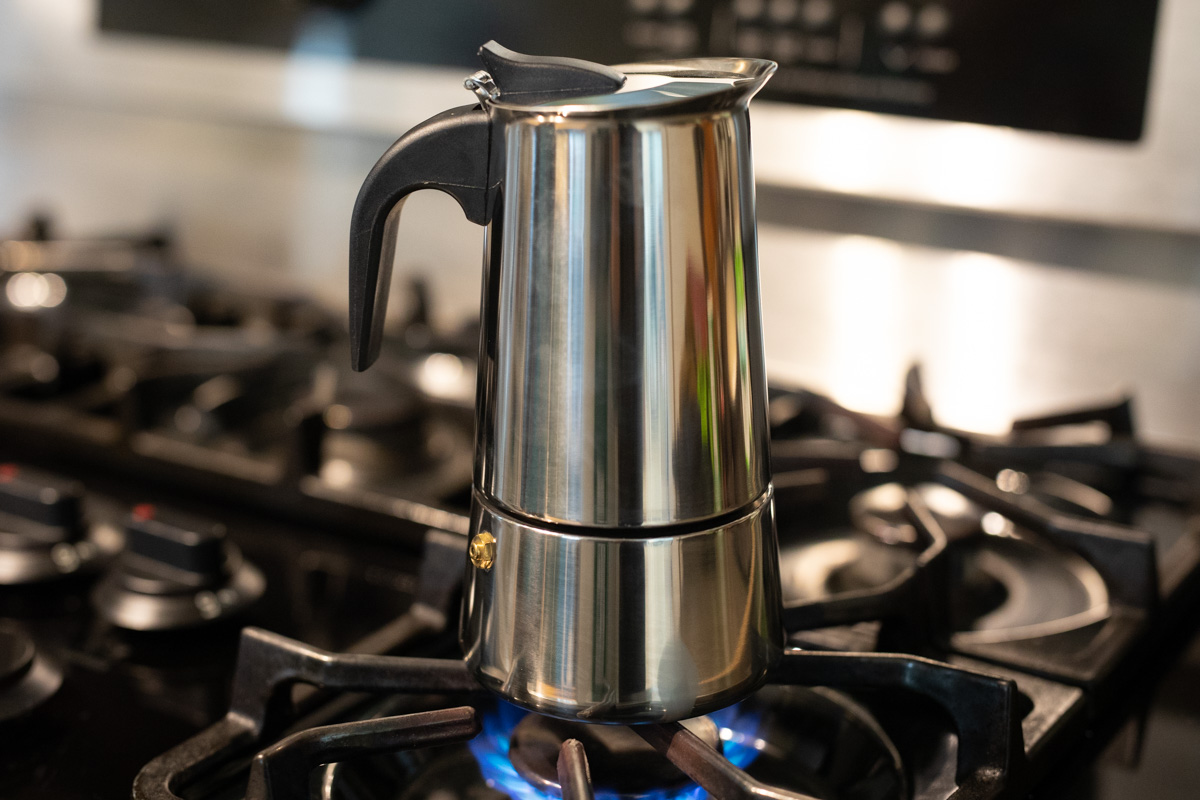
Welcome to the world of stove top espresso makers! If you’re a coffee lover who craves the rich and intense flavor of a traditional espresso, then using a stove top espresso maker is a fantastic option. This brewing method, also known as a moka pot, offers a convenient and affordable way to brew espresso-like coffee at home.
Stove top espresso makers have been a staple in Italian households for decades, and their popularity has spread around the world. They are compact, easy to use, and produce a concentrated coffee extract that forms the base of many delicious espresso-based drinks.
In this article, we will guide you on how to use a stove top espresso maker to make a perfect cup of espresso from the comfort of your own kitchen. We will cover everything from understanding the different parts of the espresso maker, to grinding the coffee, brewing the espresso, and even frothing milk for those indulgent cappuccinos or lattes.
So, whether you’re a beginner or a seasoned coffee enthusiast looking to expand your brewing skills, let’s dive in and explore the wonderful world of stove top espresso makers.
Key Takeaways:
- Master the art of brewing rich and intense espresso at home with a stove top espresso maker. Understand the components, perfect the grind, and savor the process to create a delightful coffee experience.
- Elevate your coffee game by frothing milk to create creamy foam for lattes and cappuccinos. Experiment with serving styles and enjoy the versatility of your stove top espresso maker.
Read more: How To Make Espresso With Stove Top
Understanding Stove Top Espresso Maker
Before we start brewing, let’s take a moment to familiarize ourselves with the different parts of a stove top espresso maker. Understanding how each component works will help ensure that you use it correctly and get the best results.
A typical stove top espresso maker consists of three main parts:
- Lower Chamber: This is the base of the espresso maker where you pour water. It has a pressure valve and a funnel-shaped filter basket on top.
- Filter Basket: This is where you place the ground coffee. It has small holes that allow water to pass through while retaining the coffee grounds.
- Upper Chamber: This is where the brewed coffee collects. It screws onto the lower chamber and has a spout for pouring.
Stove top espresso makers work by creating steam pressure that forces hot water from the lower chamber, through the coffee grounds in the filter basket, and into the upper chamber. This process mimics the extraction method used in traditional espresso machines, resulting in a strong and concentrated brew.
It’s important to note that stove top espresso makers come in different sizes, typically measured in cups. However, these cup measurements refer to demitasse cups, which are smaller than a regular coffee cup. So, a 3-cup stove top espresso maker will yield about 1 to 2 regular-sized cups of espresso.
Now that you have a good understanding of how a stove top espresso maker works, let’s move on to preparing and using it to make a delicious cup of espresso.
Preparing Your Stove Top Espresso Maker
Now that you’re familiar with the components of a stove top espresso maker, it’s time to prepare it for use. Follow these steps to ensure that your espresso maker is clean and ready to brew a perfect cup of espresso.
- Wash the parts: Before using your stove top espresso maker for the first time, wash all the parts with warm water and mild soap. This will remove any manufacturing residue and ensure a clean brewing process.
- Check the rubber gasket: Take a close look at the rubber gasket or seal that sits between the upper and lower chambers. Make sure it is clean and free from any cracks or damage. This gasket is essential for creating a proper seal and preventing leaks during the brewing process.
- Fill the lower chamber with water: Unscrew the upper chamber from the lower chamber, and fill the lower chamber with cold, filtered water. Be careful not to overfill it, as this can interfere with the brewing process. As a general guideline, fill the chamber just below the pressure valve.
- Insert the filter basket: Place the filter basket into the lower chamber and fill it with freshly ground coffee. Use a fine to medium grind size, similar to what you would use for espresso. The amount of coffee will depend on the size of your espresso maker and your personal preference. A good starting point is about 1 tablespoon of coffee per demitasse cup.
- Level the coffee grounds: After adding the coffee, use a spoon or your finger to level the coffee grounds in the filter basket, ensuring they are evenly distributed. This will help ensure an even extraction during the brewing process.
- Screw the upper chamber: Screw the upper chamber tightly onto the lower chamber, making sure the two parts are securely sealed. Be careful not to overtighten, as this may cause difficulties when unscrewing after brewing.
With your stove top espresso maker prepared, you’re now ready to move on to the next step: grinding and measuring your coffee.
Grinding and Measuring Coffee
One of the key factors in brewing a great cup of espresso with a stove top espresso maker is using the right grind size and measuring the coffee accurately. This ensures proper extraction and the desired flavor profile in your espresso.
Here are some tips for grinding and measuring your coffee for a stove top espresso maker:
- Choose a fine to medium grind: For stove top espresso makers, it’s best to use a grind size similar to what you would use for espresso. This means a fine to medium grind that is slightly coarser than what you would use for a traditional espresso machine.
- Grind your coffee fresh: To get the most flavor out of your coffee, it’s always best to grind your beans just before brewing. This ensures maximum freshness and optimal extraction.
- Measure the coffee: The amount of coffee you use will depend on the size of your stove top espresso maker and your personal taste preferences. As a general guideline, start with about 1 tablespoon (7-9 grams) of coffee per demitasse cup.
- Adjust the coffee amount as needed: If you find your espresso is too weak or too strong, you can adjust the amount of coffee accordingly. Remember, it’s all about finding the right balance and experimenting to suit your taste.
- Avoid compacting the coffee: Unlike traditional espresso machines, you do not need to tamp or compact the coffee in the filter basket. Simply level the coffee grounds and ensure they are evenly distributed.
Grinding your coffee to the right size and measuring it accurately are crucial steps in achieving a flavorful and well-extracted espresso. With your coffee ready to go, it’s time to move on to the next step: assembling and heating the stove top espresso maker.
Assembling and Heating the Stove Top Espresso Maker
Now that you have ground and measured your coffee, it’s time to assemble your stove top espresso maker and begin the brewing process. Follow these steps to ensure proper assembly and heating:
- Assemble the espresso maker: Take the top chamber of your espresso maker, which contains the filter basket filled with coffee, and screw it tightly onto the bottom chamber containing water. Ensure a secure fit, but avoid overtightening.
- Place the espresso maker on the stove: Set your stove to a medium heat setting. Place the assembled espresso maker on the stove, making sure it is centered and stable. Position the handle away from the heat source to avoid any accidents.
- Close the lid (if applicable): Some stove top espresso makers have a lid that covers the coffee chamber. If yours has one, close it to prevent any heat from escaping during the brewing process.
- Heat the espresso maker: Allow the espresso maker to heat up slowly. The water in the bottom chamber will heat up and create pressure, which will force the water through the coffee grounds and into the top chamber.
- Monitor the brewing process: As the espresso maker heats up, you will hear a faint gurgling sound. This indicates that the water is boiling and being forced through the coffee grounds. Keep an eye on the brewing process to ensure it doesn’t happen too quickly or too slowly.
- Remove from heat: Once you hear a steady stream of coffee flowing into the top chamber, it’s time to remove the espresso maker from the heat source. Be sure to use oven mitts or a towel to protect your hands from the heat.
By following these assembly and heating steps, you’ll be on your way to brewing a delicious cup of espresso using your stove top espresso maker. Next up, we’ll dive into the process of actually brewing the espresso. Let’s continue!
Read more: How To Use A Stove Top
Brewing the Espresso
Now comes the exciting part – brewing your espresso! With your stove top espresso maker assembled and heated, follow these steps to ensure a successful brewing process:
- Slow and steady pour: Hold onto the handle of the espresso maker and pour the brewed espresso into your cup or serving vessel. Pour slowly and steadily to avoid any splashing or spills.
- Avoid overfilling: Be mindful of the capacity of your cup or serving vessel. Aim to fill it up to about 2/3 or 3/4 full, leaving room for any additional ingredients such as sugar or milk.
- Observe the crema: As the brewed espresso fills your cup, you may notice a layer of foam on top called crema. Crema is a sign of a well-extracted espresso and adds to the rich flavor and aroma of the coffee.
- Allow the espresso to settle: After pouring, give the espresso a few moments to settle before enjoying. This allows the flavors to meld together and ensures a balanced and satisfying cup of coffee.
- Experiment with serving styles: Espresso can be enjoyed as is, or you can get creative and use it as a base for various espresso-based drinks like cappuccinos, lattes, or macchiatos. Explore different serving styles and find your favorite way to enjoy your freshly brewed espresso.
Congratulations! You have successfully brewed your espresso using a stove top espresso maker. Now, if you desire, we can move on to frothing milk to complement your espresso. If not, you can skip to the next section on serving and enjoying your espresso.
When using a stove top espresso maker, make sure to use finely ground coffee and fill the filter basket evenly without packing it too tightly. This will help to ensure a smooth and flavorful espresso.
Frothing Milk (Optional)
If you enjoy milk-based espresso drinks like cappuccinos or lattes, frothing milk is the next step to take your coffee experience to the next level. Here’s how you can froth milk to create creamy and velvety foam:
- Select the right milk: Whole milk is generally recommended for better frothing due to its higher fat content. However, you can also use other types of milk like 2%, skim, or plant-based alternatives. Experiment with different types of milk to find the taste and texture you prefer.
- Choose a frothing method: There are a few methods you can use to froth milk. Here are three common techniques:
- Manual frothing with a frother wand: If your stove top espresso maker comes with a frother wand, simply heat the milk in a small saucepan until warm, then insert the frother wand into the milk, keeping it near the surface. Move the wand up and down to create froth.
- French press method: Heat the milk in a microwave-safe container until warm. Pour the warm milk into a French press and move the plunger up and down vigorously to create foam.
- Electric frother: If you have an electric milk frother, follow the manufacturer’s instructions to heat and froth the milk. These devices are specifically designed for frothing milk and provide consistent results.
- Froth to your desired consistency: Froth the milk until it reaches your preferred consistency. For a cappuccino, aim for a rich and velvety foam. For a latte, you’ll want a creamier texture with less foam.
- Tap the milk pitcher: Once the milk is frothed to your liking, gently tap the milk pitcher on a countertop to remove any large bubbles and help the froth settle.
- Pour the frothed milk: Slowly pour the frothed milk into your freshly brewed espresso, holding back the foam with a spoon to achieve the desired milk-to-foam ratio.
- Decorate (optional): If you’re feeling creative, you can sprinkle some cocoa powder, cinnamon, or nutmeg on top of the foam for an added touch of flavor and presentation.
Now that your milk is frothed and ready, it’s time to move on to serving and enjoying your delicious espresso creation.
Serving and Enjoying Your Espresso
Now that you have brewed your espresso and frothed your milk (if desired), it’s time to savor the fruits of your labor. Here are some tips for serving and enjoying your espresso:
- Preheat your cups: Before pouring your espresso, preheat your serving cups by rinsing them with hot water. This helps maintain the temperature of the espresso and ensures a pleasurable drinking experience.
- Pour the espresso: Gently pour your brewed espresso into the preheated cups, filling them to your desired level. Take note of the enticing aroma that fills the air as you pour.
- Add sugar (if desired): Taste your espresso to see if it requires additional sweetness. If desired, add sugar to enhance the flavor. Stir well to ensure the sugar dissolves evenly.
- Add frothed milk (optional): If you frothed milk, carefully pour it into your espresso, aiming for the desired milk-to-foam ratio. Hold back the foam with a spoon if necessary. The addition of frothed milk creates a creamy and luscious texture to your espresso.
- Admire the crema: Take a moment to appreciate the beautiful layer of crema on top of your espresso. The crema not only enhances the visual appeal but also contributes to the flavors of the coffee.
- Sip and savor: Finally, take a sip and savor the complex and intense flavors of your espresso. Notice the balance of acidity, bitterness, and sweetness. Allow the flavors to linger on your palate as you enjoy the richness of the coffee.
- Take your time: Espresso is meant to be enjoyed slowly. Take your time to appreciate the nuances of the coffee as it cools down slightly. Relax, savor each sip, and let the experience unfold.
Remember, the joy of espresso lies not only in its taste but also in the overall experience. So sit back, unwind, and relish the moment with your freshly brewed espresso.
Cleaning and Maintenance Tips
Proper cleaning and maintenance of your stove top espresso maker are essential for ensuring its longevity and continued performance. Here are some tips to keep your espresso maker clean and functioning optimally:
- Wait for the espresso maker to cool: Before cleaning your espresso maker, always allow it to cool down completely. Handling hot parts can be dangerous and may cause burns.
- Disassemble the parts: After the espresso maker has cooled down, carefully disassemble the different parts, including the upper and lower chambers, filter basket, and rubber gasket (if removable).
- Wash with warm, soapy water: Wash the parts with warm water and mild dish soap. Use a soft brush or sponge to clean the filter basket and rubber gasket. Avoid using abrasive cleaners or scrubbers that may damage the surfaces.
- Rinse thoroughly: Make sure to rinse all the soap off the parts to avoid leaving any residue behind. Residual soap can affect the flavor of your espresso.
- Let it air dry: Allow all the parts to air dry completely before reassembling the espresso maker. Placing wet parts together can result in a damp and potentially moldy environment.
- Regular descaling: Over time, mineral deposits may build up inside your espresso maker, affecting its performance. Descaling the espresso maker periodically can help remove these deposits. Follow the manufacturer’s instructions for descaling or use a commercial descaling solution.
- Store properly: When not in use, store your espresso maker disassembled in a dry and clean location. Avoid storing it with coffee grounds or residue inside, as this can attract pests and affect the taste of your next brew.
By following these cleaning and maintenance tips, you can ensure that your stove top espresso maker remains in excellent condition and continues to deliver superb coffee for years to come.
Read more: How Does A Stove Top Espresso Maker Work
Troubleshooting Common Issues
While using a stove top espresso maker is generally straightforward, you may encounter some common issues along the way. Here are a few troubleshooting tips to help you resolve these issues:
- Weak or watery espresso: If your espresso turns out weak or watery, the grind size may be too coarse or the coffee may not be packed tightly enough in the filter basket. Try using a finer grind and slightly increasing the amount of coffee to achieve a stronger flavor.
- Leaking during brewing: If you notice leaking during the brewing process, double-check that the rubber gasket is in good condition and properly seated. If necessary, replace the gasket to create a better seal. Also, make sure all the parts are tightly screwed together.
- Excessive pressure valve release: If the pressure valve on your espresso maker consistently releases steam excessively or inconsistently, it may be due to overfilling the lower chamber or using too high heat. Check that you are filling the water to the appropriate level and use a moderate heat setting.
- Bitter or burnt-tasting espresso: If your espresso tastes bitter or burnt, it could be a result of over-extraction. Ensure that you’re not leaving the espresso maker on the heat source for too long and remove it promptly once brewing is complete.
- Stuck espresso maker: If your espresso maker becomes difficult to unscrew after brewing, it could be due to coffee grounds being packed too tightly. Allow the espresso maker to cool down completely before attempting to unscrew it. If necessary, gently tap the side of the espresso maker to loosen any trapped coffee grounds.
- Metallic taste in the coffee: If you notice a metallic taste in your coffee, it could be due to mineral buildup inside the espresso maker. Try descaling the espresso maker to remove any deposits. Additionally, ensure that you’re using high-quality filtered water for brewing.
If you continue to experience issues with your stove top espresso maker, consult the manufacturer’s instructions or reach out to their customer support for further assistance. Troubleshooting can vary depending on the specific brand and model of your espresso maker.
With these troubleshooting tips, you’ll be able to overcome common issues and continue enjoying a delicious cup of espresso with your stove top espresso maker.
Conclusion
Congratulations! You have now learned how to use a stove top espresso maker to brew your own delicious espresso at home. By understanding the different components, preparing the espresso maker, grinding and measuring coffee, and following the brewing process, you are well-equipped to create a rich and flavorful cup of espresso.
Remember, the key to a great espresso lies in using high-quality coffee beans, grinding them to the right consistency, and following the proper brewing techniques. With a little practice and experimentation, you’ll be able to fine-tune the process to suit your personal taste preferences.
In addition, if you enjoy milk-based espresso drinks, you can take the extra step of frothing milk to create luscious foam and elevate your coffee experience. Frothing milk allows you to unleash your creativity and enjoy a variety of espresso-based drinks like cappuccinos and lattes.
Lastly, don’t forget to keep your stove top espresso maker clean and well-maintained. Regular cleaning, proper storage, and occasional descaling will ensure that your espresso maker continues to produce excellent coffee for years to come.
Now that you have the knowledge and skills, it’s time to embark on your espresso-making journey. Enjoy the delightful aroma, the velvety texture, and the bold flavors of your homemade espresso. So go ahead, gather your favorite coffee beans and start brewing the perfect cup of espresso with your stove top espresso maker!
Frequently Asked Questions about How To Use A Stove Top Espresso Maker
Was this page helpful?
At Storables.com, we guarantee accurate and reliable information. Our content, validated by Expert Board Contributors, is crafted following stringent Editorial Policies. We're committed to providing you with well-researched, expert-backed insights for all your informational needs.


0 thoughts on “How To Use A Stove Top Espresso Maker”