Articles
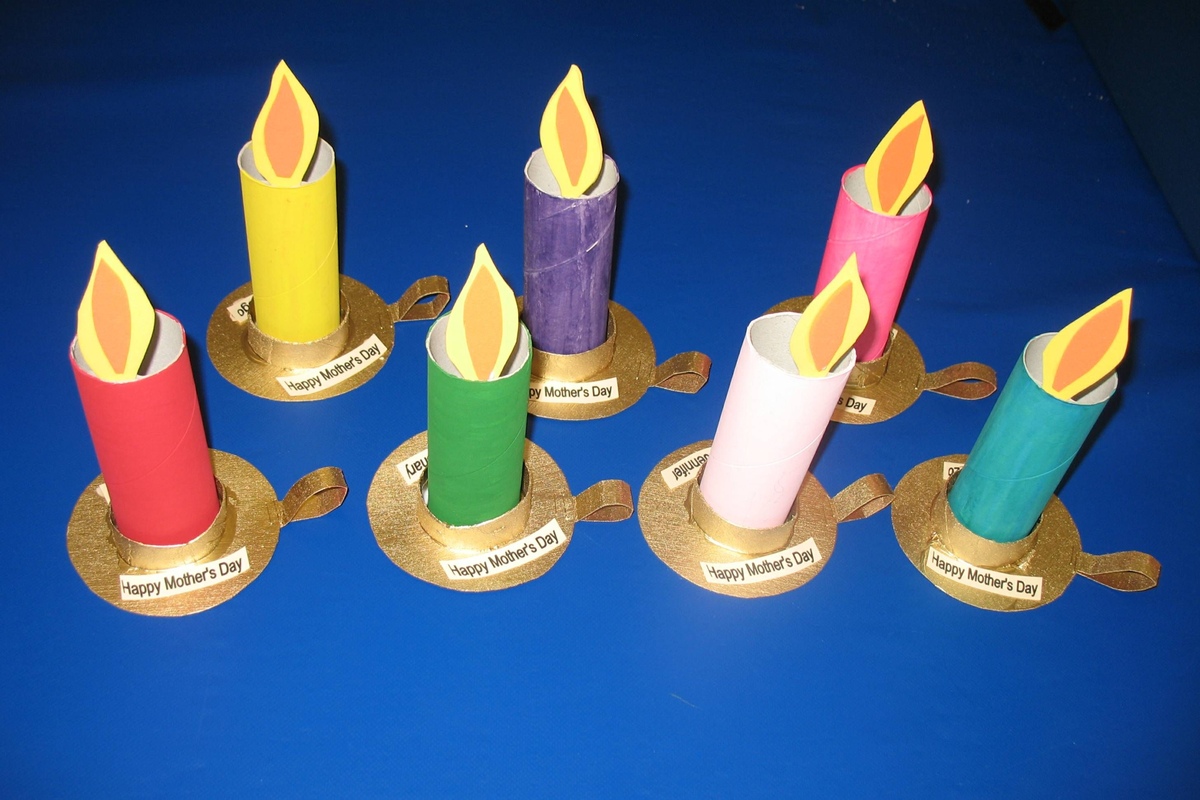
How To Make Toilet Paper Candles
Modified: February 28, 2024
Discover the step-by-step process of making beautiful toilet paper candles with this informative and engaging articles. Learn the tips and tricks to create stunning designs at home.
(Many of the links in this article redirect to a specific reviewed product. Your purchase of these products through affiliate links helps to generate commission for Storables.com, at no extra cost. Learn more)
Introduction
Do you find yourself constantly looking for unique and creative ways to elevate your home decor? Are you a fan of DIY crafts that not only add a personal touch but also serve a practical purpose? If so, then you’re in for a treat! In this article, we’ll explore the fascinating world of making candles out of toilet paper rolls.
Candles have been used for centuries to provide warmth, light, and ambiance. They add a cozy and intimate feel to any space, making them a staple in homes around the world. While traditional candles can be purchased from stores, creating your own candles can be a fulfilling and cost-effective alternative. And with the added twist of using toilet paper rolls as candle molds, you’ll be creating a unique conversation piece that’s sure to impress.
Not only will this DIY project ignite your creativity, but it also allows you to repurpose and recycle materials that would typically be discarded. By transforming something as simple as a cardboard toilet paper roll into a beautiful candle, you’ll be doing your part to reduce waste and contribute to a more sustainable environment.
This project is perfect for crafters of all skill levels. Whether you’re a seasoned candle-maker or a beginner looking to embark on a new creative adventure, making toilet paper candles is a fun and rewarding experience.
In this step-by-step guide, we’ll walk you through the process of creating your very own toilet paper candles. From preparing the toilet paper rolls to adding scent and color, we’ll cover everything you need to know to ensure your candles turn out beautifully. So, gather your materials, roll up your sleeves, and get ready to light up your space with these charming DIY candles!
Key Takeaways:
- Elevate your home decor and reduce waste by crafting unique candles from toilet paper rolls. Enjoy the fulfilling process of melting wax, adding scent and color, and personalizing your candles with decorative touches.
- Embrace your creativity and create one-of-a-kind candles that add warmth and ambiance to your space. From preparing the rolls to adding decorative elements, enjoy the fulfilling and exciting journey of candle-making.
Read more: How To Make A Toilet Paper Holder
Materials Needed
Before getting started with your toilet paper candle project, it’s important to gather all the necessary materials. Luckily, you won’t need many items, and most of them can be found around the house or easily purchased at a craft store. Here’s what you’ll need:
- Toilet paper rolls – Collect several empty toilet paper rolls. Make sure they are clean and free from any leftover paper or debris.
- Wax – Choose the type of wax that suits your preference. Paraffin wax is commonly used for candle-making and is readily available. Alternatively, you can use soy wax or beeswax for a more natural option.
- Candle wicks – Select candle wicks that are appropriate for the size of your toilet paper rolls. You can find wicks that come pre-tabbed or choose untabbed wicks and attach the metal tab yourself.
- Double boiler or melting pot – To melt the wax, you’ll need a heat-resistant container. A double boiler is ideal, but if you don’t have one, a metal or glass container that can withstand heat will work.
- Heat source – You’ll need a stove or hot plate to heat the double boiler or melting pot. Ensure you have a safe and properly functioning heat source.
- Fragrance oil or essential oil (optional) – If you want scented candles, choose fragrance oils or essential oils in your preferred scent. Make sure the fragrance is suitable for candle-making.
- Candle dye or crayons (optional) – If you desire colored candles, you can use candle dye or even melt down crayons in your chosen colors.
- Scissors – You’ll need a pair of scissors to trim the wicks and to cut any excess materials.
- Decorative items (optional) – Feel free to get creative with decorative elements such as ribbon, twine, dried flowers, or glitter to adorn your candles.
Once you have gathered all the materials, you’re ready to embark on your toilet paper candle-making adventure. Ensure you have a clean and well-ventilated workspace, and let’s move on to the first step: preparing the toilet paper rolls.
Step 1: Prepare the Toilet Paper Rolls
The first step in making your toilet paper candles is to prepare the cardboard rolls. Follow these simple instructions to ensure they are ready for use as candle molds:
- Collect empty toilet paper rolls: Start by collecting several empty toilet paper rolls. You can either save them over time or request them from friends and family.
- Clean the rolls: Before using the toilet paper rolls, make sure they are clean and free from any leftover paper or debris. Gently wipe them down with a damp cloth or tissue to remove any dirt or dust.
- Choose the length: Decide on the desired height of your candles and cut the toilet paper rolls to that length. You can use scissors to make clean, even cuts. Keep in mind that the height of the rolls will determine the size of your candles.
- Secure the bottom: To prevent the hot wax from leaking out, you’ll need to secure the bottom of the toilet paper rolls. You can use a small piece of aluminum foil or double-sided tape to seal one end of each roll. Press firmly to ensure it is securely closed.
- Set the rolls upright: Once the bottoms are sealed, arrange the toilet paper rolls upright on a heat-resistant surface or tray. Make sure they are evenly spaced and stable to prevent any accidents during the candle-making process.
By preparing the toilet paper rolls properly, you’ll create a solid foundation for your candles. This step is crucial in ensuring the final product turns out smooth and free from any imperfections. Once you have prepared the rolls, it’s time to move on to melting the wax in step 2.
Step 2: Melt the Wax
Now that you have the prepared toilet paper rolls, it’s time to melt the wax. Follow these steps to melt the wax safely and efficiently:
- Prepare a double boiler or melting pot: Fill a large saucepan with water and place it on the stove. Set a smaller pot or heat-resistant container inside the larger saucepan, creating a double boiler. Alternatively, you can use a dedicated melting pot designed for candle-making.
- Add wax to the double boiler: Measure and add the desired amount of wax to the smaller pot or melting pot. The amount of wax you’ll need depends on the number and size of your toilet paper rolls. It’s best to have slightly more wax than needed to account for any spillage or uneven pouring.
- Heat the water: Turn on the heat and bring the water in the larger saucepan to a gentle simmer. The heat from the simmering water will melt the wax in the smaller pot without direct flame contact, reducing the risk of accidental fires.
- Stir occasionally: As the wax melts, use a heat-resistant utensil like a wooden spoon or silicone spatula to stir it gently. This will help the wax melt evenly and prevent any clumps or hotspots from forming.
- Monitor the temperature: Keep an eye on the temperature of the melting wax. Different types of wax have different melting points, so consult the packaging or refer to a candle-making guide for the specific temperature range. It’s important not to overheat the wax to prevent it from becoming too hot or catching fire.
- Remove from heat: Once the wax has completely melted and reached the desired temperature, carefully remove the smaller pot or melting pot from the simmering water. Use oven mitts or heat-resistant gloves to protect your hands from the hot surfaces.
By following these steps, you’ll have successfully melted the wax for your toilet paper candles. The melted wax is now ready to be scented and colored, which we’ll cover in step 3.
Step 3: Add Scent and Color (Optional)
Adding scent and color to your toilet paper candles can enhance the overall experience and make them even more personalized. This step is optional but can add a delightful touch to your homemade candles. Here’s how to add scent and color to your melted wax:
- Fragrance oils or essential oils: If you want your candles to have a pleasant aroma, it’s time to add a fragrance. Choose fragrance oils or essential oils in your preferred scent. Make sure you select oils specifically designed for candle-making to ensure they mix well with the wax. Start with a few drops of oil and gradually add more until you achieve your desired level of fragrance. Remember that some oils are potent, so a little goes a long way.
- Candle dye or crayons: To add color to your candles, you can use candle dye or even melt down crayons in your chosen colors. If using candle dye, follow the manufacturer’s instructions for the recommended amount to add based on the quantity of wax. For crayons, break them into small pieces and mix in a small amount until you reach the desired color. Be cautious not to add too much dye or crayon, as it can affect the consistency and burn quality of the candle.
- Stir and mix: Once you’ve added scent and/or color to the melted wax, use a heat-resistant utensil (such as a wooden spoon or silicone spatula) to stir and mix thoroughly. This ensures that the fragrance and color are evenly distributed throughout the wax.
Adding scent and color is an opportunity to get creative and personalize your candles. Select scents and colors that resonate with your preferences and match the ambiance you want to create. However, remember to exercise caution and not overpower the candles with too much fragrance or color. Your wax is now scented and colored—if desired—and ready for the next step: inserting the wicks.
Read more: How To Make Pipe Toilet Paper Holder
Step 4: Insert the Wicks
Now that your wax is scented and colored, it’s time to insert the wicks into the toilet paper rolls. The wick is essential for the candle to burn properly and provide a steady flame. Follow these steps to insert the wicks:
- Measure the wick length: Cut the wick to a length that is slightly taller than the height of the toilet paper roll. Leave some excess wick so that you can trim it later.
- Attach the wick to a metal tab (if necessary): If your wicks are untabbed, you’ll need to attach a metal tab to the base of each wick. Insert one end of the wick through the small hole in the metal tab and pull it until the tab is snug against the wick’s bottom. Use a pair of pliers to crimp the metal tab securely around the wick.
- Apply adhesive to the metal tab: Place a small amount of hot glue or heat-resistant adhesive on the metal tab’s base. This will help secure the wick and prevent it from moving or coming loose during the candle-making process.
- Insert the wick into the toilet paper roll: Carefully insert the wick with the metal tab into the center of the toilet paper roll. Press the metal tab against the bottom of the roll to hold it in place.
- Ensure the wick is centered: Straighten the wick and ensure it is positioned in the center of the toilet paper roll. Adjust the position if needed.
- Stabilize the wick: To keep the wick straight and prevent it from moving while pouring the wax, you can use various methods. One option is to tie the top portion of the wick to a stick or pencil that spans across the top of the toilet paper roll. Alternatively, you can use clothespins or similar objects to hold the wick in place.
By following these steps, you have successfully inserted the wicks into the toilet paper rolls. The wicks are securely in place and ready to be surrounded by melted wax. Now, let’s move on to the exciting step of pouring the wax into the toilet paper rolls in step 5.
When making toilet paper candles, be sure to use unscented toilet paper to avoid any unwanted odors when burning. Additionally, use a high-quality wax to ensure a clean and long-lasting burn.
Step 5: Pour the Wax into the Toilet Paper Rolls
With the wicks securely in place, it’s time to pour the melted wax into the prepared toilet paper rolls. Follow these steps to ensure a smooth and successful pouring process:
- Prepare the work area: Place the toilet paper rolls with the inserted wicks on a stable and heat-resistant surface. This will ensure that the rolls remain upright and steady during the pouring process.
- Hold the wax container securely: Carefully pick up the double boiler or melting pot containing the melted wax. Make sure to use oven mitts or heat-resistant gloves to protect your hands from the hot surface.
- Pour the wax into the toilet paper rolls: Slowly and steadily pour the melted wax into each toilet paper roll. Start by filling each roll about two-thirds of the way, leaving some space at the top to prevent overflow. Work quickly but carefully to avoid spills or dribbles.
- Fill in multiple layers (optional): If you want to create layered or multi-colored candles, you can pour a thin layer of wax into the toilet paper rolls initially. Allow the wax to partially set and then pour the subsequent layers, alternating colors as desired. This will create distinct layers once the candles solidify.
- Avoid overfilling: It’s important not to overfill the toilet paper rolls to prevent the wax from overflowing when solidifying. Leave a small gap at the top to allow the candles to form a smooth surface.
Take your time when pouring the wax into the toilet paper rolls to ensure even distribution and a polished finish. Once the wax is poured, you’ll need to let the candles cool and set before moving on to the next step.
Continue to step 6 to learn how to let the candles cool and solidify properly.
Step 6: Let the Candles Cool and Set
After pouring the melted wax into the toilet paper rolls, it’s crucial to allow the candles to cool and set properly. Follow these steps to ensure your candles solidify without any issues:
- Leave the candles undisturbed: Once you’ve poured the wax into the toilet paper rolls, refrain from moving or touching them. Any disturbance during the cooling process can cause the wax to shift and result in uneven surfaces.
- Find a cool, draft-free area: Place the toilet paper candles in a cool and draft-free area of your home. This will facilitate the gradual and even cooling of the wax, allowing it to solidify uniformly.
- Allow sufficient cooling time: The time required for the candles to cool and set fully varies depending on the size of the rolls and the type of wax used. As a general guideline, it may take several hours or even overnight for the candles to completely solidify. Patience is key during this step.
- Avoid moving or disturbing the candles: It’s essential to avoid any movement or handling of the candles while they are cooling and setting. This will ensure that the wax retains its shape and doesn’t develop cracks or imperfections.
As the candles cool, you’ll notice the wax transitioning from a liquid state to a solid one. It’s an exciting process to witness, knowing that you’re creating your very own custom candles. Once the candles have cooled and set completely, you’re ready to move on to the next step: removing the cardboard tubes.
Continue to step 7 to learn how to safely remove the cardboard tubes from the candles.
Step 7: Remove the Cardboard Tubes
Now that your candles have cooled and solidified, it’s time to remove the cardboard tubes to reveal the beautiful candle creations inside. Follow these steps to safely remove the tubes:
- Gently press on the sides of the cardboard tube: Start by applying light pressure to the sides of the toilet paper roll near the bottom. This will help loosen the bond between the wax and the cardboard.
- Slowly slide the tube upwards: As you continue to apply gentle pressure, carefully and slowly slide the cardboard tube upwards. The solidified wax inside should start to separate from the sides of the tube.
- Work the tube off the candle: Once the cardboard tube has been lifted, carefully work it off the candle, still applying gentle pressure if needed. The wax should retain its shape and stay intact as you remove the tube.
- Inspect the candle for any imperfections: Once the cardboard tube is removed, inspect the candle for any uneven surfaces or imperfections. If you notice any rough edges or areas that need adjustment, use a heat gun or a hairdryer to gently heat the surface and smooth it out. Be cautious not to apply too much heat, as it can cause the wax to melt.
By following these steps, you will successfully remove the cardboard tubes and reveal your beautifully formed candles. Take your time to ensure a clean removal without causing any damage to the candles. Now, let’s move on to the next step: trimming the wicks.
Continue to step 8 to learn how to properly trim the wicks of your newly exposed candles.
Read more: Who Makes Costco Toilet Paper
Step 8: Trim the Wicks
Now that you have removed the cardboard tubes and revealed your stunning candles, it’s time to give them a finishing touch by trimming the wicks. Follow these steps to ensure your wicks are the perfect length for a clean and even burn:
- Inspect the wick length: Take a moment to examine the length of the wicks. They may have become a bit long during the cooling and setting process.
- Measure and mark the desired length: Decide on the ideal length for your wicks. A good rule of thumb is to trim them to around 1/4 inch (0.6 cm) to 1/2 inch (1.3 cm) above the surface of the wax.
- Use sharp scissors or wick trimmers: Grab a pair of sharp scissors or dedicated wick trimmers and carefully trim the wicks at the marked length. Make clean, straight cuts to ensure a uniform appearance.
- Discard the trimmed wicks: After trimming each wick, dispose of the trimmed portion in a trash bin. This will prevent any loose wick debris from interfering with the candle’s burn.
Trimming the wicks is an important step that helps promote a clean and steady burn while preventing excessive flames and smoke. By keeping the wicks at an optimal length, you’ll ensure that your candles provide hours of enjoyment. Now that the wicks are properly trimmed, it’s time to move on to the next step: decorating the candles, if desired.
Continue to step 9 to learn how to add decorative touches to your homemade candles.
Step 9: Decorate the Candles (Optional)
If you want to add a personal and creative touch to your homemade candles, step 9 is all about decorating. Feel free to unleash your imagination and customize your candles with these optional decoration ideas:
- Ribbon or twine: Wrap a decorative ribbon or twine around the base of the candle to add a touch of elegance and charm. Secure it with a knot or bow, ensuring it doesn’t interfere with the wick.
- Dried flowers or herbs: Enhance the beauty of your candles by attaching dried flowers or herbs to the outside. Use a small amount of hot glue or a heat-resistant adhesive to affix them in a decorative pattern or arrangement.
- Glitter or sparkles: Bring a bit of sparkle to your candles by gently rolling them in glitter or applying a fine coat of sparkles using a brush or adhesive. Be careful not to put too much glitter near the wick area to avoid interference with the burn.
- Personalized labels: Create custom labels using printable sticker paper or plain paper and strong adhesive. Design and print labels with your desired text, such as the scent or date of creation, and attach them to the side or bottom of the candles.
- Paint or wax seal: If you’re feeling artistic, use acrylic or fabric paint to create unique designs or patterns on the exterior of the candles. Alternatively, consider using a wax seal by melting a small amount of colored wax and carefully pressing a seal stamp into it. Allow the wax to dry and adhere to the candle.
Remember, the decoration step is entirely optional. If you prefer the simplicity of the candle’s natural appearance, you can skip this step and enjoy the beauty of the wax itself. However, if you choose to add decorative elements, ensure they are non-flammable and won’t interfere with the candle’s burn.
Congratulations! You have completed all the steps to create your own unique and beautiful candles using toilet paper rolls. Whether you decide to decorate them or leave them as is, your handcrafted candles are ready to be displayed and enjoyed. Light them up, bask in their warm glow, and embrace the ambiance they add to your space.
Thank you for joining us in this candle-making journey. We hope you had a wonderful time and discovered a new creative outlet. Happy crafting!
Conclusion
Creating candles using toilet paper rolls is a fantastic way to explore your creativity while repurposing materials that would otherwise be discarded. By following the steps outlined in this guide, you have learned how to transform simple cardboard tubes into unique and beautiful candles.
Throughout this DIY project, you have discovered the art of melting wax, adding scent and color, inserting wicks, pouring the wax into the toilet paper rolls, removing the tubes, trimming the wicks, and even embellishing the candles with decorative elements if desired.
By crafting your own candles, you not only save money but also have the opportunity to customize them to your liking. You can choose different scents, colors, and decorations that suit your personal taste and the atmosphere you want to create in your home. The options are endless, allowing you to create candles that are truly one-of-a-kind.
While this guide provides a comprehensive overview of the candle-making process, feel free to experiment and let your creativity soar. Remember that practice makes perfect, and with each new candle you make, you’ll refine your skills and discover new techniques.
Now, it’s time to gather your materials, set up your workspace, and embark on this exciting and fulfilling candle-making journey. Enjoy the process, embrace your creativity, and revel in the joy of creating beautiful, handmade candles that will bring warmth and ambiance to any space.
So go ahead, light up your life, and let your imagination shine!
Frequently Asked Questions about How To Make Toilet Paper Candles
Was this page helpful?
At Storables.com, we guarantee accurate and reliable information. Our content, validated by Expert Board Contributors, is crafted following stringent Editorial Policies. We're committed to providing you with well-researched, expert-backed insights for all your informational needs.


0 thoughts on “How To Make Toilet Paper Candles”