Articles
How To Manually Engage AC Compressor Clutch
Modified: October 20, 2024
Learn how to manually engage the AC compressor clutch with step-by-step instructions in this comprehensive article. Get started now.
(Many of the links in this article redirect to a specific reviewed product. Your purchase of these products through affiliate links helps to generate commission for Storables.com, at no extra cost. Learn more)
Introduction
When your car’s air conditioning (AC) system fails to produce cold air, it’s often due to a malfunctioning AC compressor clutch. The AC compressor clutch is responsible for engaging and disengaging the compressor, which plays a crucial role in cooling the air inside the car.
If you suspect that the AC compressor clutch is not engaging properly, you may need to manually engage it to diagnose the problem and potentially fix it. Manual engagement of the AC compressor clutch can help determine whether the issue lies with the clutch itself or other components of the AC system.
In this article, we will guide you through the process of manually engaging the AC compressor clutch. Before we begin, it’s important to note that this procedure should only be attempted by individuals with a good understanding of automotive systems and experience in working with car components.
Please make sure to follow all safety precautions and consult your vehicle’s manual for specific instructions related to your car make and model. Additionally, if you are unsure or uncomfortable with any step of the process, it is recommended to seek professional assistance to avoid any potential damage or injury.
Now, let’s delve into the details of how to manually engage the AC compressor clutch and diagnose any issues with your car’s AC system.
Key Takeaways:
- Manually engaging the AC compressor clutch is a crucial troubleshooting technique for diagnosing and potentially fixing issues with your car’s AC system. By following the step-by-step process and conducting a thorough inspection, you can identify visible problems and assess the clutch’s functionality.
- Prioritizing safety, understanding the AC compressor clutch’s function, and having the necessary tools are essential for a successful manual engagement process. Reassembling and testing the system after manual engagement ensures proper functionality and efficient cooling for your vehicle.
Read more: How Does A AC Compressor Work
Understanding the AC Compressor Clutch
To effectively troubleshoot and manually engage the AC compressor clutch, it’s important to have a basic understanding of its function within the overall AC system.
The AC compressor clutch is a critical component that engages and disengages the compressor, allowing it to compress and circulate the refrigerant through the AC system. The purpose of the AC compressor is to convert the refrigerant from a low-pressure gas to a high-pressure gas, which is necessary for efficient cooling.
The AC compressor clutch consists of several parts, including the clutch plate, pulley, and electromagnetic coil. When the AC system is activated, the electromagnetic coil generates a magnetic field, which attracts the clutch plate and engages it with the pulley. Once engaged, the compressor starts spinning, drawing in refrigerant and compressing it to produce cold air.
If the AC compressor clutch fails to engage, the compressor will not function properly, resulting in the lack of cold air. Common factors that can contribute to clutch failure include electrical issues, faulty wiring, damaged clutch components, or a refrigerant leak.
By manually engaging the AC compressor clutch, you can determine if the issue lies with the clutch itself or with other components of the AC system. This will help you pinpoint the root cause of the problem and take appropriate steps to resolve it.
Now that we have a basic understanding of the AC compressor clutch, let’s move on to the tools and materials you’ll need to successfully perform the manual engagement process.
Tools and Materials Needed
Before you can manually engage the AC compressor clutch, it’s important to gather the necessary tools and materials. Having the right equipment will ensure a smooth and successful process. Here are the tools and materials you’ll need:
1. Safety Gear
It’s always important to prioritize safety when working on car components. Make sure you have the following safety gear:
- Safety goggles
- Gloves
2. Owner’s Manual
The owner’s manual for your specific car make and model is an invaluable resource. It will provide you with any specific instructions or precautions related to the AC system.
Read more: What Is An AC Compressor
3. Wrench or Socket Set
You’ll need a wrench or socket set to remove any bolts or fasteners securing the components around the AC compressor clutch.
4. Multimeter
A multimeter is a versatile tool that will help you measure electrical current, voltage, and resistance. It’s a crucial tool for diagnosing any electrical issues related to the AC compressor clutch.
5. Diagnostic Code Reader
A diagnostic code reader is useful for identifying any specific error codes related to the AC system. This will provide you with valuable information to narrow down the potential causes of the clutch malfunction.
6. AC System Pressure Gauge
An AC system pressure gauge will allow you to monitor the pressure levels within the AC system. This can help determine if there is a refrigerant leak or any other issues affecting the functionality of the system.
Read more: How To Change AC Compressor
7. Replacement Parts
If you’ve identified that the AC compressor clutch is faulty and needs to be replaced, make sure you have the necessary replacement parts on hand. This may include a new clutch kit, clutch bearing, or other components depending on the specific issue.
Having these tools and materials readily available will ensure that you have everything you need to manually engage the AC compressor clutch and diagnose any issues with your car’s AC system. With the preparations complete, it’s time to move on to the precautions and safety measures you need to keep in mind before starting the process.
Precautions and Safety Measures
Before you begin the process of manually engaging the AC compressor clutch, it’s essential to prioritize safety. Working with car components can be hazardous, so it’s crucial to take the necessary precautions. Here are some precautions and safety measures to keep in mind:
1. Safety Gear
Always wear safety goggles and gloves to protect your eyes and hands from any potential debris or hazards. This will minimize the risk of injury during the process.
2. Power Off
Ensure that the car’s engine is turned off and the key is removed from the ignition before starting any work on the AC system. This will prevent accidental engagement of the AC compressor and minimize the risk of electrical shock.
Read more: How To Add AC Compressor Oil
3. Consult the Owner’s Manual
Refer to your vehicle’s owner’s manual for specific instructions and safety precautions related to your car’s AC system. Different car makes and models may have unique considerations, so it’s essential to consult the manual to avoid any potential damage or safety risks.
4. Allow the System to Cool Down
Before accessing any components of the AC system, allow the system to cool down fully. The AC components can become extremely hot, especially after prolonged use, and can cause burns if touched without proper cooling.
5. Disconnect the Battery
To minimize the risk of electrical shock or damage to the electrical components, disconnect the car battery before working on the AC system.
6. Follow Proper Handling Procedures
Avoid mishandling any refrigerant in the AC system. Refrigerant is under high pressure and can be harmful if it comes into contact with your skin or eyes. Follow proper disposal procedures for any removed refrigerant and ensure it is handled in accordance with environmental regulations.
Read more: How To Know If Car AC Compressor Is Bad
7. Take Note of Placement
Keep track of the placement of screws, bolts, and other fasteners as you disassemble the components. This will make reassembling the system easier.
By following these precautions and safety measures, you can ensure a safe working environment and minimize the risk of accidents or damage to yourself or your vehicle. Next, we will discuss the step-by-step process of manually engaging the AC compressor clutch.
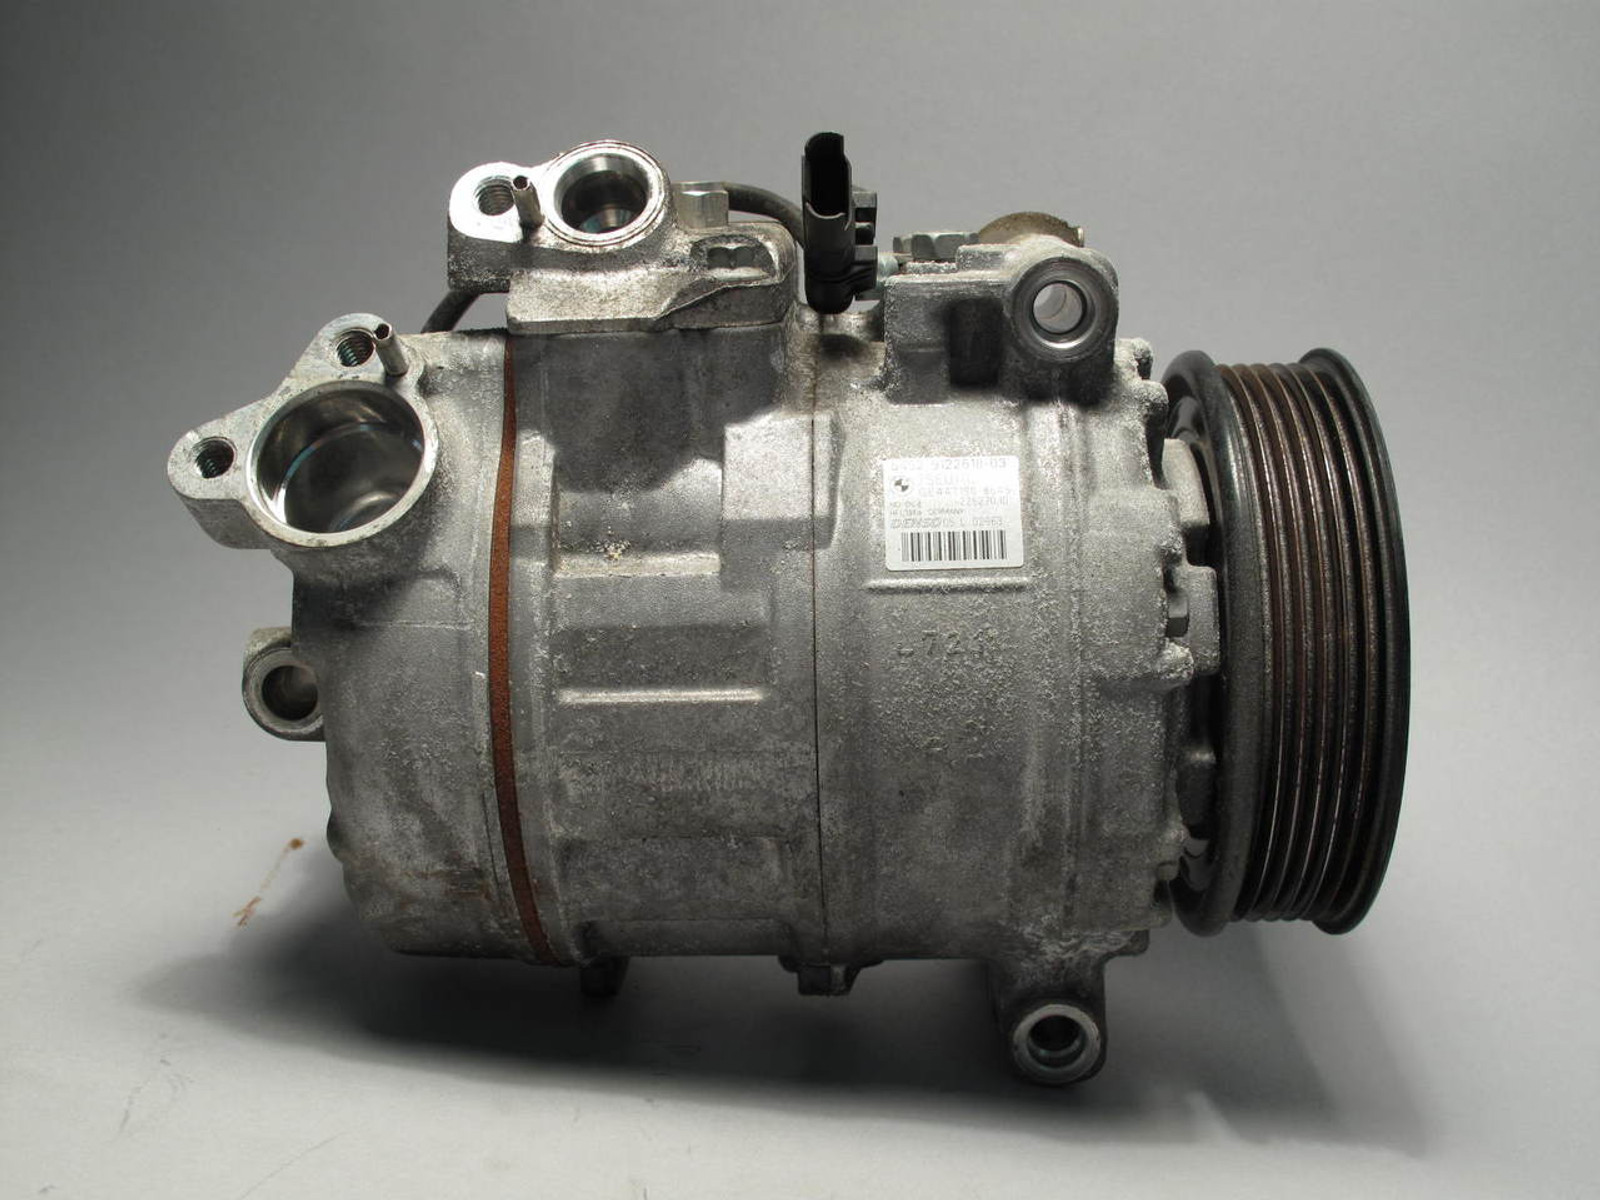
Step 1: Locate the AC Compressor and Clutch
Before you can manually engage the AC compressor clutch, you need to locate its position within the engine compartment. The AC compressor is typically located near the front of the engine, connected to the drive belt system. Follow these steps to locate the AC compressor and clutch:
1. Park the Vehicle
Park the vehicle on a flat surface and engage the parking brake. This will ensure stability and safety while working on the AC system.
2. Open the Hood
Release the hood latch and lift the hood of the car. Secure it with the prop rod to keep it in an upright position.
Read more: How To Bypass AC Compressor Pulley
3. Locate the AC Compressor
Scan the engine compartment for the AC compressor. The compressor is driven by a pulley connected to the engine’s crankshaft via a belt. It is typically a cylindrical shape with metal tubing and hoses connected to it.
4. Identify the Clutch Assembly
Within the AC compressor, you will find the clutch assembly. It is a smaller component attached to the front of the compressor. Look for a circular plate with visible wiring or an electromagnetic coil.
5. Take Note of Component Placement
Observe the position and orientation of any surrounding components, such as belts, hoses, or electrical connectors. This will assist you during the reassembly process.
Locating the AC compressor and clutch is the first step towards manually engaging the clutch. Now that you know where the components are located, you can proceed to the next step of accessing the AC compressor clutch.
Step 2: Accessing the AC Compressor Clutch
Once you have located the AC compressor and clutch, the next step is to gain access to the clutch assembly. Accessing the clutch will allow you to inspect and manually engage it. Follow these steps to access the AC compressor clutch:
Read more: How To Test AC Compressor In Car
1. Disconnect the Battery
Before working on any electrical components, disconnect the car battery to ensure safety. This will prevent any accidental electrical shocks or short circuits during the process.
2. Remove Surrounding Components
Depending on your car model, you may need to remove certain components blocking access to the AC compressor clutch. This could include air intake ducts, engine covers, or other nearby components. Refer to your vehicle’s owner’s manual for specific instructions.
3. Loosen the Tensioner
If necessary, use a wrench or socket set to loosen the tensioner on the drive belt system. This will relieve tension on the belt and allow you to remove it from the AC compressor pulley.
4. Disconnect Electrical Connections
Identify any electrical connections attached to the clutch assembly and disconnect them. This may involve removing wiring harness connectors or disengaging any clips or fasteners holding the wiring in place.
Read more: Where Is AC Compressor Located
5. Remove Clutch Housing Cover
Inspect the clutch assembly for a housing cover. Remove any bolts or fasteners securing the cover in place, and carefully lift it off to expose the clutch plate and other components.
6. Take Note of Component Placement
As you remove surrounding components and disconnect electrical connections, take note of their placement and orientation. This will make it easier to reassemble the system later.
By following these steps, you can successfully access the AC compressor clutch and prepare it for inspection and manual engagement. The next step will involve inspecting the clutch and its components to determine if there are any issues that need to be addressed.
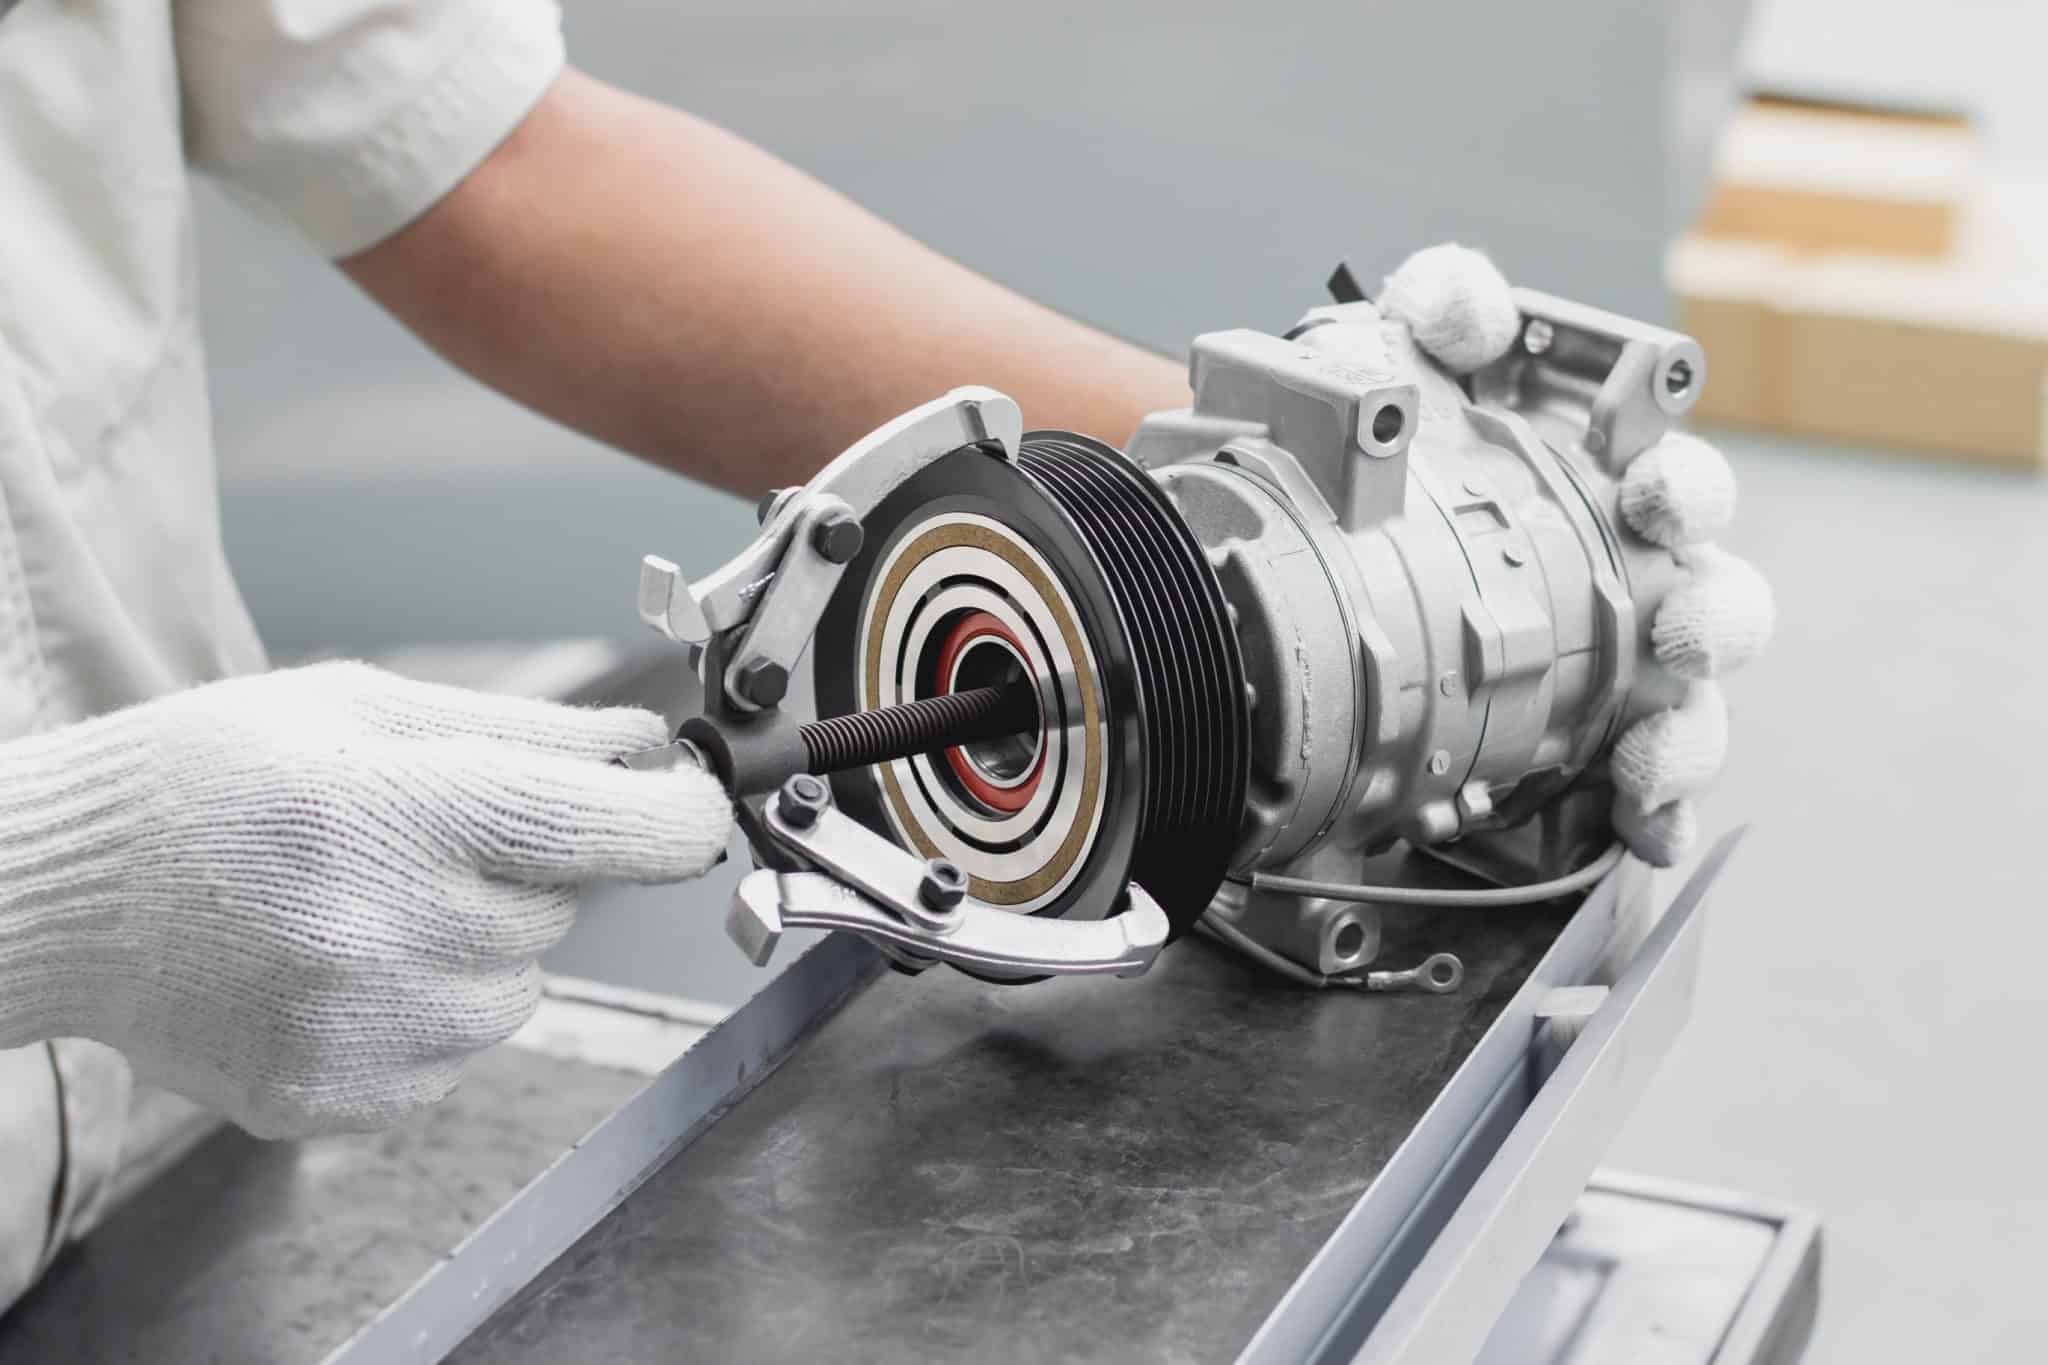
Step 3: Inspecting the Clutch and Components
Once you have gained access to the AC compressor clutch, it is important to thoroughly inspect the clutch and its components. This inspection will help you identify any visible issues or damage that may be causing the clutch to malfunction. Follow these steps to inspect the clutch and its components:
1. Examine the Clutch Plate
Start by visually inspecting the clutch plate, which is the circular plate located at the front of the AC compressor. Look for any signs of wear, such as cracks, damage, or excessive wear on the friction surface. If there are visible issues with the clutch plate, it may need to be replaced.
Read also: 5 Best AC Clutch Removal Tool for 2025
2. Check the Clutch Bearing
Inspect the clutch bearing, which is located behind the clutch plate. Rotate the bearing by hand to ensure it moves smoothly and without any resistance. If the bearing feels rough or makes any unusual noises, it may be worn out and require replacement.
3. Evaluate the Electromagnetic Coil
Inspect the electromagnetic coil, which is responsible for engaging the clutch plate when the AC system is activated. Look for any signs of damage or loose wiring connections. Use a multimeter to check the resistance of the coil and ensure it falls within the specified range provided in your vehicle’s manual. If the coil is faulty, it may need to be replaced.
4. Check for Refrigerant Leaks
While inspecting the clutch and components, also check for any signs of refrigerant leaks. Look for oil stains or residue around the clutch area, as this can indicate a refrigerant leak. If a leak is detected, it is advisable to consult a professional to properly diagnose and repair the issue.
5. Inspect Other Related Components
Take the time to inspect any other components that are directly related to the AC compressor clutch, such as belts and pulleys. Look for any signs of wear or damage and replace them if necessary. It’s important to ensure that all components are working properly to prevent future issues with the clutch.
By conducting a thorough inspection of the AC compressor clutch and its components, you can identify any visible problems that may be affecting its functionality. This will guide you in determining whether a manual engagement of the clutch is necessary or if additional repairs and component replacements are required. The next step will involve manually engaging the AC compressor clutch to test its functionality.
Read more: How To ReplACe AC Compressor In Car
Step 4: Manually Engaging the AC Compressor Clutch
After inspecting the AC compressor clutch and its components, the next step is to manually engage the clutch. This step will help diagnose whether the clutch is functioning properly or if there are any underlying issues. Follow these steps to manually engage the AC compressor clutch:
1. Prepare the Necessary Tools
Ensure that you have the appropriate tools, such as a wrench or socket set, to access and manipulate the clutch. Having the right tools will make the process easier and safer.
2. Locate the Clutch Facing Plate
Identify the clutch facing plate, which is the part of the clutch that makes direct contact with the pulley when engaged. It will have a friction surface that is typically made of metal or a composite material.
3. Engage the Clutch Facing Plate
Using your fingers or a suitable tool, gently press the clutch facing plate towards the pulley. Apply steady pressure to engage the friction surface with the pulley. You may hear a clicking sound or feel resistance as the clutch engages.
Read more: How Much Does An AC Compressor Cost
4. Observe Clutch Engagement
While manually engaging the clutch, closely observe the movement of the pulley and the behavior of the clutch components. Ensure that the clutch facing plate connects securely with the pulley and remains engaged without any slippage.
5. Assess Clutch Performance
With the clutch manually engaged, start the engine and observe its performance. Listen for any unusual noises or vibrations that may indicate a problem with the clutch or other related components. Additionally, check if the cold air starts to flow from the AC system as the compressor engages.
6. Disengage the Clutch
After assessing the clutch’s performance, gently release the pressure on the clutch facing plate to disengage the clutch from the pulley. This will prevent unnecessary wear on the clutch and allow it to return to its normal operating position.
By following these steps, you can manually engage the AC compressor clutch and evaluate its performance. The observations made during this manual engagement will provide valuable insights into the functionality of the clutch and help identify any underlying issues that may need further attention. The next step will involve checking for proper engagement of the clutch.
Step 5: Checking for Proper Engagement
After manually engaging the AC compressor clutch, it’s important to check for proper engagement to ensure that the clutch is functioning correctly. This step will help confirm if the clutch is engaging the compressor as it should. Follow these steps to check for proper engagement of the AC compressor clutch:
Read more: How Long Does An AC Compressor Last
1. Turn on the AC System
Start the engine and turn on the AC system. This will activate the AC compressor and allow you to assess its engagement with the clutch.
2. Listen for Audible Engagement
Listen for any audible signs that the clutch is engaging with the compressor. You may hear a distinct click or a change in the sound of the engine that indicates the clutch is engaging properly.
3. Observe the Pulley Movement
Watch the movement of the AC compressor pulley. If the clutch is engaging correctly, the pulley should start spinning as the compressor is activated. Confirm that the pulley movement is smooth and synchronized with the activation of the AC system.
4. Check for Cold Air Output
Feel the air coming from the AC vents inside the car. If the clutch is engaging properly, you should notice a significant drop in temperature, indicating that cold air is being produced by the system.
Read more: What Is A Scroll Compressor For HVAC
5. Monitor Clutch Performance
Observe the clutch’s performance and behavior during the operation of the AC system. Ensure that the engagement remains stable and that there is no slippage or disengagement of the clutch while the system is in use.
6. Take Note of Any Issues
If you notice any abnormalities during the engagement or operation of the AC compressor clutch, such as unusual noises, erratic pulley movement, or lack of cold air output, make a note of these issues. They may indicate further underlying problems that require attention.
By carefully checking for proper engagement of the AC compressor clutch, you can confirm that it is functioning correctly and effectively engaging the compressor. Any issues or irregularities observed during this step will provide valuable information for further diagnosis and potential repairs. The final step involves reassembling the system and testing its functionality.
Step 6: Reassembling and Testing the System
After inspecting and manually engaging the AC compressor clutch, the final step is to reassemble the system and test its functionality. Follow these steps to properly reassemble and test the AC system:
1. Reinstall the Clutch Housing Cover
If you removed the clutch housing cover during the inspection, carefully position it back onto the clutch assembly. Secure it in place by tightening the bolts or fasteners according to the manufacturer’s specifications.
Read also: 6 Best AC Compressor for 2025
2. Reconnect Electrical Connections
Reconnect any electrical connections that were disconnected earlier. Ensure that all connections are properly and securely attached, making sure to follow the correct wiring configuration or routing where necessary.
3. Reinstall Surrounding Components
If you removed any surrounding components, such as air intake ducts or engine covers, reinstall them in their original positions. Refer to your vehicle’s owner’s manual for specific instructions and torque specifications.
4. Reinstall the Drive Belt
If you loosened the tensioner and removed the drive belt, carefully reinstall it onto the AC compressor pulley and other relevant pulleys as per the belt routing diagram. Ensure proper tension in the belt and verify that it is aligned correctly.
5. Reconnect the Battery
Reconnect the car battery, ensuring that the terminals are securely fastened. This will restore power to the AC system and allow you to test its functionality.
6. Test the AC System
Start the engine and turn on the AC system. Verify that the AC compressor clutch engages smoothly and without any issues. Monitor the system’s performance, including the cold air output and the behavior of the clutch during operation.
7. Check for Leaks and Abnormalities
Inspect the AC system for any signs of refrigerant leaks or abnormal behavior. Monitor the performance of the system and listen for any unusual noises. If any issues are detected, consult a professional to diagnose and address the problem.
8. Verify Proper Cooling and Functionality
Ensure that the AC system is producing cold air and providing comfortable cooling inside the car. Check that all vents are blowing cold air and that the system is able to maintain the desired temperature.
By reassembling and thoroughly testing the AC system, you can confirm that the AC compressor clutch is functioning properly and that the system is operating efficiently. Regularly check and maintain the AC system to prevent any future issues and enjoy optimal cooling comfort in your vehicle.
Conclusion
Manually engaging the AC compressor clutch can be a valuable troubleshooting technique when your car’s AC system is not producing cold air. By following the step-by-step process outlined in this article, you can locate, inspect, and manually engage the clutch, helping diagnose any issues and potentially resolve them.
Understanding the function of the AC compressor clutch and having the necessary tools and safety measures in place is crucial for a successful engagement process. By carefully inspecting the clutch and its components, you can identify any visible damage or problems that may affect its performance.
Manually engaging the AC compressor clutch allows you to assess its functionality, listen for proper engagement, observe pulley movement, and check for cold air output. These steps provide insights into the performance of the clutch and can help identify any underlying issues that may require further attention.
Once the clutch has been manually engaged and tested, reassembling the system and ensuring proper functionality is essential. Carefully reinstalling surrounding components, reconnecting electrical connections, and testing the AC system will verify that the clutch is functioning correctly and providing efficient cooling.
It’s important to note that while manual engagement of the AC compressor clutch can be helpful in diagnosing certain problems, it is not always a permanent solution. If you encounter persistent issues or if you’re uncertain about any step of the process, it is recommended to seek professional assistance from a qualified mechanic or HVAC technician.
Regular maintenance and routine inspections of your car’s AC system will help ensure its optimal performance and longevity. By staying proactive and addressing any issues promptly, you can enjoy a cool and comfortable ride, even during the hottest days.
Remember to consult your vehicle’s owner’s manual for specific instructions and to prioritize safety at all times when working on the AC system. With proper knowledge and precautions, you can effectively troubleshoot and resolve AC compressor clutch issues, helping restore the cooling performance of your car’s AC system.
Curious about the latest advancements in air conditioning technology? Check out our detailed review on some stellar AC compressor clutches set to hit the market in 2024. Each model promises enhanced performance and reliability for your cooling needs. Also, if you're keen to understand more about the systems that keep our homes comfortable year-round, our insightful article on HVAC systems offers a clear and straightforward explanation. Perfect for anyone looking to broaden their knowledge on home maintenance and climate control solutions.
Frequently Asked Questions about How To Manually Engage AC Compressor Clutch
Was this page helpful?
At Storables.com, we guarantee accurate and reliable information. Our content, validated by Expert Board Contributors, is crafted following stringent Editorial Policies. We're committed to providing you with well-researched, expert-backed insights for all your informational needs.
0 thoughts on “How To Manually Engage AC Compressor Clutch”