Home>Articles>How To Manually Run Stacked Washer And Dryer Lock Lid Switch
Articles
How To Manually Run Stacked Washer And Dryer Lock Lid Switch
Modified: August 24, 2024
Learn how to manually run a stacked washer and dryer with a lock lid switch. Read articles and guides to troubleshoot and fix common issues.
(Many of the links in this article redirect to a specific reviewed product. Your purchase of these products through affiliate links helps to generate commission for Storables.com, at no extra cost. Learn more)
Introduction
Running a stacked washer and dryer is a convenient and efficient way to do your laundry. However, there may be times when the lock lid switch malfunctions, preventing the machine from starting or completing a cycle. Rather than calling a technician right away, there are cases where you can manually run the stacked washer and dryer by bypassing the lock lid switch.
In this article, we will guide you through the step-by-step process of manually running a stacked washer and dryer by bypassing the lock lid switch. We’ll provide you with the necessary safety precautions, tools and materials required, as well as detailed instructions on how to successfully bypass the lock lid switch and get your laundry up and running again.
Please note that this article is for informational purposes only. It is important to consult the manufacturer’s manual or seek professional assistance if you’re unsure or uncomfortable performing these steps. Safety should always be a top priority when working with any electrical appliance.
So, let’s get started and learn how to manually run a stacked washer and dryer with a lock lid switch malfunction.
Key Takeaways:
- Safety First!
Before attempting to manually run a stacked washer and dryer by bypassing the lock lid switch, prioritize safety by following crucial precautions such as disconnecting the power, wearing protective gear, and seeking professional assistance if needed. - Temporary Solution with Caution
Manually bypassing the lid switch can be a practical temporary solution, but it’s essential to address the underlying issue causing the malfunction. Always prioritize safety and consider seeking professional help if uncertain.
Read more: How To Remove A Stacked Washer And Dryer
Safety Precautions
Before attempting to manually run a stacked washer and dryer by bypassing the lock lid switch, it is crucial to follow these safety precautions to prevent any accidents or injuries:
1. Disconnect the Power: Always unplug the washer and dryer from the power outlet before beginning any repair or maintenance work. This will ensure that there is no electrical current flowing through the appliances, reducing the risk of electrical shock.
2. Wear Protective Gear: It is advisable to wear safety goggles, gloves, and footwear with non-slip soles to protect yourself while working on the machines. This will minimize the chances of injury from sharp edges or electrical components.
3. Read the Manual: Familiarize yourself with the manufacturer’s manual for your specific stacked washer and dryer model. Each machine may have different safety instructions, so make sure to read and understand them thoroughly before proceeding.
4. Work in a Well-Ventilated Area: If you’re working in a confined space, ensure proper ventilation to avoid inhaling dust, fumes, or potentially harmful chemicals. Open windows or use fans to keep the area well-ventilated.
5. Use Proper Tools: Use the recommended tools for the job to avoid damaging the appliances or causing accidents. Improvised tools may not work effectively and can lead to injuries.
6. Avoid Excessive Force: Apply only the necessary amount of force when handling parts or components. Excessive force can damage the appliance or cause injury to yourself.
7. Keep Children and Pets Away: Ensure that children and pets are kept at a safe distance from the work area. This will prevent accidents and keep them away from any potential hazards.
8. Seek Professional Help if Needed: If you are unsure or uncomfortable with any step of the process, it is always best to seek professional assistance. This ensures that the repair is done correctly and safely.
By following these safety precautions, you can minimize the risks involved and ensure a safe working environment while manually running a stacked washer and dryer with a lock lid switch malfunction.
Tools and Materials Required
To manually run a stacked washer and dryer by bypassing the lock lid switch, you will need the following tools and materials:
1. Screwdriver: A screwdriver is essential for removing the screws that hold the control panel in place. Make sure you have the appropriate screwdriver size for your specific washer and dryer model.
2. Wire Cutters/Strippers: Wire cutters or strippers are required to safely disconnect and reattach the wires to the lid switch. They allow you to trim or strip the wire insulation without damaging the wires themselves.
3. Replacement Lid Switch (if necessary): If your current lid switch is completely malfunctioning, you may need to purchase a replacement lid switch. Make sure to buy the exact replacement switch that is compatible with your washer and dryer model.
4. Electrical Tape: Electrical tape is used to insulate the exposed wires after disconnecting them from the lid switch. It helps secure the connection and prevents any accidental contact with live wires.
5. Optional: Multimeter: A multimeter is a useful tool for testing electrical connections, continuity, and voltage. It can help diagnose any underlying electrical issues in the switch or wiring.
Make sure you have these tools and materials readily available before attempting to manually run your stacked washer and dryer. It’s always better to be prepared and have everything you need to complete the task safely and efficiently.
Please note that the specific tools required may vary depending on your washer and dryer model. Refer to the manufacturer’s manual or guidelines for any additional tools or materials that may be necessary for your specific machine.
Step 1: Unplug the Washer and Dryer
Before starting any repair or maintenance work on your stacked washer and dryer, it is essential to ensure your safety by disconnecting the appliances from the power source. Follow these steps to unplug the washer and dryer:
1. Locate the Power Outlet: Find the power outlet or power cord that supplies electricity to your stacked washer and dryer. It is usually located behind or near the machines.
2. Unplug the Power Cord: Gently pull out the power cord from the outlet to disconnect the appliances from the power source. Make sure to handle the plug and cord carefully and avoid pulling on the cord itself.
3. Confirm Power Disconnection: Before proceeding with any further steps, double-check that the washer and dryer are completely disconnected from the power source. You can do this by pressing the machine’s power buttons to ensure that they do not turn on.
By unplugging the washer and dryer, you eliminate the risk of electrical shock or injury while working on the machines. This precaution is vital for your safety and the proper execution of the repair process.
Remember to keep the machines unplugged until the entire process is completed, including the reattachment of the control panel and lid switch wires. Once you have finished the repair, you can plug the appliances back into the power outlet and continue using them as usual.
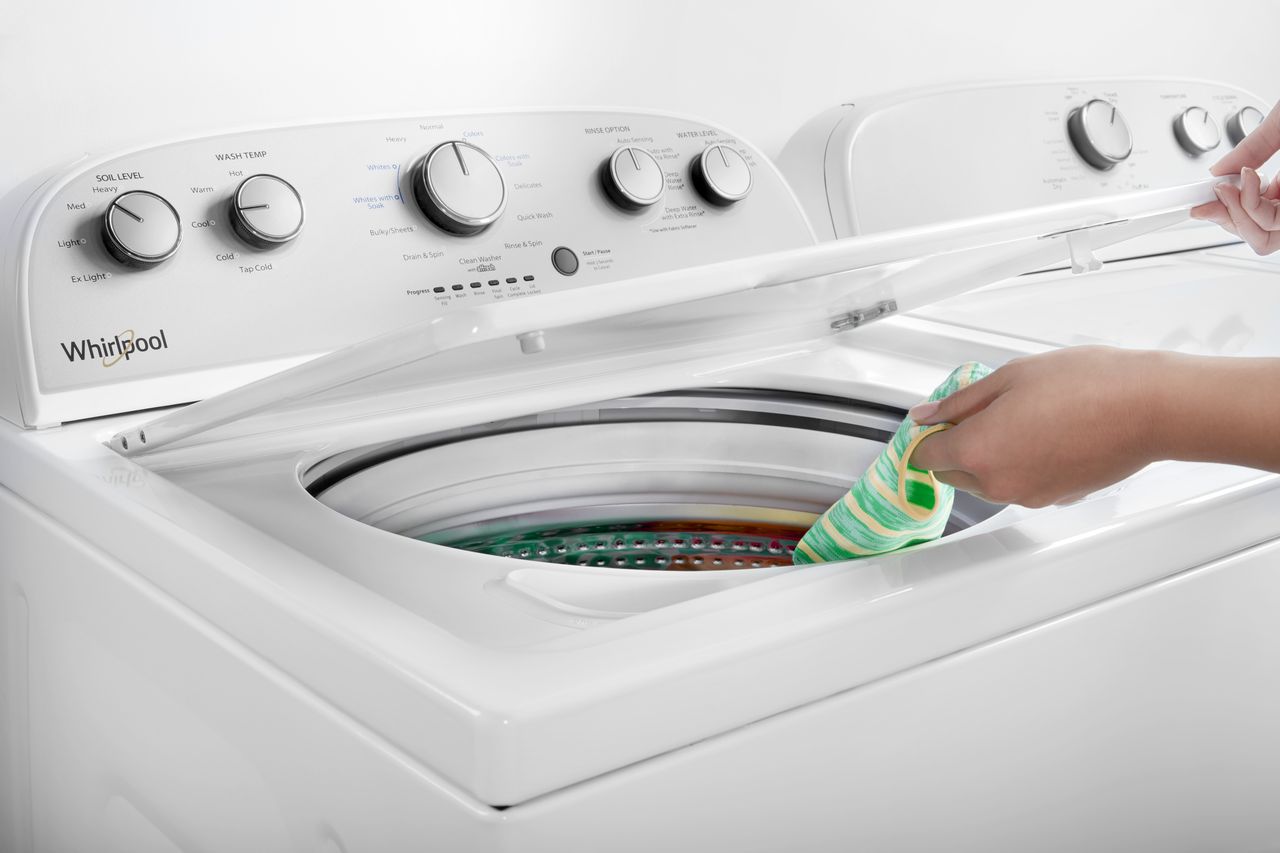
Step 2: Locate the Lid Switch
The lid switch is a safety mechanism that prevents the washer and dryer from operating when the lid is open. To manually run a stacked washer and dryer by bypassing the lock lid switch, you first need to locate the lid switch. Follow these steps to find the lid switch:
1. Examine the Control Panel: The control panel is typically located at the top of the washer or dryer. Look for a panel with buttons or knobs that control the machine’s functions.
2. Identify the Lid Switch Opening: On the control panel, you should see a small opening or slot that corresponds to the location of the lid switch. The lid switch is usually located near the edge of the opening.
3. Use a Flashlight (If Necessary): If the lid switch opening is not clearly visible, you may need to use a flashlight to get a better view. Shine the light into the opening to identify the lid switch.
4. Look for a Small Lever or Button: The lid switch is typically operated by a small lever or button. It may be labeled or have a distinct color to help you identify it. This lever or button is what gets activated when the lid is closed.
Once you have located the lid switch, take a moment to familiarize yourself with its position. This will help you in the following steps when disconnecting and bypassing the switch.
Please note that the lid switch’s exact location may vary depending on the make and model of your stacked washer and dryer. Refer to the manufacturer’s manual or guidelines for more specific information about locating the lid switch on your particular machine.
Read more: How Tall Is A Stacked Washer Dryer
Step 3: Remove the Control Panel
Now that you have located the lid switch, the next step is to remove the control panel to access the inner components of the stacked washer and dryer. Follow these steps to remove the control panel:
1. Disconnect the Power (if not already done): Before proceeding, ensure that the washer and dryer are completely disconnected from the power source by following Step 1.
2. Remove Control Panel Screws: Look for screws securing the control panel to the machine. These screws are usually located on the back or sides of the control panel. Use a screwdriver appropriate for the screw heads and carefully unscrew them.
3. Label and Keep Track of Screws: As you remove the control panel screws, keep them organized and label them if necessary. This will make reassembling the control panel easier later on.
4. Gently Remove the Control Panel: Once all the screws are removed, gently pull the control panel forward and away from the stacked washer and dryer. Take care not to force or damage any wires connected to the panel.
5. Set Aside the Control Panel: Find a stable surface nearby to place the control panel. This will ensure that it stays safe and does not get damaged during the rest of the repair process.
By removing the control panel, you gain access to the inner components of the stacked washer and dryer, including the lid switch. This step is crucial for disconnecting and bypassing the lid switch, which we will cover in the next steps.
Make sure to handle the control panel with care, as it may contain delicate components that need to be protected. Keep track of all the screws and parts you remove to ease the reassembly process later on.
Step 4: Disconnect the Lid Switch Wires
With the control panel removed, you can now proceed to disconnect the lid switch wires. This step is essential for bypassing the lock lid switch. Follow these steps to disconnect the lid switch wires:
1. Identify the Lid Switch Wires: Look for the wires connected to the lid switch. They are usually color-coded and may be connected using electrical connectors or wire terminals. Take note of which wires are connected to the lid switch for reconnection later.
2. Disconnect the Wires: Using wire cutters or strippers (if necessary), carefully disconnect the wires from the lid switch. Pay attention to how they are connected and ensure a clean and secure disconnect.
3. Insulate the Exposed Wires: Once the lid switch wires are disconnected, it is important to insulate the exposed ends of the wires. This is to prevent any accidental contact with live wires during the repair process. Use electrical tape to wrap the exposed ends securely.
4. Secure the Disconnected Wires: To prevent the disconnected wires from interfering with other components or getting in your way, secure them using tape or twist ties. This will keep the wires organized and out of the working area.
By disconnecting the lid switch wires, you have effectively bypassed the lock lid switch that was preventing the stacked washer and dryer from running. This allows you to manually start and operate the machine without the lid switch engagement.
Take care to handle the wires gently and avoid twisting or pulling them forcefully. Properly insulating the exposed wire ends is crucial to ensure your safety throughout the repair process.
Before manually running a stacked washer and dryer with a lock lid switch, ensure the lid is securely closed. Then, use a small object to press the switch and start the cycle. Always follow safety precautions.
Step 5: Install the New Lid Switch
If you have a replacement lid switch for your stacked washer and dryer, you can now proceed to install it. Follow these steps to install the new lid switch:
1. Check Compatibility: Ensure that the new lid switch you have purchased is compatible with your specific washer and dryer model. Check the manufacturer’s manual or guidelines for information on the correct lid switch replacement.
2. Prepare the New Lid Switch: Before installation, inspect the new lid switch to ensure it is in good condition and free of any defects. If any parts are damaged or missing, contact the supplier for a replacement.
3. Position the New Lid Switch: Take the new lid switch and position it in the same location as the old lid switch. Align it properly to fit and secure it into place.
4. Connect the Lid Switch Wires: Reconnect the wires to the appropriate terminals on the new lid switch. Follow the color-coding or markings to make sure the wires are correctly connected.
5. Secure the Lid Switch: Once the wires are connected, secure the lid switch in place using any clips, screws, or brackets provided. Ensure that it is firmly attached to prevent any movement during operation.
6. Double-Check Connections: Double-check that all the lid switch connections are secure and properly fitted. This will help prevent any issues or malfunctions when the stacked washer and dryer is in use.
By installing the new lid switch, you have replaced the faulty or malfunctioning switch and restored the functionality of your stacked washer and dryer. This step allows the machine to recognize the lid as closed, enabling it to operate as intended.
Remember to refer to the manufacturer’s manual or guidelines for any specific instructions or recommendations on installing the new lid switch. If you’re unsure or uncomfortable with the installation process, it’s always best to seek professional assistance to ensure a safe and accurate setup.
Step 6: Reconnect the Lid Switch Wires
After installing the new lid switch, the next step is to reconnect the lid switch wires. This step is crucial for ensuring the proper functionality of the stacked washer and dryer. Follow these steps to reconnect the lid switch wires:
1. Inspect the Wires: Before reconnecting the lid switch wires, inspect them for any damage or wear. If there are any frayed or damaged wires, trim them carefully and create clean ends for reconnection.
2. Match the Wires: Refer to the markings or color-coding on the wires and the terminals of the lid switch. Match the corresponding wires to their designated terminals. This will ensure the proper connection and functionality of the lid switch.
3. Reconnect the Wires: Take the insulated ends of the lid switch wires and carefully connect them to their respective terminals on the new lid switch. Make sure the connections are secure and properly fitted.
4. Test the Connections: Once the lid switch wires are reconnected, gently tug on each wire to ensure they are securely fastened. Check for any loose connections or improper fittings. Properly connected wires are crucial for the reliable operation of the stacked washer and dryer.
5. Insulate the Connections: To further secure the lid switch wire connections, use electrical tape to insulate the terminal connectors. This helps prevent any accidental contact with live wires during operation.
By reconnecting the lid switch wires, you are ensuring the proper transmission of electrical signals between the lid switch and the control panel of the stacked washer and dryer. This allows the machine to detect the lid status accurately and function accordingly.
It is essential to double-check all the connections before proceeding to the next steps. Properly connected and insulated lid switch wires are vital for the safe and efficient operation of the appliance.
Read more: How To Hide A Stacked Washer Dryer
Step 7: Reattach the Control Panel
After successfully reconnecting the lid switch wires, the next step is to reattach the control panel to the stacked washer and dryer. Follow these steps to reattach the control panel:
1. Align the Control Panel: Position the control panel in the correct alignment with the front of the machine. Ensure that all the screw holes on the control panel align with the corresponding holes on the washer and dryer.
2. Secure the Control Panel: Insert the screws you previously removed back into their original positions on the control panel. Use a screwdriver to tighten the screws securely. Be careful not to overtighten and strip the screws or damage the control panel.
3. Confirm Tightness: Double-check that all screws are tightened properly. Ensure that the control panel is secure and does not wiggle or move loosely. A properly attached control panel is essential for the reliable operation of the stacked washer and dryer.
4. Verify the Lid Closure Function: Before proceeding to the next steps, ensure that the lid switch is engaging properly when the lid is closed. Test the lid closure by gently pressing down on the lid to simulate closing. Verify that the lid switch activates and releases as expected.
By reattaching the control panel, you are enclosing the internal components of the stacked washer and dryer, providing protection and stability. It also allows for easy operation of the machine through the accessible buttons and knobs on the control panel.
Make sure to follow the manufacturer’s instructions or guidelines for any specific recommendations or precautions regarding reattaching the control panel. Proper installation of the control panel is crucial for the safe and efficient functioning of the appliance.
Step 8: Plug in the Washer and Dryer
Once you have successfully reattached the control panel, the next step is to plug in the stacked washer and dryer. Follow these steps to safely plug in the appliances:
1. Double-Check the Power Outlet: Before plugging in the washer and dryer, ensure that the power outlet is in good condition. Check for any signs of damage or loose connections. If you suspect any issues with the power outlet, consult a professional electrician to address the problem.
2. Position the Machines: Make sure the stacked washer and dryer are in their designated location, with enough clearance around them for proper ventilation and operation.
3. Insert the Power Cord: Take the power cord and insert the plug securely into the power outlet. Push it in until it is fully seated in the outlet.
4. Confirm Power Connection: Check that the power cord is securely connected to the power outlet and there are no loose connections. Ensure no exposed wires are visible and the plug is not damaged.
5. Turn on the Power: Locate the power control buttons or switches on the control panel of the stacked washer and dryer. Press the appropriate buttons or flip the switches to turn on the power to the machines.
By properly plugging in the stacked washer and dryer, you are supplying the electrical power needed for the machines to operate. This step is essential for completing the repair process and testing the functionality of the appliances.
After plugging in the appliances, you can proceed with the final steps to test the lid switch and ensure that the stacked washer and dryer are running correctly.
Step 9: Test the Lid Switch
Now that you have completed the necessary steps to manually run a stacked washer and dryer by bypassing the lock lid switch, it’s time to test the functionality of the lid switch. Follow these steps to test the lid switch:
1. Close the Lid: Gently close the lid of the stacked washer and dryer. Ensure that it is securely closed and latched.
2. Start a Test Cycle: Select a test cycle or program on the control panel of the washer and dryer. This could be a quick wash or a short drying cycle. Start the test cycle as you would for a normal laundry load.
3. Observe the Operation: Monitor the operation of the stacked washer and dryer during the test cycle. Notice if the lid switch engages properly, allowing the machine to start and run. Also, observe if there are any error messages or issues that may indicate a problem with the lid switch or any other component.
4. Pause and Open the Lid: Once the test cycle has started running, pause the machine and carefully open the lid. Check if the machine pauses immediately upon lid opening. This is an indication that the lid switch is working correctly, as it should stop the machine when the lid is opened for safety purposes.
5. Resume and Complete the Cycle: Close the lid again and resume the test cycle. Let the stacked washer and dryer complete the entire cycle, ensuring that it operates smoothly and without any issues.
By testing the lid switch, you can determine if the bypassed switch is functioning properly and allowing the appliance to operate as intended. If you encounter any problems during the test cycle, such as the machine not starting or pausing when the lid is opened, it may indicate a further issue with the lid switch or another component that requires professional attention.
Remember, always follow the manufacturer’s instructions and guidelines for testing the lid switch and operating the stacked washer and dryer. If you experience persistent issues or are unsure about the results of the lid switch test, it is best to consult with a qualified technician or contact the manufacturer for further assistance.
Conclusion
Manually running a stacked washer and dryer by bypassing the lock lid switch can be a practical solution when faced with lid switch malfunctions. By following the step-by-step guide provided in this article, you can safely and effectively bypass the lock lid switch and get your laundry appliances up and running again.
Throughout the process, it is important to prioritize safety by adhering to the recommended safety precautions, such as disconnecting the power, wearing protective gear, and seeking professional assistance if needed. Taking these precautions ensures your well-being and prevents accidents or injuries.
The necessary tools and materials, including a screwdriver, wire cutters/strippers, and potentially a replacement lid switch, are required for a successful repair. Following the suggested steps, including unplugging the washer and dryer, locating the lid switch, removing and reattaching the control panel, and reconnecting the lid switch wires, helps you complete the repair process systematically.
After installing the new lid switch and reattaching the control panel, it’s crucial to plug in the washer and dryer and test the functionality of the lid switch. This final step verifies that the bypassed switch is operating correctly and allowing the appliance to function as it should.
It’s worth noting that while manually running the washer and dryer by bypassing the lid switch can be a temporary solution, it is always essential to address the underlying issue causing the lid switch malfunction. If the problem persists or if you’re uncertain about any aspect of the repair, it’s advisable to consult a professional technician or contact the manufacturer for further assistance.
Remember, safety should always be a priority when working with electrical appliances. If at any point you feel uncomfortable or unsure about performing tasks within this repair process, it is best to seek professional help. With the right knowledge, tools, and precautions, you can successfully navigate the process of manually running a stacked washer and dryer with a malfunctioning lock lid switch.
Frequently Asked Questions about How To Manually Run Stacked Washer And Dryer Lock Lid Switch
Was this page helpful?
At Storables.com, we guarantee accurate and reliable information. Our content, validated by Expert Board Contributors, is crafted following stringent Editorial Policies. We're committed to providing you with well-researched, expert-backed insights for all your informational needs.


0 thoughts on “How To Manually Run Stacked Washer And Dryer Lock Lid Switch”