Articles
How To Open The Stove Top
Modified: March 1, 2024
Learn how to open the stove top with our informative articles. Find step-by-step guides and expert tips to safely access and clean your stove.
(Many of the links in this article redirect to a specific reviewed product. Your purchase of these products through affiliate links helps to generate commission for Storables.com, at no extra cost. Learn more)
Introduction
Welcome to the ultimate guide on how to open the stove top! Whether you’re experiencing an issue with your stove or simply want to give it a deep clean, knowing how to safely and effectively open the stove top is essential. In this article, we will walk you through the step-by-step process, providing valuable insights and tips along the way.
Before we begin, it’s important to emphasize the importance of safety. Always make sure your stove is turned off and disconnected from any power source before attempting to open the stove top. Additionally, if you’re unsure or uncomfortable with any step, it’s advisable to seek professional assistance. Now, let’s dive into the tools and materials needed for this endeavor.
Key Takeaways:
- Safety First!
Always prioritize safety when opening the stove top. Turn off the stove and disconnect it from the power source before starting. If unsure, seek professional assistance to avoid accidents. - Regular Maintenance Is Key
Cleaning and inspecting the stove top is crucial for its efficiency and longevity. Use mild cleaning solutions and follow the manufacturer’s instructions for optimal maintenance.
Read more: How To Open Whirlpool Stove Top
Tools and Materials Needed
Before you begin opening the stove top, gather the following tools and materials:
- Flathead screwdriver
- Phillips screwdriver
- Needle-nose pliers
- Soft cloth or sponge
- Mild cleaning solution
- Clean, dry towel
Having these tools and materials on hand will ensure that you are equipped to handle any necessary tasks during the process.
It’s important to note that the specific tools and materials required may vary depending on the make and model of your stove. Always consult the manufacturer’s instructions or refer to the stove’s user manual for any specific recommendations or requirements.
Step 1: Turn Off the Stove
The first and most crucial step in opening the stove top is to turn off the stove and disconnect it from any power source. This is essential to ensure your safety throughout the process.
Start by locating the stove’s control panel or knobs. Turn all the burners to the “off” position and verify that the heat indicator lights, if present, are no longer illuminated.
Next, locate the power cord of the stove. Depending on the type of stove you have, the power cord may plug into a wall outlet or be hardwired into the electrical system. Disconnect the power cord from the outlet or turn off the circuit breaker that supplies power to the stove.
By following these steps, you can be confident that the stove is completely turned off and disconnected from any power source, minimizing the risk of electrical shock or other accidents.
Step 2: Remove the Burners
Once the stove is safely turned off, you can proceed to remove the burners. This step will allow you better access to the stove top for cleaning or maintenance.
Firstly, let the burners cool down completely to avoid any risk of burns. Once they are cooled, carefully lift each burner away from the stove top. Some burners may be removable by simply lifting them, while others may need to be twisted or unclipped. Consult your stove’s user manual if you are unsure about the specific method for removing the burners.
If your burners are electric coils, be cautious when removing them as they can be delicate. Hold the burner carefully by the edges and lift it straight up to avoid damaging the coils.
Once you have removed all the burners, place them aside on a clean surface or wrap them in a soft cloth to prevent any scratches or damage.
With the burners safely removed, you are now ready to proceed to the next step: lifting or unclipping the stove top.
Before attempting to open the stove top, ensure that the stove is turned off and cool. Most stove tops can be opened by lifting the top panel or removing the grates and burner caps. Refer to the user manual for specific instructions.
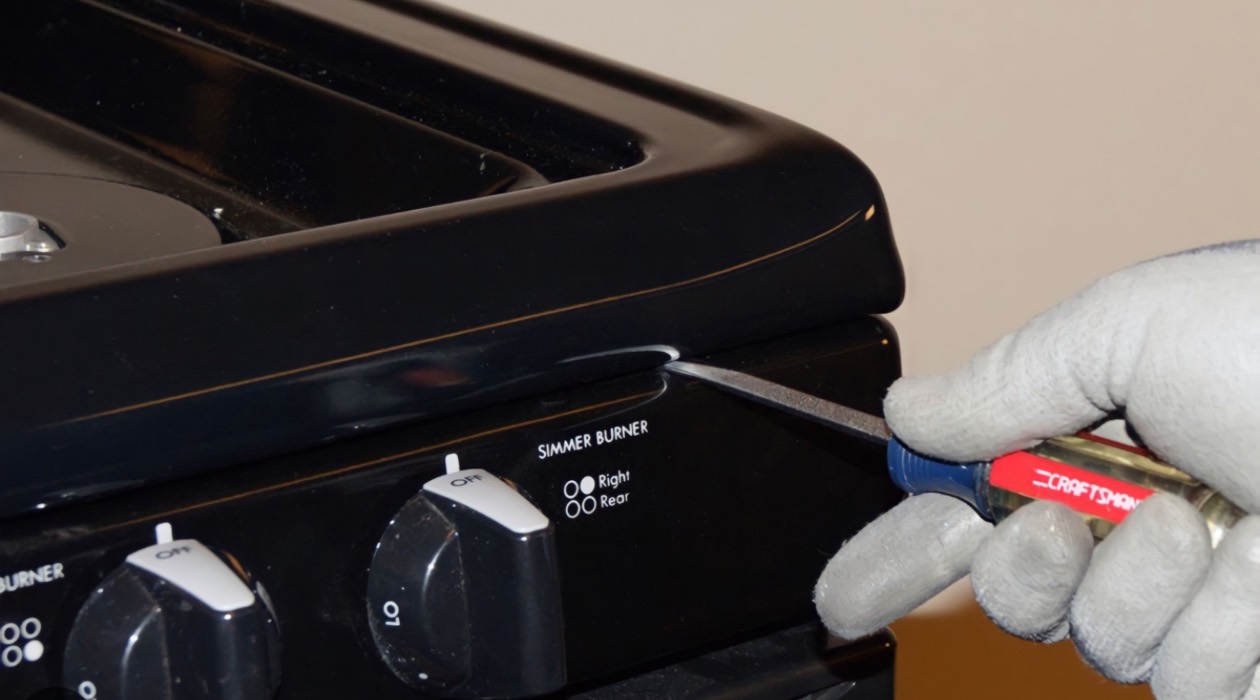
Step 3: Lift or Unclip the Stove Top
Now that the burners are removed, you can move on to lifting or unclipping the stove top. The method for accessing the interior of the stove may vary depending on the model, so it’s important to consult your stove’s user manual for specific instructions. However, we will provide a general guideline below.
Locate the securing clips or screws that hold the stove top in place. These are typically located either at the front or the back of the stove top, near the control panel or burners. Use a flathead or Phillips screwdriver to remove any screws that are securing the top.
If your stove has securing clips, use a flathead screwdriver or needle-nose pliers to lift or release them. Gently pry or push the clips upwards to disengage them from the stove top. Be cautious not to use excessive force to avoid damaging the clips or the stove top.
Once the securing clips or screws are removed or disengaged, you can start lifting the stove top. Carefully grasp the edges of the stove top and lift it upwards. Note that some stove tops may be hinged at the back, making it easier to lift, while others may require you to fully remove the top.
If the stove top doesn’t easily lift, double-check for any missed securing clips or screws, and repeat the process to ensure all of them are removed or disengaged.
With the stove top lifted, you’ll have a clear view of the interior and be able to proceed to the next step: cleaning and inspecting the stove top.
Read more: How To Open Hotpoint Stove Top
Step 4: Clean and Inspect the Stove Top
Now that the stove top is lifted or unclipped, it’s time to clean and inspect it. Over time, food particles, grease, and spills can accumulate on the surface, affecting its performance and appearance. Cleaning the stove top will not only improve its efficiency but also enhance its lifespan.
Start by using a soft cloth or sponge dampened with a mild cleaning solution. Avoid using abrasive cleaners or scouring pads, as they may scratch or damage the surface of the stove top. Wipe down the entire surface, paying special attention to any stubborn stains or spills.
If there are removable elements on the stove top, such as grates or drip pans, remove them and clean them separately. Scrub them gently with warm, soapy water, and rinse thoroughly before allowing them to dry.
After cleaning the stove top, take the time to inspect it for any signs of damage or wear. Look for cracks, chips, or any other issues that may require repair or replacement. Also, check the burners’ receptacles to ensure they are clean and in good condition.
If you notice any significant damage or issues during the inspection, it’s advisable to consult a professional for further assistance.
Once the stove top is clean and inspected, you can move on to the final step: reassembling the stove top.
Step 5: Reassemble the Stove Top
After cleaning and inspecting the stove top, it’s time to reassemble it. Reassembling the stove top is the reverse process of disassembly, but it’s important to follow the steps carefully to ensure everything is aligned properly.
Start by carefully lowering the stove top back into place. If your stove top was hinged, ensure that it is aligned with the hinges and gently lower it until it rests securely on the stove. If you fully removed the stove top, align it with the control panel and burner openings before lowering it into place.
Once the stove top is in place, reattach any securing clips or screws that were previously removed. Use a flathead or Phillips screwdriver to tighten the screws securely, or engage the clips by gently pressing them into position.
If your stove top has removable elements, such as grates or drip pans, now is the time to put them back in their designated spots.
Finally, carefully insert the burners back into their respective receptacles. Ensure that they are properly aligned and fully seated. For electric coil burners, make sure the coils are positioned correctly and securely in their holders.
With the stove top reassembled and the burners in place, you can now test your stove by turning it on and ensuring that everything is functioning correctly. If you encounter any issues, refer to your stove’s user manual or consider seeking professional assistance.
Congratulations! You have successfully opened and reassembled your stove top. By following these steps, you’ve taken an important step towards maintaining the performance and longevity of your stove.
Remember, it’s a good practice to periodically clean your stove top and perform any necessary maintenance to keep it in top shape. This will not only prolong its lifespan but also ensure safe and efficient cooking.
Thank you for following this guide on how to open the stove top. We hope you found it helpful and informative!
Conclusion
Opening the stove top may seem like a daunting task, but with the right knowledge and tools, it can be done safely and effectively. In this comprehensive guide, we have walked you through the step-by-step process of opening the stove top, from turning off the stove to reassembling the components. By following these steps, you can access the interior of the stove for cleaning, maintenance, or troubleshooting purposes.
Remember to always prioritize safety when working with stoves. Make sure the stove is turned off and disconnected from any power source before attempting to open the stove top. If you’re unsure or uncomfortable with any step, it’s advisable to seek professional assistance.
Throughout the process, we emphasized the importance of consulting your stove’s user manual for specific instructions and recommendations. Every stove model may have slight variations in the opening mechanism, so it’s essential to familiarize yourself with your specific stove’s requirements.
Cleaning and inspecting the stove top is an important part of the process. By regularly maintaining your stove top, you can improve its efficiency and prolong its lifespan. Remember to use mild cleaning solutions and avoid abrasive cleaners or scouring pads that may cause damage.
Once you have completed the steps and reassembled the stove top, take a moment to test your stove and ensure everything is functioning correctly. Address any issues promptly or seek professional assistance if needed.
By following this guide, you have gained the knowledge and confidence to open and reassemble the stove top. This skill will not only help you keep your stove in optimal condition but also enable you to troubleshoot and address any issues that may arise.
We hope that this guide has been informative and helpful to you. Remember, safety is paramount when working with stoves, so always exercise caution and seek professional assistance when needed. Thank you for reading, and happy stove maintenance!
Frequently Asked Questions about How To Open The Stove Top
Was this page helpful?
At Storables.com, we guarantee accurate and reliable information. Our content, validated by Expert Board Contributors, is crafted following stringent Editorial Policies. We're committed to providing you with well-researched, expert-backed insights for all your informational needs.


0 thoughts on “How To Open The Stove Top”