Articles
How To Remove A Stove Top
Modified: March 1, 2024
Learn how to remove a stove top with our informative articles. Follow our step-by-step guide for easy and safe stove top removal.
(Many of the links in this article redirect to a specific reviewed product. Your purchase of these products through affiliate links helps to generate commission for Storables.com, at no extra cost. Learn more)
Introduction
Removing a stove top may seem like a daunting task, but with the right knowledge and tools, it can be a straightforward process. Whether you are replacing a faulty stove top or simply giving your kitchen a makeover, knowing how to safely and efficiently remove a stove top is essential.
Before you begin, it is important to familiarize yourself with the specific model and brand of stove top you have, as different types may have slightly different removal procedures. Additionally, always prioritize safety by following proper precautions and turning off the power before starting any work.
In this article, we will guide you through the step-by-step process of how to remove a stove top. From disconnecting the power supply to uninstalling the burners and control knobs, we will cover everything you need to know to successfully remove your stove top with ease.
Key Takeaways:
- Prioritize safety by turning off the power, wearing protective gear, and following manufacturer’s instructions when removing a stove top. Each step, from disconnecting the gas or electric supply to reinstalling components, plays a crucial role in ensuring a successful removal process.
- After replacing or installing a new stove top, reconnect the gas or electric supply and reinstall burner grates, caps, and control knobs. Test each component for proper functionality before using the stove top. Following these steps will result in a functional and updated kitchen space.
Read more: How To Remove Rust From Stove Top
Safety Precautions
Before you start removing your stove top, it is important to take necessary safety precautions to avoid any accidents or injuries. Here are some essential safety measures to follow:
- Turn off the power: Before beginning any work, ensure that the power supply to the stove is turned off. This will prevent any electrical shocks or accidents.
- Use protective gear: Wear gloves to protect your hands and goggles to shield your eyes from any debris or small particles that may be present during the removal process.
- Allow the stove top to cool: If you have been using the stove recently, make sure to let it cool down completely before attempting to remove any parts. This will prevent burns or other injuries.
- Work in a well-ventilated area: If you are working with gas stoves, ensure that the area is properly ventilated to prevent the build-up of gas fumes.
- Read the manufacturer’s instructions: Consult the user manual or manufacturer’s instructions for any specific safety guidelines or recommendations for your particular stove top model.
By following these safety precautions, you can minimize the risk of accidents or injuries while removing your stove top.
Tools and Materials Needed
Before you start removing your stove top, gather the necessary tools and materials to ensure a smooth and efficient process. Here are the tools and materials you will need:
- Flathead screwdriver: This will be used to loosen and remove screws or fasteners holding the stove top in place.
- Adjustable wrench or pliers: These tools will be useful for disconnecting gas or electric supply lines.
- Masking tape: Use tape to label and keep track of wires or connections during the removal process.
- Cleaning supplies: You may need cleaning materials such as a sponge, mild detergent, and a soft cloth to clean the area once the stove top is removed.
- Replacement stove top (if necessary): Depending on the reason for removing your stove top, you might need a replacement stove top ready to install after removal.
- Work gloves: Protect your hands during the removal process by wearing work gloves.
Make sure to gather all the necessary tools and materials beforehand to avoid any interruptions during the removal process. If you are uncertain about any specific tools required for your stove top model, refer to the manufacturer’s instructions or consult with a professional.
Step 1: Turn Off the Power
The first and most important step in removing a stove top is to turn off the power supply. This step is crucial to ensure your safety during the removal process.
Locate the main power source or circuit breaker and switch it off. This will prevent any electrical current from flowing to the stove top and reduce the risk of electrical shocks or accidents.
If you are unsure about which circuit breaker controls the stove top, you can test it by turning on the stove and then flipping the circuit breakers one by one until the stove turns off. Once you’ve identified the correct breaker, switch it off and double-check that the stove is no longer receiving power.
It is also a good idea to use a voltage tester to confirm that there is no electrical current running to the stove top. This additional step can provide an extra layer of assurance before proceeding with the removal process.
Remember, electricity can be dangerous, so being thorough in turning off the power supply will help ensure your safety throughout the rest of the stove top removal.
Step 2: Remove the Burners or Elements
Once you’ve successfully turned off the power supply, the next step is to remove the burners or elements from the stove top. This step may vary slightly depending on the type of stove top you have, so refer to your specific stove top’s user manual for detailed instructions.
Here’s a general guide on how to remove the burners or elements:
- Allow the burners or elements to cool down completely if you have recently been using the stove. This will prevent any burns or injuries during removal.
- Lift or tilt the burners or elements gently to access the connection points. Avoid using excessive force to prevent damage to the stove top.
- Depending on your stove top model, the burners or elements may be secured by clips, screws, or a twist-and-pull mechanism. Follow the instructions in your user manual or use the appropriate tools to unfasten or disconnect these components.
- Once the burners or elements are detached, carefully lift them away from the stove top. Place them on a clean and safe surface to avoid damage.
- Label or take note of the location of each burner or element to ensure easy reinstallation later.
By following these steps, you can safely remove the burners or elements from your stove top. Setting them aside carefully will keep them protected and ready for installation once the stove top removal process is complete.
Read more: How To Make A Stove Top Distiller
Step 3: Disconnect the Gas or Electric Supply
After removing the burners or elements, the next step is to disconnect the gas or electric supply to your stove top. This step is crucial to ensure your safety and prevent any accidents during the removal process.
Here’s a guide on how to disconnect the gas or electric supply:
Gas Stove Top:
- Locate the gas shut-off valve, usually located behind the stove.
- Turn the valve clockwise to shut off the gas supply to the stove top.
- Use an adjustable wrench or pliers to gently disconnect the gas line from the stove top. Be cautious as some gas may still be trapped in the line.
- Once the gas line is disconnected, securely cap it with a fitting to prevent any gas leaks.
Electric Stove Top:
- Locate the circuit breaker panel and turn off the power supply to the stove top. Double-check that the power is indeed turned off using a voltage tester.
- Inspect the power cord connection at the back of the stove top.
- Depending on your stove top model, you may need to remove a cover or unscrew the power cord from the stove top. Again, refer to the user manual for specific instructions.
- Gently pull the power cord out of the outlet or disconnect any wire connectors.
Ensure that you follow proper safety precautions and, if needed, consult a professional technician to handle the disconnection of gas or electrical appliances.
By disconnecting the gas or electric supply, you are taking the necessary steps to ensure a safe and smooth removal process for your stove top.
Step 4: Remove the Control Knobs
With the gas or electric supply disconnected, the next step in removing your stove top is to remove the control knobs. These knobs give you control over the burners or elements on your stove top.
Follow these steps to remove the control knobs:
- Inspect the base of each control knob to identify any securing mechanisms.
- Depending on your stove top model, the knobs may be secured with a small screw or fastener. Use a screwdriver to loosen and remove any screws.
- If there are no visible screws, your control knobs may have a push-and-turn mechanism. In this case, firmly grasp each knob and push down before turning counterclockwise to release it from the control panel.
- Repeat this process for each control knob on the stove top.
Once the control knobs are removed, set them aside in a safe place for later reinstallation.
Removing the control knobs will allow you to access the components beneath the knobs and prepare the stove top for the next steps in the removal process.
Read more: How To Clean A Smooth Top Range Or Cooktop
Step 5: Remove the Burner Grates and Caps
After removing the control knobs, the next step in removing your stove top is to remove the burner grates and caps. These components protect the burners and distribute heat evenly during cooking.
Follow these steps to remove the burner grates and caps:
- Lift or remove any burner grates that are covering the burners on your stove top. These grates are typically made of cast iron or stainless steel.
- Set the burner grates aside in a safe place to prevent any damage.
- Underneath the burner grates, you will find the burner caps. These caps help direct the flow of gas to the burners.
- Gently lift and remove the burner caps from each burner, being careful not to damage them in the process.
Take note of the position of each burner cap to ensure proper reinstallation later.
Removing the burner grates and caps will give you access to the burners for the next steps in the stove top removal process.
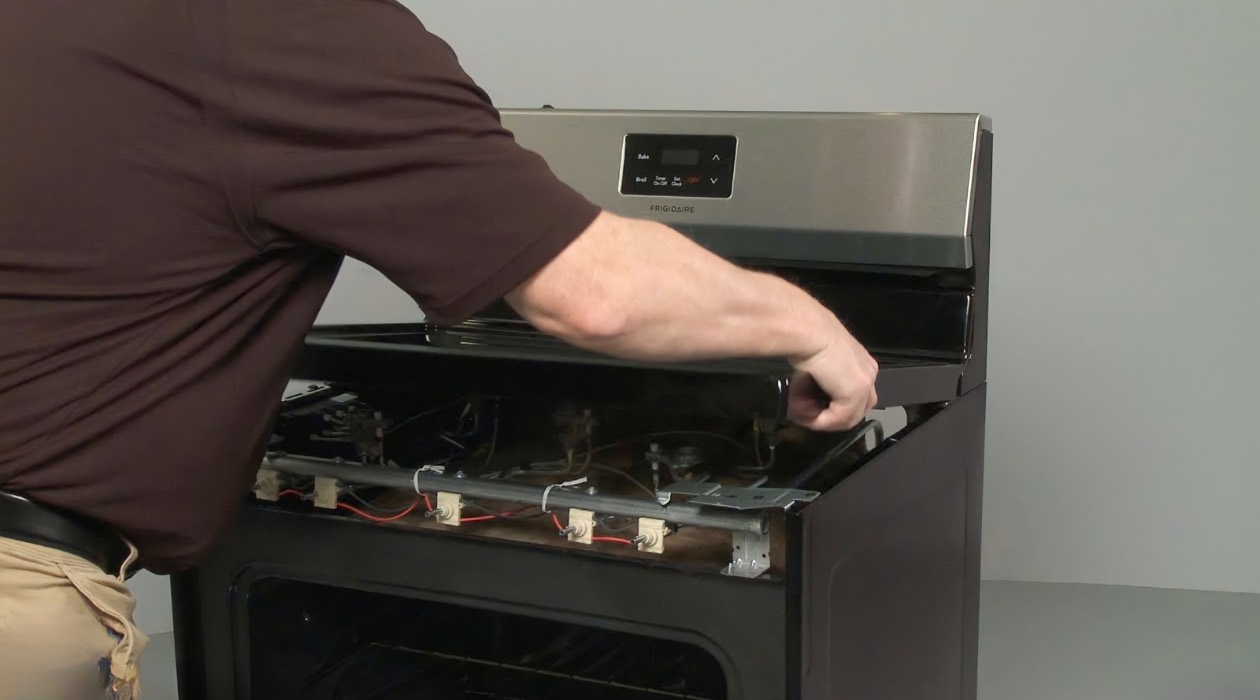
Step 6: Remove the Stove Top
Now that you have removed the burner grates and caps, it’s time to remove the stove top itself. This step will require you to carefully detach the stove top from the main body of the stove.
Follow these steps to remove the stove top:
- Locate the screws or fasteners that secure the stove top to the main body of the stove.
- Using a screwdriver or the appropriate tool, carefully unscrew or unfasten these screws. Be sure to keep track of each screw and set them aside in a safe place.
- Once all the screws or fasteners are removed, gently lift the stove top to detach it from the main body.
- Be cautious during this step as the stove top may still be connected by wires or hoses. If you encounter resistance, double-check for any remaining connections.
- If there are any wires or hoses connected to the stove top, carefully disconnect them by following the specific instructions in your user manual or consulting with a professional if needed.
Once the stove top is free from any attachments, set it aside in a safe location. Take care to avoid any damage during this process.
By successfully removing the stove top, you have completed a significant step in the stove top removal process and are now ready to move on to the next steps.
Step 7: Clean and Prepare the Counter Space
After removing the stove top, it’s essential to clean and prepare the counter space where the stove top was installed. This step ensures a clean and smooth surface for the installation of a new stove top, if necessary, or for other purposes.
Follow these steps to clean and prepare the counter space:
- Begin by removing any debris, food particles, or spills from the counter surface. Use a soft cloth or sponge and a mild detergent to clean the area thoroughly. Pay extra attention to any stubborn stains.
- Wipe the counter surface dry using a clean and dry cloth or paper towels.
- Inspect the area for any stains that may require additional cleaning. If necessary, use a specialized cleaner or stain remover suitable for your counter material.
- Ensure that the counter surface is completely dry before proceeding to the next steps of stove top installation or any other use.
By cleaning and preparing the counter space, you create a clean and welcoming environment for the next steps in the stove top removal process.
Use a screwdriver to remove the burner grates and knobs. Lift the stove top to access the screws holding it in place. Unscrew and carefully lift the stove top off to clean or replace.
Step 8: Replace or Install a New Stove Top
After cleaning and preparing the counter space, you are now ready to either replace the old stove top or install a new one. This step will depend on your specific needs and whether you are replacing a faulty stove top or upgrading your kitchen.
Follow these steps to replace or install a new stove top:
- If you are replacing a faulty stove top, carefully inspect the new stove top to ensure it matches the dimensions and specifications of the old one. Take note of any differences or additional instructions provided by the manufacturer.
- Position the new stove top over the prepped counter space, aligning it with the designated opening.
- Carefully lower the stove top into place, ensuring it sits securely and evenly on the counter.
- Refer to the manufacturer’s instructions for your specific stove top model to determine whether any additional securing mechanisms, such as screws or brackets, need to be used to hold the stove top in place.
- If necessary, follow the instructions provided to properly secure the stove top using the designated mechanisms. Be cautious not to overtighten or damage the stove top during this process.
If you are installing a brand new stove top, ensure that you follow all installation instructions provided by the manufacturer. This may involve additional steps such as connecting gas or electric supply lines or engaging the services of a professional.
By replacing or installing a new stove top, you are one step closer to having a fully functional and updated kitchen.
Read more: How To Remove Stove Burners
Step 9: Reconnect the Gas or Electric Supply
With the new stove top in place, the next step is to reconnect the gas or electric supply. This step is vital to ensure the proper functioning of the stove top.
Follow these steps to reconnect the gas or electric supply:
Gas Stove Top:
- If the gas supply was previously disconnected, ensure that the gas shut-off valve is in the “off” position.
- Carefully align the gas line with the connection point on the stove top.
- Gently insert the gas line into the connection point until it fits securely.
- Use an adjustable wrench or pliers to tighten the connection, ensuring it is firm but not overtightened.
- Once the gas line connection is secure, turn the gas shut-off valve to the “on” position.
Electric Stove Top:
- If the electric supply was previously disconnected, ensure that the power is still turned off at the circuit breaker.
- Align the power cord with the appropriate connection point on the stove top.
- Gently insert the power cord into the connection point until it fits securely.
- Follow the manufacturer’s instructions to properly secure the power cord to the stove top, whether it involves tightening screws or reattaching covers.
- With the power cord securely connected, turn on the power at the circuit breaker.
Ensure that you follow proper safety protocols when reconnecting gas or electric supplies. If you are unsure about the process, it is always recommended to consult with a professional technician.
By successfully reconnecting the gas or electric supply, you are one step closer to having a fully functional stove top ready for use.
Step 10: Reinstall the Burner Grates, Caps, and Control Knobs
With the gas or electric supply reconnected, it’s time to reinstall the burner grates, caps, and control knobs onto the stove top. These components are essential for the proper functioning of the burners and for controlling the heat on your stove top.
Follow these steps to reinstall the burner grates, caps, and control knobs:
- Begin by placing the burner caps back onto their respective burners. Ensure they are properly positioned and fitting securely.
- Next, carefully place the burner grates back onto the stove top. Make sure they are aligned correctly and sitting evenly.
- Take note of the location and orientation of each control knob.
- If there were any screws or fasteners securing the control knobs, reattach them using a screwdriver or the appropriate tool.
- If the control knobs use a push-and-turn mechanism, simply push them onto their respective control shafts and turn them clockwise until they fit snugly.
- Give each control knob a gentle twist to ensure it operates smoothly and securely.
Take a moment to double-check that all burner grates, caps, and control knobs are properly installed and aligned. This will ensure that the stove top operates correctly and safely.
By reinstalling the burner grates, caps, and control knobs, your stove top will be ready for use and will provide you with full control over your cooking experience.
Read more: How To Bake On The Stove Top
Step 11: Replace the Burners or Elements
The final step in the stove top removal process is to replace the burners or elements. These components are crucial for generating heat and allowing you to cook your favorite meals.
Follow these steps to replace the burners or elements:
- Ensure that the stove top is powered off and any gas supply is still turned off if applicable.
- Position each burner or element on the designated spot on the stove top. They should fit securely into their respective receptacles.
- Make sure each burner or element is aligned correctly and evenly seated.
- If needed, refer to the manufacturer’s instructions to secure each burner or element using clips, screws, or other securing mechanisms.
Take a moment to test each burner or element by turning them on individually. Confirm that they heat up properly and adjust the temperature controls as needed.
If you notice any issues with the burners or elements, double-check that they are installed correctly or consult the manufacturer’s troubleshooting guide.
With the burners or elements properly replaced, your stove top is now fully functional and ready to use.
Remember, before using your stove top, follow any additional instructions or safety guidelines provided by the manufacturer to ensure safe operation.
Congratulations! You have successfully completed the stove top removal and replacement process, allowing you to enjoy a functional and updated cooking space.
Conclusion
Removing a stove top may seem like a complex task, but with the right knowledge and approach, it can be done safely and efficiently. By following the step-by-step guide outlined in this article, you can successfully remove your stove top, whether it is for replacement or maintenance purposes.
Throughout the process, it is crucial to prioritize safety by turning off the power, wearing protective gear, and following manufacturer’s instructions. Always exercise caution when handling gas or electrical connections, and if you are unsure about any steps, consult a professional technician.
Each step, from turning off the power to uninstalling the burners, removing the control knobs, and disconnecting the gas or electric supply, plays a vital role in ensuring a smooth and successful stove top removal process. Additionally, cleaning and preparing the counter space provides a clean canvas for further actions, such as installing a new stove top.
Once the new stove top is in place, the reconnection of the gas or electric supply, as well as the reinstallation of burner grates, caps, and control knobs, brings the process to completion. Remember to test each component to ensure proper functionality before using the stove top.
With the stove top successfully removed and replaced, you can now enjoy a functional and updated kitchen space. Whether you are cooking daily meals or preparing elaborate feasts, having a reliable and efficient stove top is essential.
By following the steps outlined in this article, you have taken the necessary steps to remove and replace your stove top with confidence. Remember to consult your manufacturer’s instructions for specific steps related to your stove top model, as procedures may vary slightly.
Now, roll up your sleeves, gather your tools, and get ready to embark on this stove top removal journey. With patience and care, you’ll have your stove top replaced or maintained in no time!
Frequently Asked Questions about How To Remove A Stove Top
Was this page helpful?
At Storables.com, we guarantee accurate and reliable information. Our content, validated by Expert Board Contributors, is crafted following stringent Editorial Policies. We're committed to providing you with well-researched, expert-backed insights for all your informational needs.


0 thoughts on “How To Remove A Stove Top”