Articles
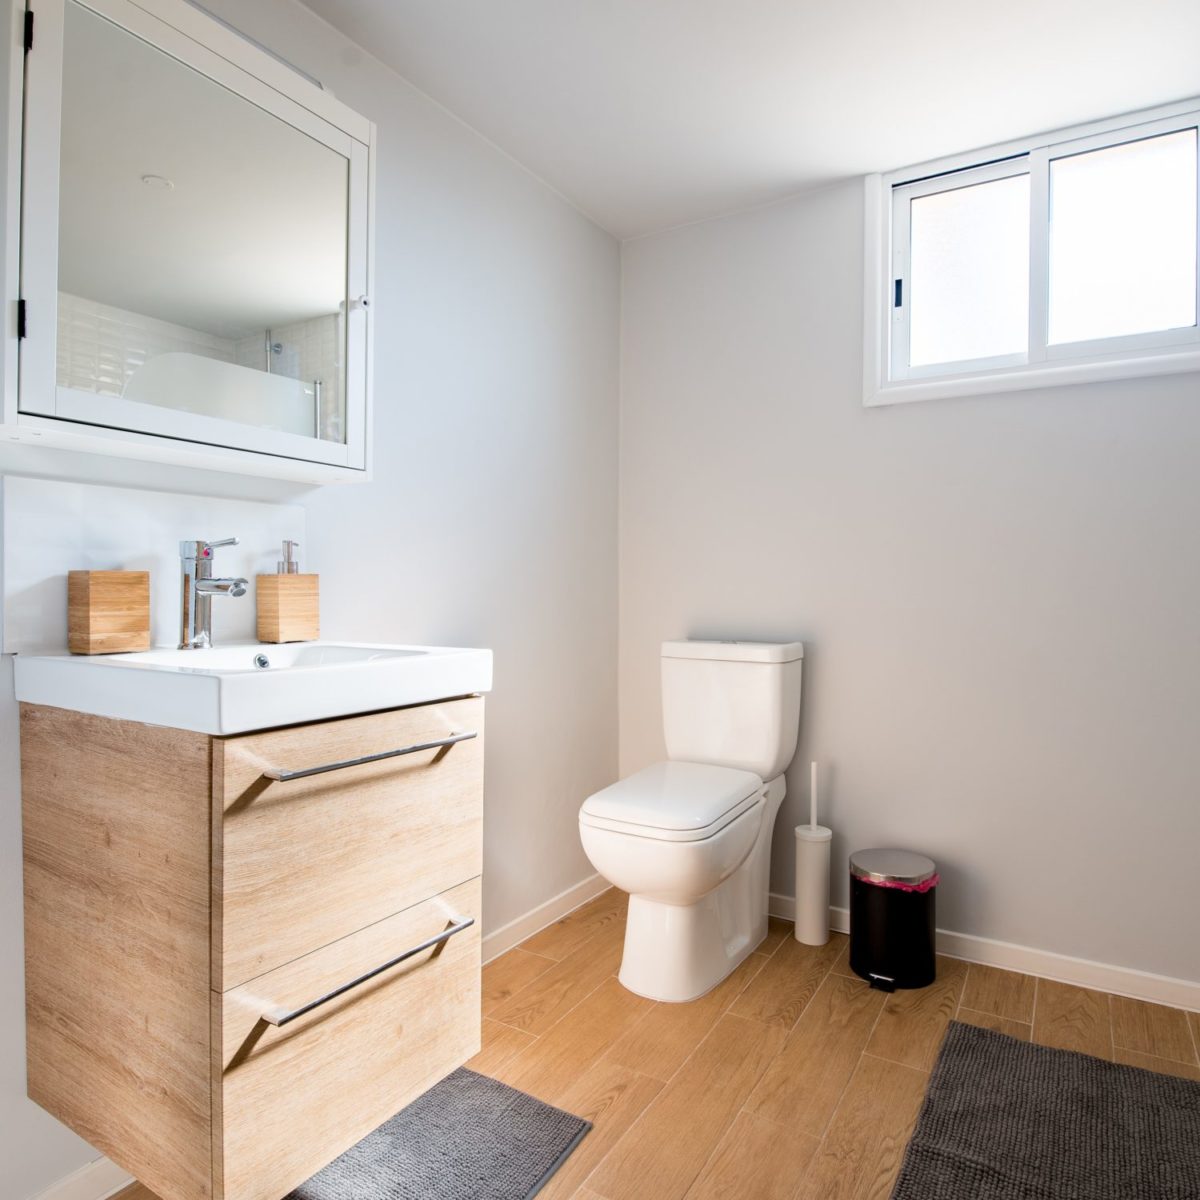
How To Paint Behind Toilet
Modified: January 19, 2024
Learn how to paint behind a toilet with our informative articles. Follow our step-by-step guide for a professional finish.
(Many of the links in this article redirect to a specific reviewed product. Your purchase of these products through affiliate links helps to generate commission for Storables.com, at no extra cost. Learn more)
Introduction
Painting behind a toilet might not be the most glamorous task, but it is an important part of maintaining the overall aesthetics of your bathroom. These hard-to-reach areas can accumulate dust, dirt, and grime over time, making them prone to discoloration and wear. By taking the time to paint behind your toilet, you can refresh the look of your bathroom and ensure a clean and polished finish.
In this article, we will guide you through the process of painting behind a toilet, step-by-step. From preparing the area to choosing the right paint and applying it with precision, we will cover all the necessary techniques and considerations to help you achieve professional-looking results.
So, grab your paintbrush and let’s dive into the world of toilet painting!
Key Takeaways:
- Transform the often overlooked area behind your toilet into a clean, stylish, and inviting space by following proper preparation, painting techniques, and careful consideration of paint selection and protective measures.
- Achieve a professional-looking finish by preparing the area, choosing the right paint, protecting the toilet, using proper painting techniques, and ensuring a thorough cleanup. These steps will help maintain the appearance of your freshly painted area behind the toilet for years to come.
Read more: How To Paint Behind A Radiator
Preparing the Area
Before you begin painting behind the toilet, it’s important to properly prepare the area. This will help you achieve better results and minimize any potential mess or damage. Here are the steps to follow:
- Clear the space: Start by removing any items that may be in the way, such as toilet paper holders or small bathroom accessories. Clearing the area will give you more room to work and avoid any accidental spills or splatters.
- Protect the floor: Place a drop cloth or old sheets on the floor around the toilet to protect it from paint drips or spills. Make sure to tuck the cloth under the edges of the toilet to keep it secure and prevent any paint from seeping through.
- Mask off the toilet: Use painter’s tape to carefully mask off the edges of the toilet, including the base and the tank. This will protect the porcelain surface from accidental paint marks and ensure a clean, crisp finish. Take your time to apply the tape evenly and press it firmly to ensure it adheres well.
- Clean the walls: Use a mild cleaning solution and a sponge or cloth to clean the walls behind the toilet. Remove any dirt, grime, or mold that may have accumulated over time. This step is crucial for ensuring proper paint adhesion and a smooth result.
- Repair any damage: Inspect the wall for any cracks, holes, or imperfections. Use a lightweight spackling compound to fill in any gaps and sand it down once it’s dry. This will create a smooth surface for the paint and ensure a flawless finish.
By taking the time to prepare the area properly, you can create an ideal canvas for your paint job and ensure a professional-looking outcome. Once you’ve completed these steps, you’re ready to move on to the next phase: gathering the materials.
Gathering the Materials
Before you start painting behind the toilet, it’s essential to gather all the necessary materials. Being prepared will save you time and ensure a smoother painting process. Here’s a list of items you’ll need:
- Paint: Choose a high-quality paint that is suitable for bathroom use. Look for paints that are moisture-resistant and offer a washable finish. Consider the color and finish you want to achieve and purchase the appropriate amount of paint for the size of the area you’ll be covering.
- Paintbrushes: Select a variety of paintbrushes to handle different areas and techniques. A 2-inch angled brush is ideal for cutting in around edges and corners, while a smaller brush can be used for touch-ups and detailed work. Consider using synthetic brushes for water-based paints and natural bristle brushes for oil-based paints.
- Roller and tray: A roller can help you cover larger areas quickly and efficiently. Make sure to choose a roller cover that is appropriate for the texture of your walls. Additionally, a paint tray will provide a convenient place to pour and distribute the paint.
- Extension pole: If you have high ceilings or hard-to-reach areas above the toilet, an extension pole can be a valuable tool. It will allow you to reach higher areas without the need for a ladder.
- Painter’s tape: As mentioned earlier in the preparation phase, painter’s tape is essential for masking off areas and achieving clean lines. Ensure you have enough painter’s tape to cover all the necessary surfaces.
- Drop cloths or old sheets: Protect your floor and surroundings from paint drips or spills with drop cloths or old sheets. They will catch any stray paint and prevent damage to your bathroom surfaces.
- Cleaning supplies: Keep a bucket of warm soapy water, a sponge, and a cloth or paper towels nearby for cleaning any accidental messes or drips. This will allow you to address any issues as they arise and keep your workspace clean.
- Protective gear: Depending on your preference, consider wearing old clothes or a painting smock to protect yourself from paint splatters. Additionally, it’s a good idea to wear disposable gloves to keep your hands clean and protected.
Make sure you have all these materials readily available before you begin painting behind the toilet. Having everything at hand will help you work efficiently and get the job done with ease.
Protecting the Toilet
When painting behind the toilet, it’s crucial to take steps to protect the fixture itself from any accidental paint splatters or drips. Here are some measures you can take to safeguard your toilet:
- Cover the toilet tank with plastic wrap or a plastic bag: Start by placing plastic wrap or a plastic bag over the top of the toilet tank. Secure it tightly with painter’s tape or a rubber band. This will create a protective barrier and prevent any paint from accidentally splattering onto the tank.
- Wrap the toilet bowl with plastic wrap or a plastic bag: Similar to the tank, wrap plastic wrap or a plastic bag around the toilet bowl. Ensure it covers the entire surface and extends below the water line. Secure it tightly with painter’s tape or a rubber band. This will protect the bowl from any paint drips or accidental contact.
- Use a toilet cover or a cloth: If you have a toilet cover or a cloth that you don’t mind getting dirty, you can place it over the toilet seat. This will provide an additional layer of protection and prevent any accidental smudges or paint transfer.
- Be cautious and attentive while painting: While taking preventive measures is essential, it’s equally important to remain cautious during the painting process. Pay attention to your brush or roller to prevent any excess paint from splattering onto the toilet. Take your time and work carefully to ensure a neat and tidy result.
By taking these precautions, you can minimize the risk of paint damage to your toilet and maintain its pristine appearance throughout the painting process.
Now that you’ve protected your toilet, it’s time to move on to the next step: choosing the right paint for the job.
Choosing the Right Paint
Choosing the right paint for painting behind the toilet is crucial to ensure durability and a smooth, long-lasting finish. Here are some factors to consider when selecting the appropriate paint:
- Moisture resistance: Bathrooms are subject to high humidity levels, so it’s essential to choose a paint that is moisture-resistant. Look for paints specifically formulated for bathroom use, as they are designed to withstand moisture and prevent mold or mildew growth.
- Washability: Bathrooms also tend to get dirty easily, so opt for a paint with a washable finish. This will allow you to clean the painted surface without damaging the paint or leaving visible marks. Semi-gloss or satin finishes are often recommended for their easy-to-clean properties.
- Color and sheen: Consider the color and sheen (or level of shine) you want to achieve. Lighter colors can help make small bathrooms feel more spacious, while darker colors can add drama and depth. As for sheen, remember that higher sheen levels provide more durability and are easier to wipe clean, but they may also highlight surface imperfections. Choose a sheen level that suits your bathroom’s aesthetic and maintenance needs.
- Paint type: Determine whether you want to use latex (water-based) or oil-based paint. Latex paint is generally the preferred choice for bathrooms due to its quick drying time, easy cleanup, and low odor. However, oil-based paints may offer superior durability and moisture resistance, especially for areas with high moisture exposure.
- Sample testing: If you’re unsure about the color or finish, consider purchasing small paint samples and testing them on a small section of the wall. This will allow you to see how the paint looks in your bathroom lighting and evaluate if it meets your expectations before committing to a full paint job.
When purchasing paint, make sure to buy enough to cover the entire area behind the toilet. Measure the width and height of the wall, and consult the product label or a paint professional to determine the appropriate amount. It’s better to have a bit extra paint on hand for touch-ups or future maintenance.
Now that you’ve chosen the right paint, it’s time to dive into the exciting part – applying the paint and bringing a fresh new look to the area behind your toilet. We’ll discuss painting techniques in the next section.
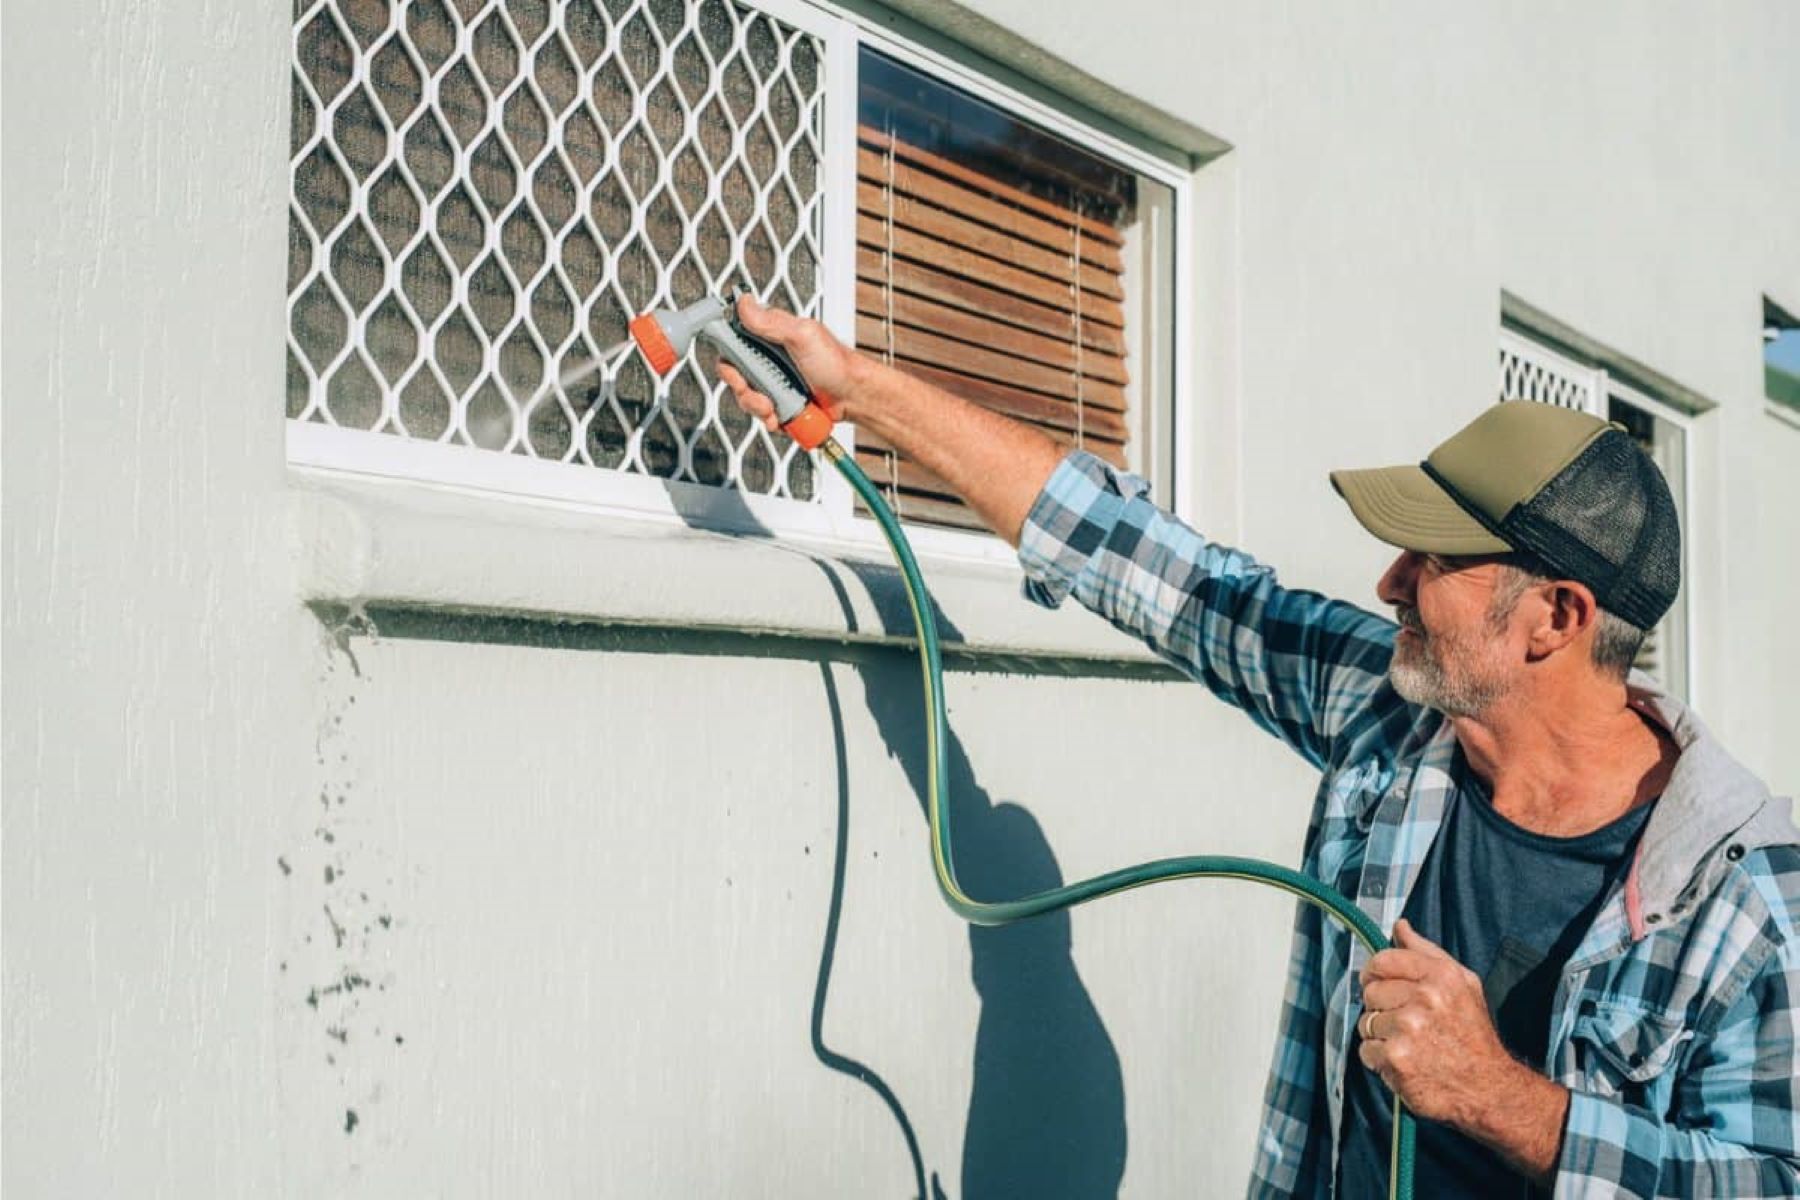
Use a small, angled paintbrush to reach behind the toilet. Start by painting the edges and corners, then use a roller for the larger areas. Make sure to protect the toilet with a drop cloth.
Read more: How To Paint Toilet Bowl
Painting Techniques
When it comes to painting behind the toilet, using the right techniques can help you achieve a professional-looking finish. Follow these step-by-step instructions for a successful paint job:
- Start with cutting in: Begin by using a 2-inch angled brush to cut in around the edges and corners of the wall behind the toilet. Apply a thin and even coat of paint along the edges, ensuring a smooth transition between the painted area and the adjacent wall surfaces.
- Use a roller for larger areas: Once you’ve cut in, switch to a paint roller for the larger areas. Dip the roller into the paint tray and remove any excess paint by rolling it against the textured part of the tray. Begin rolling the paint onto the wall in a “W” or “M” motion, starting from the top and working your way down. Apply even pressure and maintain a consistent speed to achieve an even layer of paint.
- Overlap and blend: To avoid visible lines or roller marks, make sure to overlap each stroke slightly with the previous one. This will help blend the paint and create a seamless finish. Work in small sections at a time, keeping a wet edge to prevent any visible demarcations.
- Apply multiple thin coats: It’s better to apply multiple thin coats of paint rather than one thick coat. This will allow for better coverage and drying time between coats. Follow the paint manufacturer’s instructions regarding drying time, usually a few hours, before applying subsequent coats.
- Keep a wet edge: To achieve a smooth and even finish, make sure to maintain a wet edge while painting. This means always painting into the previously painted area while it is still wet. Avoid going back over dried or partially dried paint, as it can result in visible brush or roller marks.
- Check for uniform coverage: After applying the desired number of coats, step back and inspect the painted area for any missed spots or uneven coverage. Touch up any areas that require additional paint, using a brush or roller as necessary.
Remember to allow the paint to dry completely before removing any masking tape or plastic coverings. This will prevent any smudging or damage to the freshly painted surface.
Now that you’ve mastered the painting techniques, let’s move on to the next step – cleaning up.
Cleaning Up
Cleaning up after a painting project is an essential part of the process. By properly cleaning your tools and removing any protective coverings, you can maintain the longevity of your painting equipment and ensure a tidy bathroom. Follow these steps to clean up after painting behind the toilet:
- Remove the protective coverings: Begin by carefully removing the plastic wrap or plastic bags from the toilet tank and bowl. Dispose of them properly, ensuring that any paint residue is contained and not spread around your bathroom.
- Peel off the painter’s tape: Gently peel off the painter’s tape from the edges of the toilet, taking care not to damage the painted surface. Pull the tape at a 45-degree angle away from the wall for clean removal. Dispose of the used tape properly.
- Clean your brushes and roller: Rinse your paintbrushes and roller cover under running water until the water runs clear. Use a brush comb or your fingers to remove any remaining paint from the bristles. For oil-based paints, use a paint thinner or mineral spirits for cleaning instead of water. Once clean, shake off any excess moisture and allow the brushes and roller cover to air dry before storing them.
- Dispose of paint properly: If you have any leftover paint, store it in a tightly sealed container for future touch-ups. If you no longer need the paint, check with your local recycling or hazardous waste facilities for proper disposal guidelines.
- Clean up your work area: Wipe down the surrounding surfaces, such as the floor or countertop, to remove any paint splatters or drips. Use a damp cloth or sponge with warm soapy water to clean these areas. Check for any stray paint marks and address them promptly with the appropriate cleaning method.
Proper cleaning and tidying up will not only leave your bathroom looking neat and fresh but also ensure that your painting tools are ready for future use.
Now that you’ve completed the cleanup process, it’s time for some final tips and considerations to keep in mind.
Final Tips and Considerations
As you wrap up your painting project behind the toilet, here are some final tips and considerations to keep in mind:
- Ventilate the area: Ensure proper ventilation in the bathroom while painting and allow the painted area to fully dry. Open windows or use a fan to circulate fresh air and help with the drying process.
- Keep your paint for touch-ups: Save a small amount of the paint you used for future touch-ups. This will come in handy if you need to repair any chips, scratches, or damage to the painted surface down the line.
- Regular maintenance: To keep the painted area behind the toilet looking its best, establish a regular cleaning routine. Use mild soapy water and a soft cloth to gently wipe the painted surface on a periodic basis.
- Consider a trim color: If you want to add a touch of visual interest, consider painting the trim or baseboard behind the toilet in a complementary or contrasting color. This can add depth and dimension to your bathroom design.
- Protective coatings: If you want to provide extra protection and durability to the painted surface, consider applying a clear protective coating or sealer designed for bathroom walls. This can help prevent staining, moisture damage, and make cleaning easier.
- Take your time: Don’t rush the painting process. Take your time to ensure smooth brush strokes and even coverage. Patience and attention to detail will yield better results.
- Consult a professional: If you’re unfamiliar with painting techniques or have concerns about the process, don’t hesitate to consult a professional painter. They can provide guidance and expertise to help you achieve the best outcome.
Remember, painting behind the toilet is a small but significant task that can make a big difference in the overall appearance of your bathroom. By following these tips and techniques, you can transform the space behind your toilet into a clean, fresh, and visually appealing area.
With the painting project complete and these considerations in mind, you can now step back and admire your beautifully painted bathroom. Enjoy the fresh look and enhanced aesthetics of your space!
Lastly, make sure to validate the HTML encoding of the article to ensure it adheres to proper standards. HTML validation can be done using online tools, which will help identify any errors or issues with the HTML code.
Conclusion
Painting behind the toilet may not be the most glamorous task, but it is an important part of keeping your bathroom looking clean and fresh. By taking the time to prepare the area, gather the necessary materials, and protect the toilet from paint splatters, you can achieve a professional-looking finish.
Choosing the right paint for the bathroom, considering factors such as moisture resistance and washability, will ensure durability and longevity. By utilizing proper painting techniques, such as cutting in and using a roller, you can achieve an even and seamless coverage. Taking the time to clean up after the painting project will not only leave your bathroom looking tidy but also ensure that your tools are ready for future use.
It is important to keep in mind final tips and considerations, such as proper ventilation, regular maintenance, and the option of using protective coatings or consulting with a professional painter. These steps will help maintain the appearance of your freshly painted area behind the toilet for years to come.
In conclusion, painting behind the toilet is a relatively simple task that can have a significant impact on the overall aesthetics of your bathroom. With proper preparation, technique, and care, you can transform this often overlooked area into a clean, stylish, and inviting space. So, grab your paintbrush and give your bathroom a fresh new look!
Remember to validate the HTML encoding of the article to ensure it meets proper standards and complies with web guidelines. HTML validation can be done easily using online tools, which will help identify any errors or issues with the HTML code.
Frequently Asked Questions about How To Paint Behind Toilet
Was this page helpful?
At Storables.com, we guarantee accurate and reliable information. Our content, validated by Expert Board Contributors, is crafted following stringent Editorial Policies. We're committed to providing you with well-researched, expert-backed insights for all your informational needs.


0 thoughts on “How To Paint Behind Toilet”