Articles
How To Prime A Rv Water Pump
Modified: October 19, 2024
Learn how to prime a RV water pump with these informative articles. Ensure your water pump is working efficiently for your next camping adventure.
(Many of the links in this article redirect to a specific reviewed product. Your purchase of these products through affiliate links helps to generate commission for Storables.com, at no extra cost. Learn more)
Introduction
Welcome to the world of RV camping! One of the essential components of any RV is the water system, which includes a water pump that ensures a steady supply of water for various purposes such as drinking, showering, and doing dishes. However, there may come a time when your RV water pump needs to be primed to maintain its optimal functionality.
Understanding how to prime your RV water pump can save you from potential water flow issues and ensure a smooth camping experience. Whether you are a seasoned RV owner or new to the world of RVing, this article will guide you through the process of priming your RV water pump, step by step.
We will start by understanding the basics of an RV water pump and the signs that indicate it needs priming. Then we will walk you through the necessary preparations before priming the pump. Finally, we will outline the process of priming the water pump and provide you with helpful tips to test the pump once the priming is complete.
By the end of this article, you will have a clear understanding of how to prime your RV water pump and be well-equipped to tackle any water flow issues that may arise during your camping adventures. So, let’s dive in and get your water pump ready for action!
Key Takeaways:
- Properly priming your RV water pump is essential for ensuring a steady flow of water during camping. Understanding the signs, preparing for priming, and following the step-by-step process are crucial for a successful outcome.
- By patiently connecting the priming kit, filling it with water, and priming the pump, you can enjoy a reliable water supply for all your camping needs. Testing the water pump ensures its proper functionality, allowing you to embark on your next adventure with confidence.
Read more: How To Prime A Water Pump On A Well
Understanding the RV Water Pump
Before diving into the priming process, it’s crucial to understand how the RV water pump functions. The water pump in an RV is responsible for drawing water from the freshwater tank and distributing it throughout the RV’s plumbing system.
Most RV water pumps are self-priming, meaning they can create the necessary suction to draw water into the system. However, in certain situations, the pump may lose its prime, resulting in reduced or no water flow. Priming the pump is the process of reintroducing water into the pump to restore its prime and ensure smooth water flow.
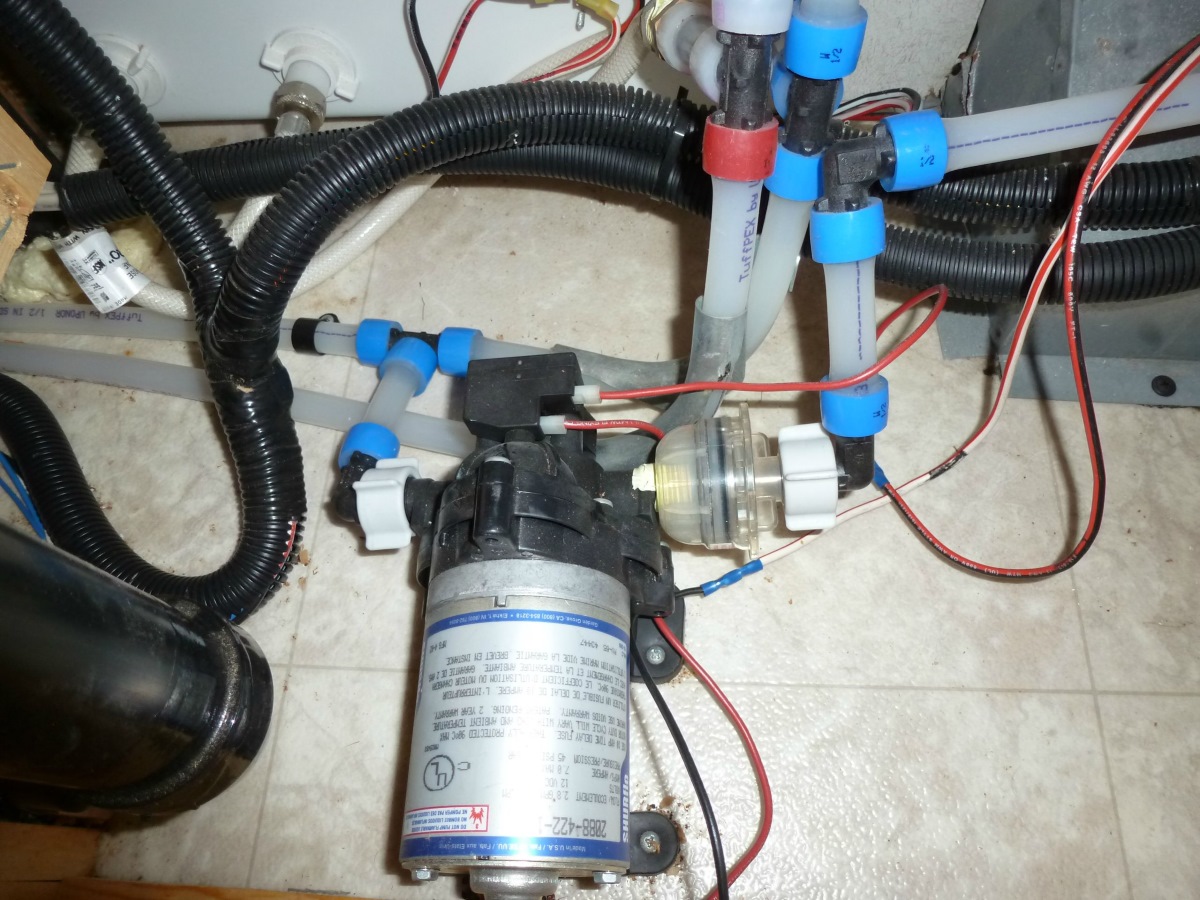
The water pump is usually located in a compartment or storage area, typically near the freshwater tank. It is connected to the RV’s electrical system and is activated when you turn on the faucet or any other water outlet in the RV. When the pump is running, it creates pressure within the system, allowing water to flow from the tank to the various fixtures throughout the RV.
It’s important to note that not all RVs have the same type of water pump. Some RVs may have a manual pump that requires you to manually operate a lever or handle to pump water, while most modern RVs are equipped with electric water pumps that automatically activate when a water outlet is opened.
Understanding the basic operation and location of your RV water pump will help you better navigate the priming process and troubleshoot any issues that may arise. Now that you have a grasp on how the water pump works, let’s move on to recognizing the signs that indicate your pump needs priming.
Signs of a Pump that Needs Priming
As an RV owner, it’s essential to be aware of the signs that indicate your water pump may need priming. Recognizing these signs early on can help you address the issue promptly and avoid further water flow problems during your camping trip. Here are a few common signs that your RV water pump may need priming:
- Reduced or No Water Flow: One of the most obvious signs that your water pump needs priming is when you notice a significant decrease in water pressure or no water coming out of your faucets, showerheads, or toilet.
- Strange Noises: If you hear unusual noises coming from the water pump, such as a sputtering or vibrating sound, it can indicate that the pump is struggling to draw water due to loss of prime.
- Frequent Cycling: When the water pump turns on and off frequently, it could be a sign of a loss of prime. The pump tries to build up pressure but fails due to air in the system.
- Air Bubbles in the Water: If you notice air bubbles in the water flowing from your faucets, it means there is air in the system, which can cause the water pump to lose its prime.
- Non-Functional Water System: In extreme cases, the water system may completely stop working, leaving you without any water flow within your RV. This can happen if the water pump has lost its prime and cannot draw water from the freshwater tank.
If you experience any of these signs, it is crucial to address the issue promptly to restore the functionality of your water pump. Priming the pump will help eliminate air pockets and reintroduce water into the system, allowing the pump to regain its prime and provide you with a steady flow of water.
Now that you know the signs of a pump that needs priming, let’s move on to the preparations you need to make before starting the priming process.
Preparing for Pump Priming
Before you begin the process of priming your RV water pump, there are a few important preparations you need to make. These preparations will ensure a smooth and efficient priming process and help you avoid any unnecessary complications. Follow these steps to prepare for pump priming:
- Step 1: Turn off the Water Pump: Before you start any work on the water system, make sure to turn off the water pump. This will prevent any accidental water flow and ensure your safety during the priming process.
- Step 2: Locate the Water Pump and Access Points: Familiarize yourself with the location of your RV water pump. It is typically found in a compartment or storage area, often near the freshwater tank. Take note of any access points or valves connected to the pump, as you will need to access them during the priming process.
- Step 3: Locate the Freshwater Tank and Drain Valve: Identify the location of your RV’s freshwater tank and locate the drain valve. It is essential to drain any water from the tank before priming the pump to prevent contamination and ensure clean water flow.
- Step 4: Open the Faucets and Drains: Open all the faucets and drains in your RV to release any remaining water and air from the system. This will allow for a smoother priming process and ensure that air pockets are eliminated from the entire plumbing system.
- Step 5: Prepare the Priming Kit: Gather the necessary tools and supplies for priming the water pump. This typically includes a priming kit, which can be purchased from an RV supply store or online. The priming kit usually consists of a hose or tubing and a connector that attaches to the water pump inlets or access points.
By following these preparatory steps, you will be ready to begin the priming process with ease. Next, we will guide you through the step-by-step process of priming your RV water pump, ensuring a successful restoration of water flow in your RV’s plumbing system.
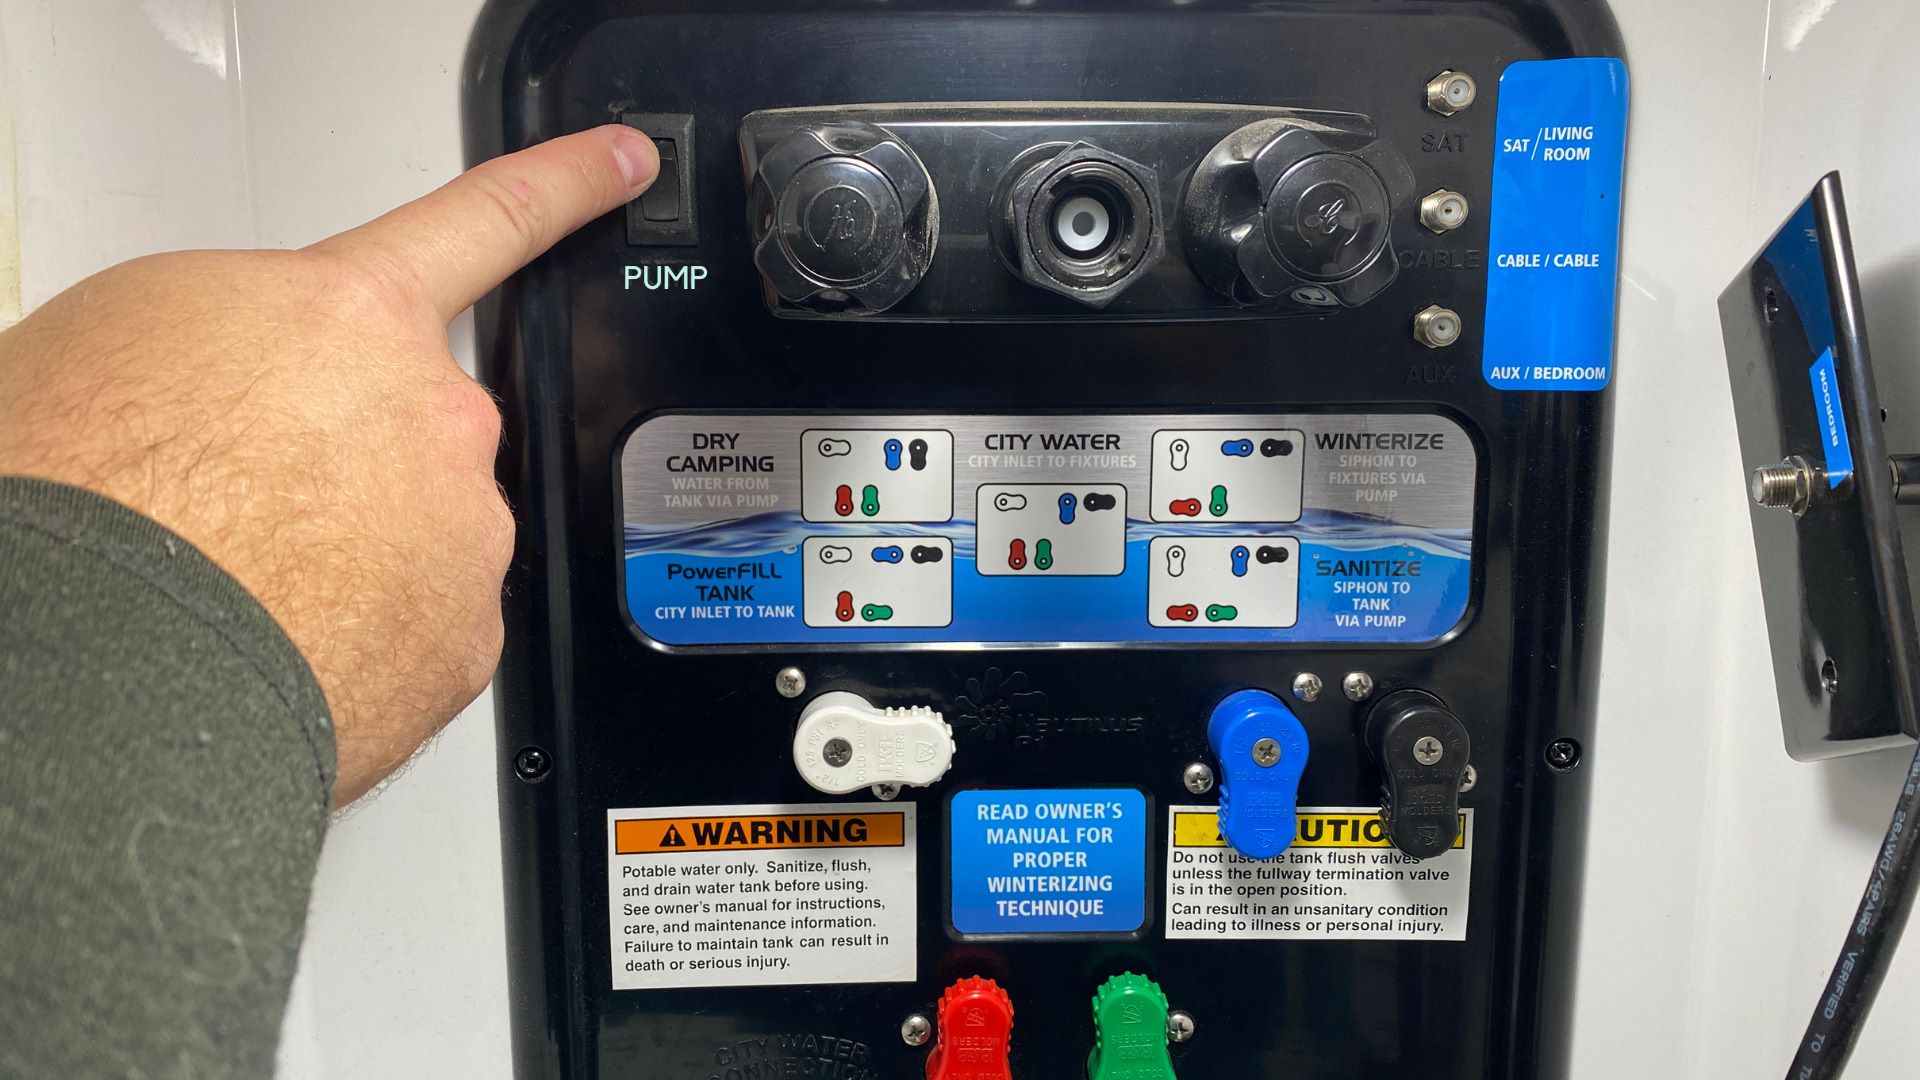
Step 1: Turn off the Water Pump
Before you begin the process of priming your RV water pump, it is essential to turn off the pump to ensure your safety and avoid accidental water flow. Here’s how you can accomplish this:
- Locate the switch or button that controls the water pump. This is typically found in the RV’s control panel or near the water pump itself.
- Switch off the water pump by toggling the switch or pressing the designated button. If there is no visible switch or button, consult your RV’s manual for specific instructions on how to turn off the water pump.
- Make sure you have successfully turned off the water pump by opening a faucet or water outlet in your RV. If no water flows out, this confirms that the pump is off.
By turning off the water pump, you prevent water from flowing through the system during the priming process. This ensures that you can work on the pump and its connections safely without encountering any water-related accidents.
It is important to note that different RV models may have different methods of turning off the water pump. If you are unsure about how to turn off your specific RV water pump, consult your RV’s manual or contact the manufacturer for guidance.
With the water pump turned off, you are now ready to proceed with the next steps of priming your RV water pump. The subsequent steps will guide you through locating the water pump and accessing the necessary points for priming.
Read more: What Is A Self Priming Water Pump
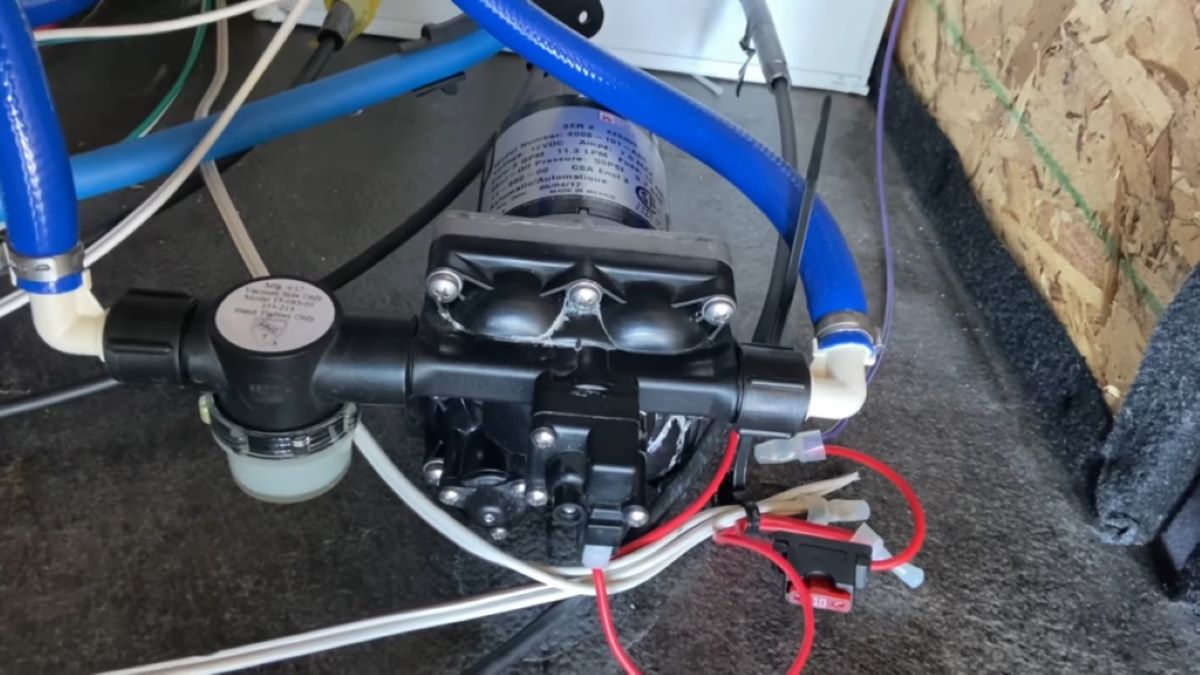
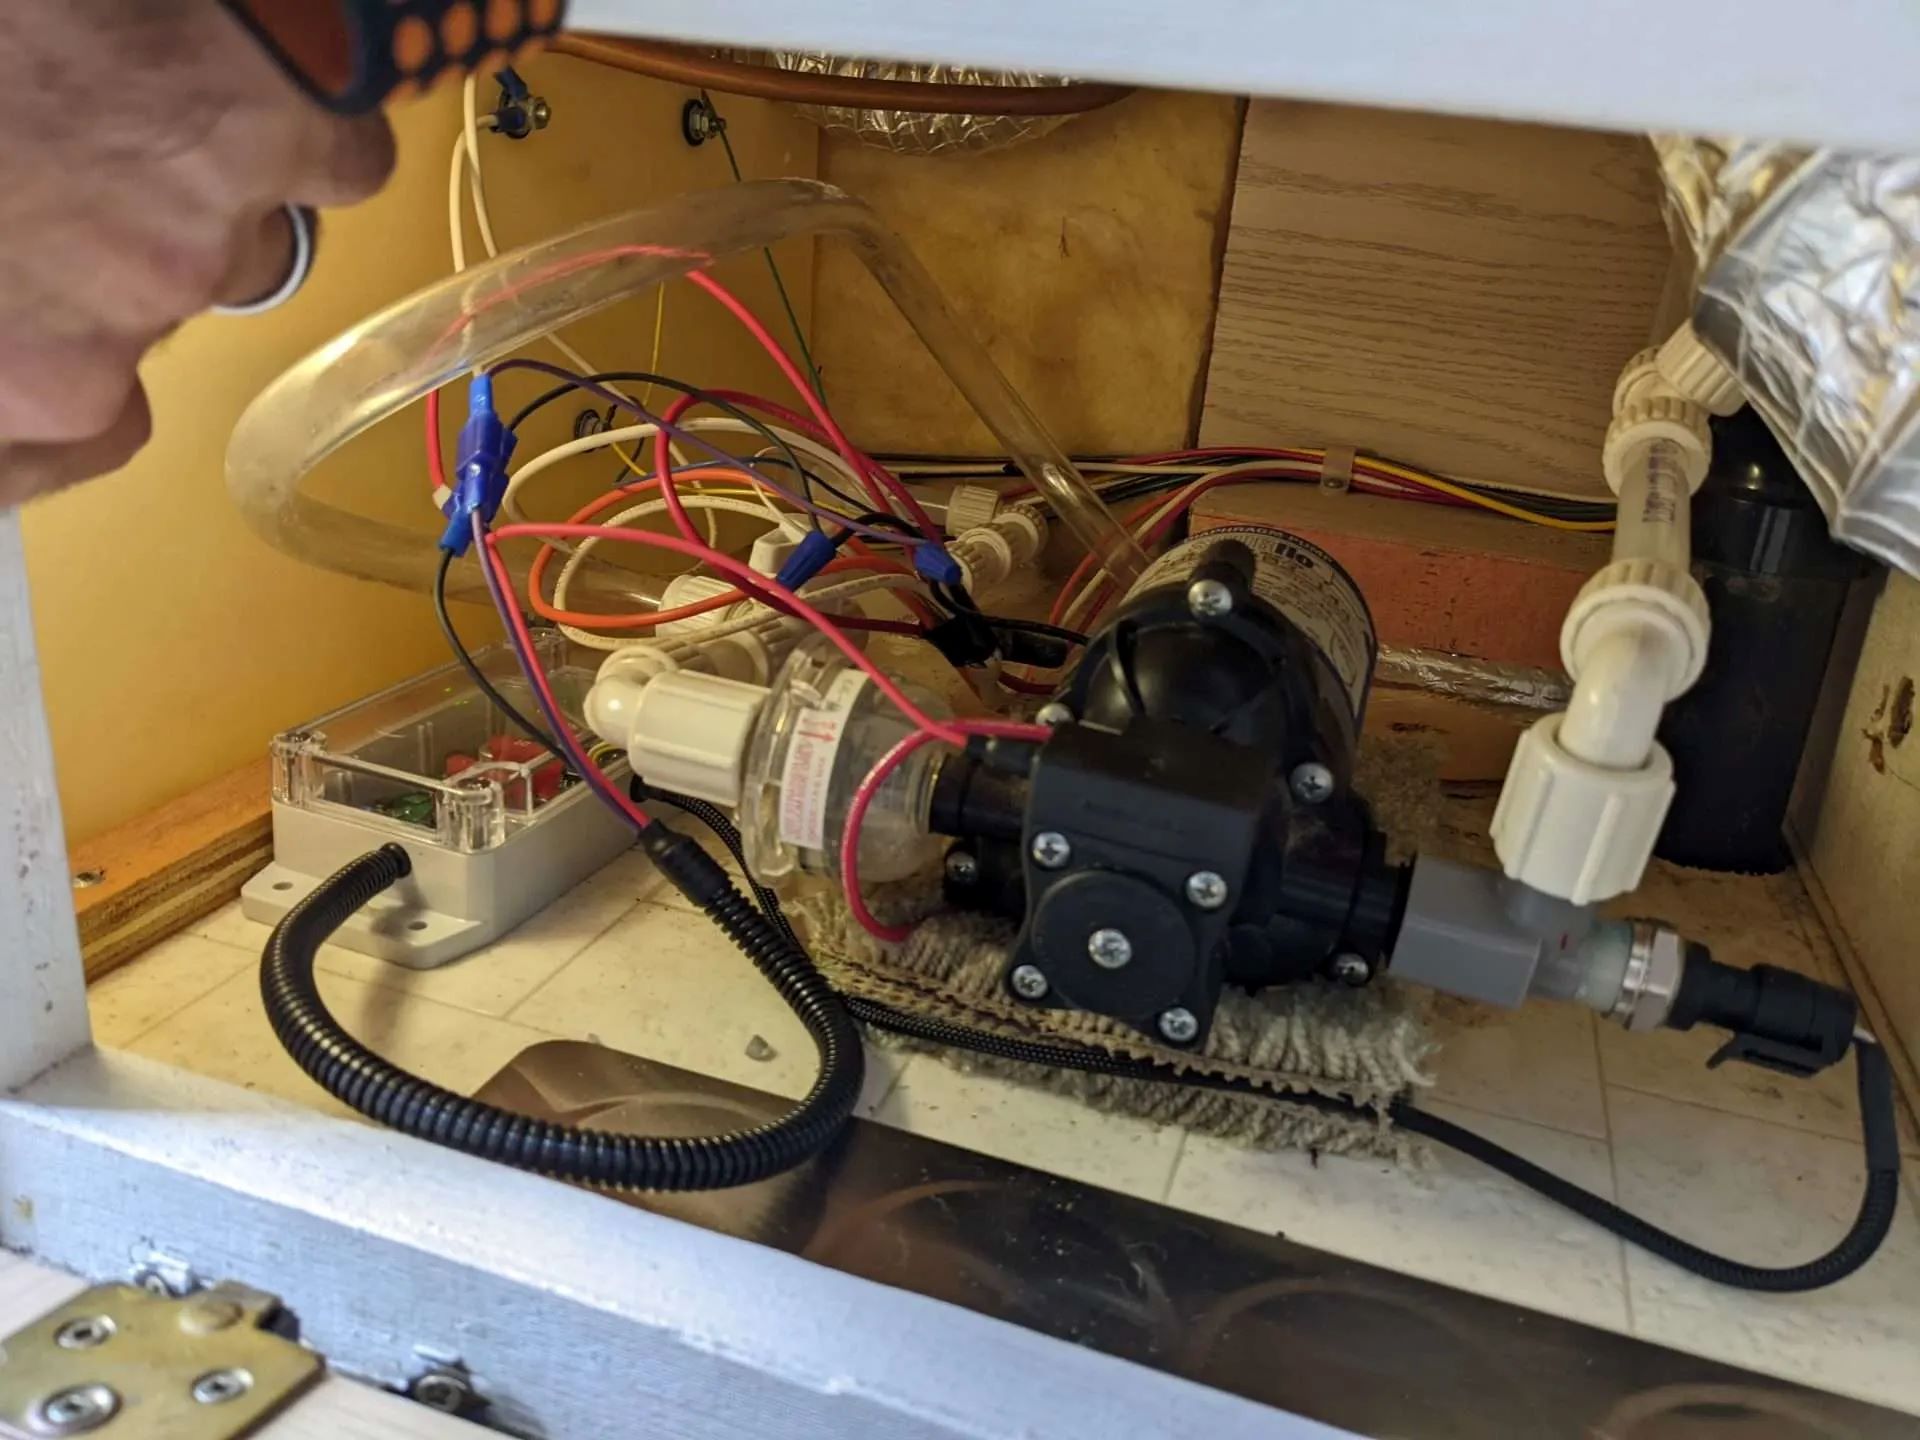
Step 2: Locate the Water Pump and Access Points
In order to prime your RV water pump, you need to locate the pump itself and identify the access points or connections that will be used during the priming process. Follow these steps to find the water pump and access points:
- Refer to your RV’s manual or documentation to determine the general location of the water pump. Common areas where the water pump is often located include storage compartments, utility bays, or under the sink.
- Inspect your RV’s interior and exterior compartments to locate the water pump. It is usually housed in a protective casing or enclosure to prevent damage and to reduce noise.
- Once you have found the water pump, examine it to identify the various access points or connections. These are typically labeled and color-coded for ease of identification.
- Look for the inlet and outlet connections on the water pump. The inlet is where water flows into the pump from the freshwater tank, while the outlet is where water is pumped out to the plumbing system.
- Other access points may include valve switches, pressure sensors, or quick-connect fittings. These access points provide a means to connect hoses, tubing, or priming kits for the priming process.
By locating the water pump and identifying the access points, you will have a better understanding of the pump’s structure and how to connect the necessary components during the priming process.
If you are unable to locate the water pump or access points on your own, consult your RV’s manual or contact the manufacturer for specific guidance. Each RV model may have variations in the pump’s location and access points, so it’s always best to refer to the appropriate documentation to ensure accuracy.
With the water pump and access points identified, you are now ready to move on to the next step, which involves locating the freshwater tank and drain valve. This step is essential for ensuring a successful priming process.
Step 3: Locate the Freshwater Tank and Drain Valve
In order to properly prime your RV water pump, it is important to locate the freshwater tank and the associated drain valve. This will allow you to drain any existing water from the tank, ensuring a clean and efficient priming process. Follow these steps to locate the freshwater tank and drain valve:
- Refer to your RV’s manual or documentation to get a general idea of where the freshwater tank is located. Common areas include storage compartments, utility bays, or underneath the RV.
- Inspect the interior and exterior of your RV to find the freshwater tank. It is typically an opaque container made of plastic or other durable materials.
- Once you have located the freshwater tank, search for the drain valve. It is usually located near the bottom of the tank and may be a separate valve or a screw-type plug.
- Prepare a container or attach a hose to the drain valve to catch the water that will be drained from the tank.
- Open the drain valve to release the water from the freshwater tank. Make sure the container or hose is placed securely to prevent any spills or leaks.
- Allow the tank to completely drain. You can check this by observing the flow of water from the drain valve and ensuring that it stops completely.
- Once the tank is empty, close the drain valve to prevent any debris or contaminants from entering the tank during the priming process.
Locating the freshwater tank and drain valve is crucial for preparing your RV’s water system for priming. Draining the tank ensures that any stagnant or contaminated water is removed, allowing for a fresh start during the priming process.
If you have difficulties finding the freshwater tank or drain valve, consult your RV’s manual or contact the manufacturer for specific guidance. They will be able to provide you with accurate information based on your RV model.
Now that you have successfully located the freshwater tank and drained it, you are now ready to move on to the next step, which involves opening the faucets and drains in your RV.
Step 4: Open the Faucets and Drains
Before priming your RV water pump, it is essential to open all the faucets and drains in your RV. This step will allow the removal of any remaining water and air from the system, ensuring a smooth and efficient priming process. Follow these steps to open the faucets and drains in your RV:
- Start by locating all the faucets in your RV, including those in the kitchen, bathroom, and shower. Additionally, identify any drains, such as those in the sink or shower.
- Open each faucet by turning the handles counterclockwise. If you have single-handle faucets, turn the lever or knob to the open position. Ensure that both the hot and cold water handles are opened.
- If there are any drains in your RV, such as in the sink or shower, remove the stoppers or covers to allow air to escape freely.
- Keep all the faucets and drains open for the duration of the priming process. This will enable any remaining water to flow out and any trapped air to escape, preventing airlocks in the system.
- Observe each faucet and drain to ensure that water and air bubbles are being released. This indicates that the system is being properly purged of any trapped air.
- Once you have verified that all the faucets and drains have been opened and water is flowing freely, move on to the next step of the priming process.
Opening the faucets and drains is a crucial step in preparing your RV’s water system for priming. It helps eliminate any air pockets that may hinder the priming process and ensures a smooth and consistent flow of water throughout the system.
If you encounter any difficulties or notice that water is not flowing from certain faucets or drains, check for any obstructions, such as clogged filters or valves, and address them accordingly. Consult your RV’s manual or contact the manufacturer for specific troubleshooting guidance if needed.
Now that the faucets and drains in your RV are open, you are ready to proceed with the next step, which involves preparing the priming kit for the pump priming process.
Before priming your RV water pump, make sure to turn off the pump and disconnect the power source. Then, open a faucet to release pressure and remove the pump’s inlet strainer to access the pump. Fill the pump with water and reassemble the strainer before turning the pump back on.
Step 5: Prepare the Priming Kit
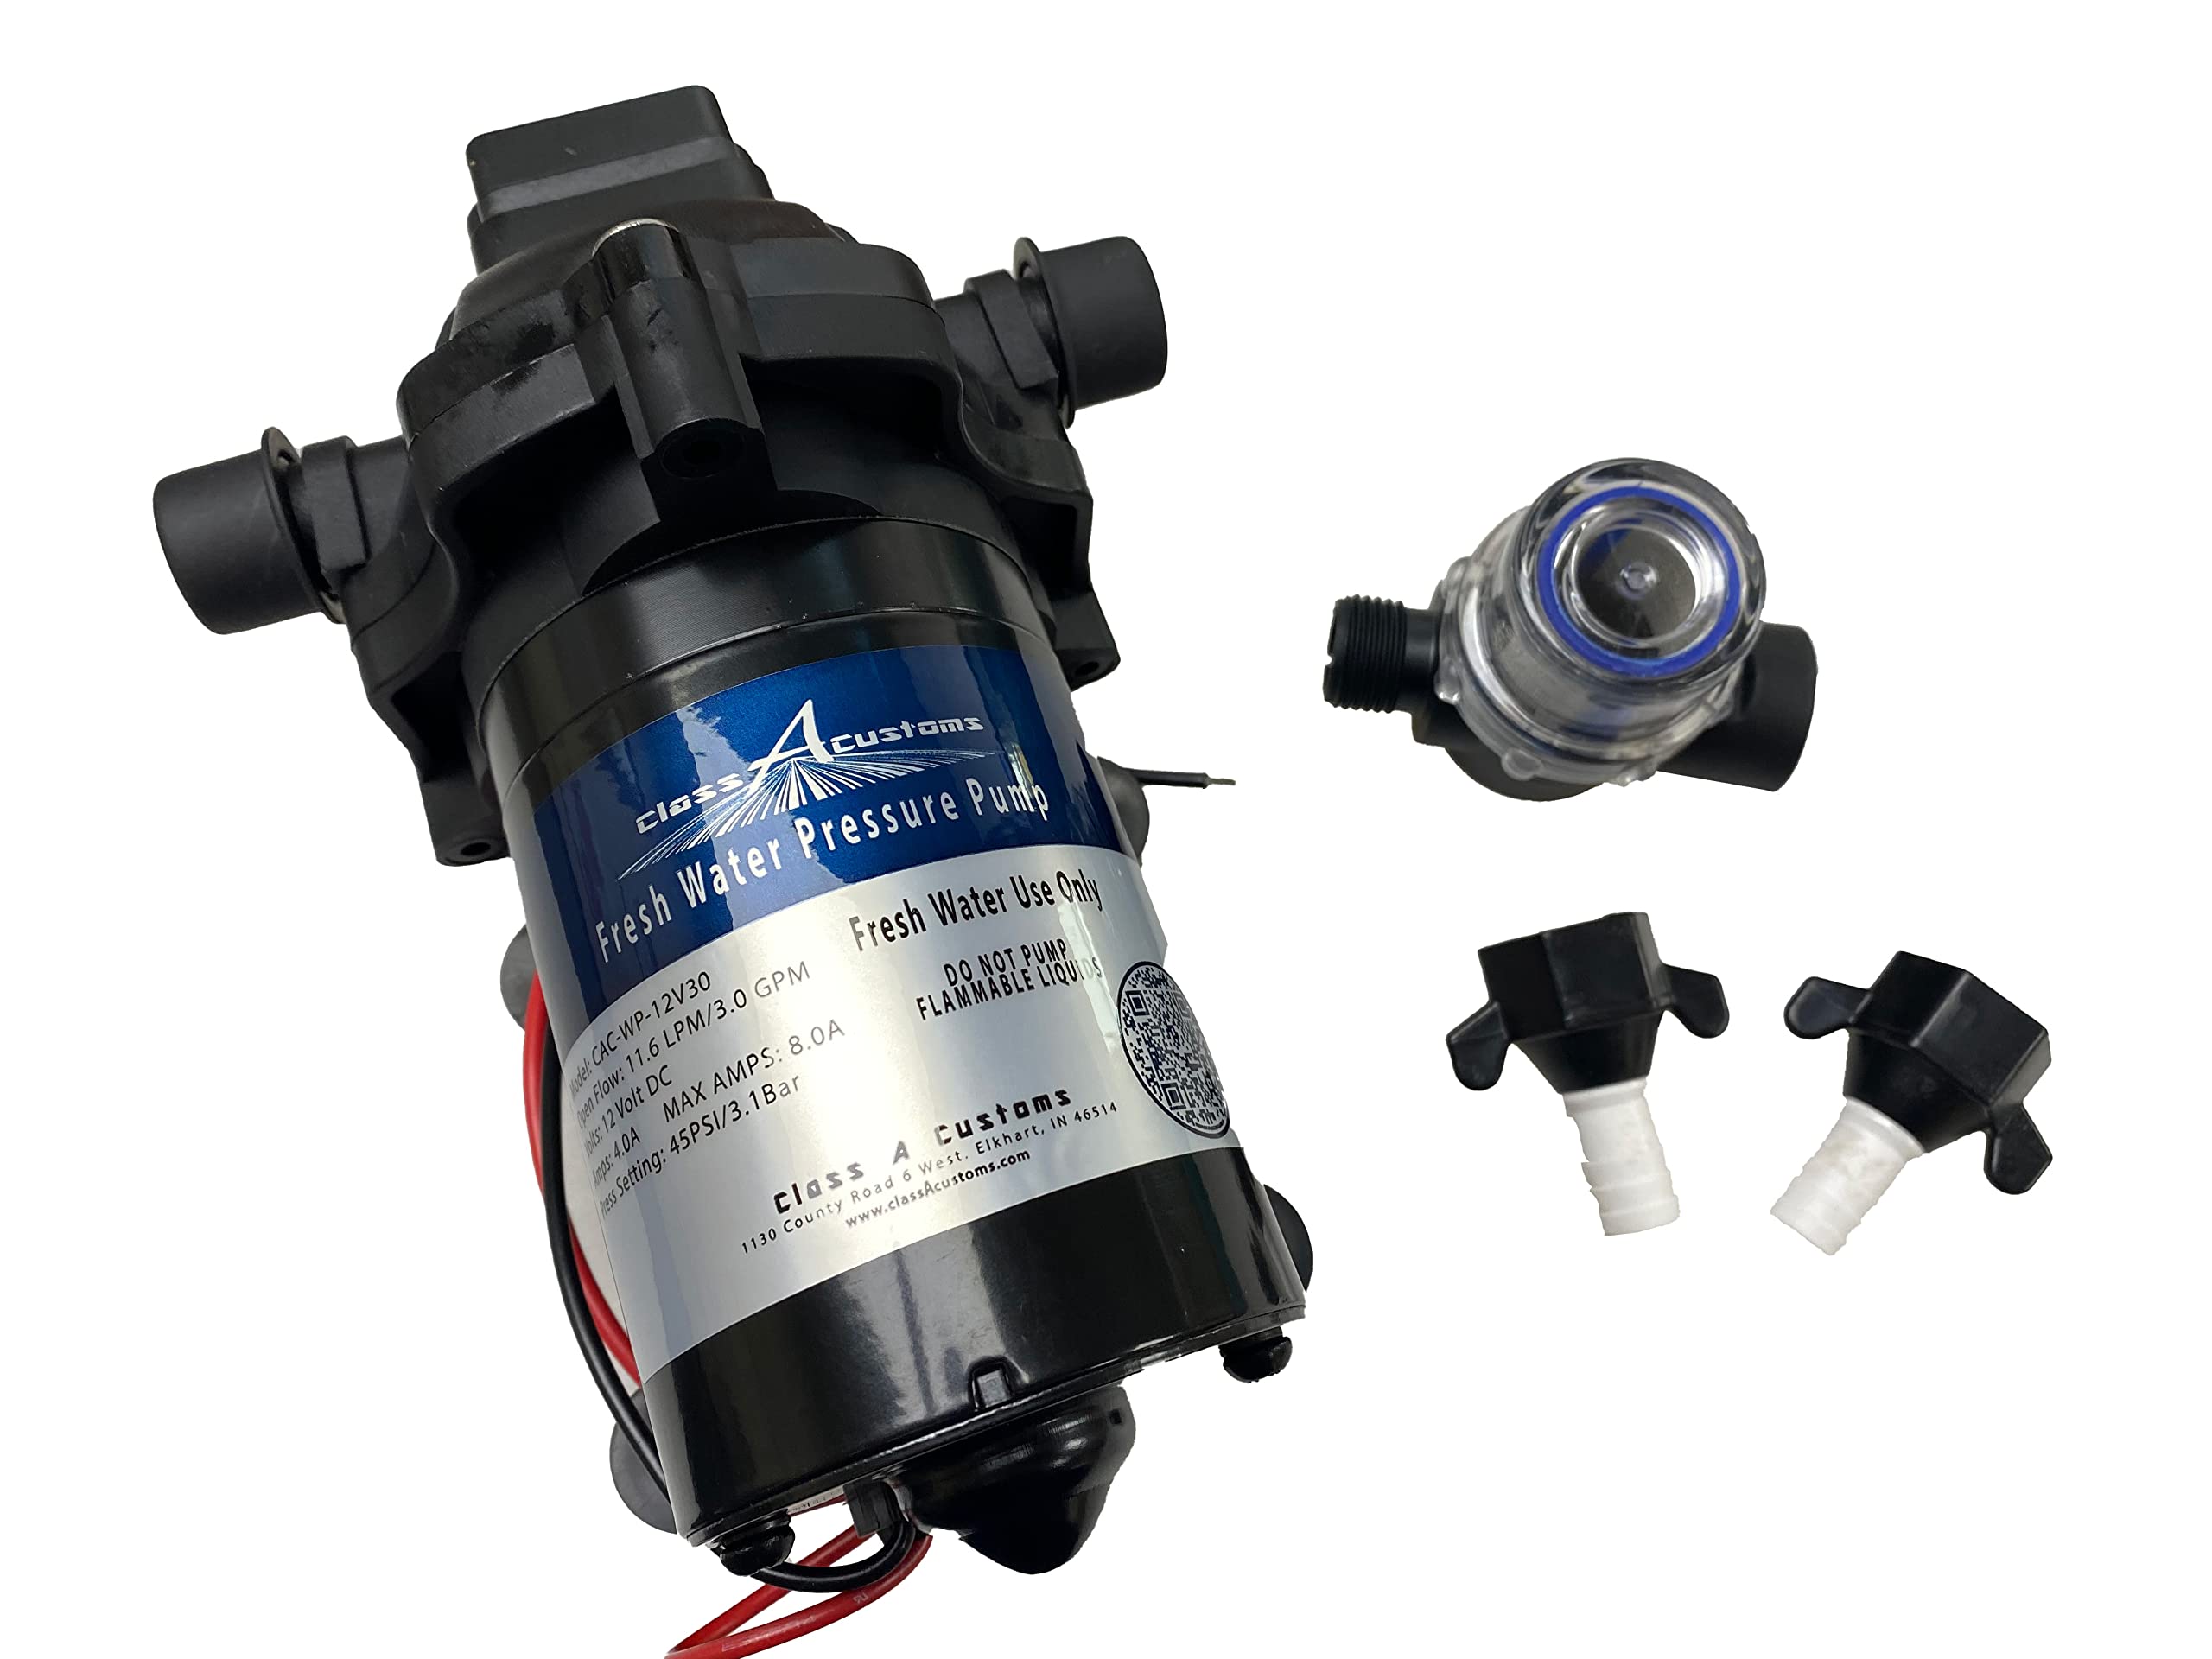
Before you can begin priming your RV water pump, you’ll need to prepare the necessary priming kit. The priming kit is an essential tool that helps reintroduce water into the pump, allowing it to regain its prime and restore water flow throughout the system. Follow these steps to prepare the priming kit:
- Acquire a priming kit that is compatible with your RV water pump. Priming kits can be purchased from RV supply stores or online. Ensure that the kit includes a hose or tubing and a connector that will attach to the water pump’s inlet.
- Inspect the components of the priming kit to ensure they are in good condition and free of any damage or defects. Verify that the hose or tubing is long enough to reach the water source and the water pump’s inlet.
- If the priming kit does not include a connector specific to your water pump, ensure that it contains a connector that can be easily adapted or connected to the pump’s inlet.
- If the priming kit requires any assembly, carefully follow the manufacturer’s instructions to connect the components securely. This may involve attaching fittings, screws, or adapters as needed.
- Once the kit is assembled, verify that all connections are tight and secure. This will prevent any leaks or detachment during the priming process, ensuring a successful prime for your water pump.
By preparing the priming kit in advance, you’ll have all the necessary tools and components ready for the priming process. This will help you save time and ensure that the priming process proceeds smoothly and efficiently.
If you encounter any issues with the priming kit or need assistance in assembling or connecting the components, refer to the instructions provided by the manufacturer or consult an RV professional for guidance.
With the priming kit prepared and ready, you can now move on to priming your RV water pump and enjoy a restored flow of water throughout your RV.
Read more: How To Winterize Rv Water Pump
Priming the RV Water Pump
Now that you have completed the necessary preparations, it’s time to prime your RV water pump. Follow these step-by-step instructions to ensure a successful priming process:
- Step 1: Connect the Priming Kit to the Water Pump: Attach one end of the hose or tubing from the priming kit to the water pump’s inlet. Ensure that the connection is secure and tight to prevent any leaks.
- Step 2: Fill the Priming Kit with Water: Place the other end of the hose or tubing into a clean container filled with fresh water. This container should be located lower than the level of the water pump to allow for proper water flow through the system.
- Step 3: Prime the Pump: Turn on the water pump. It will begin drawing water from the container through the hose or tubing into the pump’s inlet. Monitor the flow of water and pay attention to any air bubbles or gurgling sounds as the pump is primed.
- Step 4: Check for Leaks and Reconnect the System: While the water pump is running and drawing water, inspect all connections, fittings, and hoses for any signs of leaks. If you notice any leaks, tighten the connections as needed. Once you have verified that there are no leaks, reconnect any access points or valves that were disconnected during the priming process.
- Step 5: Test the Water Pump: With the system reconnected, turn on a faucet or water outlet in your RV to test the water pump. Check if water is flowing smoothly and consistently without any sputtering or interruptions. You should also ensure that there are no air bubbles in the water flow, indicating that the pump has been successfully primed.
It’s important to note that the priming process may take some time, especially if the water pump has been completely dry. Be patient and allow the pump to draw water and remove any air from the system. Monitor the priming process closely to ensure that there are no issues or leaks.
If you encounter any difficulties or the priming process is not successful, refer to your RV’s manual for specific troubleshooting guidance or consult an RV professional for assistance.
Once you have completed the priming process and verified that the water pump is working properly, congratulations! You have successfully primed your RV water pump, ensuring a steady flow of water throughout your RV’s plumbing system.
Now it’s time to enjoy the convenience of having a properly functioning water pump during your camping adventures!
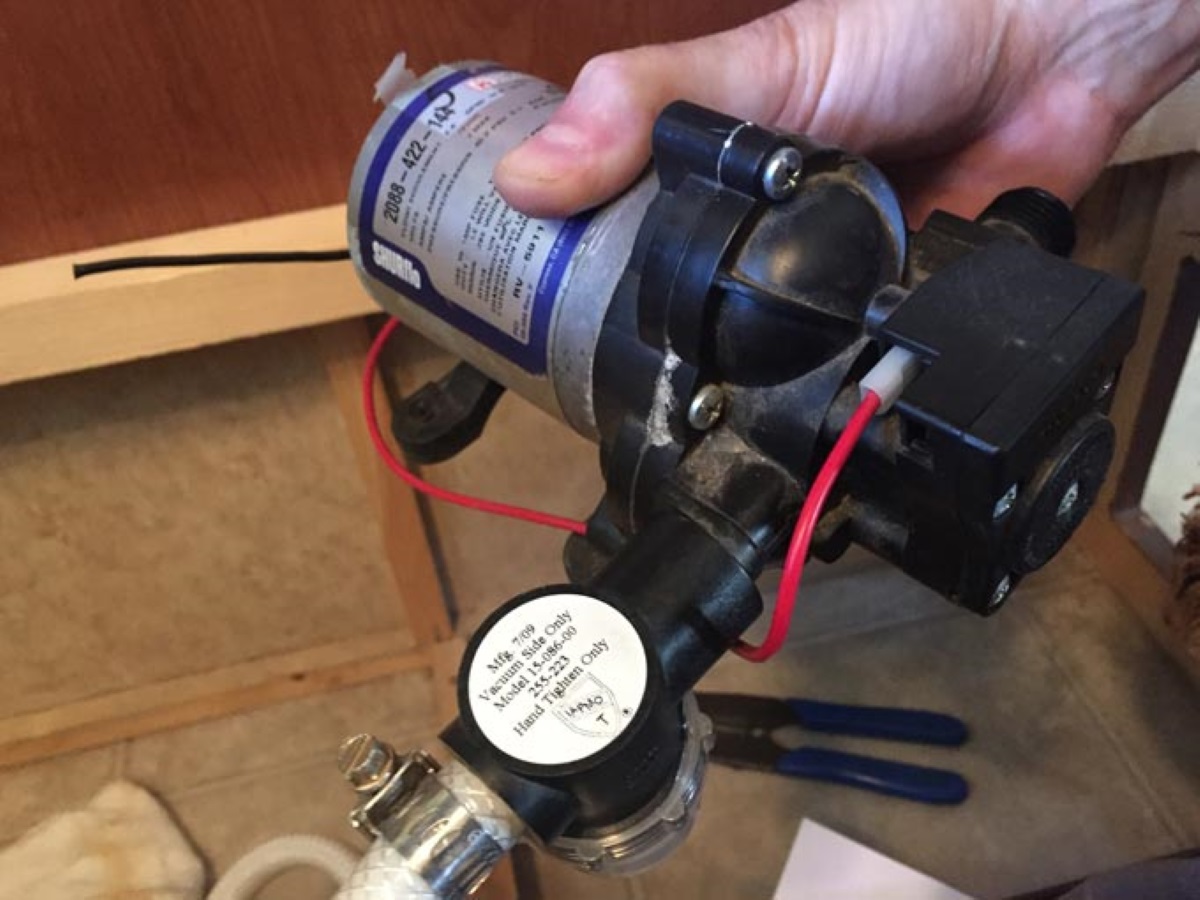
Step 1: Connect the Priming Kit to the Water Pump
Connecting the priming kit to your RV water pump is the first step in the priming process. This crucial step allows the priming kit to introduce water into the pump, ensuring its proper functionality. Follow these instructions to connect the priming kit to the water pump:
- Locate the water pump in your RV. It is usually housed in a compartment or storage area, often near the freshwater tank.
- Inspect the water pump and identify the inlet connection. The inlet is where water is drawn into the pump from the freshwater tank.
- Take the hose or tubing from the priming kit and attach one end securely to the water pump’s inlet connection. Ensure that the connection is tight to prevent any leaks.
- Depending on the type of priming kit you have, you may need to use a connector or adapter to attach the hose or tubing to the water pump’s inlet. Follow the instructions provided with the kit to ensure a proper and secure connection.
- Confirm that the hose or tubing is connected firmly and securely to the water pump’s inlet. Wiggle it gently to ensure there is no looseness or movement.
- Once the priming kit is connected to the water pump, you are ready to proceed to the next step of the priming process.
By connecting the priming kit to the water pump, you are setting the stage for reintroducing water into the pump to restore its prime. This connection allows water to flow from the priming kit into the pump, eliminating any airlocks or obstructions that may have occurred.
If you encounter any difficulties or are unsure about the specific connection method for your RV water pump, consult your RV’s manual or contact the manufacturer for guidance. They will provide you with detailed instructions and ensure that you make the correct connection safely.
With the priming kit securely connected to your water pump, you are ready to move on to the next steps of the priming process, bringing you closer to restoring a steady flow of water in your RV.
Step 2: Fill the Priming Kit with Water
To successfully prime your RV water pump, you need to fill the priming kit with water. This water will be used to reintroduce into the pump and help restore its prime. Follow these steps to fill the priming kit with water:
- Prepare a clean container filled with fresh water. The container should be clean and free from any contaminants that could potentially affect the pump or the RV’s water system.
- Take the open end of the hose or tubing from the priming kit and place it into the container. Ensure that the end of the hose is submerged in water to allow for proper water flow.
- Hold the hose or tubing securely in place to prevent it from coming loose during the filling process. You can use a clamp or your hand to maintain a firm grip on the hose or tubing.
- Monitor the priming kit as you fill it with water. You should see the water traveling through the hose or tubing, indicating that it is filling up.
- Continue filling the priming kit until it is filled with water, ensuring that the hose or tubing remains submerged in the water throughout the process.
- Once the priming kit is filled with water, you are ready to proceed to the next step of the priming process.
Filling the priming kit with water is essential because it provides the necessary fluid to reintroduce into the water pump. This water will help eliminate airlocks and enable the pump to function properly.
Remember to use clean, fresh water to fill the priming kit. Using contaminated or dirty water can potentially impact the effectiveness of the priming process and compromise the overall functionality of the water pump.
If you encounter any issues with filling the priming kit or need assistance, refer to the instructions provided with the kit or consult an RV professional for guidance.
With the priming kit filled with water, you are now ready to move on to the next step of the priming process, which involves priming the pump itself and restoring its optimal functionality.
Step 3: Prime the Pump
Priming the RV water pump is the crucial step that reintroduces water into the system, allowing it to regain its prime and restore water flow throughout your RV. Follow these steps to successfully prime the pump:
- Turn on the water pump. This can usually be done using a switch or a button located on the control panel or near the water pump itself. Alternatively, consult your RV’s manual for specific instructions on how to start the water pump.
- As the water pump begins running, it will draw water from the priming kit into the pump’s inlet. Monitor the flow of water and observe the pump carefully.
- Pay attention to any air bubbles or gurgling sounds coming from the pump or the priming kit. These may indicate that air is being expelled from the system, and water is starting to fill the pump.
- Continue to let the water pump run until you no longer see any significant air bubbles and the water flow becomes steady and consistent.
- While the pump is priming, observe all the connections, hoses, and fittings to ensure there are no leaks or signs of water leakage. If you notice any leaks, promptly tighten or adjust the affected components.
- Allow the pump to run for a few minutes after it has been successfully primed. This helps to ensure that any remaining air pockets are expelled from the system, and the pump is fully functional.
During the priming process, it’s important to be patient as it may take some time for the pump to fully prime, especially if the system has been completely dry. Be vigilant in monitoring the water flow and listening for any unusual sounds that may indicate airlocks or issues with the pump.
If the pump fails to prime or you continue to experience issues after following these steps, consult your RV’s manual or contact an RV professional for further assistance and guidance.
With the water pump successfully primed and water flowing smoothly, you can proceed to the next step of checking for leaks and reconnecting the system.
Read more: What Does The Water Pump Do In An Rv
Step 4: Check for Leaks and Reconnect the System
After priming your RV water pump, the next step is to check for any leaks and ensure that all connections are secure. It’s important to address any leaks promptly to prevent water waste and potential damage to your RV. Follow these steps to check for leaks and reconnect the system:
- While the water pump is still running, inspect all the connections, hoses, and fittings that were involved in the priming process. Check for any signs of water leakage.
- If you notice any leaks, tighten the affected connections using the appropriate tools. Ensure that all connections are secure and free from leaks.
- If any hoses or tubing were temporarily removed or disconnected during the priming process, reattach them securely to their respective access points.
- Confirm that all valves or switches that were accessed during the priming process are properly closed or secured.
- Take a moment to overlook the overall system and ensure that everything is in place and functioning as expected.
- Allow the water pump to continue running for a few more minutes to ensure that there are no further leaks or issues with the reconnected system.
Checking for leaks and reconnecting the system is crucial to ensure the integrity of your RV’s water system. Small leaks can lead to wasted water, increased wear on the pump, and potential water damage to your RV.
If you encounter any persistent leaks or difficulties with reconnection, consult your RV’s manual or consider seeking assistance from an RV professional who can provide guidance and resolve any issues.
With the system checked for leaks and the connections securely reconnected, you are now ready to move on to the final step of the priming process: testing the water pump.
Step 5: Test the Water Pump
After priming your RV water pump and ensuring that all connections are secure, it’s time to test the pump to ensure that it is functioning properly. This step allows you to verify that water is flowing smoothly and consistently throughout your RV’s plumbing system. Follow these steps to test the water pump:
- Turn on a faucet or water outlet in your RV. This could be a kitchen faucet, bathroom faucet, or shower.
- Observe the water flow from the faucet. It should start smoothly and consistently without any sputtering or interruptions. If the water flow is weak or stops completely, there may still be air in the system or another issue with the pump.
- Check for any air bubbles in the water flowing from the faucet. While a few small bubbles are normal immediately after priming, continuous or large air bubbles may indicate a problem that needs further attention.
- Test the water flow from other faucets and water outlets in your RV, including the shower and toilet. Ensure that water is flowing properly from all of them.
- Listen for any unusual sounds coming from the water pump or plumbing system, such as excessive noise or vibration. These could indicate a problem with the pump or an issue with the water flow.
- If you encounter any issues during the testing phase, it’s important to troubleshoot the problem. Check for any obvious obstructions, leaks, or connections that require adjustment. If the issue persists, consult your RV’s manual or contact an RV professional for further assistance.
Testing the water pump allows you to confirm that it is primed and working properly, providing a steady flow of water throughout your RV. By checking multiple faucets and outlets, you can ensure that water flow is consistent and there are no issues specific to certain areas.
If you notice any ongoing problems with water flow or experience any unusual symptoms, it’s important to address them promptly. This will help prevent any further complications and ensure that your water system functions optimally during your RV adventures.
Congratulations! You have successfully completed the priming process and tested your RV water pump. With a properly functioning water pump, you can now enjoy a reliable supply of water for all your needs while on the road.
Conclusion
Priming your RV water pump is an essential task to ensure a steady flow of water during your camping adventures. By understanding the basics of your RV water pump and recognizing the signs that indicate the need for priming, you can address any water flow issues promptly.
Through the step-by-step process outlined in this article, you have learned how to prepare for pump priming, including turning off the water pump, locating the water pump and access points, locating the freshwater tank and drain valve, and opening the faucets and drains. You have also discovered how to connect the priming kit to the water pump, fill the priming kit with water, prime the pump, check for leaks, and reconnect the system. Finally, you have learned how to test the water pump to ensure its proper functionality.
Remember to be patient throughout the process, allowing the pump to draw water and remove any air from the system. Monitor the priming kit for water flow and any signs of air bubbles. Be diligent in checking for leaks and ensuring that all connections are secure.
If you encounter any difficulties or persistent issues during the priming process, consult your RV’s manual or consider seeking assistance from an RV professional. They can provide you with additional guidance and expertise tailored to your specific RV model.
With your RV water pump properly primed, you can now enjoy a reliable supply of water for drinking, showering, washing dishes, and all your other camping activities. Take advantage of this knowledge and embark on your next adventure with confidence, knowing that you are well-prepared to maintain a smoothly functioning water system in your RV.
Happy camping!
Frequently Asked Questions about How To Prime A Rv Water Pump
Was this page helpful?
At Storables.com, we guarantee accurate and reliable information. Our content, validated by Expert Board Contributors, is crafted following stringent Editorial Policies. We're committed to providing you with well-researched, expert-backed insights for all your informational needs.


0 thoughts on “How To Prime A Rv Water Pump”