Articles
How To Remove Heavy Floor Wax Build Up
Modified: August 27, 2024
Learn effective methods to remove heavy floor wax build up with these informative articles. Find step-by-step guides and expert tips to restore the natural beauty of your floors.
(Many of the links in this article redirect to a specific reviewed product. Your purchase of these products through affiliate links helps to generate commission for Storables.com, at no extra cost. Learn more)
Introduction
Floor wax can be a great way to enhance the appearance and protect the quality of your floors. However, over time, the repeated application of wax can lead to a buildup that can make your floors look dull and dirty. This heavy wax build up can become difficult to remove and may require some extra effort and the right techniques to get rid of effectively. In this article, we will explore the causes of heavy floor wax build up, as well as provide you with a step-by-step guide on how to remove it and prevent future build up. So, let’s dive in and learn how to restore the shine to your floors!
Key Takeaways:
- Prevent heavy floor wax build up by following the recommended waxing schedule, using the right wax, and maintaining regular cleaning. Patience and thoroughness are key to effectively removing wax buildup and restoring the beauty of your floors.
- Proper preparation, softening the wax, thorough scrubbing, and meticulous cleaning are essential steps in removing heavy floor wax buildup. By taking proactive measures and following the step-by-step guide, you can achieve clean, shining floors for years to come.
Read more: How To Remove Floor Wax From Laminate Floors
What Causes Heavy Floor Wax Build Up
There are several factors that can contribute to the build up of heavy wax on your floors. Understanding these causes can help you prevent future build up and maintain the quality and appearance of your floors. Here are some common culprits:
1. Over-application of wax: One of the main reasons for heavy floor wax build up is the excessive application of wax. Applying too many layers without properly removing the old wax can lead to a thick accumulation over time.
2. Inadequate cleaning: Insufficient cleaning and maintenance can also contribute to wax build up. When dirt, dust, and debris are not properly removed before applying wax, they can get trapped underneath the wax layers, resulting in a buildup over time.
3. Using the wrong wax: Using the wrong type of wax for your specific floor type can also cause build up. Different floor types require different types of wax, so it’s essential to choose the appropriate one to ensure proper adhesion and avoid excessive accumulation.
4. Waxing too frequently: While regular waxing is necessary to protect your floors, waxing too frequently can lead to build up. It’s important to follow the recommended waxing schedule for your specific floor type to avoid overloading it with wax.
5. Improper buffing: Improper buffing techniques can also contribute to wax build up. If the wax layers are not evenly spread or buffed correctly, it can result in an uneven buildup on the floor surface.
By understanding these causes, you can take the necessary steps to prevent heavy floor wax build up. In the next sections, we will discuss the tools and materials needed and provide a step-by-step guide on how to effectively remove the buildup. So, let’s get started!
Tools and Materials Needed
Before you begin the process of removing heavy floor wax build up, it’s important to gather the necessary tools and materials. Having everything prepared ahead of time will ensure a smoother and more efficient cleaning process. Here is a list of items you will need:
1. Protective gear: To protect yourself during the cleaning process, it’s important to wear gloves, safety goggles, and a mask to prevent any contact with harsh chemicals and fumes.
2. Scraper or putty knife: A scraper or putty knife will be useful in gently removing the softened wax from the floor surface. Make sure to choose a tool with a smooth edge to avoid scratching or damaging the flooring.
3. Floor cleaner or wax stripper: You will need a commercial floor cleaner or a specialized wax stripper to effectively remove the heavy wax buildup. Make sure to choose a product that is suitable for your specific flooring material.
4. Scrub brush or scrub pad: A scrub brush or scrub pad will help you agitate and scrub away the softened wax from the floor surface. Choose a brush or pad with medium to stiff bristles for effective results.
5. Bucket: A bucket will be useful for mixing the floor cleaner or wax stripper with water. It will also be used for rinsing the scrub brush or scrub pad during the cleaning process.
6. Mop or sponge: You will need a mop or sponge to apply the cleaning solution to the floor surface and to wipe away any residue. Ensure that the mop or sponge is clean and in good condition for optimal cleaning.
7. Clean, soft cloths: Have a few clean, soft cloths on hand for wiping away excess moisture and for final drying.
8. Floor polish or wax (optional): After removing the heavy wax buildup, you may choose to apply a fresh layer of floor polish or wax to restore shine and protect the floors. Ensure that you choose a product that is suitable for your specific flooring material.
By gathering these tools and materials before you begin, you will be well-prepared to tackle the task of removing heavy floor wax build up. In the next sections, we will guide you through the step-by-step process to effectively remove the wax and restore the beauty of your floors. So, let’s get started!
Step 1: Preparation
Before you start the process of removing heavy floor wax build up, it’s essential to complete some preparatory steps to ensure a successful cleaning process. Follow these steps to prepare your space:
1. Clear the area: Remove any furniture, rugs, or objects from the floor to create an open space for cleaning. This will make it easier to access the entire floor surface and prevent any obstacles during the cleaning process.
2. Ventilation: Ensure that the area is well-ventilated by opening windows and doors or using fans. This will help to dissipate any lingering fumes from the cleaning products and provide fresh air circulation.
3. Read the manufacturer’s instructions: If you are using a commercial floor cleaner or wax stripper, carefully read the instructions provided by the manufacturer. Familiarize yourself with any specific requirements or precautions to ensure safe and effective usage.
4. Test on a small area: Before applying the cleaning solution or wax stripper to the entire floor, perform a patch test on a small, inconspicuous area. This will help you determine the product’s compatibility with your flooring material and avoid any potential damage or discoloration.
5. Protect adjacent surfaces: If there are any adjacent surfaces, such as walls or baseboards, that you want to protect from the cleaning solution, use painter’s tape or plastic sheeting to cover them. This will prevent any accidental contact with the cleaning product.
By completing these preparation steps, you will create an ideal environment for effectively removing the heavy floor wax build up. Once you have prepared the space, you can move on to the next steps, which involve softening and scrubbing the wax. So, let’s continue our journey towards restoring the shine to your floors!
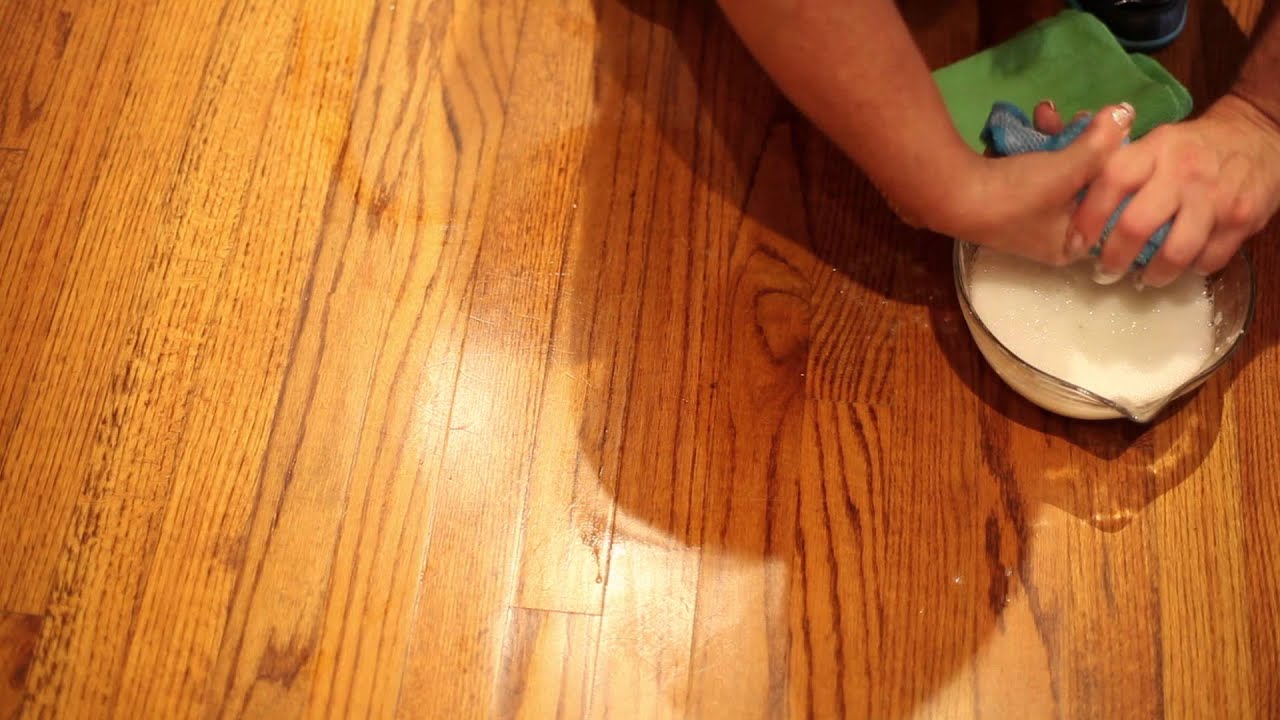
Step 2: Softening the Wax
Now that you have prepared the space, it’s time to soften the heavy wax build up on your floors. This step will help to break down the wax, making it easier to remove in the subsequent steps. Follow these instructions to effectively soften the wax:
1. Dilute the floor cleaner or wax stripper: Mix the recommended amount of floor cleaner or wax stripper with water in a bucket, following the instructions provided by the manufacturer. Make sure to use the appropriate ratio to ensure optimal effectiveness.
2. Apply the solution: Using a mop or sponge, apply the diluted floor cleaner or wax stripper to a small section of the floor. Work in manageable areas to ensure thorough coverage.
3. Let it sit: Allow the solution to sit on the floor for a few minutes, as directed by the manufacturer. This will give the cleaning agent enough time to penetrate and soften the wax buildup.
4. Agitate the wax: Using a scrub brush or scrub pad, gently scrub the softened wax in a circular motion. Apply light pressure to avoid damaging the flooring surface.
5. Continue with the rest of the floor: Repeat the process of applying the solution, letting it sit, and agitating the wax on the rest of the floor. Work in small sections to ensure that the solution remains active and does not dry out.
6. Check the progress: Periodically check the progress of the wax softening. If the wax is sufficiently softened, you will notice a dulling or lifting of the wax layers.
By following these steps, you will effectively soften the heavy wax build up on your floors, preparing it for the next stage of removal. In the next section, we will guide you through the process of scrubbing the floor to remove the softened wax. Get ready to roll up your sleeves and restore the beauty of your floors!
Use a commercial wax stripper and follow the manufacturer’s instructions. Apply the stripper, let it sit, then scrub with a brush or floor machine. Rinse thoroughly and allow the floor to dry completely before applying new wax.
Read more: How To Wax A Floor
Step 3: Scrubbing the Floor
Now that the wax on your floor has been softened, it’s time to scrub away the buildup. This step is crucial in removing the excess wax and revealing the clean surface underneath. Follow these instructions to effectively scrub the floor:
1. Start with a clean scrub brush or scrub pad: Ensure that the scrub brush or scrub pad you are using is clean and free from any debris or residue. This will prevent any dirt or contaminants from being transferred to the floor surface.
2. Begin scrubbing: Take the scrub brush or scrub pad and start scrubbing the floor in small circular motions. Apply moderate pressure to effectively loosen the softened wax. Work in manageable sections, moving from one area to another.
3. Pay attention to corners and edges: Use the edge of the scrub brush or a small scrub brush to clean hard-to-reach areas, such as corners and edges. These areas often accumulate more wax buildup, so give them extra attention.
4. Rinse the scrub brush or scrub pad: Regularly rinse the scrub brush or scrub pad in the bucket of water to remove any wax residue and prevent it from redistributing onto the floor.
5. Change the cleaning solution as needed: If the cleaning solution becomes too soiled or loses its effectiveness, replace it with fresh solution. This will ensure that you are using a clean and potent solution throughout the scrubbing process.
6. Work systematically: Work your way across the entire floor, one section at a time, until you have scrubbed the entire area. Take breaks as needed to rest your arms and maintain your focus.
7. Regularly check the progress: Periodically stop scrubbing and check the progress of the wax removal. You should see the wax building up on the scrub brush or scrub pad, indicating that it’s being effectively removed from the floor.
By following these steps and taking your time to thoroughly scrub the floor, you will successfully eliminate the heavy wax buildup. In the next section, we will discuss the steps to remove the softened wax residue from the floor. So, let’s continue on our journey to reclaim the natural beauty of your floors!
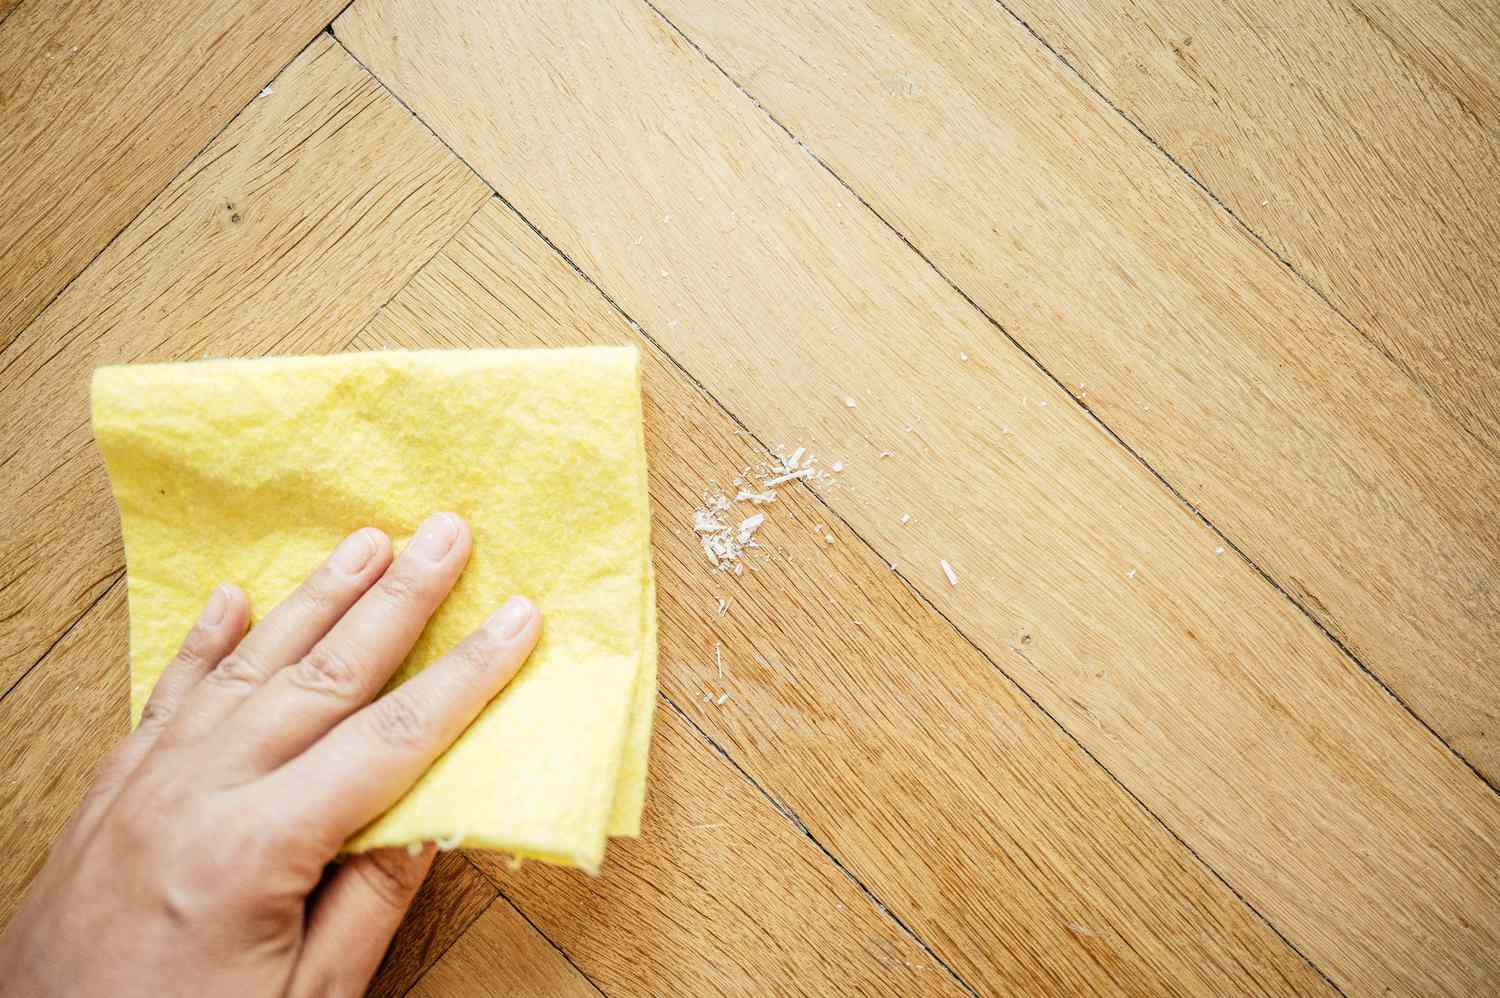
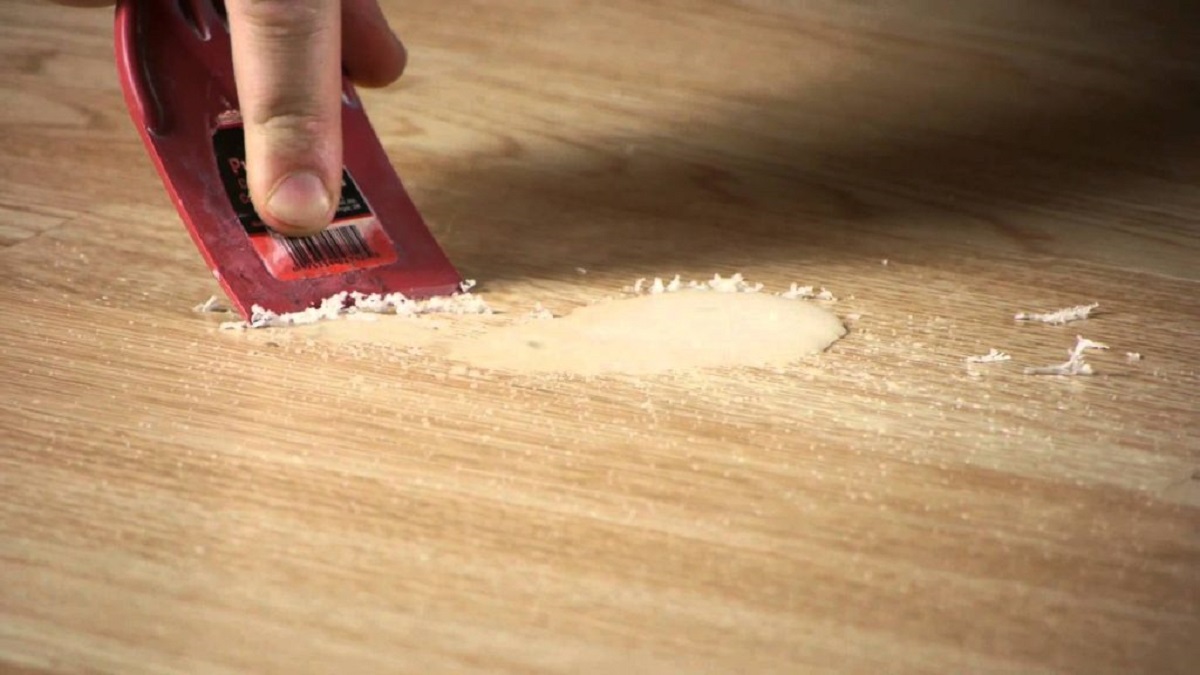
Step 4: Removing the Softened Wax
After scrubbing the floor to loosen the wax buildup, it’s time to remove the softened wax residue. This step will help reveal the clean and refreshed surface of your floors. Follow these instructions to effectively remove the wax:
1. Use a scraper or putty knife: Take a scraper or putty knife with a smooth edge and gently scrape away the loosened wax from the floor surface. Be careful not to apply too much pressure or scrape too aggressively, as this can potentially damage the flooring material.
2. Work in small sections: Focus on one small section of the floor at a time. Gradually move across the floor, using the scraper or putty knife to lift and remove the softened wax from the surface. It may be helpful to have a bucket nearby to collect the scraped-off wax.
3. Wipe off excess residue: As you scrape the wax, use a clean, soft cloth to wipe away any excess residue. This will help to prevent it from spreading or smearing across the floor.
4. Repeat as necessary: Depending on the thickness of the wax buildup, you may need to repeat the process of scraping and wiping multiple times to fully remove all traces of wax from the floor. Take your time and be thorough in this step.
5. Inspect the floor: Once you have removed the wax residue, inspect the floor for any remaining patches or traces of wax. If you notice any spots that still contain wax, go back and repeat the scraping and wiping process for those specific areas.
6. Clean the floor: After removing the wax, it’s essential to thoroughly clean the floor to remove any lingering residue. Use a fresh solution of floor cleaner mixed with water and mop the entire floor, ensuring that all remnants of wax are eliminated.
By following these steps, you will effectively remove the softened wax from your floors, bringing back their natural beauty. In the next section, we will discuss the final steps of cleaning and offer tips for preventing future wax buildup. So, let’s keep moving towards immaculate floors!
Step 5: Cleaning and Finishing Touches
After removing the wax from your floors, it’s crucial to thoroughly clean the surface and add some finishing touches to restore their shine and beauty. Follow these steps to complete the cleaning process:
1. Prepare a clean mop or sponge: Ensure that your mop or sponge is thoroughly cleaned and free from any remaining wax or residue. This will prevent any cross-contamination and ensure a clean finish.
2. Mix a fresh cleaning solution: In a bucket, mix a fresh solution of floor cleaner or a neutral pH cleaner with water according to the manufacturer’s instructions. Make sure to use the appropriate ratio for your specific flooring material.
3. Mop the entire floor: Dip the mop or sponge into the cleaning solution and wring out any excess liquid. Start at one end of the room and work your way across the entire floor, moving in overlapping strokes. This will help to remove any remaining residue and provide a clean, even finish.
4. Rinse the mop or sponge as needed: Regularly rinse the mop or sponge in clean water to remove any dirt or debris that has been collected. This will prevent the spread of grime and ensure a more effective cleaning process.
5. Wipe dry: After mopping, use a clean, dry cloth or mop to wipe away any excess moisture from the floor surface. This step is essential to prevent any water spots or streaks from forming as the floor dries.
6. Inspect for any missed spots: Take a close look at the floor to ensure that all areas have been effectively cleaned and are free from any residue or streaks. If you notice any missed spots or areas that require additional cleaning, go back and address them before finishing the process.
7. Add a finishing touch: If desired, you can further enhance the shine and protection of your floors by applying a fresh layer of floor polish or wax. Follow the manufacturer’s instructions to apply the product evenly across the floor surface.
By completing these cleaning and finishing touches, you will leave your floors looking pristine and revitalized. In the final section, we will discuss some essential tips for preventing future wax buildup and maintaining the beauty of your floors. So, let’s wrap up this guide on a high note!
Preventing Wax Build Up in the Future
After investing the time and effort to remove heavy floor wax build up, it’s important to take proactive measures to prevent it from occurring again in the future. Here are some tips to help you maintain clean and wax-free floors:
1. Follow the recommended waxing schedule: Different types of flooring materials have specific guidelines for waxing frequency. It’s essential to follow the recommended schedule to prevent over-application of wax. Regularly check the manufacturer’s recommendations or consult with a flooring professional to determine the appropriate waxing intervals for your specific flooring.
2. Properly clean the floor before waxing: Before applying a new layer of wax, ensure that the floor is thoroughly cleaned and free from any dirt, dust, or debris. Use a suitable floor cleaner or neutral pH cleaner to remove any contaminants that can become trapped underneath the wax and contribute to build up.
3. Remove older layers of wax: When it’s time to reapply wax, make sure to remove any existing layers of wax thoroughly. This can be done by following the steps outlined in this guide or by using a commercial wax stripper. By starting with a clean surface, you can prevent the accumulation of multiple layers of wax.
4. Use the appropriate wax for your flooring: Different types of flooring require specific types of wax. It’s crucial to choose a wax that is suitable for your flooring material to ensure proper adhesion and longevity. Look for wax products that are recommended by the manufacturer of your flooring.
5. Apply wax in thin, even layers: When applying wax, it’s important to avoid overloading the floor with thick layers. Instead, apply thin, even coats of wax, allowing each layer to dry completely before applying the next. This will minimize the chances of excessive buildup and make future removal easier.
6. Regularly maintain and clean your floors: Implement a regular cleaning routine to keep your floors in optimal condition. Sweep or vacuum regularly to remove loose dirt and debris. Use a damp mop with a suitable floor cleaner to maintain the cleanliness and shine of your floors. Avoid using harsh chemicals or abrasive cleaning tools that can damage the wax or flooring surface.
7. Take precautions with furniture and foot traffic: Place floor protectors or felt pads on furniture legs to prevent scratching and scuffing the floor surface. Additionally, encourage the use of doormats or shoe-removing stations at entrances to minimize the amount of dirt and debris brought onto the floors.
By following these preventive measures, you can minimize the occurrence of heavy floor wax build up and maintain clean and beautiful floors for years to come. Regular maintenance and proper cleaning will go a long way in preserving the quality and appearance of your floors.
Read more: How To Wax A Floor With A Mop
Conclusion
Floor wax buildup can be a common problem, but with the right knowledge and techniques, you can effectively remove it and restore the beauty of your floors. By understanding the causes of heavy floor wax build up and following the step-by-step guide provided in this article, you can easily eliminate the excess wax and achieve clean, shining floors.
Proper preparation, softening the wax, scrubbing the floor, removing the softened wax, and thorough cleaning are all essential steps in the removal process. Additionally, taking preventative measures to prevent future wax buildup, such as following the recommended waxing schedule, using the appropriate wax for your flooring, and maintaining regular cleaning and maintenance, will help to keep your floors in optimal condition.
Remember, patience and attention to detail are key. Take your time and thoroughly clean each section of the floor to ensure the best results. Always follow the manufacturer’s instructions and take necessary safety precautions when working with cleaning products.
By investing the effort in removing heavy floor wax build up and adopting preventative measures, you can enjoy clean, shiny floors for years to come. So roll up your sleeves, gather the necessary tools, and rejuvenate your floors. With a little time and dedication, your floors will be transformed into showcases of cleanliness and beauty.
Frequently Asked Questions about How To Remove Heavy Floor Wax Build Up
Was this page helpful?
At Storables.com, we guarantee accurate and reliable information. Our content, validated by Expert Board Contributors, is crafted following stringent Editorial Policies. We're committed to providing you with well-researched, expert-backed insights for all your informational needs.


0 thoughts on “How To Remove Heavy Floor Wax Build Up”