
Articles
How To Build A Shed Floor
Modified: October 31, 2024
Learn how to build a sturdy shed floor with our comprehensive articles. Get step-by-step instructions and expert tips for a successful project.
(Many of the links in this article redirect to a specific reviewed product. Your purchase of these products through affiliate links helps to generate commission for Storables.com, at no extra cost. Learn more)
Introduction
Greetings DIY enthusiasts! Are you ready to take on a new and exciting project? Today, we’re going to delve into the world of shed construction and specifically focus on how to build a shed floor. Having a solid and level foundation is crucial for the stability and durability of any structure, and a shed is no exception. By following these step-by-step instructions, you’ll be well on your way to creating a sturdy and reliable floor for your shed.
Whether you plan to use your shed as a storage space, a workshop, or a cozy backyard getaway, it’s essential to start with a solid foundation. Building a shed floor is a fundamental step in the construction process, and with the right materials and tools, it can be a rewarding and enjoyable experience.
Throughout this article, we’ll guide you through each stage of building a shed floor, offering valuable tips and insights along the way. From gathering the necessary materials and tools to laying down the final touches, we’ve got you covered.
So, let’s roll up our sleeves, grab our hammer and nails, and get started on this exciting journey of building a shed floor!
Key Takeaways:
- Building a shed floor is a crucial step in shed construction, requiring precise measurements, sturdy materials, and attention to detail. Prioritize safety, level the ground, and follow the step-by-step process for a reliable and durable shed floor.
- Completing the shed floor sets the stage for the next phases of shed construction, allowing for personalization and functionality. Embrace creativity, prioritize precision, and enjoy the process of transforming your shed into a versatile and inviting space.
Read more: How To Build An 8×10 Shed Floor
Step 1: Gather Materials and Tools
Before diving into the construction process, it’s essential to gather all the necessary materials and tools. Having everything at hand will not only streamline the process but also ensure that you have everything you need to complete the project. Here’s a comprehensive list of the materials and tools you’ll need for building a shed floor:
- Pressure-treated lumber for the foundation frame
- 2×6 or 2×8 boards for the floor joists
- Plywood sheets for the flooring
- Galvanized nails or screws
- Hammer or nail gun
- Circular saw or miter saw
- Tape measure
- Level
- Pencil or marker
- Safety glasses and gloves
- Dust mask
When choosing the materials, opt for high-quality options that are suitable for outdoor use. Pressure-treated lumber is an excellent choice for the foundation frame as it is resistant to rot and decay. Additionally, make sure to select the appropriate thickness and grade of plywood for the flooring, depending on the intended use of your shed.
Once you have gathered all the necessary materials, double-check to ensure that you have the correct quantity and sizes. It’s better to have a few extra pieces on hand than to run out in the middle of the construction process.
Now that you have all the materials, it’s time to gather your tools. A hammer or nail gun will be essential for securing the lumber together, while a circular saw or miter saw will help you make accurate cuts. A tape measure, level, and pencil will assist you in marking and measuring dimensions. Don’t forget to prioritize your safety by wearing protective glasses, gloves, and a dust mask.
With your materials and tools ready, you’re now prepared to move on to the next step: clearing and leveling the ground. Let’s get started!
Step 2: Clear and Level the Ground
Now that you have all your materials and tools ready, it’s time to prepare the ground where your shed floor will be built. Clearing and leveling the ground is a crucial step to ensure a stable foundation and even surface for your shed. Follow these steps to get your ground prepped and ready:
- Remove any vegetation or debris: Start by clearing the area where your shed will be situated. Remove any grass, weeds, rocks, or debris that may hinder the construction process. It’s important to have a clean and clear space to work with.
- Measure and mark the shed dimensions: Use a tape measure to determine the dimensions of your shed. Mark the corners with stakes or spray paint to create a clear outline of where your shed will be placed. Double-check your measurements to ensure accuracy.
- Level the ground: Use a level and a long, straight board to check for any uneven areas. Remove or add soil as needed to create a level surface. This step is vital to prevent future issues such as a sagging or unstable shed floor.
- Compact the soil: After leveling the ground, use a tamper or a roller to compact the soil. This process will help to stabilize the ground and minimize any potential sinking or shifting in the future.
By taking the time to clear and level the ground properly, you are setting the stage for a solid and durable shed floor. It’s crucial not to rush through this step as it will greatly impact the overall stability and longevity of your shed.
With a clean and level surface, you are now ready to move on to the next step: measuring and marking the shed dimensions. Grab your tape measure and let’s get started!
Step 3: Measure and Mark the Shed Dimensions
Now that you have cleared and leveled the ground, it’s time to measure and mark the dimensions of your shed. This step is crucial in ensuring that your shed fits perfectly on the floor and aligns with your desired design. Follow these steps to measure and mark the shed dimensions accurately:
- Refer to your shed plans: If you have preexisting shed plans, refer to them to gather the necessary measurements. If you don’t have plans, determine the size of your shed based on your specific needs and preferences. Take into consideration the intended use of the shed, available space, and any local building regulations.
- Measure and mark the corners: Use a tape measure to measure and mark the corners of your shed on the ground. Start from one corner and measure the length of each side, making sure to mark the measurements clearly. Use stakes, spray paint, or any other suitable markers to indicate the corners.
- Check for squareness: To ensure that your shed will be square, measure the diagonals of your marked dimensions. The two diagonal measurements should be equal to each other. If they are not, adjust the marked corners until the diagonals are equal. This will guarantee a square and symmetrical shed.
- Double-check the measurements: Once you have marked the corners and confirmed squareness, double-check all the measurements. Make sure that the length and width of the shed are accurate and match your desired dimensions. Any errors at this stage can lead to problems in the later stages of construction.
Accurate measurements and markings are essential for building a shed floor that fits your needs perfectly. Take your time to ensure that the dimensions are correct, as it will greatly impact the overall appearance and functionality of your shed.
With the shed dimensions measured and marked, we’re ready to move on to the next step: building the foundation frame. Grab your materials and let’s get started!
Step 4: Build the Foundation Frame
With the shed dimensions measured and marked, it’s time to start building the foundation frame for your shed floor. The foundation frame provides structural support and stability to the floor, ensuring that it can withstand the weight of the shed and its contents. Follow these steps to build the foundation frame:
- Measure and cut the lumber: Using your measurements, cut the pressure-treated lumber to the appropriate lengths for the perimeter of the shed floor. Make precise cuts using a circular saw or miter saw, ensuring that the pieces fit snugly together.
- Assemble the frame: Lay out the cut lumber on the ground according to the marked dimensions. Connect the pieces at the corners using galvanized nails or screws. Use a level to ensure that the frame is straight and level. You can also use diagonal bracing to add extra stability to the frame.
- Secure the frame to the ground: To secure the frame to the ground, use concrete anchors, metal stakes, or rebar stakes. Place them at intervals along the perimeter and drive them into the ground using a hammer. This will prevent the frame from shifting or moving once the shed floor is installed.
When building the foundation frame, it’s important to ensure that it is square and level. A properly aligned frame will result in a sturdy and even shed floor. Take your time during this step to make any necessary adjustments and double-check the measurements and levelness of the frame.
Once the foundation frame is complete and securely anchored to the ground, you’re ready to move on to the next step: installing the floor joists. This is where the structure of the shed floor begins to take shape. Get ready to bring your shed project one step closer to completion!
When building a shed floor, make sure to use pressure-treated lumber to prevent rot and decay. Additionally, use a moisture barrier to protect the floor from water damage.
Read more: How Build A Shed
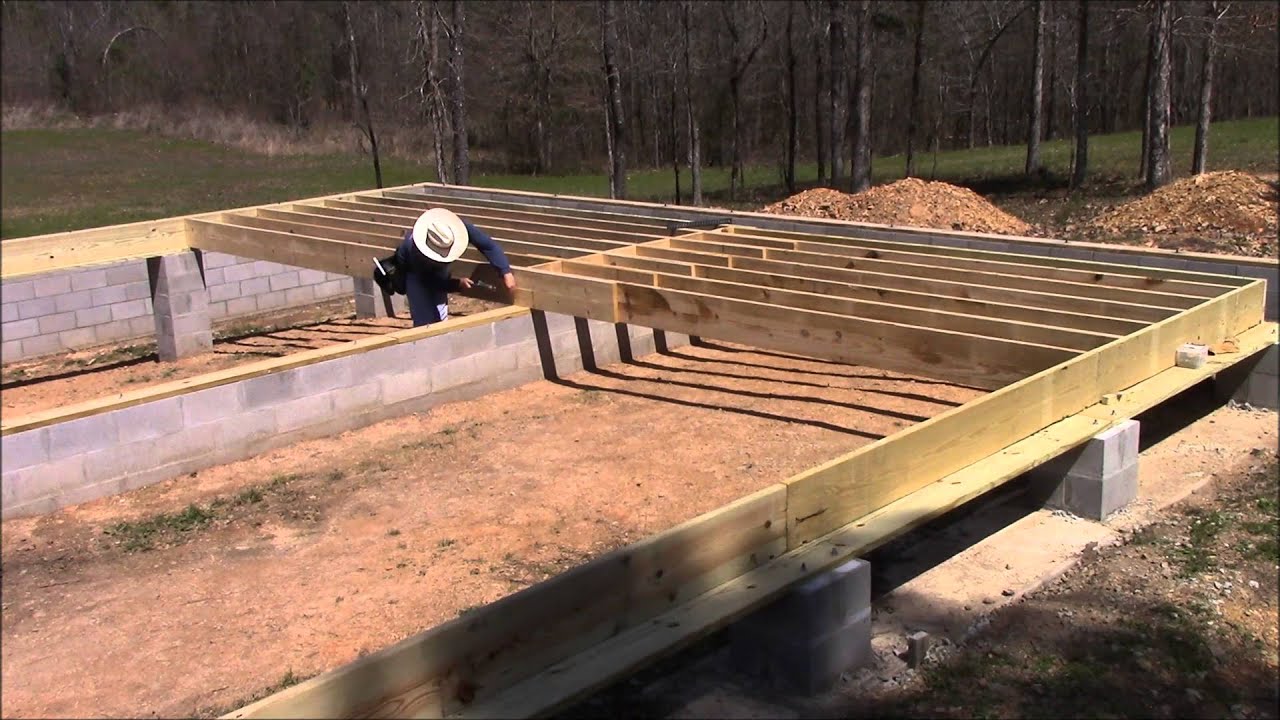
Step 5: Install the Floor Joists
Now that the foundation frame is in place, it’s time to install the floor joists. The floor joists provide the support for the plywood flooring and ensure that the shed floor is sturdy and stable. Follow these steps to install the floor joists:
- Measure and cut the joists: Using your tape measure and the dimensions of your shed, measure and cut the 2×6 or 2×8 boards to the appropriate length for the floor joists. Make sure to cut enough joists to span the entire width of the shed floor.
- Place the joists: Position the first floor joist along one side of the foundation frame, ensuring that it is aligned with the outer edge. Secure it in place using nails or screws, making sure it is level and flush with the top of the foundation frame.
- Continue with the remaining joists: Place the remaining floor joists at regular intervals along the foundation frame, typically 16 inches apart. Use a tape measure and level to ensure they are evenly spaced and aligned. Secure each joist in place using nails or screws.
- Add additional supports: For larger sheds or if your shed will be supporting heavy loads, consider adding additional support beams or blocking between the floor joists for added stability.
When installing the floor joists, it’s important to maintain proper spacing and alignment to ensure a level and sturdy shed floor. Take your time during this step to make any necessary adjustments and double-check the levelness and alignment of the joists.
With the floor joists in place, you’re now ready to move on to the next step: laying the plywood flooring. This is where your shed floor will really start to take shape, so let’s keep the momentum going!
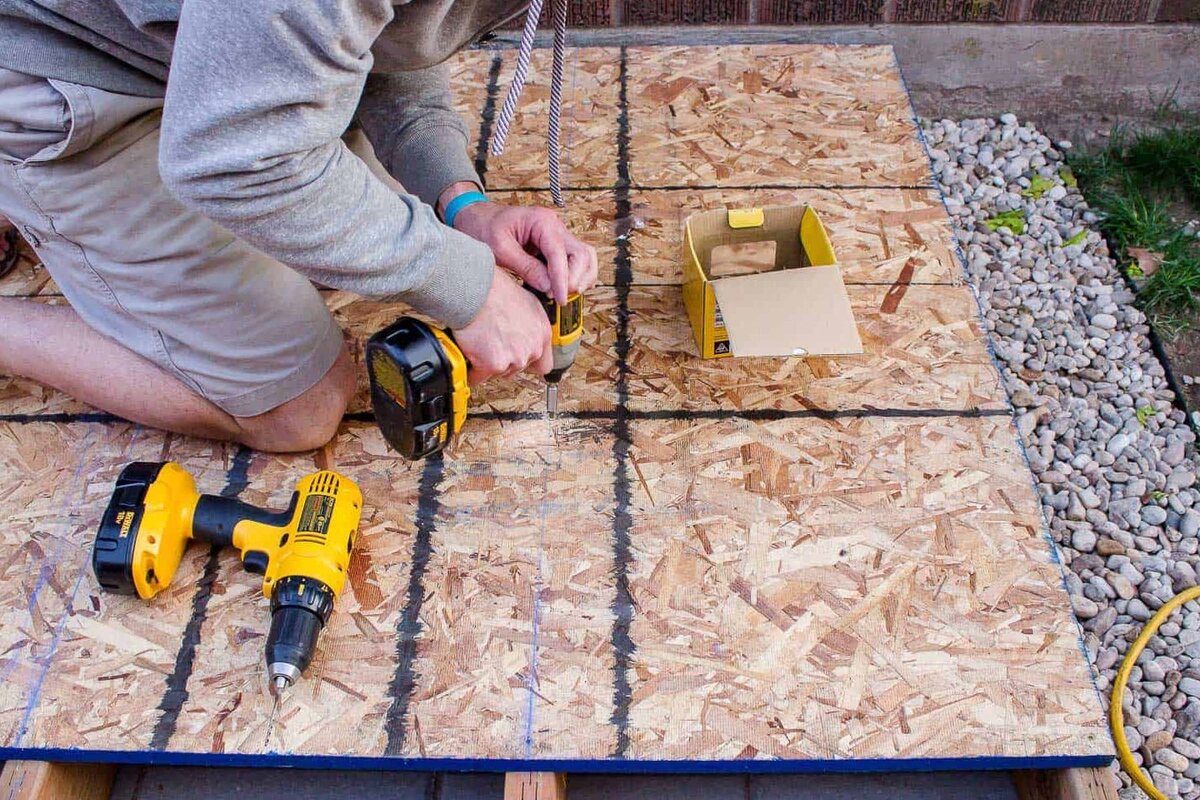
Step 6: Lay the Plywood Flooring
With the floor joists securely in place, it’s time to lay down the plywood flooring for your shed. The plywood will provide a smooth and durable surface that can withstand the weight of your shed and its contents. Follow these steps to lay the plywood flooring:
- Measure and cut the plywood: Measure the dimensions of your shed floor and mark them on the plywood sheets. Use a circular saw or a table saw to cut the plywood to the appropriate size. Make sure the cuts are precise for a snug fit.
- Start at one edge: Begin at one edge of the shed and lay the first sheet of plywood along the length of the floor joists. Ensure that it is flush with the foundation frame and align it with the edge of the shed floor.
- Secure the plywood: Use galvanized nails or screws to secure the plywood to the floor joists. Place the fasteners along the edges and at regular intervals within the plywood, ensuring that it is securely attached.
- Continue with the remaining sheets: Lay down the remaining sheets of plywood in the same manner, making sure they are tightly fitted together. Stagger the seams between the sheets for added strength and stability.
When laying the plywood flooring, it’s important to ensure that each sheet is properly aligned and securely fastened. Take the time to double-check the measurements and the placement of each plywood sheet before attaching it to the floor joists.
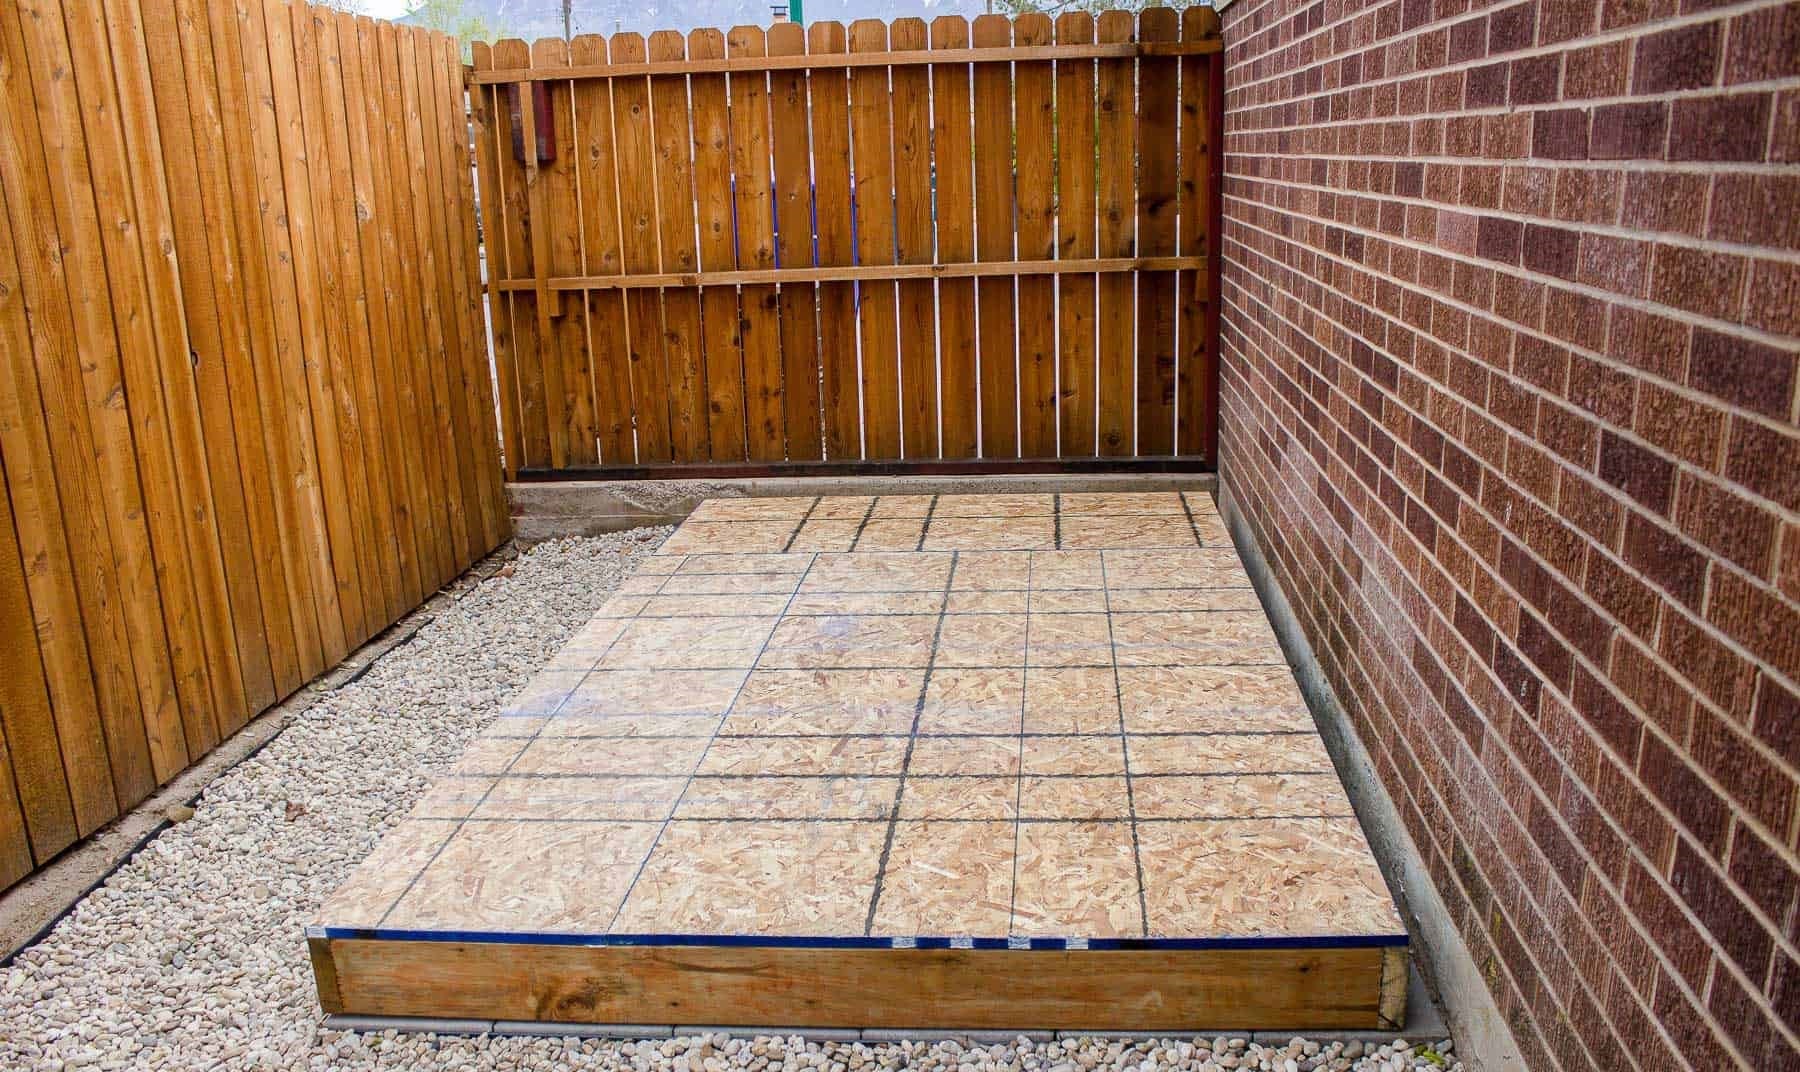
Once the plywood flooring is fully installed, you’re almost done building your shed floor. It’s time to move on to the final step: applying the finishing touches. Get ready to add those final details that will complete your shed floor and make it ready for use!
Step 7: Apply Finishing Touches
Congratulations! You’re in the final step of building your shed floor. Now it’s time to apply the finishing touches to ensure your floor is not only functional but also aesthetically appealing. Follow these steps to complete your shed floor:
- Sand the plywood surface: Use sandpaper or a power sander to smooth out any rough edges or imperfections on the plywood surface. This step will not only enhance the appearance of the floor but also prevent any splinters or snags.
- Seal the plywood: Apply a coat of wood sealer or paint to protect the plywood from moisture and rot. Make sure to choose a product suitable for outdoor use, and follow the manufacturer’s instructions for application.
- Add skirting or trim: Install skirting or trim along the edges of the shed floor to provide a finished and polished look. This will also help to prevent dirt, debris, and pests from entering the shed through gaps.
- Clean up the work area: Take the time to clean up any debris or leftover materials from the construction process. This will not only make your shed floor look better but also create a safer environment for future use.
By applying the finishing touches, you’ll give your shed floor that final flair and ensure its long-term durability. Take pride in your hard work and attention to detail as you admire your completed shed floor.
Now that your shed floor is complete, you’re ready to move on to the next phase of your shed construction project. Whether you’re installing walls, adding a roof, or finishing the interior, your solid and level floor will serve as the foundation for the rest of the project.
Enjoy the satisfaction of a job well done and celebrate your newly built shed floor. It’s time to start utilizing your shed for storage, work, or leisure purposes. Happy shed building!
Conclusion
Building a shed floor is a rewarding and essential step in the construction process. A well-built shed floor provides stability, durability, and a solid foundation for your shed. By following the step-by-step instructions outlined in this article, you have learned how to gather materials and tools, clear and level the ground, measure and mark the shed dimensions, build the foundation frame, install the floor joists, lay the plywood flooring, and apply the finishing touches.
Throughout this process, attention to detail and precision are key. Ensuring accurate measurements, proper alignment, and secure fastening will result in a structurally sound and reliable shed floor. Taking the time to level the ground, build a solid foundation frame, and install high-quality materials will contribute to the longevity and functionality of your shed floor.
Remember to prioritize safety at all times by wearing protective gear and working with caution. Also, make sure to check your local building codes and regulations to ensure compliance throughout the construction process.
With your shed floor complete, you’re now ready to progress to the next steps of your shed project, such as adding walls, a roof, and personalizing the interior. Your newly built shed floor will serve as the sturdy and reliable base for your entire structure.
So, roll up your sleeves, embrace your creativity, and enjoy the process of transforming your shed into a functional and inviting space that meets your unique needs. With a solid floor in place, the possibilities for your shed are endless. Happy building!
Now that you've mastered building a shed floor, why not dive deeper into the DIY realm? Our featured guide on DIY Projects will show you why taking on such projects could be the most rewarding decision you make this year. If your interests extend to your backyard, don't miss our insights on Outdoor Structures, perfect for enhancing your outdoor living space. For enthusiasts ready to tackle more intricate tasks, our roundup of the Woodworking techniques for 2024 is a must-read, packed with the latest tips and trends.
Frequently Asked Questions about How To Build A Shed Floor
Was this page helpful?
At Storables.com, we guarantee accurate and reliable information. Our content, validated by Expert Board Contributors, is crafted following stringent Editorial Policies. We're committed to providing you with well-researched, expert-backed insights for all your informational needs.


0 thoughts on “How To Build A Shed Floor”