Home>Gardening & Outdoor>Outdoor Structures>How To Build A Floor For A Shed
Outdoor Structures
How To Build A Floor For A Shed
Modified: May 6, 2024
Learn how to build a sturdy and durable floor for your outdoor shed with our step-by-step guide. Create a solid foundation for your outdoor structures.
(Many of the links in this article redirect to a specific reviewed product. Your purchase of these products through affiliate links helps to generate commission for Storables.com, at no extra cost. Learn more)
Introduction
Building a shed can be a rewarding and practical project, providing valuable storage space and enhancing the functionality of your outdoor area. One crucial aspect of shed construction is creating a solid and durable floor that can withstand the weight of tools, equipment, and other stored items. Whether you’re a seasoned DIY enthusiast or a novice looking to embark on your first construction endeavor, this guide will walk you through the process of building a sturdy floor for your shed.
Constructing a shed floor involves several essential steps, from meticulous planning and gathering materials to executing the construction and adding finishing touches. Throughout this article, we’ll delve into each stage, offering valuable insights and practical tips to help you navigate the process with confidence.
By the end of this comprehensive guide, you’ll have the knowledge and expertise to construct a reliable shed floor that meets your specific needs and stands the test of time.
Key Takeaways:
- Planning and preparation are crucial for building a sturdy shed floor. Clear and level the ground, gather quality materials, and follow local regulations to ensure a successful construction process.
- Building a shed floor requires attention to detail and precision. From laying the foundation to adding finishing touches, each step contributes to creating a reliable and durable storage space.
Read more: How To Build A Shed Floor
Planning and Preparation
Before diving into the construction of your shed floor, meticulous planning and thorough preparation are essential. Start by determining the ideal location for your shed, considering factors such as accessibility, sunlight exposure, and proximity to utilities. Once you’ve identified the perfect spot, take accurate measurements to determine the dimensions of the floor, ensuring that it aligns with the overall size of your shed.
Next, it’s crucial to check local building codes and regulations to ensure compliance with any relevant requirements. Some areas may have specific guidelines regarding shed construction, including floor specifications, setbacks from property lines, and the need for building permits. Familiarizing yourself with these regulations early in the planning process can prevent potential setbacks and ensure a smooth and hassle-free construction experience.
After confirming the regulatory aspects, sketch a detailed blueprint of your shed floor, taking into account the placement of support beams, floor joists, and entry points. This blueprint will serve as a valuable reference throughout the construction process, guiding your efforts and minimizing the risk of errors.
Additionally, consider the intended use of your shed and the weight it will need to support. If you plan to store heavy items such as lawnmowers, bicycles, or power tools, your floor must be designed to accommodate these loads without sagging or deteriorating over time.
Finally, gather the necessary tools and materials for the project, ensuring that you have everything from measuring tape, a level, and a circular saw to pressure-treated lumber, galvanized nails, and plywood sheets. Adequate preparation and organization will streamline the construction process and minimize interruptions, allowing you to focus on bringing your shed floor to fruition with confidence and efficiency.
Gathering Materials and Tools
Equipping yourself with the right materials and tools is a pivotal step in the shed floor construction process. To ensure the longevity and structural integrity of your floor, opt for high-quality, durable materials that can withstand the rigors of outdoor exposure and heavy use.
Start by procuring pressure-treated lumber, which is specifically designed to resist rot, decay, and insect infestation, making it an ideal choice for outdoor construction projects. The dimensions of the lumber will depend on the size of your shed floor, so refer to your blueprint and measurements to determine the quantity and lengths required.
In addition to pressure-treated lumber, you’ll need galvanized nails or screws to secure the structural components of the floor. These corrosion-resistant fasteners are essential for ensuring a secure and long-lasting assembly, especially in outdoor environments where exposure to moisture and humidity is inevitable.
Plywood sheets will form the surface of your shed floor, providing a sturdy and smooth foundation for your storage needs. Opt for exterior-grade plywood to withstand the elements and maintain its structural integrity over time. Ensure that the thickness of the plywood is appropriate for the intended use of your shed, considering the weight of the items it will support.
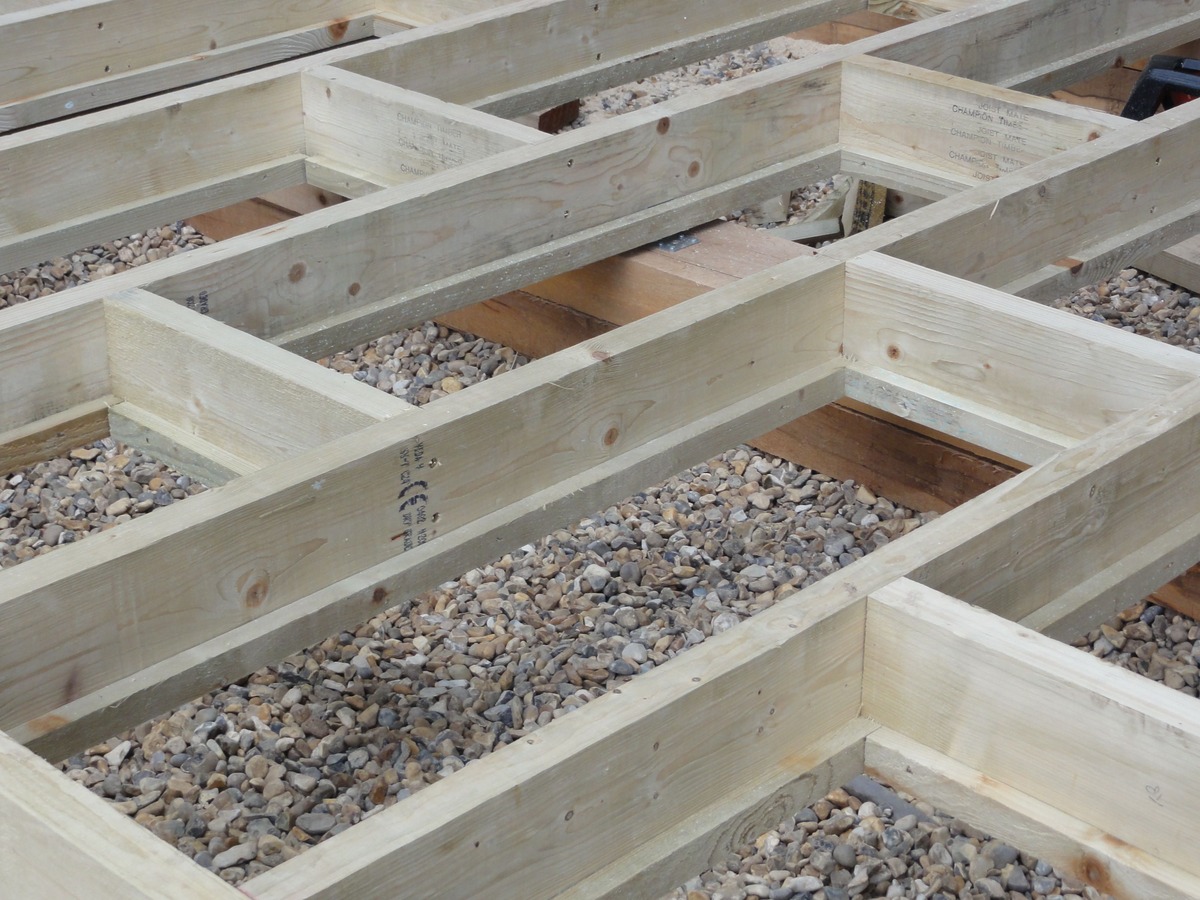
Other essential materials include gravel or crushed stone for creating a stable base, as well as concrete blocks or deck blocks to elevate and support the floor joists. These foundational elements are crucial for ensuring proper drainage, preventing moisture buildup, and safeguarding the structural integrity of your shed floor.
As for tools, gather a comprehensive set that includes a measuring tape, a level, a circular saw, a power drill, a hammer, and safety equipment such as gloves and protective eyewear. Having the right tools at your disposal will streamline the construction process and enable you to execute each step with precision and efficiency.
By carefully selecting top-quality materials and assembling a well-rounded toolkit, you’ll lay a solid foundation for the construction of a robust and dependable shed floor that will serve you well for years to come.
Clearing and Leveling the Ground
Before commencing the construction of your shed floor, it’s crucial to prepare the ground to ensure a stable and level foundation. Start by clearing the designated area of any debris, vegetation, or obstructions that could impede the construction process or compromise the integrity of the floor. This includes removing rocks, tree roots, and any other uneven or protruding objects that could create an uneven surface.
Once the area is cleared, use a shovel and a rake to level the ground, aiming to create a smooth and uniform surface for the foundation. Pay close attention to achieving an even grade, as any variations in the ground level can impact the stability and alignment of the floor structure.
After leveling the ground, consider adding a layer of gravel or crushed stone to further enhance the stability and drainage capabilities of the foundation. This layer will help prevent moisture buildup and minimize the risk of water-related damage to the shed floor over time. Spread the gravel evenly across the prepared area, using a tamper to compact it and create a solid base for the subsequent construction steps.
It’s essential to verify that the ground is not only level but also properly sloped to facilitate drainage away from the shed. This is particularly important in areas prone to heavy rainfall or snow accumulation, as proper drainage will prevent water from pooling around the shed and potentially causing structural damage.
Using a long, straight board and a level, check the evenness of the ground in multiple directions, making adjustments as needed to achieve a perfectly level and sloped surface. Taking the time to meticulously prepare the ground will set the stage for a successful and durable shed floor, ensuring that it remains structurally sound and resistant to environmental factors.
By diligently clearing and leveling the ground, you’ll establish a solid and stable foundation for the construction of your shed floor, laying the groundwork for a reliable and long-lasting outdoor structure.
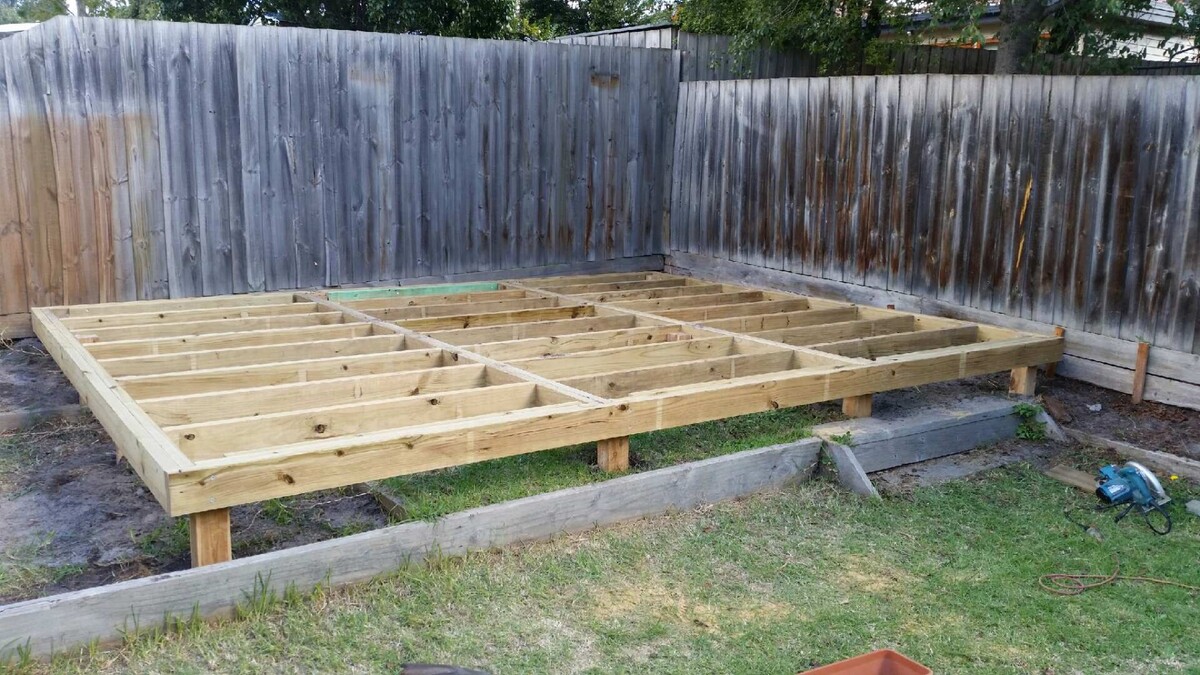
Building the Foundation
With the ground cleared and leveled, it’s time to embark on the construction of the foundation for your shed floor. The foundation serves as the base on which the floor structure will rest, providing essential support and stability for the entire shed.
Begin by placing concrete blocks or deck blocks at strategic intervals along the perimeter of the shed floor area. These blocks will elevate the floor joists, preventing direct contact with the ground and minimizing the risk of moisture damage. Ensure that the blocks are positioned evenly and aligned to support the floor joists according to your blueprint and measurements.
Next, lay pressure-treated beams or skids across the blocks, creating a sturdy framework that will serve as the primary support for the floor joists. The beams should be positioned parallel to one another, with their spacing determined by the design specifications and load-bearing requirements of your shed floor.
Using a level, verify that the beams are perfectly horizontal and aligned, making any necessary adjustments to achieve uniformity and precision. This step is crucial for ensuring the structural integrity of the foundation and, by extension, the entire shed floor.
Once the beams are in place, secure them to the blocks using galvanized brackets or fasteners, reinforcing their connection and further stabilizing the foundation. This secure attachment will prevent shifting or movement of the foundation components, maintaining the structural integrity of the shed floor over time.
With the foundation framework in position, take the time to recheck the levelness and alignment of the entire structure, making any final adjustments to guarantee a solid and stable foundation for the shed floor.
By meticulously constructing a robust and level foundation, you’ll establish a reliable base for the subsequent stages of shed floor construction, setting the stage for the installation of floor joists and the completion of your outdoor storage space.
When building a floor for a shed, make sure to use pressure-treated lumber to prevent rot and decay. Also, consider using a moisture barrier to protect the floor from water damage.
Read more: How To Build An 8×10 Shed Floor
Installing the Floor Joists
With the foundation in place, the next critical step in building a shed floor is the installation of floor joists. These horizontal structural members will form the framework on which the plywood sheets, the surface of the floor, will be secured. Properly installed floor joists are essential for distributing the weight of the shed’s contents and ensuring the overall stability and durability of the floor.
Begin by measuring and marking the locations where the floor joists will be positioned along the length of the foundation beams. The spacing between joists will depend on the dimensions of your shed floor and the load it’s expected to support. Refer to your blueprint and local building codes to determine the appropriate spacing and ensure compliance with structural requirements.
Using pressure-treated lumber, cut the floor joists to the specified lengths, taking care to achieve precise and uniform dimensions. Position each joist on the foundation beams, aligning them with the marked locations and ensuring that they are perpendicular to the beams. Secure the joists in place using galvanized joist hangers or metal brackets, ensuring a strong and stable connection between the joists and the foundation.
As you progress with the installation, use a level to verify the evenness and alignment of each joist, making any necessary adjustments to achieve a uniformly level framework. This meticulous attention to detail will contribute to the overall stability and structural integrity of the shed floor, ensuring that it can support heavy loads without sagging or unevenness.
Throughout the installation process, it’s crucial to maintain consistent spacing between the floor joists, promoting structural uniformity and enhancing the load-bearing capacity of the floor. Additionally, double-check the levelness and alignment of the entire joist framework to confirm that it meets the required standards for a stable and reliable shed floor.
By methodically installing the floor joists with precision and care, you’ll establish a robust and dependable framework that forms the backbone of your shed floor, laying the groundwork for the addition of the plywood sheets and the completion of your outdoor storage space.
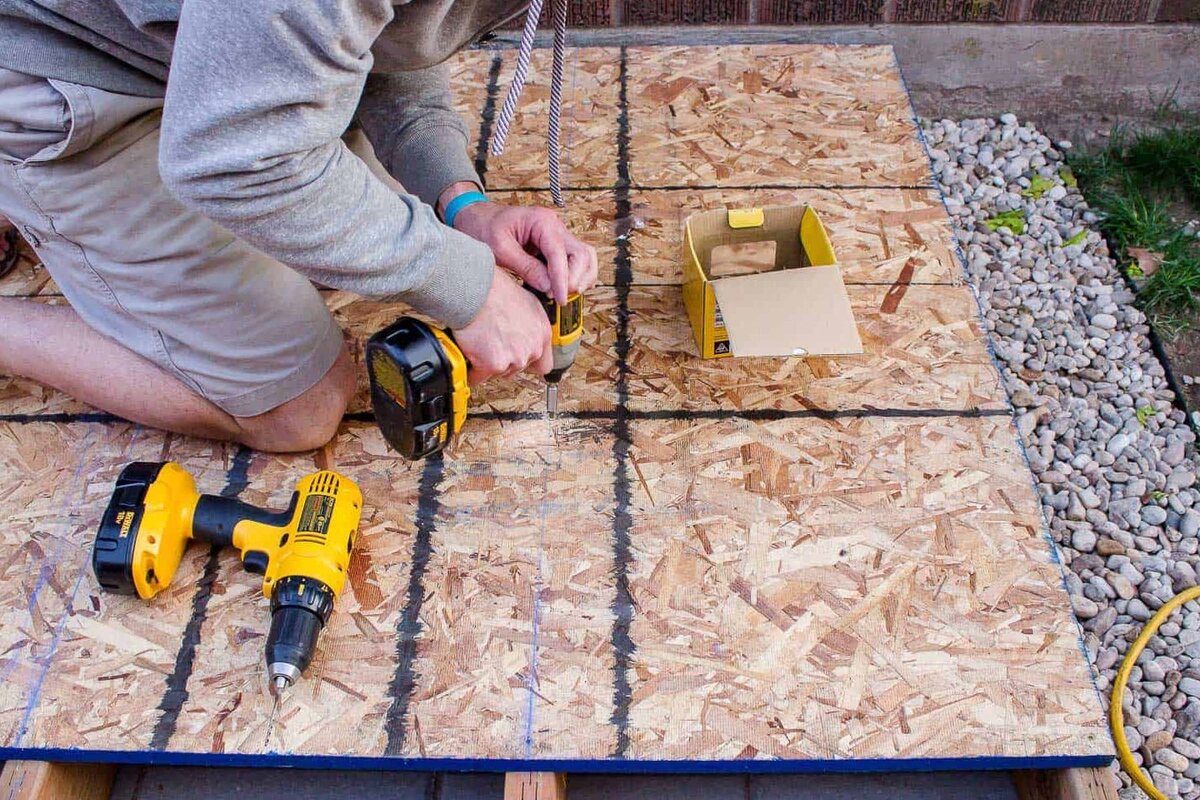
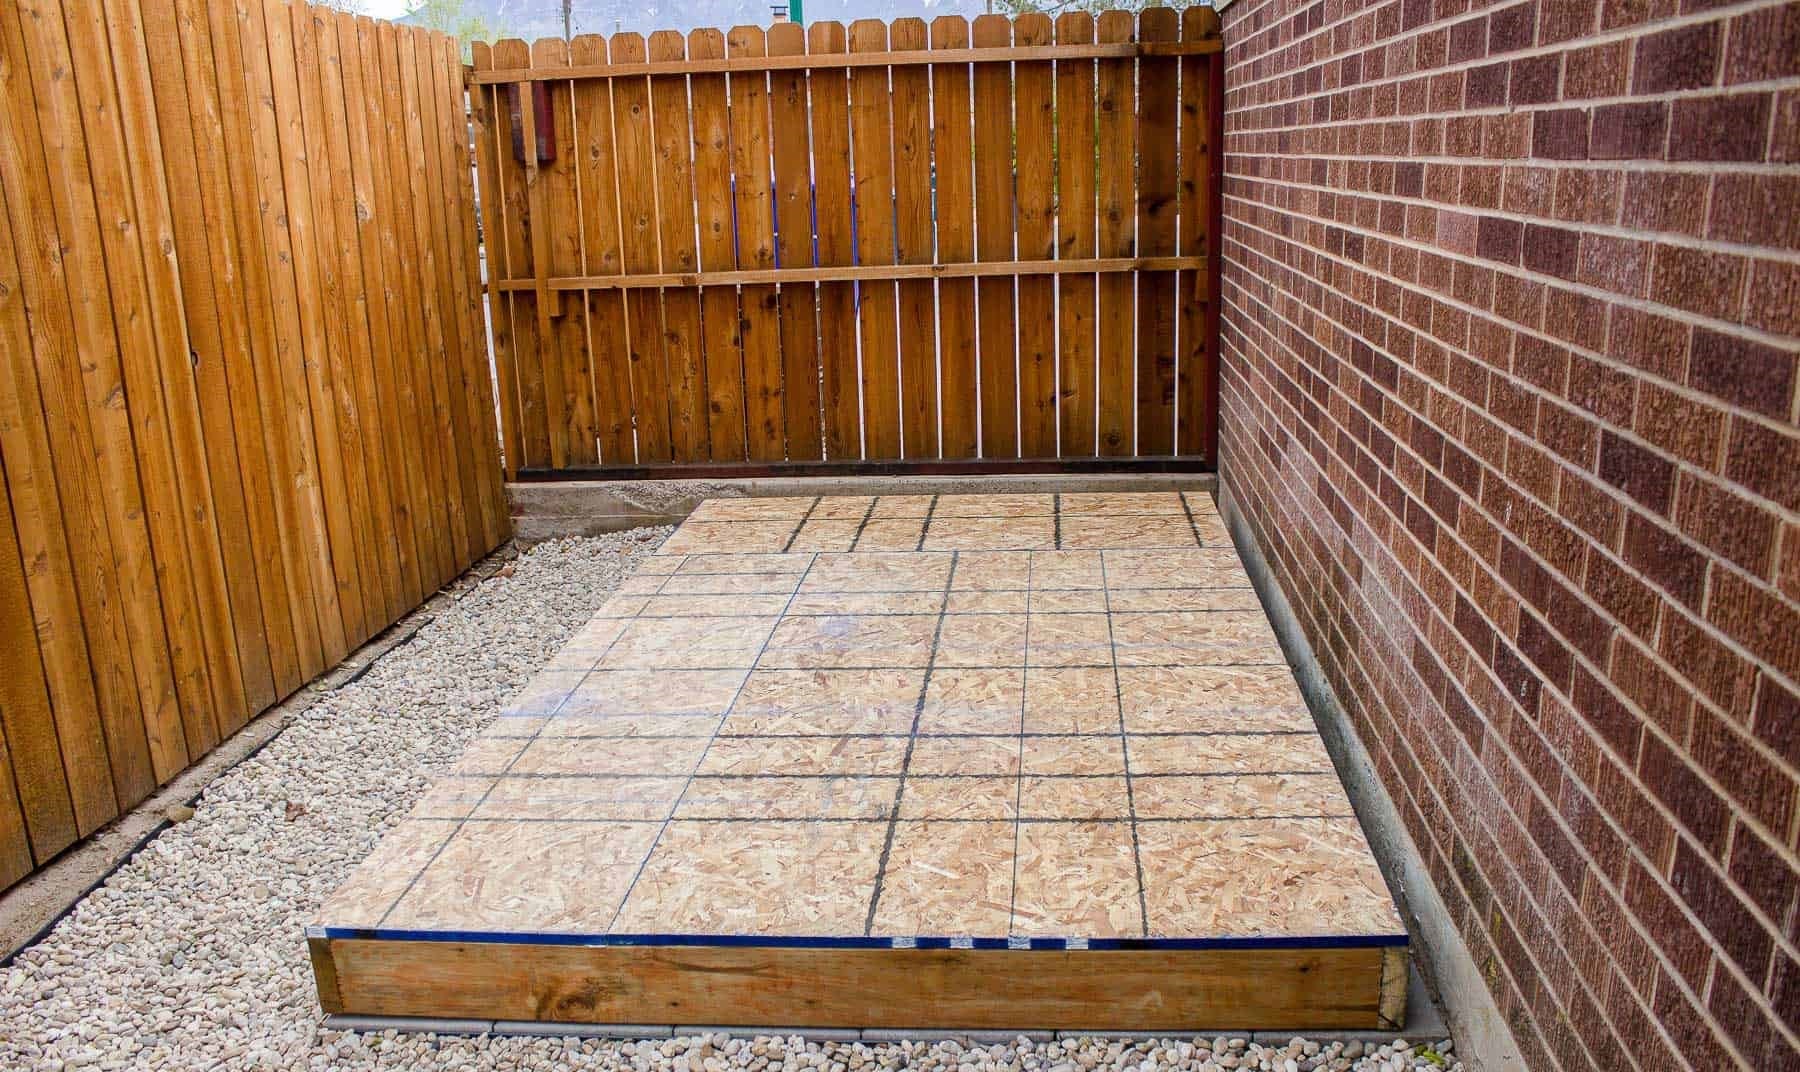
Adding the Plywood Sheets
Once the floor joists are securely in place, it’s time to add the plywood sheets that will form the surface of your shed floor. The plywood serves as a durable and stable platform for storing items in your shed, providing a smooth and even surface that can withstand the weight of various tools, equipment, and other stored items.
Before laying the plywood, carefully measure the dimensions of the shed floor to determine the required size of the plywood sheets. Using a circular saw, cut the plywood to fit the dimensions of the floor, ensuring precise and accurate cuts that align with the joist framework.
Position the first plywood sheet at one corner of the shed floor, ensuring that its edges align with the outer edges of the floor joists. Secure the sheet to the joists using galvanized nails or screws, driving them at regular intervals along the edges and across the interior of the sheet to create a secure and uniform attachment.
As you proceed to add additional plywood sheets, leave a small gap of approximately 1/8 inch between each sheet to account for natural expansion and contraction due to changes in temperature and humidity. This gap will prevent the sheets from buckling or warping over time, ensuring the long-term integrity of the shed floor.
Ensure that each subsequent plywood sheet is aligned with the previous one, creating a seamless and level surface across the entire shed floor. Use a level to verify the evenness of the plywood as you progress, making any necessary adjustments to maintain a uniform and stable surface.
As you near the completion of the plywood installation, double-check the entire floor surface for any protruding nails or screws, ensuring that they are driven flush with the plywood to create a smooth and hazard-free surface. This attention to detail will enhance the safety and usability of the shed floor, providing a reliable space for storing and accessing your belongings.
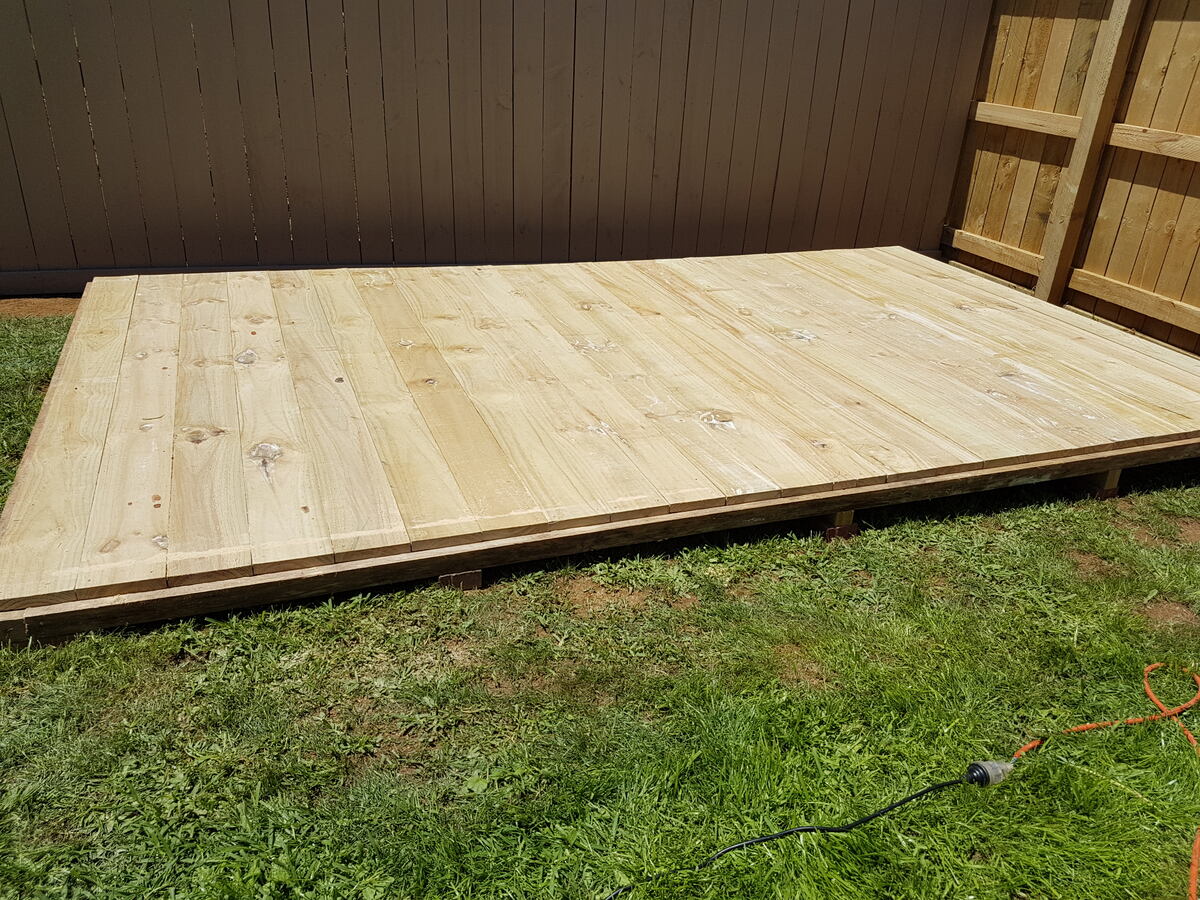
By methodically adding the plywood sheets with precision and care, you’ll complete the construction of a robust and dependable shed floor, ready to accommodate your storage needs and withstand the demands of daily use.
Finishing Touches
With the shed floor construction nearing completion, it’s time to add the finishing touches that will enhance the functionality, durability, and aesthetic appeal of your outdoor storage space. These final steps will ensure that your shed floor is not only structurally sound but also well-prepared to withstand the elements and serve as a reliable storage area for your belongings.
One crucial aspect of the finishing touches is to apply a protective sealant or wood preservative to the plywood surface of the shed floor. This treatment will safeguard the plywood against moisture, rot, and decay, extending its lifespan and maintaining its structural integrity in outdoor conditions. Choose a high-quality sealant or preservative designed for exterior use, and apply it according to the manufacturer’s instructions to create a protective barrier that shields the plywood from environmental damage.
Additionally, consider adding a layer of weather-resistant flooring material, such as vinyl sheeting or outdoor carpeting, to further protect the plywood surface and create a more comfortable and inviting interior for your shed. This flooring material can enhance the aesthetics of the space while providing an additional layer of protection against wear and tear.
As a final step, install a threshold at the entry point of the shed to create a smooth transition between the floor and the doorway. A threshold not only enhances the visual appeal of the shed but also helps prevent debris, moisture, and pests from entering the interior, maintaining a clean and secure storage environment.
Before considering the shed floor complete, conduct a thorough inspection of the entire structure, verifying the stability, levelness, and overall quality of the construction. Address any remaining details or adjustments to ensure that the floor meets your expectations in terms of functionality, safety, and durability.
By adding these finishing touches, you’ll elevate the shed floor from a basic structural element to a well-protected, visually appealing, and highly functional space that’s ready to accommodate your storage needs for years to come.
Conclusion
Congratulations on successfully completing the construction of a sturdy and reliable floor for your shed! The process of planning, preparing, and executing the construction has transformed an empty space into a functional and versatile storage area that will serve you well for years to come.
Building a shed floor is a testament to your dedication to creating a practical and organized outdoor space, and the effort you’ve invested will undoubtedly pay off in the form of a valuable addition to your property. The completed shed floor provides a solid foundation for storing tools, equipment, seasonal items, and other belongings, offering a convenient and secure solution for decluttering your home and yard.
Throughout the construction journey, you’ve demonstrated a keen eye for detail, a commitment to precision, and a willingness to tackle a challenging yet rewarding project. Your dedication to following the steps outlined in this guide, from clearing and leveling the ground to adding the finishing touches, has culminated in the creation of a space that reflects your craftsmanship and determination.
As you step back and admire the completed shed floor, take pride in the knowledge that you’ve not only built a practical structure but also gained valuable skills and experience in outdoor construction. The lessons learned and the satisfaction of a job well done will undoubtedly inspire future projects and endeavors, empowering you to continue enhancing and optimizing your outdoor living space.
With your shed floor now ready to support your storage needs, take the time to organize and arrange the space to maximize its utility and efficiency. Whether it’s housing gardening tools, sports equipment, or seasonal decorations, your shed will now serve as a dedicated and reliable storage solution, contributing to a more organized and enjoyable outdoor environment.
Thank you for embarking on this construction journey with us, and we hope that the knowledge and skills you’ve gained will continue to benefit you in future projects and endeavors. From all of us, we wish you many fulfilling and rewarding experiences in your newly constructed shed and beyond.
Now that you've mastered building a shed floor, why not expand your skills further? For those passionate about crafting with wood, our guide on the best woodworking techniques offers a wealth of creative ideas to get started on next projects. Also, if you're itching for more hands-on activities, our list of DIY outdoor projects provides plenty of inspiration to transform your outdoor space into a personalized haven. Dive into these resources and keep that DIY spirit alive!
Frequently Asked Questions about How To Build A Floor For A Shed
Was this page helpful?
At Storables.com, we guarantee accurate and reliable information. Our content, validated by Expert Board Contributors, is crafted following stringent Editorial Policies. We're committed to providing you with well-researched, expert-backed insights for all your informational needs.


0 thoughts on “How To Build A Floor For A Shed”