Articles
How To Remove Soap Dispenser From Lg Washer
Modified: October 19, 2024
Learn how to remove the soap dispenser from your LG washer with this helpful article. Discover step-by-step instructions and expert tips to make the process easy and hassle-free.
(Many of the links in this article redirect to a specific reviewed product. Your purchase of these products through affiliate links helps to generate commission for Storables.com, at no extra cost. Learn more)
Introduction
Investing in a high-quality washing machine is a smart decision that can simplify your laundry routine. One popular brand that offers innovative features and reliable performance is LG. LG washers are known for their advanced technology and stylish design.
One of the key components of an LG washer is the soap dispenser. This handy feature allows you to conveniently add detergent and fabric softener to your laundry load. However, over time, the soap dispenser may need to be removed and cleaned to maintain its functionality and prevent buildup.
If you’re wondering how to remove the soap dispenser from your LG washer, you’ve come to the right place. In this article, we’ll provide you with a step-by-step guide to safely and effectively remove the soap dispenser from your LG washer.
Before we dive into the process, it’s important to familiarize yourself with the tools and materials you’ll need. This will ensure you have everything on hand to complete the task efficiently and without any hassle.
Key Takeaways:
- Regularly cleaning the soap dispenser of your LG washer is essential for optimal performance and longevity, ensuring proper dispensing of detergent and fabric softener.
- Following the step-by-step guide to remove, clean, and reinstall the soap dispenser can help maintain a well-functioning LG washer and fresh, clean laundry.
Read more: How To Remove Rust From Soap Dispenser
Tools and Materials Required
Before you begin the process of removing the soap dispenser from your LG washer, gather the following tools and materials:
- Screwdriver (Phillips or flat-head, depending on your washer model)
- Small scrub brush or toothbrush
- Mild detergent or vinegar
- Soft cloth or sponge
- Bucket or basin
- Clean water
Having these tools and materials ready will ensure a smooth and efficient process. Now that you’re prepared, let’s move on to the step-by-step guide.
Step 1: Preparation
Before you begin removing the soap dispenser from your LG washer, it’s important to take a few necessary precautions:
- Ensure that the washing machine is unplugged or the power is turned off. This will prevent any accidental electric shocks while working on the appliance.
- Clear the area around the washer to create enough space for maneuvering. Remove any items that may obstruct your access to the soap dispenser.
- Put on a pair of gloves to protect your hands from any sharp edges or cleaning agents you may encounter during the process.
Once you have completed these preparation steps, you’re ready to move on to the next step, which involves disconnecting the power to the washer.
Step 2: Disconnecting the Power
Before you begin working on your LG washer and removing the soap dispenser, it’s crucial to ensure that the power is completely disconnected to avoid any potential accidents. Follow these steps to disconnect the power:
- Locate the main power cord at the back of your LG washer.
- Unplug the cord from the electrical outlet. If your washer is hardwired, you may need to turn off the circuit breaker that supplies power to the appliance.
- Wait for a few minutes to allow any residual electrical charge to dissipate before proceeding with the next steps.
By following these steps, you’ll ensure your safety while working on your LG washer. Now that you’ve disconnected the power, we can move on to the next step of removing the top panel of the washer.
Step 3: Removing the Top Panel
Now that you’ve disconnected the power from your LG washer, it’s time to remove the top panel to gain access to the soap dispenser. Follow these steps to remove the top panel:
- Locate the screws at the back of the top panel. These screws may be covered with small plastic caps.
- Using a screwdriver that matches the type of screws on your washer, carefully remove the screws by turning them counterclockwise. Keep the screws in a safe place to avoid misplacing them.
- Once all the screws are removed, gently slide the top panel towards the back of the washer. You may need to apply a slight amount of force.
- Once the top panel is free from the washer, lift it up and set it aside in a safe place.
Now that the top panel is removed, you have clear access to the internal components of the washer, including the soap dispenser. In the next step, we’ll guide you through the process of accessing the soap dispenser itself.
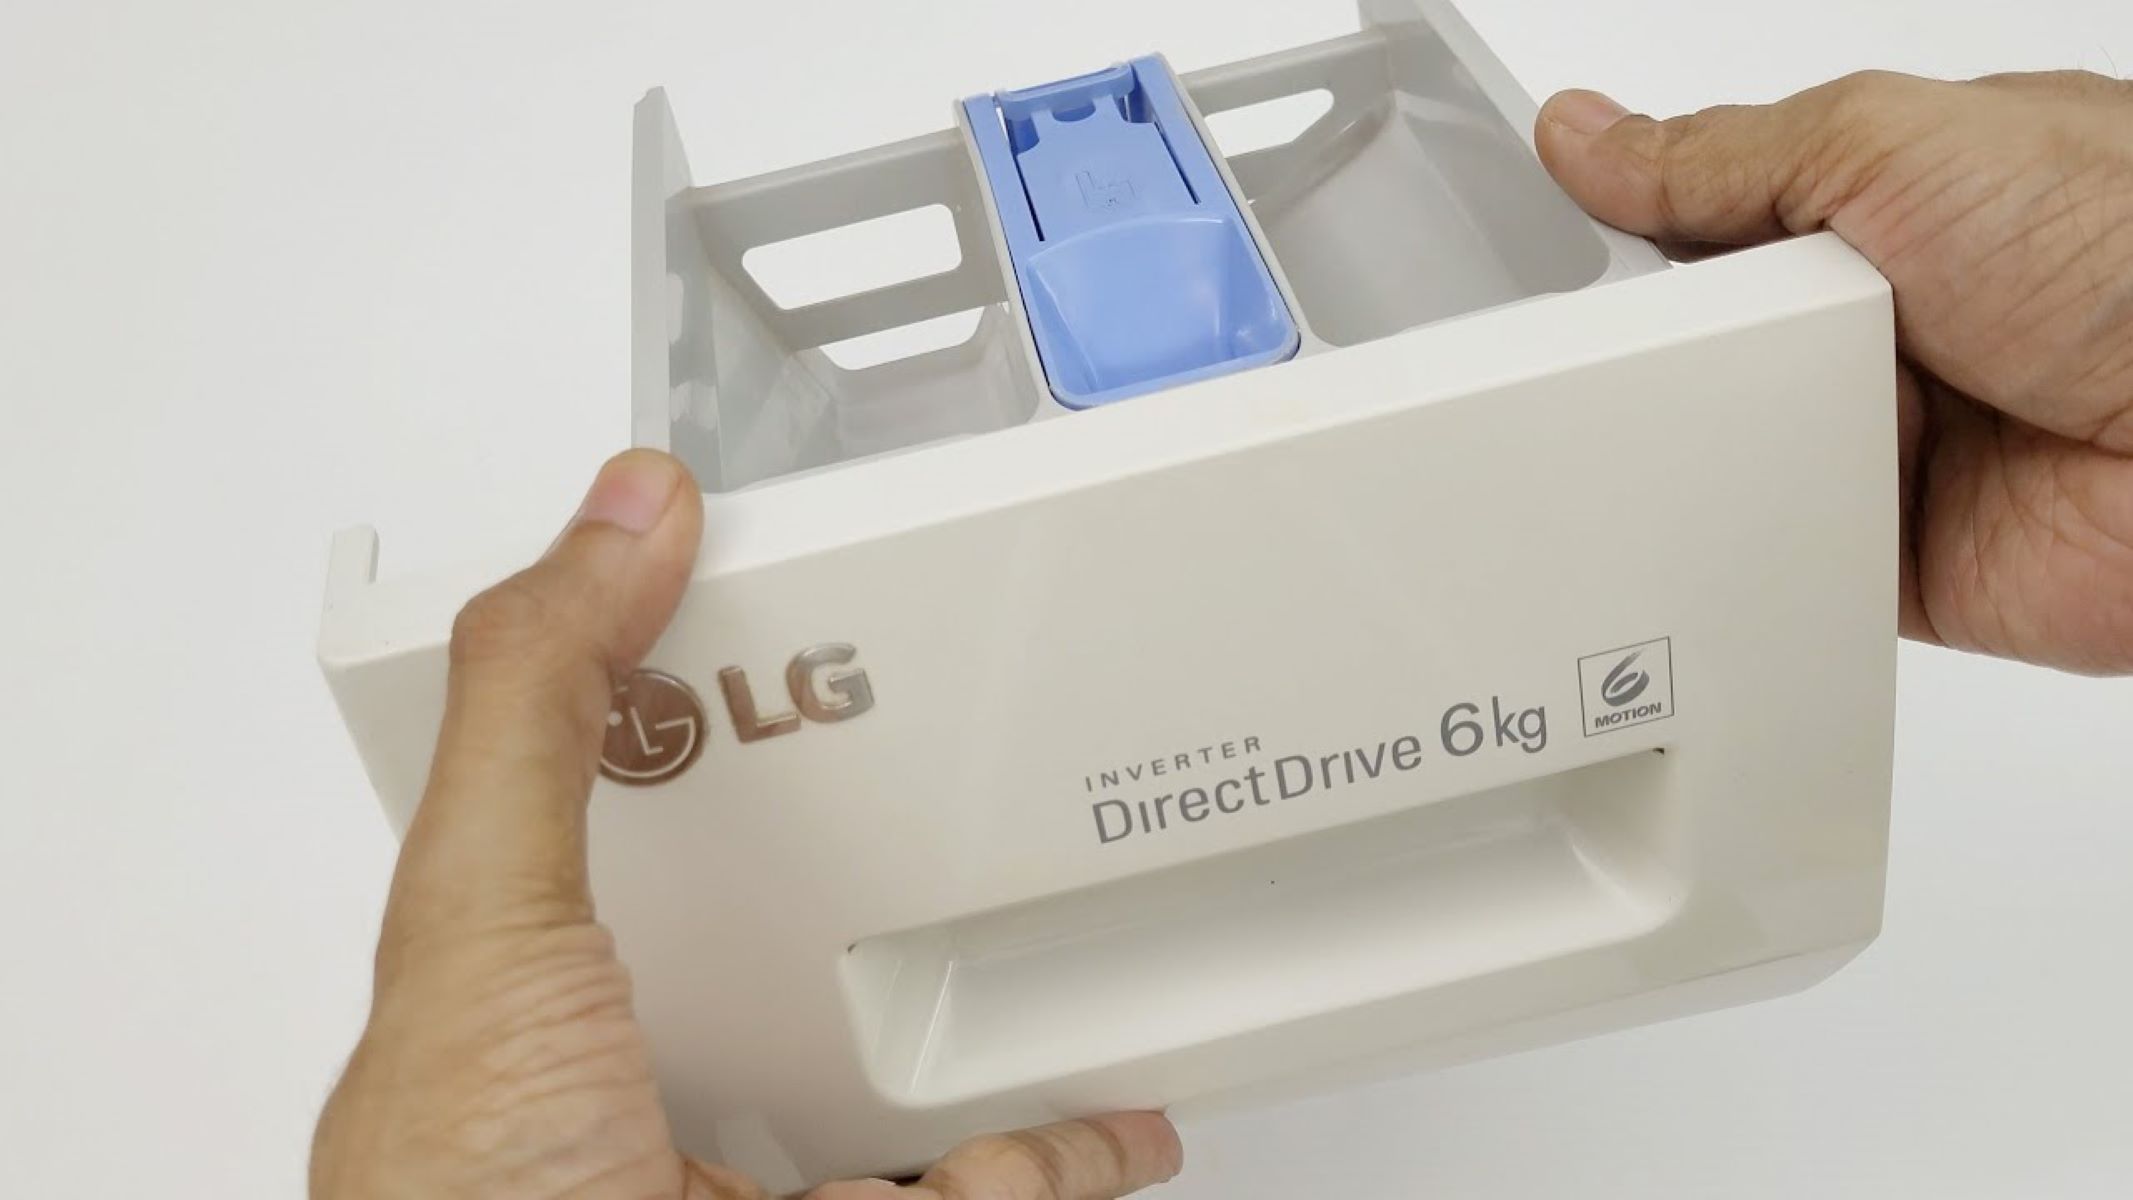
To remove the soap dispenser from an LG washer, locate the dispenser drawer and press the release button to remove it. Then, press the tabs on the sides of the dispenser to release it from the drawer.
Read more: How To Remove Sink Soap Dispenser
Step 4: Accessing the Soap Dispenser
Now that you have successfully removed the top panel of your LG washer, you can access the soap dispenser. Follow these steps to gain access to the soap dispenser:
- Locate the soap dispenser compartment on the top of the washer. It is typically located near the front of the machine.
- You’ll notice that the soap dispenser is secured in place by a series of screws or clips.
- Using a screwdriver or your hands, carefully remove the screws or release the clips that are holding the soap dispenser in place. Be sure to keep track of any screws or clips that you remove.
- Once the screws or clips are removed, the soap dispenser should be easily removable. Gently lift the dispenser and set it aside.
With the soap dispenser removed, you are now ready to move on to the next step, which involves cleaning and reinstalling the dispenser.
Step 5: Detaching the Soap Dispenser
Now that you have accessed the soap dispenser of your LG washer, it’s time to detach it from the washer for cleaning. Follow these steps to detach the soap dispenser:
- Inspect the soap dispenser for any additional screws or clips that may be securing it further.
- If there are any screws, use a screwdriver to remove them. If there are clips, gently pry them open to release the dispenser.
- Once any additional attachments are removed, carefully pull the soap dispenser towards you. It may require a slight amount of force, but be gentle to avoid damaging it.
- As you detach the soap dispenser, be mindful of any hoses or tubes that may be connected to it. If necessary, disconnect these hoses carefully by loosening any clamps or connectors.
- Once the soap dispenser is completely detached, set it aside in a safe place where it will not be accidentally bumped or dropped.
Now that the soap dispenser is detached from the washer, you are one step closer to having a clean and functional dispenser. In the next step, we will guide you through the process of cleaning and reinstalling the dispenser.
Step 6: Cleaning and Reinstalling the Dispenser
With the soap dispenser detached from your LG washer, it’s time to clean it thoroughly before reinstalling. Follow these steps to clean and reinstall the dispenser:
- Fill a bucket or basin with warm water.
- Add a small amount of mild detergent or vinegar to the water. This will help remove any accumulated residue or buildup.
- Using a small scrub brush or toothbrush, dip it into the soapy water and gently scrub the inside and outside of the soap dispenser. Pay close attention to the nozzles and openings, as these areas tend to collect the most residue.
- Rinse the soap dispenser thoroughly with clean water to remove any leftover soap or cleaning agents.
- Use a soft cloth or sponge to wipe down and dry the soap dispenser completely.
- Inspect the dispenser for any cracks or damages. If you notice any, you may need to replace the dispenser before reinstalling it.
- Once the soap dispenser is clean and dry, reattach any hoses or tubes that were disconnected in the previous step. Make sure they are securely fastened.
- Align the soap dispenser with its original position in the washer.
- Slide the dispenser back into place, making sure it fits snugly.
- If there were any screws or clips that you removed earlier, reinsert and secure them to hold the dispenser in place.
Now that the soap dispenser is cleaned and reinstalled, you can move on to the final step of reassembling the LG washer.
Step 7: Reassembling the Washer
Now that you have cleaned and reinstalled the soap dispenser of your LG washer, it’s time to put everything back together. Follow these steps to reassemble your washer:
- Take the top panel of the washer that you set aside earlier.
- Align the top panel with the front and back of the washer.
- Gently slide the top panel towards the front of the washer, making sure it fits securely.
- Once the top panel is in place, locate the screws that you removed in the “Step 3: Removing the Top Panel” section.
- Using a screwdriver, tighten the screws by turning them clockwise. Ensure that they are securely fastened, but be careful not to overtighten them.
- Check that the top panel is properly attached and does not wobble or move when gently pressed.
- Plug the power cord back into the electrical outlet or turn on the circuit breaker to restore power to the washer.
- Double-check that the power is functioning by turning on the washer and running a quick test cycle.
- Once you are satisfied that the washer is functioning properly, close the soap dispenser compartment lid.
Congratulations! You have successfully reassembled your LG washer, with a clean and functional soap dispenser. Regularly maintaining and cleaning the soap dispenser will help ensure optimal performance and longevity of your LG washer.
Remember to consult your LG washer’s user manual for specific instructions and guidance regarding soap dispenser removal and cleaning. If you encounter any difficulties or have concerns, it’s always best to seek assistance from a professional technician.
By following these steps and properly maintaining your LG washer, you can continue to enjoy efficient and hassle-free laundry days.
Conclusion
Removing and cleaning the soap dispenser of your LG washer is a simple yet essential maintenance task that can help keep your machine running smoothly and efficiently. By following the step-by-step guide outlined in this article, you can confidently remove the soap dispenser, clean it thoroughly, and reinstall it to ensure optimal performance.
Remember to always take necessary precautions before working on your washer, such as disconnecting the power and wearing gloves. Additionally, gather all the required tools and materials beforehand to avoid any delays or interruptions during the process.
Regularly cleaning the soap dispenser of your LG washer can prevent buildup and residue, ensuring that your detergent and fabric softener are dispensed correctly. This not only enhances the cleaning performance of your machine but also keeps your clothes smelling fresh and looking their best.
Following the cleaning process, make sure to reassemble the washer correctly, ensuring that the top panel is securely fastened. Double-check that the power is restored and test your washer to ensure proper functionality.
Proper maintenance and care of your LG washer, including cleaning the soap dispenser, can extend the lifespan of the appliance and save you from unnecessary repairs. So, make it a regular part of your laundry routine to keep your washer in top shape.
By dedicating a little time and effort to clean the soap dispenser of your LG washer, you can enjoy the benefits of a well-maintained machine and fresh, clean laundry for years to come.
Frequently Asked Questions about How To Remove Soap Dispenser From Lg Washer
Was this page helpful?
At Storables.com, we guarantee accurate and reliable information. Our content, validated by Expert Board Contributors, is crafted following stringent Editorial Policies. We're committed to providing you with well-researched, expert-backed insights for all your informational needs.


0 thoughts on “How To Remove Soap Dispenser From Lg Washer”