Articles
How To Restring A Ryobi Expand-It
Modified: December 7, 2023
Learn how to restring a Ryobi Expand It trimmer in this informative article. Discover the step-by-step process and expert tips to get your trimmer working like new again.
(Many of the links in this article redirect to a specific reviewed product. Your purchase of these products through affiliate links helps to generate commission for Storables.com, at no extra cost. Learn more)
Introduction
Restringing a Ryobi Expand It trimmer is a simple and essential maintenance task that ensures optimal performance and efficiency. Over time, the trimmer line on your Ryobi Expand It trimmer may become worn out or break, requiring you to replace it. By restringing the trimmer with a fresh line, you can continue to tackle those unruly weeds and achieve a manicured lawn.
In this guide, we will walk you through the step-by-step process of restringing a Ryobi Expand It trimmer. With a few basic tools and materials, you’ll be able to successfully replace the trimmer line and have your trimmer working like new in no time.
Before we begin, it’s important to note that different models of Ryobi Expand It trimmers may have minor variations in terms of the trimmer head design or the specific instructions. Always refer to your trimmer’s user manual for precise instructions. Now, let’s get started!
Key Takeaways:
- Restringing a Ryobi Expand It trimmer is a straightforward process that requires gathering the right tools, removing the old trimmer line, preparing and inserting the new line, and securing it in place. Following these steps ensures optimal trimmer performance and efficiency.
- Prioritizing safety and proper maintenance, such as restringing the Ryobi Expand It trimmer, guarantees outstanding cutting performance and a well-maintained yard. By following the step-by-step guide and testing the restringed trimmer, you can confidently tackle lawn care tasks with ease.
Read more: How To Restring Cellular Blinds
Step 1: Gather the necessary tools and materials
Before you begin the restringing process, it’s crucial to gather all the tools and materials you’ll need. Here’s a list of what you’ll need:
- A replacement trimmer line: Choose a trimmer line that is specifically designed for your Ryobi Expand It trimmer model. Check your trimmer’s user manual for the recommended line diameter and length.
- A pair of safety gloves: Protect your hands from any potential cuts or injuries while working with the trimmer line.
- A pair of safety goggles: Safeguard your eyes from flying debris or any accidents that might occur during the restringing process.
- A flathead screwdriver or a trimmer head removal tool: This tool will be used to remove the trimmer head from the trimmer.
- A clean cloth: Wipe away any dirt or debris from the trimmer head and spool before restringing.
Once you have gathered all the necessary tools and materials, find a clean and well-lit work area to proceed with the restringing process. It’s essential to work in a space where you have enough room to maneuver the trimmer and follow the steps comfortably.
Remember, safety should always be a priority when working with power tools. Wear your safety gloves and goggles throughout the restringing process to protect yourself from any potential hazards.
Now that you have everything you need, let’s move on to the next step – removing the old trimmer line.
Step 2: Remove the old trimmer line
Before you can restring your Ryobi Expand It trimmer, you’ll need to remove the old trimmer line. Follow these steps to remove the old line:
- Turn off the trimmer: Ensure that the trimmer is turned off and that the engine is cooled down before you begin. This will prevent any accidental starting or injuries.
- Remove the trimmer head: Depending on your model, you may need to use a flathead screwdriver or a trimmer head removal tool to detach the trimmer head from the trimmer. Insert the tool into the slot on the trimmer head and rotate counterclockwise to loosen and remove it.
- Inspect the trimmer head: Take a moment to inspect the trimmer head for any signs of wear or damage. If you notice any cracks or excessive wear, it may be a good idea to replace the trimmer head as well.
- Clean the trimmer head: Use a clean cloth to wipe away any dirt, debris, or built-up grass clippings from the trimmer head. This will ensure a clean surface for the new trimmer line to be installed.
- Remove the old trimmer line: Pull out and remove the old trimmer line from the trimmer head. You can either unravel the line from the spool or cut it into smaller pieces for easier removal.
Once you have successfully removed the old trimmer line, you’re ready to move on to the next step – preparing the new trimmer line.
Step 3: Prepare the new trimmer line
Now that you have removed the old trimmer line from your Ryobi Expand It trimmer, it’s time to prepare the new trimmer line. Follow these steps to get it ready:
- Measure and cut the trimmer line: Refer to your trimmer’s user manual to determine the recommended length for the trimmer line. Using a pair of scissors or a utility knife, cut the line to the appropriate length. Make sure to cut it evenly and avoid any frayed ends.
- Inspect the trimmer line: Take a moment to inspect the trimmer line for any signs of damage or wear. If you notice any weak spots or breaks in the line, it’s best to discard it and use a new one.
- Optional: Soak the trimmer line in water: Some experts recommend soaking the trimmer line in water for a few minutes before installation. This can help to soften the line and make it more flexible during use.
Preparing the new trimmer line ensures that it’s the correct length and in good condition for effective trimming. Once you have completed this step, you can move on to the next step – inserting the new trimmer line into the spool.
Step 4: Insert the new trimmer line into the spool
With the new trimmer line prepared, it’s time to insert it into the spool of your Ryobi Expand It trimmer. Follow these steps to ensure proper insertion:
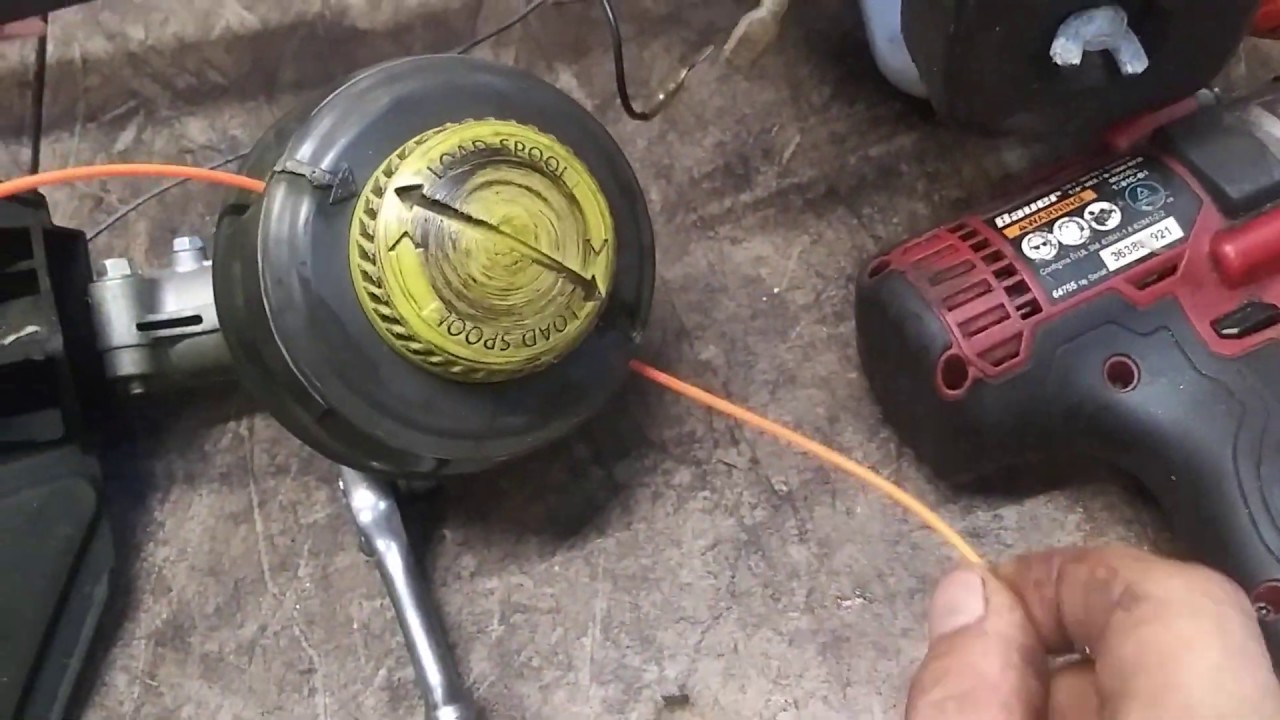
- Locate the line insertion points: Look for the small holes or notches on the trimmer head where the trimmer line is inserted. These insertion points are usually labeled with an arrow or other markings.
- Feed the trimmer line through the holes: Take one end of the trimmer line and carefully insert it into one of the line insertion points. Push it through until about 5 to 6 inches of the line is sticking out from the other side.
- Repeat for the second line insertion point: Take the other end of the trimmer line and insert it into the opposite line insertion point. Again, leave about 5 to 6 inches of line sticking out.
- Ensure even line lengths: Check that both ends of the trimmer line are sticking out from the line insertion points in equal lengths. This will ensure balanced trimming performance.
Inserting the new trimmer line into the spool correctly is essential for smooth operation and efficient cutting. Take your time to ensure that the line is threaded through the proper holes and is sticking out evenly from both sides.
After successfully inserting the new trimmer line into the spool, it’s time to proceed to the next step – winding the trimmer line onto the spool.
When restringing a Ryobi Expand It trimmer, make sure to use the correct size and type of trimmer line recommended by the manufacturer for optimal performance. Follow the manufacturer’s instructions carefully to ensure proper installation and avoid any potential damage to the trimmer.
Read more: How To Restring A Cloth Hammock
Step 5: Wind the trimmer line onto the spool
Now that you have inserted the new trimmer line into the spool of your Ryobi Expand It trimmer, it’s time to wind the line onto the spool. Follow these steps to ensure proper winding:
- Secure the trimmer line: Hold the trimmer line firmly, ensuring that it stays in place on the spool. You can use your fingers or the palm of your hand to keep the line securely in position.
- Rotate the spool in the proper direction: Refer to your trimmer’s user manual to determine the correct direction for winding the line onto the spool. Most Ryobi Expand It trimmers require a counterclockwise rotation, but it’s always best to double-check.
- Begin winding the line: Start rotating the spool in the designated direction, slowly winding the trimmer line around the spool. Ensure that the line is tightly wound and evenly distributed along the spool.
- Keep tension on the line: As you wind the trimmer line, maintain tension on the line to prevent it from unraveling or overlapping. This will ensure smooth and efficient operation when trimming.
Winding the trimmer line onto the spool correctly is crucial for hassle-free trimming and prevents tangles or jams while in use. Take your time and ensure that the line is evenly wound and securely in place on the spool.
Once you have successfully wound the trimmer line onto the spool, it’s time to move on to the next step – securing the trimmer line.
Step 6: Secure the trimmer line
After winding the trimmer line onto the spool of your Ryobi Expand It trimmer, it’s important to secure the line to ensure it stays in place during operation. Follow these steps to properly secure the trimmer line:
- Create anchor points: Locate the small notches or holes on the edge of the spool where the trimmer line can be anchored. These anchor points will prevent the line from unraveling or coming loose during use.
- Insert the trimmer line into the anchor points: Take the end of the trimmer line and insert it into one of the anchor points. Make sure it is securely held in place. Repeat the process for the other end of the trimmer line.
- Tug the trimmer line: Give the trimmer line a gentle tug to ensure that it is securely anchored and will not come loose while trimming. If the line feels loose, reinsert it into the anchor points and tug again to ensure a secure hold.
Securing the trimmer line is essential to prevent it from unraveling and causing interruptions or tangling during use. Make sure to check that the line is properly anchored and firmly in place before proceeding.
With the trimmer line securely anchored, you are now ready to move on to the next step – reassembling the trimmer head.
Step 7: Reassemble the trimmer head
After securing the trimmer line, it’s time to reassemble the trimmer head of your Ryobi Expand It trimmer. Follow these steps to properly reassemble the trimmer head:
- Align the trimmer head: Position the trimmer head back onto the trimmer shaft, ensuring that it aligns correctly and securely with the shaft. Make sure that any grooves or notches on the trimmer head match up with the corresponding features on the shaft.
- Tighten the trimmer head: Use a flathead screwdriver or the trimmer head removal tool to tighten the trimmer head onto the trimmer shaft. Rotate it clockwise until it is securely fastened. Take care not to overtighten, as this may cause damage.
- Test the trimmer head: Give the trimmer head a few gentle pulls to ensure that it is securely attached and will not come loose during operation. If it feels loose, double-check the tightening and make any necessary adjustments.
Reassembling the trimmer head is an important step to ensure proper functionality and safety during use. Take your time to align and tighten the trimmer head correctly, ensuring that it is securely fastened to the trimmer shaft.
Once you have successfully reassembled the trimmer head, you are now ready for the final step – testing the restringed Ryobi Expand It trimmer.
Step 8: Test the restringed Ryobi Expand It trimmer
After completing the restringing process for your Ryobi Expand It trimmer, it’s important to test its functionality before putting it to use. Follow these steps to test the restringed trimmer:
- Ensure the trimmer is in a safe and clear area: Find an open space where you can safely test the trimmer without any obstructions or potential hazards.
- Turn on the trimmer: Depending on your model, either press the power button or engage the throttle to start the trimmer. Allow the trimmer to warm up for a few moments before beginning the test.
- Engage the trimmer head: With a firm grip on the trimmer, engage the trimmer head by pressing the appropriate button or lever. The trimmer line should start spinning and cutting through the air.
- Monitor performance: Pay attention to the performance of the trimmer as you navigate through grass or weeds. Check for smooth operation, efficient cutting, and proper line advancement. Ensure that the trimmer line remains securely in place.
- Inspect the trimmer line: After testing, examine the trimmer line to ensure it is still properly wound and hasn’t come loose or unraveled. If needed, make any necessary adjustments or re-secure the line.
Testing the restringed Ryobi Expand It trimmer allows you to ensure that the trimmer line is functioning correctly and that the trimmer is ready for use. It also provides an opportunity to make any final adjustments or address any issues that may arise during the test.
If you encounter any problems during the test, refer to your trimmer’s user manual for troubleshooting tips. Remember to always follow proper safety precautions while operating the trimmer.
With the successful test of your restringed Ryobi Expand It trimmer, you can now confidently use it to tackle your lawn maintenance tasks with ease.
Read more: How To Restring Horizontal Blinds
Conclusion
Restringing a Ryobi Expand It trimmer is an essential maintenance task that ensures optimal performance and efficiency. By following the step-by-step process outlined in this guide, you can easily replace the trimmer line and have your trimmer working like new again.
Throughout the restringing process, it’s important to gather all the necessary tools and materials, remove the old trimmer line, prepare the new trimmer line, insert it into the spool, wind it onto the spool, secure it in place, reassemble the trimmer head, and finally, test the restringed trimmer.
Always refer to your trimmer’s user manual for specific instructions that may pertain to your particular model. It’s important to prioritize safety by wearing protective gloves and goggles while working with power tools.
By properly maintaining your Ryobi Expand It trimmer and routinely restringing it, you can ensure that it remains in good working condition and consistently delivers outstanding cutting performance.
Now, armed with the knowledge and skills to restring your Ryobi Expand It trimmer, you can confidently tackle your lawn care tasks, keeping your yard looking neat and well-maintained.
Frequently Asked Questions about How To Restring A Ryobi Expand-It
Was this page helpful?
At Storables.com, we guarantee accurate and reliable information. Our content, validated by Expert Board Contributors, is crafted following stringent Editorial Policies. We're committed to providing you with well-researched, expert-backed insights for all your informational needs.


0 thoughts on “How To Restring A Ryobi Expand-It”