Articles
How To Soundproof A Closet
Modified: October 28, 2024
Learn how to soundproof your closet with expert interior design tips. Create a peaceful and noise-free space with our step-by-step guide.
(Many of the links in this article redirect to a specific reviewed product. Your purchase of these products through affiliate links helps to generate commission for Storables.com, at no extra cost. Learn more)
Introduction
Do you have a noisy closet that’s disrupting your peace and quiet? Whether you’re using your closet as a personal storage space or converting it into a home office or a recording studio, soundproofing the area can make a significant difference in reducing unwanted noise.
Soundproofing a closet involves creating barriers that prevent sound from entering or escaping the space. By implementing simple and effective techniques, you can transform your noisy closet into a quiet sanctuary.
In this article, we’ll walk you through the process of soundproofing your closet from top to bottom. Whether you’re dealing with internal noise from appliances, nearby traffic, or loud neighbors, we’ve got you covered. Let’s dive in and discover the steps to create a peaceful and tranquil closet environment.
Key Takeaways:
- Transform your noisy closet into a peaceful sanctuary by understanding soundproofing principles, sealing gaps, adding weatherstripping, using soundproofing curtains, installing acoustic foam panels, choosing the right flooring, and finalizing the setup.
- Achieve a noticeably quieter and more peaceful closet by combining multiple soundproofing techniques, balancing functionality with aesthetics, and conducting regular maintenance to ensure continued effectiveness.
Read more: How To Soundproof Floor
Understanding Soundproofing
Before we delve into the specifics of soundproofing a closet, it’s essential to understand the principles of soundproofing. Soundproofing is the process of minimizing the transmission of sound waves between spaces. The goal is to create a barrier that prevents sound from entering or leaving a room.
Soundproofing works by employing various techniques to reduce and absorb sound waves. These techniques include sealing gaps and cracks, adding insulation, using soundproof curtains, installing acoustic foam panels, soundproofing walls and ceilings, and selecting the right flooring materials.
It’s important to note that achieving complete soundproofing, where not even a whisper can be heard, is nearly impossible. The goal is to significantly reduce the amount of noise that enters or escapes the closet, creating a quieter and more peaceful environment.
When deciding how much soundproofing is necessary, consider the type of noise you’re trying to block. Is it low-frequency bass, high-frequency voices, or a combination of sounds? Identifying the primary sources of noise will help you determine which soundproofing techniques will be most effective.
Additionally, keep in mind that soundproofing techniques can vary in terms of complexity and effectiveness. Some techniques may provide better results than others, depending on the specific circumstances of your closet and the level of soundproofing desired.
Now that we have a basic understanding of soundproofing, let’s move on to assessing the soundproofing needs of your closet.
Assessing Closet Soundproofing Needs
Before you commence the soundproofing process, it’s crucial to assess the specific soundproofing needs of your closet. This involves identifying the sources of noise and evaluating the current insulation and structural integrity of the closet.
Start by determining the type of noise you need to address. Is the closet exposed to external noise, such as traffic or neighbors? Or is the noise coming from within the house, such as appliances or HVAC systems? Understanding the source of the noise will assist you in selecting the most effective soundproofing solutions.
Next, inspect the closet for any gaps, cracks, or holes that may allow sound to leak in or out. Check around the door, windows, ventilation ducts, and any other openings. Even the smallest gaps can contribute to sound transmission. Mark these areas for later treatment.
In addition to sealing gaps, consider the materials used in the closet’s construction. Are the walls thin and inadequately insulated? Is there any sound-dampening material already in place? Evaluating the current state of insulation and construction will help determine which soundproofing techniques will be most beneficial.
Once you have assessed the soundproofing needs of your closet, you can proceed to implement the appropriate soundproofing solutions. In the following sections, we will explore various techniques to seal gaps, add insulation, and create a more soundproof environment for your closet.
Remember, every closet is unique, and the specific needs may vary. It’s important to adapt the soundproofing techniques to suit your closet’s characteristics and address the specific noise issues you are encountering. With a thorough assessment and the right soundproofing strategies in place, you can transform your closet into a quiet and peaceful space.
Sealing Gaps and Cracks
One of the key steps in soundproofing a closet is to seal any gaps, cracks, or holes that may allow sound to leak in or out. These openings can significantly contribute to sound transmission and reduce the effectiveness of other soundproofing techniques. Here’s how you can effectively seal gaps and cracks in your closet:
- Inspect the closet: Carefully examine the closet for any visible gaps or cracks. Pay close attention to areas around the door, windows, electrical outlets, and any ventilation ducts. Even small openings can have a significant impact on soundproofing.
- Apply weatherstripping: Weatherstripping is an excellent option to seal gaps around the edges of the door. Choose a weatherstripping material that is suitable for your closet door, such as adhesive foam tape or rubber gaskets. Apply it to the door frame to create a tight seal that prevents sound leakage.
- Seal gaps with caulk: Use a high-quality acoustic caulk to seal any visible gaps or cracks in the closet walls or ceiling. Apply the caulk generously to ensure a proper seal. Pay special attention to joints and corners where sound is likely to escape or enter.
- Install door sweeps: Door sweeps are another effective way to seal the gap between the bottom of the door and the floor. Choose a door sweep that is specifically designed for soundproofing purposes. It will create a tight seal and prevent sound from traveling through the bottom of the door.
- Consider acoustic putty: Acoustic putty is a specially formulated material that is used to seal gaps around electrical outlets, light switches, and other small openings. It is malleable and can be easily applied to fill in the gaps, preventing sound leakage.
By sealing gaps and cracks in your closet, you can significantly reduce the amount of sound that enters or escapes the space. These simple and affordable solutions can make a noticeable difference in the overall soundproofing effectiveness of your closet.
Now that you have successfully sealed the gaps and cracks, it’s time to explore additional soundproofing techniques to further enhance the acoustic insulation of your closet.
Adding Weatherstripping to Closet Door
One effective method of soundproofing your closet is by adding weatherstripping to the door. Weatherstripping creates a tight seal around the edges of the door, preventing sound from escaping or entering through gaps. Here’s how you can add weatherstripping to your closet door:
- Choose the right weatherstripping: There are various types of weatherstripping available, such as adhesive foam tape, rubber gaskets, or door sweeps. Consider the material that suits your closet door best for achieving optimum soundproofing results.
- Measure the door: Before applying weatherstripping, measure the dimensions of your closet door. This will help you determine the length of weatherstripping needed for a proper fit.
- Clean the door surface: Ensure that the surface of the door is clean and free from dust or debris. Use a mild detergent or cleaning solution to wipe down the door and remove any dirt or residue.
- Apply weatherstripping to the door frame: Carefully peel off the backing of the weatherstripping and align it along the edges of the door frame. Press firmly to secure it in place and create a snug seal. Be sure to cover all gaps and spaces where sound may leak.
- Trim the excess: Once the weatherstripping is applied, trim any excess length using a utility knife or scissors. Ensure a clean and neat finish.
- Test for effectiveness: Close the closet door and check for any visible gaps or spaces. If necessary, make adjustments or add additional weatherstripping to areas that require better sealing.
Adding weatherstripping to your closet door can significantly reduce sound transmission through gaps and cracks. It creates a barrier that prevents noise from leaking into or out of the closet, enhancing the overall soundproofing efficiency.
Remember to regularly inspect the weatherstripping and replace it if it becomes damaged or worn out over time. With proper maintenance, your weatherstripping will continue to provide effective soundproofing for your closet door for years to come.
Now that you have sealed gaps and added weatherstripping to your closet door, let’s explore other soundproofing strategies to further enhance the acoustic insulation of your closet.
Read more: How To Soundproof A Shed
Using Soundproofing Curtains
Soundproofing curtains are a practical and stylish solution to reduce noise and enhance the soundproofing of your closet. These curtains are designed with specialized materials that absorb and block sound waves, helping to create a quieter environment. Here’s how you can effectively utilize soundproofing curtains in your closet:
- Choose the right curtains: Look for curtains specifically labeled as “soundproof” or “acoustic.” These curtains are made with heavy and dense materials that have sound-absorbing properties.
- Measure your closet windows: Take precise measurements of your closet windows to determine the size of curtains you need. Ensure that the curtains will fully cover the windows and provide adequate soundproofing coverage.
- Hang the curtains: Install curtain rods or tracks above the windows according to the manufacturer’s instructions. Hang the soundproofing curtains, making sure they are pulled tight and reach down to the floor to block sound from entering or escaping through the windows.
- Consider double-layering curtains: For maximum soundproofing effectiveness, you can double-layer the curtains. Hang a sheer or decorative curtain in front of the soundproofing curtain to add an aesthetic touch while further blocking sound waves.
- Seal gaps and openings: To optimize the soundproofing capabilities of the curtains, ensure that there are no gaps or openings around the sides or bottom. Use curtain tiebacks or magnetic strips to create a tight seal when the curtains are closed.
- Utilize floor-to-ceiling curtains: If your closet has additional wall space, consider installing floor-to-ceiling curtains. This will provide maximum coverage and create a barrier that absorbs and reduces sound reflections.
Soundproofing curtains not only help to minimize noise but also add a touch of elegance and style to your closet. They come in a variety of colors and designs, allowing you to choose curtains that complement your existing decor.
Remember to periodically clean your soundproofing curtains to remove dust and maintain their functionality. Follow the manufacturer’s instructions for specific care and maintenance guidelines.
By incorporating soundproofing curtains into your closet, you can significantly improve the overall acoustic insulation and enjoy a quieter and more peaceful space.
Next, let’s explore the benefits of installing acoustic foam panels in your closet to further enhance the soundproofing capabilities.
Use soundproofing materials like acoustic foam or mass-loaded vinyl to line the walls of the closet. Seal any gaps or cracks with weatherstripping to prevent sound leakage.
Installing Acoustic Foam Panels
Acoustic foam panels are a popular choice for soundproofing closets due to their excellent sound absorption properties. These panels are designed to reduce echo and reverberation, resulting in a quieter and more controlled acoustic environment. Here’s how you can install acoustic foam panels in your closet:
- Measure the walls: Take precise measurements of the closet walls that you wish to cover with acoustic foam panels. This will help you determine the number and size of panels you need to purchase.
- Choose the right foam panels: Look for high-quality acoustic foam panels that are designed for soundproofing purposes. Consider the thickness, density, and overall performance of the panels.
- Prepare the walls: Before installing the acoustic foam panels, ensure that the walls are clean and free from dust or debris. Use a mild detergent or cleaning solution to wipe down the walls and remove any dirt or residue.
- Apply adhesive: Use a strong adhesive that is specifically designed for mounting acoustic foam panels. Apply the adhesive to the back of each panel, following the manufacturer’s instructions for proper application.
- Position the panels: Carefully place each foam panel on the wall, pressing firmly to ensure proper adhesion. Start from one corner and work your way across the wall, aligning the panels as you go.
- Fill the entire wall: Continue installing foam panels until the entire desired wall surface is covered. Make sure there are no gaps or spaces between the panels to maximize sound absorption.
- Consider using corner bass traps: If your closet has corners, consider adding corner bass traps. These specialized foam panels help reduce low-frequency sound buildup and enhance the overall soundproofing effectiveness.
Acoustic foam panels are not only functional but also add a unique aesthetic appeal to your closet. They come in various shapes, sizes, and colors, allowing you to create a visually pleasing and acoustically optimized space.
Keep in mind that the coverage area and placement of the acoustic foam panels will depend on the specific soundproofing needs of your closet. Experiment with different configurations to achieve the desired sound reflection and absorption levels.
With the installation of acoustic foam panels, your closet will benefit from reduced echo and improved sound quality, providing a more enjoyable and tranquil space.
Next, let’s explore how you can soundproof the walls of your closet to further enhance its acoustic insulation.
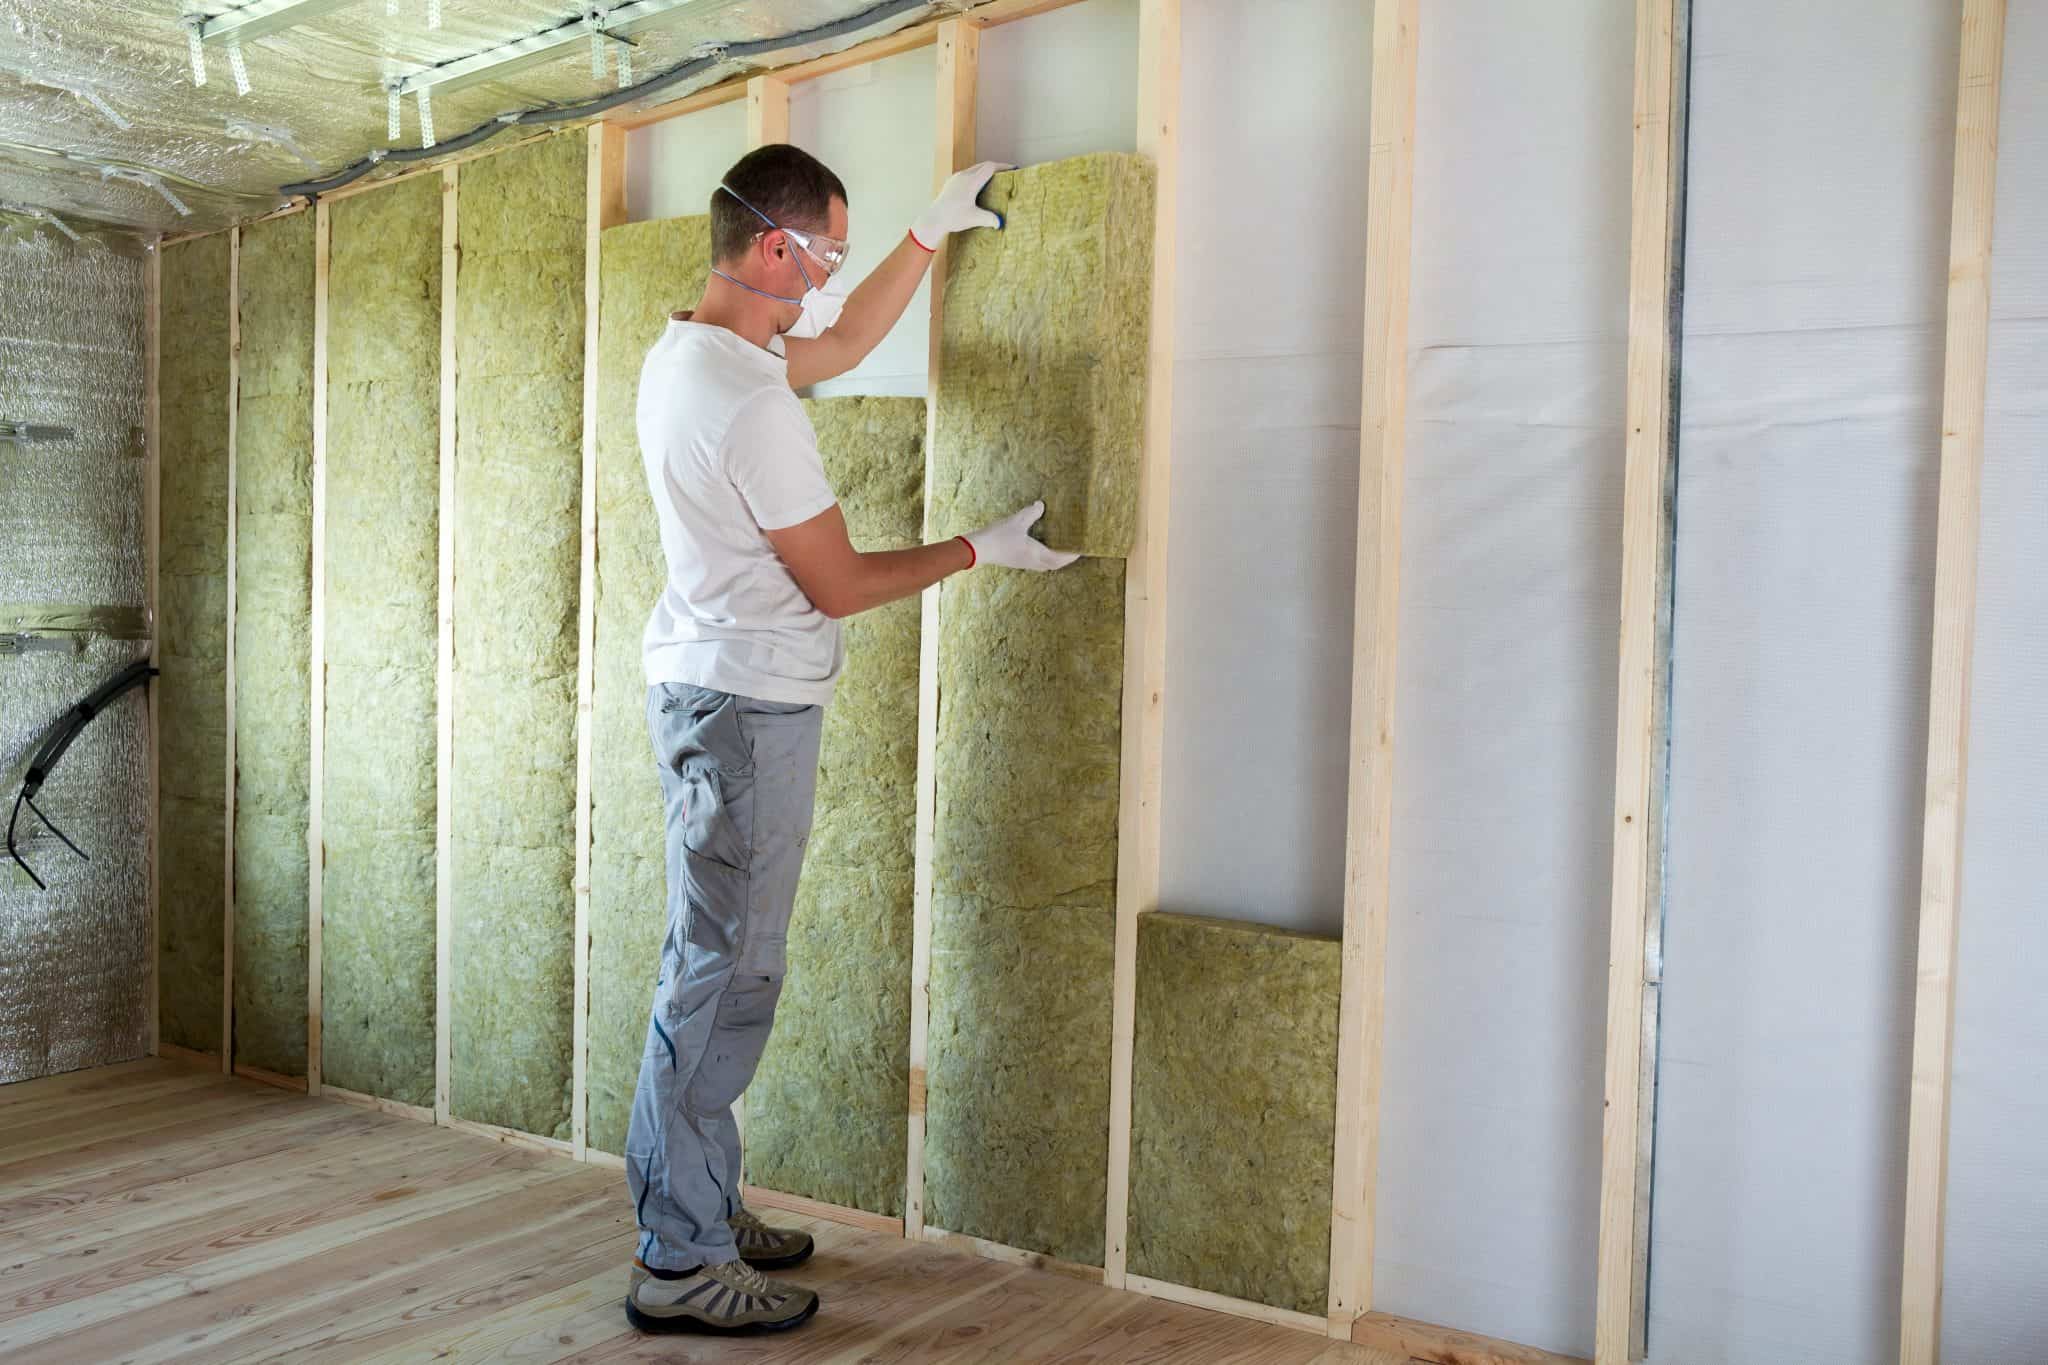
Soundproofing Closet Walls
Soundproofing the walls of your closet is an essential step in creating an acoustically insulated space. By reducing sound transmission through the walls, you can enjoy a quieter and more peaceful environment. Here’s how you can soundproof the walls of your closet:
- Assess the existing walls: Evaluate the current state of your closet walls. Determine if they are thin and transmit sound easily or if they have insulation that can be enhanced. This will help you decide which soundproofing methods to employ.
- Add insulation: If your closet walls lack proper insulation, consider adding soundproof insulation material. This can include acoustic insulation batts or spray foam insulation. Install the insulation in the wall cavities to minimize sound transmission.
- Use mass-loaded vinyl (MLV): MLV is a dense and flexible material that effectively blocks sound. Install MLV sheets on the closet walls, creating a solid barrier that prevents sound waves from passing through. Remember to seal the edges and seams to maintain its effectiveness.
- Apply soundproof paint: Soundproof paint is an innovative option that can help reduce sound transmission. It contains special additives that enhance its sound-absorbing properties. Apply several coats of soundproof paint to the closet walls for added soundproofing benefits.
- Consider acoustic wall panels: Acoustic wall panels are designed to absorb sound and reduce echo. Install these panels on the closet walls to dampen sound waves and improve overall soundproofing. Choose panels with a high noise reduction coefficient (NRC) for optimal results.
- Seal gaps and outlets: Similar to other soundproofing methods, sealing gaps, cracks, and electrical outlets on the closet walls is crucial. Use acoustic caulk to seal any visible openings and outlets to prevent sound leakage.
Combining multiple soundproofing techniques for your closet walls will yield the best results. The specific methods you choose will depend on the level of soundproofing you desire and your budget constraints.
Keep in mind that addressing both airborne and impact noise (such as footsteps or banging) will provide comprehensive soundproofing for your closet walls.
With the implementation of these soundproofing techniques, you can significantly reduce sound transmission through the closet walls, creating a more tranquil and isolated space.
Next, let’s move on to soundproofing the ceiling of your closet to complete the acoustic insulation process.
Soundproofing Closet Ceiling
Soundproofing the ceiling of your closet is an integral part of creating a fully insulated and noise-controlled space. By reducing sound transmission from above, you can enjoy a more peaceful and quiet environment. Here’s how you can soundproof the ceiling of your closet:
- Add ceiling insulation: Insulating the ceiling is an effective way to reduce sound transmission. Consider installing soundproof insulation material, such as acoustic batts or blown-in insulation, between the ceiling joists. This will help absorb and dampen sound waves.
- Install resilient channels: Resilient channels are metal strips that help decouple the ceiling from the structure, minimizing sound transfer. Mount the channels perpendicular to the ceiling joists before attaching the drywall. This technique reduces vibrations and airborne noise transmission.
- Use acoustic ceiling tiles: Acoustic ceiling tiles are designed to absorb sound and improve room acoustics. Install these specialized tiles on the ceiling to reduce echo and block noise. Choose tiles with a high noise reduction coefficient (NRC) for optimal results.
- Apply soundproofing paint: Soundproof paint can also be applied to the closet ceiling to enhance soundproofing. Use paint specifically formulated with sound-absorbing additives to reduce noise transmission. Apply multiple coats as directed by the manufacturer.
- Eliminate ceiling gaps: Inspect the ceiling for any gaps or openings that may allow sound to leak. Use acoustic caulk or sealant to fill in these gaps and create a tight seal. Pay attention to areas around light fixtures, ventilation ducts, and other ceiling openings.
- Consider hanging a soundproofing blanket: If additional soundproofing is required, you can hang a soundproofing blanket from the ceiling. These blankets are made from dense materials that absorb sound waves and reduce noise reflection.
Implementing these soundproofing techniques for your closet ceiling will greatly reduce sound transmission, providing you with a more serene and isolated space.
Remember that the combination of ceiling and wall soundproofing methods will offer comprehensive noise reduction for your closet. Assess the specific needs of your closet and choose the techniques that best align with your soundproofing goals.
Now that you have soundproofed the walls and ceiling of your closet, let’s move on to the next step: choosing the right flooring materials to further enhance the acoustic insulation.
Read more: How To Soundproof A Balcony
Choosing the Right Flooring
When it comes to soundproofing your closet, selecting the right flooring materials can make a significant difference in reducing noise transmission. The type of flooring you choose can impact the overall acoustic insulation of your closet. Here are some factors to consider when choosing the right flooring:
- Select sound-absorbing materials: Opt for flooring materials that have good sound-absorbing properties. Materials such as carpet, cork, or rubber are excellent choices for minimizing noise transmission. These materials help to dampen footsteps and absorb sound waves.
- Consider carpet or carpet tiles: Carpet is a popular and effective choice for soundproofing due to its ability to absorb sound. Install wall-to-wall carpeting or consider carpet tiles to cover the closet floor. The thicker the carpet or carpet padding, the better it will be at reducing noise.
- Use area rugs: If you prefer a hard surface flooring, consider placing area rugs in strategic locations within the closet. Rugs with thick padding will add an extra layer of sound absorption, reducing noise reflection and impact sound.
- Choose cork or rubber flooring: Cork and rubber are excellent choices for soundproofing due to their natural sound-dampening properties. These materials help to absorb impact sound and reduce vibrations from footsteps or other movements.
- Avoid hard surface flooring: Hard surface flooring options like hardwood or tile tend to reflect sound, making them less ideal for soundproofing. If you prefer hard surface flooring, consider using thick underlayment or soundproofing mats beneath the flooring to help reduce noise transmission.
It’s important to note that in addition to the type of flooring material, proper installation is essential for maximizing soundproofing benefits. Ensure that the flooring is installed with appropriate underlayment or soundproofing mats to further reduce noise vibrations.
Remember to balance your soundproofing needs with personal preferences and functionality. Choose flooring materials that not only provide adequate soundproofing but also align with your aesthetic and durability requirements.
With the right flooring materials in place, you can enhance the overall acoustic insulation of your closet, creating a quieter and more enjoyable space.
Now that we have covered the various aspects of soundproofing your closet, let’s finalize the soundproofing setup and conclude our guide.
Finalizing the Soundproofing Setup
Now that you have implemented various soundproofing techniques throughout your closet, it’s time to finalize the setup to ensure maximum effectiveness. Here are some key steps to take when finalizing the soundproofing of your closet:
- Inspect for any remaining gaps or cracks: Conduct a thorough inspection of your closet to identify any remaining gaps or cracks that may allow sound to leak. Use acoustic caulk or sealant to fill in these openings, ensuring a tight and sealed space.
- Check for sound leaks: Close the closet door and carefully listen for any signs of sound leakage. If you detect any areas where sound is still getting through, focus on reinforcing the soundproofing in those specific spots. This may involve adding additional weatherstripping, adhesive foam tape, or other sealing methods.
- Consider soundproofing the ventilation system: If your closet has a ventilation system that contributes to noise transmission, consider incorporating soundproofing materials around the vents. This can help minimize the transfer of sound from the outside or other parts of the house.
- Pay attention to lighting: Look for lighting fixtures that may generate noise or vibrations. If necessary, replace these fixtures with more soundproof alternatives. Additionally, consider using soundproofing materials around light fixtures to reduce sound transmission.
- Test the overall soundproofing: Once you have completed the soundproofing setup, take the time to test the effectiveness of your efforts. Play some music or generate noise inside the closet and listen from outside to assess the sound reduction. Adjust and fine-tune the soundproofing as needed.
By thoroughly finalizing the soundproofing setup, you can ensure that your closet is adequately insulated against noise, creating a peaceful and isolated space.
It’s important to note that while soundproofing can significantly reduce noise, complete silence may not be achievable. Environmental factors, such as external noise sources or structural limitations, may still impact the overall soundproofing effectiveness. However, by implementing the mentioned techniques, you can achieve a substantial reduction in noise transmission.
Overall, the successful soundproofing of your closet will enhance your comfort and allow you to use the space without disturbance. Enjoy the tranquility of your soundproofed closet!
If you have any further questions or need assistance, feel free to reach out. Good luck with your soundproofing project!
Conclusion
Soundproofing your closet is a worthwhile endeavor that can transform a noisy space into a peaceful sanctuary. By implementing the right techniques and materials, you can significantly reduce unwanted noise and create a more enjoyable environment. Here’s a summary of the key steps to soundproofing your closet:
- Understanding soundproofing principles and the specific noise challenges in your closet.
- Assessing the soundproofing needs of your closet, including identifying sources of noise and sealing gaps and cracks.
- Adding weatherstripping to the closet door to prevent sound leakage.
- Using soundproofing curtains or blinds to block noise from entering or escaping through windows.
- Installing acoustic foam panels on the walls to absorb sound waves and reduce echo.
- Soundproofing the closet ceiling through insulation, acoustic tiles, or paint.
- Choosing flooring materials that absorb and dampen sound, such as carpet, cork, or rubber.
- Finalizing the soundproofing setup by inspecting for any remaining gaps, testing for sound leaks, and addressing other sources of noise.
Remember, no soundproofing method is foolproof, and complete silence may not be achievable. However, by combining multiple techniques and adapting them to your specific needs, you can create a noticeably quieter and more peaceful closet.
Throughout the soundproofing process, it’s important to balance functionality with aesthetics. Incorporate materials and solutions that not only offer effective sound insulation but also complement the overall design of your closet.
Regular maintenance and periodic inspections of the soundproofing components are essential to ensure their continued effectiveness. Address any wear or damage promptly to maintain optimal soundproofing performance.
Soundproofing your closet provides a myriad of benefits, from creating a tranquil environment for relaxation or focus to reducing noise disruptions in other areas of your living space. Take the time to implement the soundproofing techniques outlined in this guide, and enjoy the difference they can make in enhancing the acoustic insulation of your closet.
If you have any further questions or need assistance, don’t hesitate to seek professional advice or consult with an experienced soundproofing specialist. Good luck with your soundproofing journey, and may your closet become a haven of peace and quiet!
Frequently Asked Questions about How To Soundproof A Closet
Was this page helpful?
At Storables.com, we guarantee accurate and reliable information. Our content, validated by Expert Board Contributors, is crafted following stringent Editorial Policies. We're committed to providing you with well-researched, expert-backed insights for all your informational needs.


0 thoughts on “How To Soundproof A Closet”