Home>Articles>How To Install 12×12 Tongue And Groove Ceiling Tiles

Articles
How To Install 12×12 Tongue And Groove Ceiling Tiles
Modified: December 7, 2023
Learn how to easily install 12x12 tongue and groove ceiling tiles with our step-by-step articles. Transform your space with this stylish and durable solution.
(Many of the links in this article redirect to a specific reviewed product. Your purchase of these products through affiliate links helps to generate commission for Storables.com, at no extra cost. Learn more)
Introduction
Welcome to the comprehensive guide on how to install 12×12 tongue and groove ceiling tiles! If you’re looking to add a touch of elegance and sophistication to your space, installing ceiling tiles is a great way to achieve that. Tongue and groove ceiling tiles provide a seamless and polished look that can elevate the overall aesthetic of any room.
Whether you are a seasoned DIY enthusiast or a beginner, this step-by-step guide will walk you through the process of installing 12×12 tongue and groove ceiling tiles. We will cover everything from the materials needed to the finishing touches, ensuring that you have all the information you need to complete a successful installation.
Before we dive into the installation process, let’s go over the materials you will need:
- 12×12 tongue and groove ceiling tiles
- Adhesive suitable for ceiling tile installation
- Measuring tape
- Pencil or marker
- Straight edge or level
- Utility knife or tin snips
- Construction adhesive
- Paint or stain (optional for finishing)
Now that you have gathered all the necessary materials, let’s move on to the installation process. Remember to always wear appropriate safety gear such as gloves and goggles when handling tools and materials.
Key Takeaways:
- Elevate your space with elegance and sophistication by installing 12×12 tongue and groove ceiling tiles. Follow the step-by-step guide for a seamless and professional-looking installation.
- Prioritize safety, precision, and attention to detail to achieve a visually appealing and durable ceiling. From preparation to finishing touches, create a polished and refined living space.
Materials Needed
Before you begin the installation process, it’s important to gather all the necessary materials. Having everything on hand will make the installation smoother and more efficient. Here’s a list of the materials you’ll need:
- 12×12 tongue and groove ceiling tiles: These are the main materials for the installation. Measure your ceiling area to determine the quantity of tiles needed.
- Adhesive suitable for ceiling tile installation: Look for an adhesive that is specifically designed for ceiling tiles. This will ensure a strong and durable bond between the tiles and the ceiling.
- Measuring tape: You’ll need a measuring tape to accurately measure the dimensions of your ceiling and the tiles.
- Pencil or marker: Use a pencil or marker to mark the measurements on the tiles.
- Straight edge or level: A straight edge or level will help you keep the tiles aligned and ensure a straight installation.
- Utility knife or tin snips: These tools will be used to cut the tiles to fit around obstacles such as light fixtures or vents.
- Construction adhesive: In addition to the adhesive for the tiles, you’ll also need construction adhesive to secure the tiles to the ceiling.
- Paint or stain (optional for finishing): If you want to customize the look of the tiles, you can paint or stain them before or after installation.
Make sure you have all these materials ready before you start the installation. This will save you time and allow you to complete the project without interruptions.
Now that you have gathered all the necessary materials, you’re ready to move on to the next step: preparation. This step is crucial for ensuring a successful installation, so be sure to follow it carefully.
Step 1: Preparation
Proper preparation is key to a successful installation of the 12×12 tongue and groove ceiling tiles. Follow these steps to prepare your space:
- Clean the ceiling: Start by removing any dirt, dust, or debris from the ceiling. Use a broom or vacuum cleaner to thoroughly clean the surface.
- Inspect the ceiling: Carefully inspect the ceiling for any damage or sagging areas. If you notice any issues, address them before proceeding with the installation.
- Turn off the power: If you’ll be working near electrical fixtures, turn off the power to avoid any accidents. This is particularly important when installing tiles around light fixtures.
- Measure the ceiling: Use a measuring tape to determine the dimensions of your ceiling. This will help you calculate the number of tiles needed and plan the layout.
- Create a layout plan: Before you start installing the tiles, create a layout plan to ensure a balanced and symmetrical appearance. This will help you determine the starting point and the direction in which to install the tiles.
- Mark the starting point: Use a pencil or marker to mark the starting point on the ceiling. This will serve as a reference point during the installation process.
By thoroughly preparing your space, you’ll ensure that the installation process goes smoothly and that the end result is a polished and professional-looking ceiling. Once you have completed these preparation steps, you’re ready to move on to the next step: measuring and cutting the tiles.
Step 2: Measuring and Cutting the Tiles
Now that you have completed the preparation stage, it’s time to measure and cut the 12×12 tongue and groove ceiling tiles. Follow these steps:
- Measure the tiles: Place a tile on the ceiling, starting from the marked starting point. Measure the remaining space left at the end of the row to determine the width of the last tile. This will help you determine if any tiles need to be cut for a proper fit.
- Mark the cuts: Using a pencil or marker, mark the areas on the tiles that need to be cut to fit around light fixtures or other obstacles.
- Use a straight edge: Place a straight edge or level along the marked lines to ensure a straight and accurate cut.
- Cut the tiles: Use a utility knife or tin snips to cut along the marked lines. Take your time and make precise cuts to achieve a clean and professional look.
- Test the fit: Once you have cut the tiles, test their fit on the ceiling. Make any necessary adjustments or additional cuts to ensure a snug and seamless fit.
Remember to always wear appropriate safety gear when handling tools and cutting the tiles. Additionally, it’s a good practice to cut and measure one tile at a time to ensure accuracy.
By measuring and cutting the tiles to fit your ceiling dimensions, you’ll be one step closer to achieving a professional-looking installation. With the tiles cut and ready, it’s time to move on to the next step: applying adhesive.
Step 3: Applying Adhesive
With the 12×12 tongue and groove ceiling tiles measured and cut, it’s time to move on to the next step: applying adhesive. Follow these steps to ensure a secure and long-lasting installation:
- Prepare the adhesive: Follow the manufacturer’s instructions to prepare the adhesive for application. This may involve mixing the adhesive or simply opening the container.
- Apply the adhesive: Using a trowel or putty knife, apply a generous amount of adhesive on the back of each tile. Spread the adhesive evenly, covering the entire surface.
- Align the tiles: Place the first tile on the ceiling, starting from the marked starting point. Press it firmly against the ceiling, ensuring it is properly aligned with the layout plan.
- Continue with the rest of the tiles: Place the subsequent tiles next to each other, forming rows across the ceiling. Press each tile firmly against the adhesive and adjust its position if needed.
- Check for alignment: Use a straight edge or level to check the alignment of the tiles. Make any necessary adjustments to ensure a straight and even installation.
- Allow the adhesive to dry: Follow the manufacturer’s instructions regarding the drying time of the adhesive. Avoid touching or disturbing the tiles until the adhesive has fully dried.
Remember to work in small manageable sections, applying the adhesive and placing the tiles row by row. This will prevent the adhesive from drying out before you have a chance to install the tiles.
By carefully applying adhesive and ensuring the tiles are properly aligned, you’ll create a strong bond between the tiles and the ceiling. Once the adhesive has dried, you can move on to the next step: installing the first row of tiles.
Before installing 12×12 tongue and groove ceiling tiles, make sure to measure the area accurately and ensure the surface is clean and flat. Use a brad nailer or adhesive to secure the tiles in place, starting from the center for a balanced look.
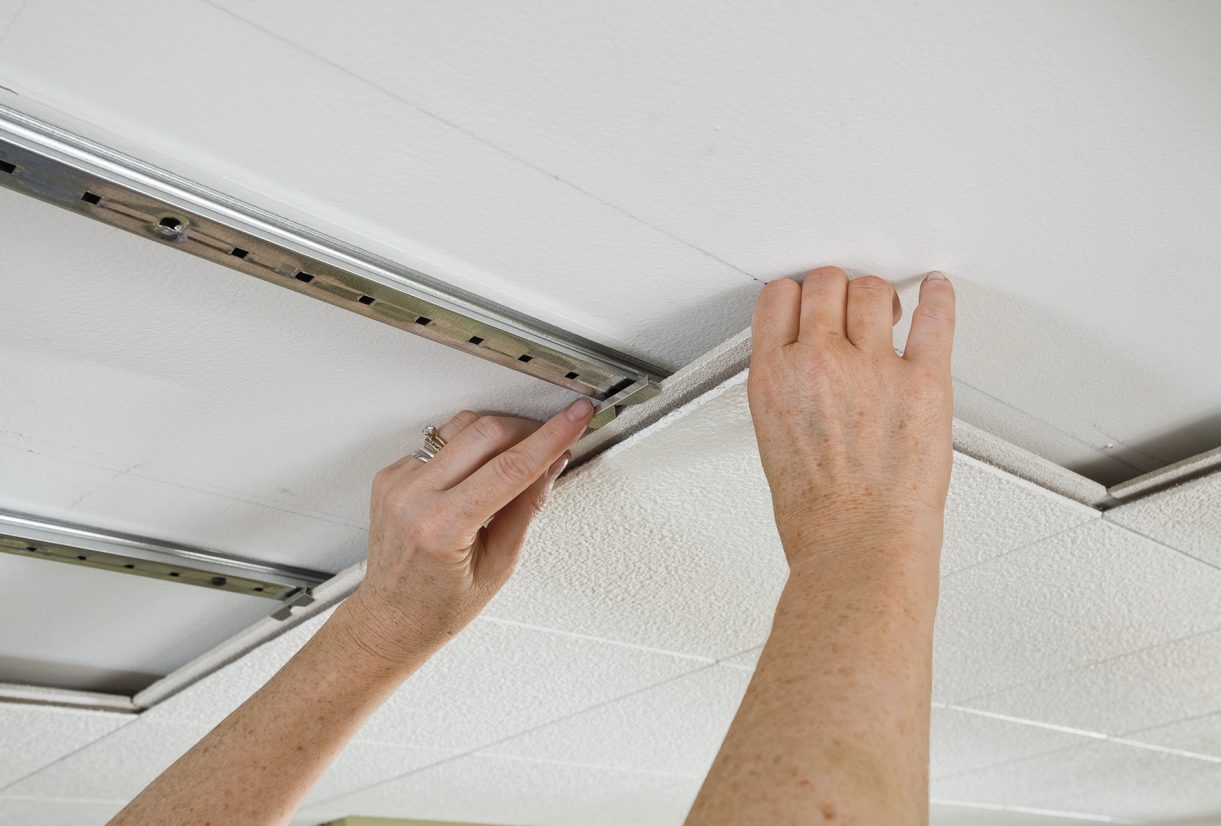
Step 4: Installing the First Row
Now that the adhesive has dried, it’s time to start installing the 12×12 tongue and groove ceiling tiles. Follow these steps to install the first row:
- Apply adhesive to the back of the first tile: Using a trowel or putty knife, apply a sufficient amount of adhesive to the back of the first tile. Make sure the entire surface is covered.
- Align the first tile: Place the tile at the starting point on the ceiling, pressing it firmly against the adhesive. Ensure that it is level and aligned according to the layout plan.
- Secure the first tile: To secure the first tile in place, use finishing nails or staples around the edges. Place the nails or staples just above the tongue of the tile to hide them from view.
- Continue with the rest of the first row: Apply adhesive to the back of the next tile and place it next to the first tile, using the tongue and groove mechanism to lock them together. Repeat this process until the first row is complete.
- Check for alignment: Use a straight edge or level to check the alignment of the tiles in the first row. Adjust their positions if necessary to ensure a straight and even appearance.
It’s important to secure the first row of tiles properly to provide stability and ensure that the subsequent rows align correctly. By following these steps, you’ll be on your way to creating a beautiful and professional-looking ceiling.
Once you have installed the first row, you can continue with the remaining rows. The process is similar, but make sure to interlock the tongue and groove of each tile for a secure and seamless installation.
Next, we’ll move on to Step 5: installing subsequent rows of tongue and groove ceiling tiles.
Step 5: Installing Subsequent Rows
With the first row of 12×12 tongue and groove ceiling tiles installed, it’s time to proceed with the installation of the subsequent rows. Follow these steps to ensure a smooth and seamless installation:
- Apply adhesive to the back of each tile: Using a trowel or putty knife, apply adhesive to the back of each tile. Make sure to cover the entire surface with a sufficient amount of adhesive.
- Align the tiles: Place the next tile next to the previously installed tile, ensuring that the tongue and groove interlock. Press the tiles firmly together to create a snug fit.
- Secure the tiles: To secure the tiles, use finishing nails or staples near the edges of the tiles. Place the nails or staples just above the tongue to hide them from view.
- Continue installing subsequent rows: Repeat the process of applying adhesive, aligning the tiles, and securing them row by row. Make sure to stagger the tiles, so that the joints between the tiles are not aligned.
- Check for alignment: Use a straight edge or level to check the alignment of the tiles in each row. Adjust their positions if necessary to maintain a straight and level installation.
As you install the subsequent rows, make sure to maintain the pattern and alignment established in the first row. This will ensure a cohesive and visually appealing result.
Continue with the installation until you have covered the entire ceiling area. Take your time and ensure that each tile is securely attached to the adhesive and interlocked with the adjacent tiles.
Once all the rows are installed, you can proceed to the next step: cutting tiles to fit around light fixtures.
Step 6: Cutting Tiles to Fit Around Light Fixtures
When installing 12×12 tongue and groove ceiling tiles, you may encounter the need to cut tiles to fit around light fixtures or other obstacles on your ceiling. Follow these steps to cut the tiles and achieve a seamless fit:
- Turn off the power: Before you begin working around light fixtures, ensure that the power is turned off to avoid any electrical hazards.
- Measure and mark: Take precise measurements of the area where the tile needs to be cut to fit around the light fixture. Use a pencil or marker to mark these measurements on the tile.
- Use a straight edge: Place a straight edge or level along the marked lines to guide your cut and ensure a straight and accurate line.
- Cut the tile: Utilize a utility knife or tin snips to carefully cut along the marked lines. Take your time and make smooth, controlled cuts to avoid any damage to the tile.
- Test the fit: After making the cut, test the tile’s fit around the light fixture. Make any necessary adjustments or additional cuts to achieve a snug and seamless fit.
It’s important to exercise caution when cutting tiles and always wear appropriate safety gear, such as gloves and goggles. Take your time with the cutting process to ensure accurate and clean cuts, as they will contribute to the overall professional appearance of your ceiling.
By following these steps, you’ll be able to successfully fit the tiles around light fixtures or any other obstacles on your ceiling, ensuring a polished and customized result.
Once you have cut the necessary tiles and fitted them around the light fixtures, you’re ready to move on to the final step: adding the finishing touches.
Step 7: Finishing Touches
With the 12×12 tongue and groove ceiling tiles installed, it’s time to add the final touches to complete the project. Follow these steps to give your ceiling a polished and finished look:
- Trim or moldings: Consider adding trim or moldings to the edges of your ceiling tiles. These decorative elements can provide a clean and seamless transition between the tiles and the surrounding walls, giving your ceiling a more refined appearance.
- Fill any gaps: Inspect the installed tiles for any gaps or spaces between them. Fill these gaps with a touch-up adhesive or caulk to ensure a smooth and seamless finish.
- Paint or stain (optional): If desired, you can paint or stain the ceiling tiles to match your overall color scheme. Make sure to use paint or stain that is suitable for the material of the tiles and apply them according to the manufacturer’s instructions.
- Lighting fixtures: Reconnect the power to the light fixtures if you had turned it off during the installation process. Ensure that the fixtures are securely mounted and properly aligned with the ceiling tiles.
- Clean up: Once you have completed the installation and any finishing touches, clean up any debris or adhesive residue from the work area. Dispose of any materials used in the installation process properly.
By paying attention to these finishing touches, you’ll bring your 12×12 tongue and groove ceiling tile installation to its final form, showcasing its beauty and enhancing the overall aesthetic of the room.
Congratulations on successfully installing your tongue and groove ceiling tiles! Take a step back and admire the transformation you’ve achieved. Now you can enjoy the elegance and sophistication that these tiles bring to your space.
We hope this comprehensive guide has provided you with the knowledge and confidence to complete your ceiling tile installation. Remember to always follow safety guidelines and manufacturer’s instructions during the process. Happy decorating!
Conclusion
Installing 12×12 tongue and groove ceiling tiles is a rewarding project that can elevate the look and feel of any room. By following the step-by-step guide provided in this article, you have learned how to properly prepare, measure, cut, and install these tiles. We’ve covered the importance of applying adhesive, aligning the tiles, and securing them row by row. We’ve also discussed how to cut tiles to fit around light fixtures and add the finishing touches to complete the project.
Throughout the installation process, remember to prioritize safety by wearing appropriate gear and handling tools with caution. Take your time with each step to ensure accuracy and precision. By doing so, you’ll achieve a professionally installed ceiling that adds elegance and visual appeal to your space.
Whether you’re a seasoned DIY enthusiast or a beginner, this guide has equipped you with the knowledge and confidence to tackle a tongue and groove ceiling tile installation successfully. Remember to gather all the necessary materials and plan the layout carefully. Take measurements accurately, and make precise cuts to achieve a seamless fit. Apply adhesive generously and secure the tiles firmly to ensure their longevity and durability.
With the installation complete, you may choose to further enhance the aesthetic appeal by adding trim or moldings, painting or staining the tiles, and ensuring proper lighting fixture installation. These finishing touches will contribute to the overall polished look of your ceiling.
We hope this comprehensive guide has been informative and helpful. Now that you have learned the techniques and steps involved in installing 12×12 tongue and groove ceiling tiles, you can embark on your own project with confidence. Enjoy the process and the transformation that these tiles will bring to your living space.
Now that you've got the hang of revamping your ceiling with tongue and groove tiles, why not dive deeper into hands-on home improvement? Our article on the joys of DIY projects is packed with insights that'll fuel your passion for crafting and creating. If you're considering more extensive changes, our piece on renovation tips offers valuable advice to ensure your roof remodeling project runs smoothly. Both read promise practical tips and fresh ideas to make your next home project a standout success.
Frequently Asked Questions about How To Install 12x12 Tongue And Groove Ceiling Tiles
Was this page helpful?
At Storables.com, we guarantee accurate and reliable information. Our content, validated by Expert Board Contributors, is crafted following stringent Editorial Policies. We're committed to providing you with well-researched, expert-backed insights for all your informational needs.


0 thoughts on “How To Install 12×12 Tongue And Groove Ceiling Tiles”