Articles
How To Spray Foam Insulation In An Attic
Modified: January 18, 2024
Learn how to spray foam an attic with our informative articles. Get expert tips and advice for a successful insulation project.
(Many of the links in this article redirect to a specific reviewed product. Your purchase of these products through affiliate links helps to generate commission for Storables.com, at no extra cost. Learn more)
Introduction
Welcome to the ultimate guide on how to spray foam an attic. If you’re looking for an effective way to insulate your attic and improve the energy efficiency of your home, then spray foam insulation might be the answer. Unlike traditional insulation materials like fiberglass or cellulose, spray foam insulation expands and fills every nook and cranny, creating an airtight barrier that can prevent heat loss and reduce energy costs.
In this article, we will take you through a step-by-step process of spraying foam insulation in your attic. From preparation to cleanup, we will cover everything you need to know to successfully complete this project. So, if you’re ready to transform your attic into an energy-efficient space, let’s get started!
Key Takeaways:
- Proper preparation, safety precautions, and meticulous application are essential for successfully spraying foam insulation in your attic. Follow the step-by-step guide to achieve effective and efficient insulation while prioritizing safety.
- Insulating your attic with spray foam not only improves energy efficiency but also enhances comfort and reduces energy costs. By following the comprehensive guide, you can enjoy the benefits of a well-insulated and energy-efficient home.
Read more: How To Spray Foam Insulation In Attic
Step 1: Preparation
Before you begin the process of spraying foam insulation in your attic, it’s essential to properly prepare the area. Here are some important steps to follow:
- Clean and declutter the attic: Start by removing any items or debris from the attic. This will provide you with a clear workspace and ensure that the foam insulation adheres properly to the surfaces.
- Inspect for any damage: Take the time to inspect the attic for any signs of damage, such as leaks or pest infestations. It’s crucial to address these issues before proceeding with the insulation process.
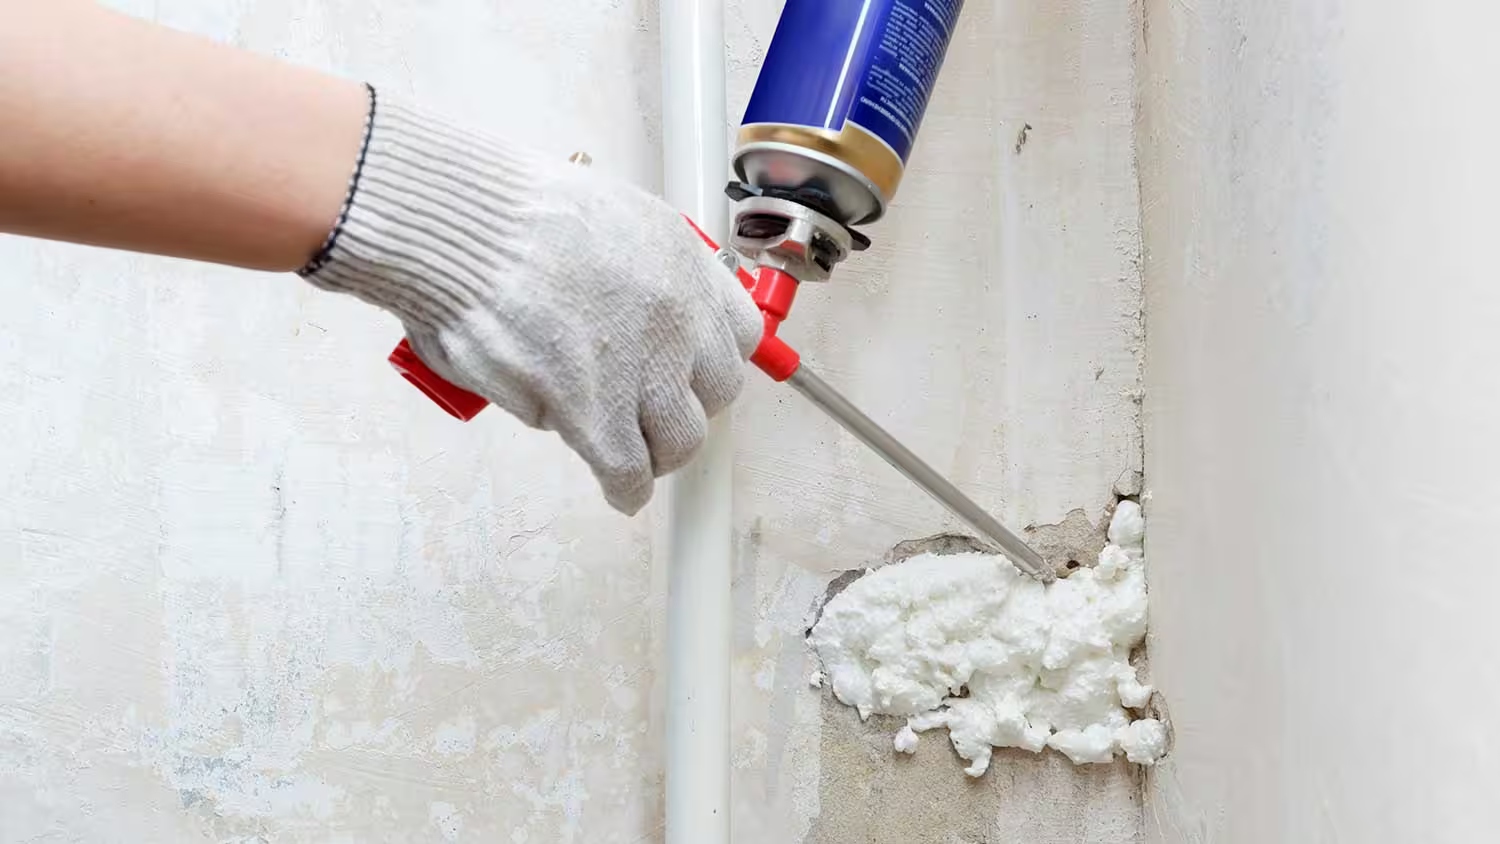
- Seal any cracks or gaps: Use caulk or foam sealant to seal any cracks, gaps, or openings in the attic. This will prevent air leakage and ensure that the insulation works effectively.
- Check for proper ventilation: Adequate attic ventilation is essential to avoid moisture buildup. Make sure that the attic has proper vents in place to allow for airflow.
- Measure the area: Calculate the square footage of your attic to determine how much foam insulation you will need. This will help you purchase the correct amount of insulation material.
By following these preparatory steps, you will create an ideal environment for spraying foam insulation in your attic. Once you have completed the preparation process, you can move on to the next steps of the project, ensuring a smooth and successful insulation process.
Step 2: Safety Precautions
When working with spray foam insulation, it’s crucial to prioritize safety. Here are some important safety precautions to keep in mind:
- Wear protective gear: Before you begin the insulation process, make sure to wear the appropriate protective gear, including safety goggles, gloves, a respirator mask, and long-sleeved clothing. This will prevent any skin or inhalation contact with the insulation material.
- Ensure proper ventilation: Proper ventilation is essential to maintain a healthy breathing environment. Open windows and doors in the attic to ensure proper airflow during the insulation process.
- Work in a well-lit area: Adequate lighting is crucial to see clearly and avoid any accidents. Ensure that the attic is well-lit before you start spraying the foam insulation.
- Keep a fire extinguisher nearby: Spray foam insulation is highly flammable during the application process. It’s vital to have a fire extinguisher readily available in case of any emergencies.
- Follow manufacturer instructions: Read and understand the instructions provided by the manufacturer of the spray foam insulation. Adhere to their guidelines regarding application techniques, drying time, and any specific safety precautions.
- Do not mix different foam products: Avoid mixing different brands or types of foam insulation products. Stick to a single brand or type recommended by the manufacturer to ensure compatibility and optimal performance.
Remember, safety should always be a top priority when working with spray foam insulation. By following these safety precautions, you can minimize the risks associated with this type of project and ensure a safe and successful insulation process.
Step 3: Clearing the Attic
Before you start spraying foam insulation in your attic, it’s crucial to clear the area of any obstacles or obstructions. Clearing the attic will provide you with a clean and accessible workspace for the insulation process. Here are the steps to follow:
- Remove stored items: If you have any items stored in the attic, carefully remove them and find an alternative storage space. This will prevent the insulation material from coming into contact with your belongings.
- Protect valuable items: If you have any valuable items that cannot be moved out of the attic, cover them with plastic sheets or drop cloths to protect them from overspray or accidental contact with the foam insulation.
- Secure wiring and fixtures: Take measures to secure any electrical wiring, light fixtures, or other fixtures in the attic. Use zip ties or tape to keep them out of the way during the insulation process.
- Clear away debris: Remove any debris, dust, or loose insulation from the attic floor. Use a broom or vacuum cleaner to ensure a clean surface for the foam insulation.
- Seal off openings: If there are any openings or exposed areas in the attic, such as gaps in the ceiling or walls, seal them off with plastic sheets or foam sealant. This will prevent overspray or air leakage during the insulation process.
By clearing the attic and preparing the space properly, you will create an ideal environment for spraying foam insulation. This step ensures that the insulation material can be applied efficiently and effectively to maximize its benefits. Once the attic is cleared, you can move on to the next steps of the insulation process with confidence.
Step 4: Covering Vents and Openings
Before you start spraying foam insulation in your attic, it’s essential to cover any vents, openings, or areas that should not be coated with the insulation material. This step will prevent the foam from entering unwanted spaces and ensure a clean and precise application. Here’s how to cover vents and openings:
- Inspect the vents: Begin by inspecting all the vents in your attic, including HVAC vents, exhaust vents, and any other openings. Determine which vents need to be covered and which should remain open for ventilation purposes.
- Use plastic sheets or cardboard: For vents or openings that need to be covered, cut plastic sheets or cardboard to the appropriate size. Attach these covers using duct tape or staples to secure them in place.
- Seal around the covers: To ensure a tight seal, use foam sealant or caulk to seal around the edges of the covers. This will prevent the foam insulation from seeping through any gaps or cracks.
- Protect other areas: If there are any electrical outlets, light fixtures, or other fixtures in the attic that should not come into contact with the foam insulation, cover them with plastic sheets or tape. This will protect them from overspray or accidental coating.
- Mark the covered areas: To avoid confusion during the spraying process, mark the covered vents and openings with labels or tape. This will help you identify which areas should not be coated with the foam insulation.
By covering vents and openings, you will ensure a clean and precise application of the foam insulation. This step is crucial to prevent any unwanted areas from being coated and maintain proper ventilation in the attic. Once you have covered the necessary vents and openings, you are ready to move on to the next steps of the insulation process.
Read more: How To Spray Foam Insulation
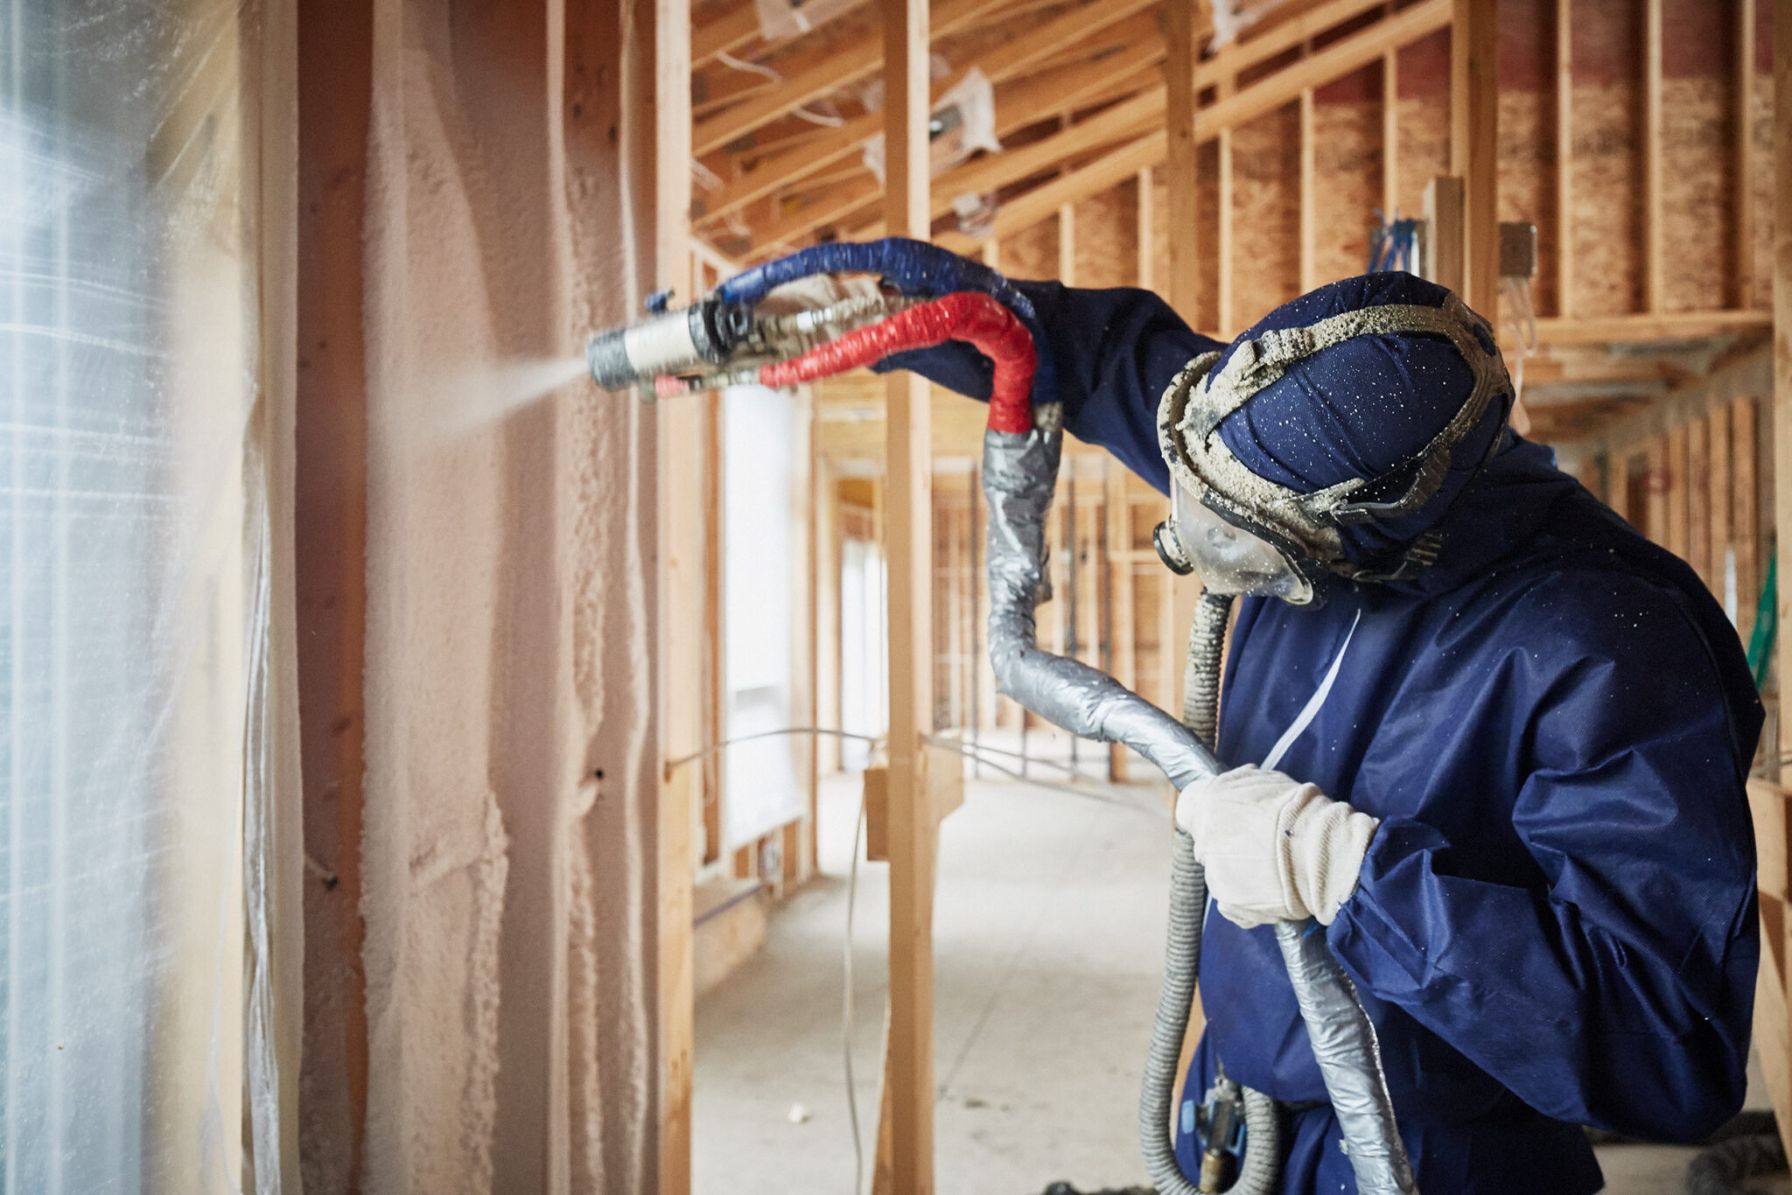
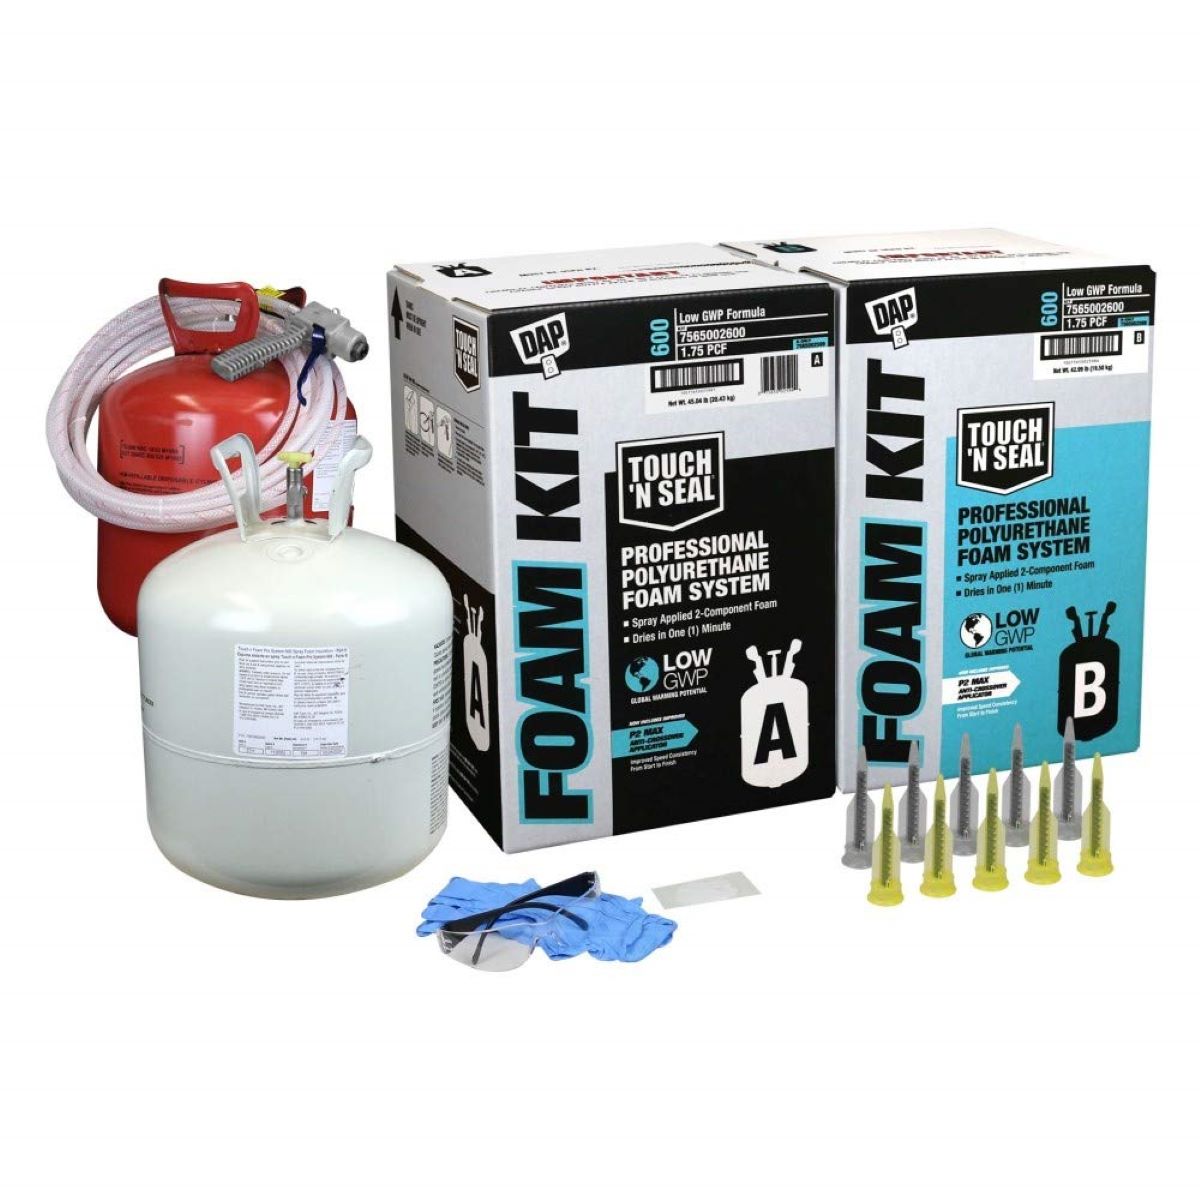
Step 5: Setting Up Equipment
Before you start spraying foam insulation in your attic, it’s important to properly set up your equipment. This will ensure that you have everything you need for a smooth and efficient insulation process. Here’s how to set up your equipment:
- Spray foam insulation kit: Purchase a spray foam insulation kit that is suitable for your attic size and insulation needs. Make sure to read and follow the manufacturer’s instructions for proper usage.
- Protective gear: Put on the necessary protective gear, including safety goggles, gloves, a respirator mask, and appropriate clothing, to ensure your safety during the insulation process.
- Spray foam gun: Install the spray foam gun according to the manufacturer’s instructions. Make sure it is securely attached to the spray foam kit and test it to ensure proper functioning.
- Flexible extension wand: Attach a flexible extension wand to the foam gun. This will allow you to reach the difficult-to-access areas of your attic and ensure even coverage.
- Drop cloths or plastic sheets: Lay down drop cloths or plastic sheets to protect the floor and any remaining items in the attic from overspray or accidental coating.
- Ensure proper lighting: Make sure the attic is well-lit to see clearly during the insulation process. Use flashlights or additional lighting if necessary.
- Have additional foam cans: It’s always a good idea to have extra foam cans on hand in case you need to refill the spray foam insulation kit during the process. This will prevent any interruptions or delays.
By setting up your equipment properly, you will have everything you need to apply the foam insulation effectively and efficiently. Take the time to familiarize yourself with the equipment and ensure that everything is in working order before starting the insulation process. With your equipment properly set up, you’re ready to move on to the next step of mixing the foam insulation.
Before starting to spray foam in the attic, make sure to properly seal any gaps or cracks to prevent air leakage and maximize the effectiveness of the insulation.
Step 6: Mixing the Foam
Before you can start spraying foam insulation in your attic, you need to properly mix the foam components. The mixing process is crucial for achieving the desired consistency and expanding properties of the foam. Here’s how to mix the foam insulation:
- Read manufacturer’s instructions: Refer to the manufacturer’s instructions provided with your spray foam insulation kit. Follow their specific guidelines for mixing ratios and techniques.
- Prep the foam canisters: Ensure that the foam canisters are at room temperature before mixing. This will ensure the chemicals mix properly and perform optimally.
- Shake the canisters: Shake each foam canister individually for at least one minute to thoroughly mix the contents. This will help to activate the chemicals and ensure a consistent blend.
- Attach hoses and set up the mixing chamber: Connect the appropriate hoses and attachments to your spray foam gun. Set up the mixing chamber according to the instructions provided by the manufacturer.
- Purge the hoses: Before mixing the foam, purge the hoses to remove any air or impurities. Follow the manufacturer’s recommendations for purging the hoses.
- Mix the foam components: Start by opening the valves on the foam canisters. Gradually adjust the control knob to introduce the foam components into the mixing chamber. Mix the components thoroughly by spraying a small amount onto a disposable surface until a consistent color and texture are achieved.
- Adjust the flow rate: Adjust the flow rate of the foam by turning the control knob on the spray foam gun. Test the flow rate on a scrap surface to ensure it meets your requirements.
It’s crucial to follow the manufacturer’s instructions for mixing the foam insulation to ensure proper chemical reaction and the desired expanding properties. Taking the time to mix the foam correctly will result in a more effective and efficient insulation application. Once the foam is mixed, you’re ready to move on to the next step of applying the foam insulation in your attic.
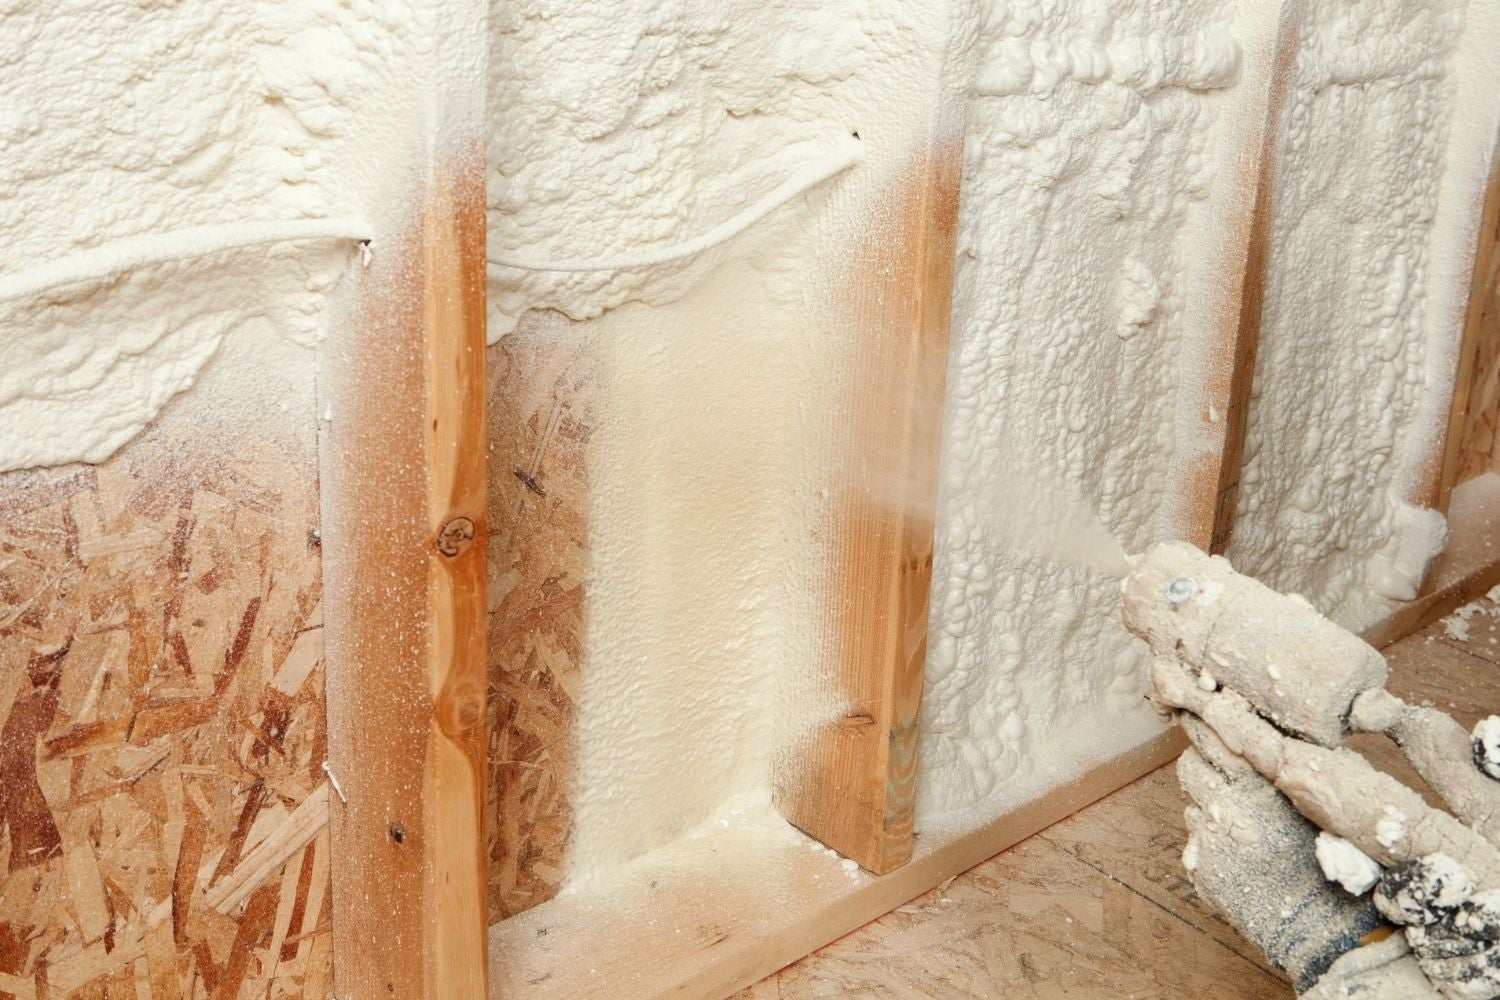
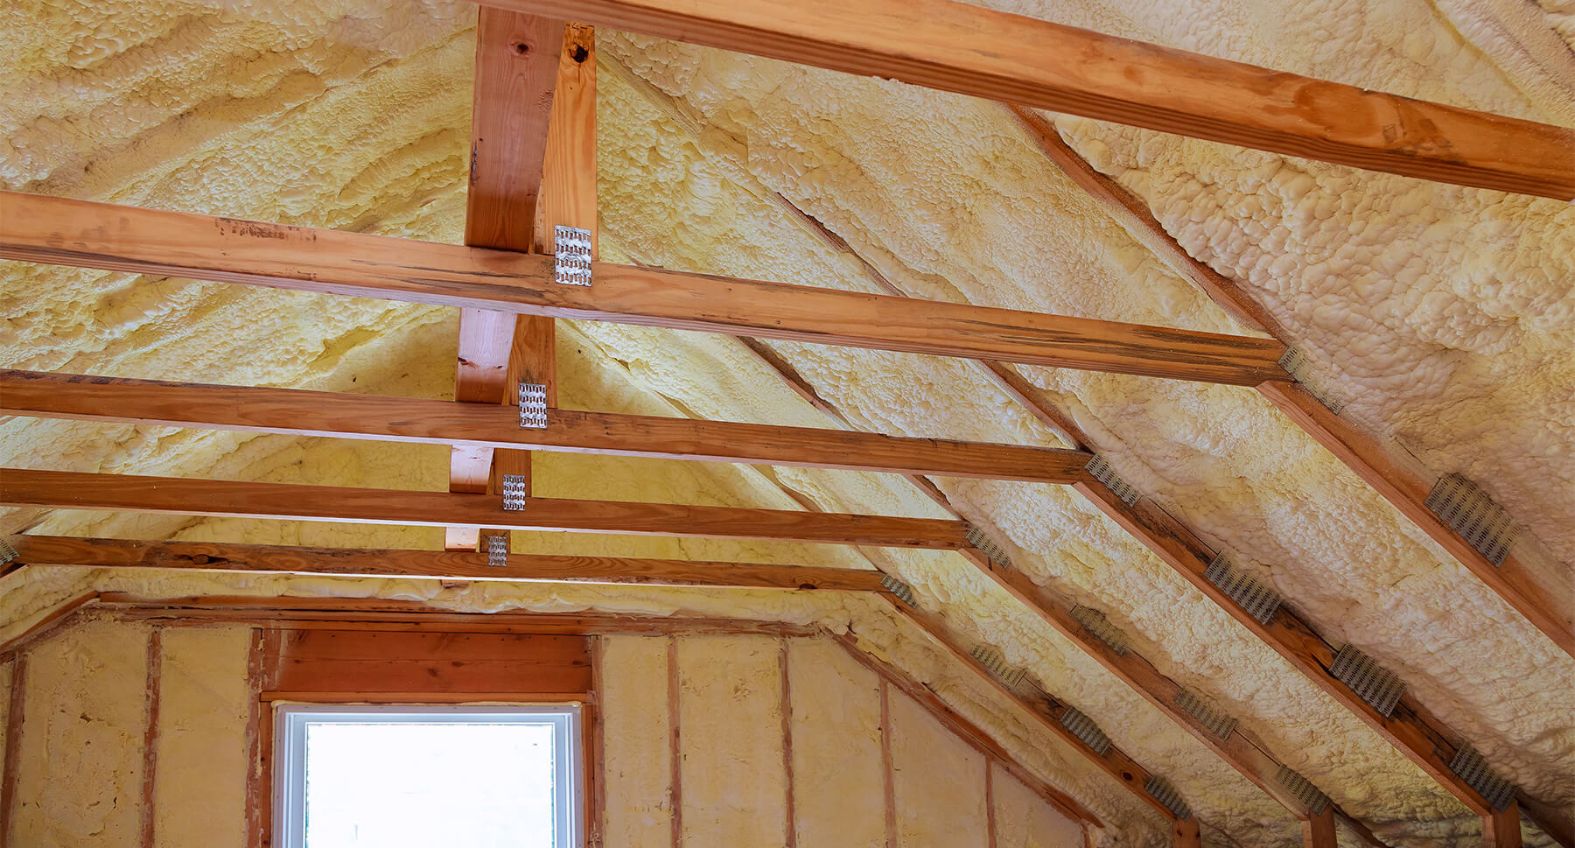
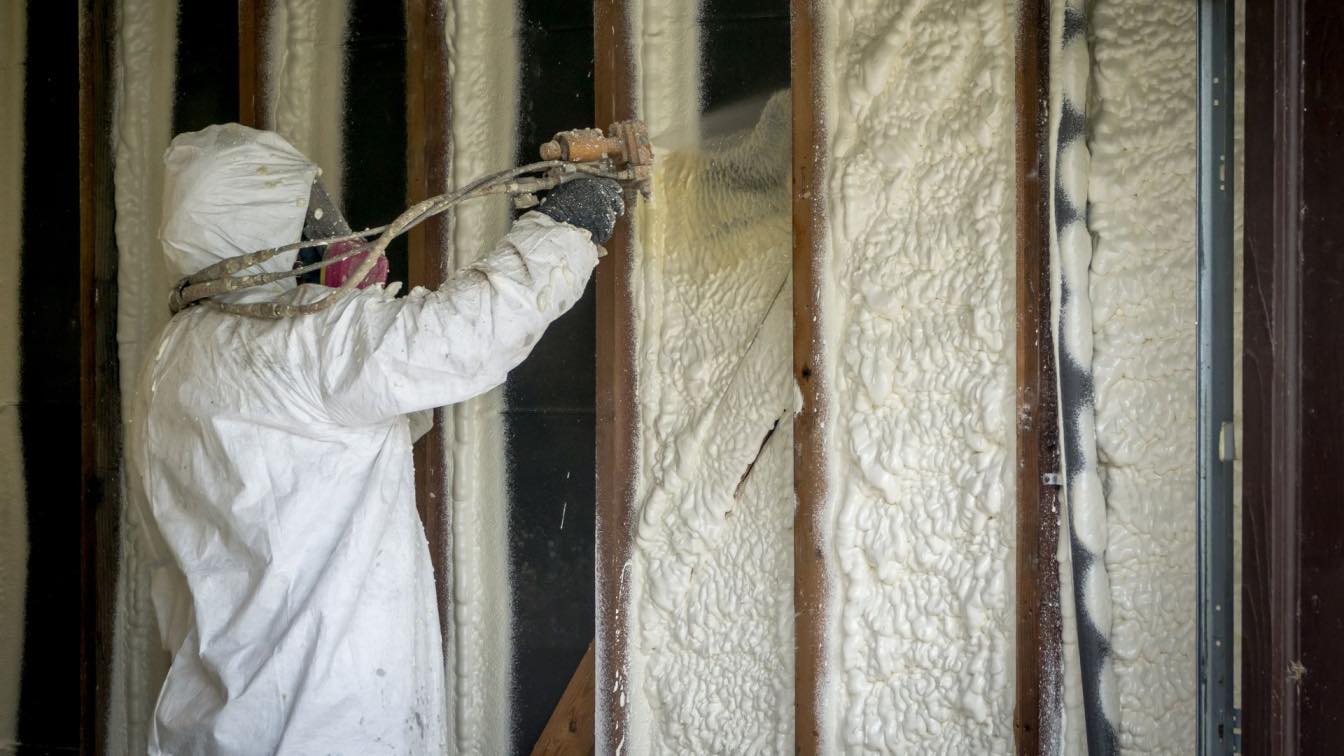
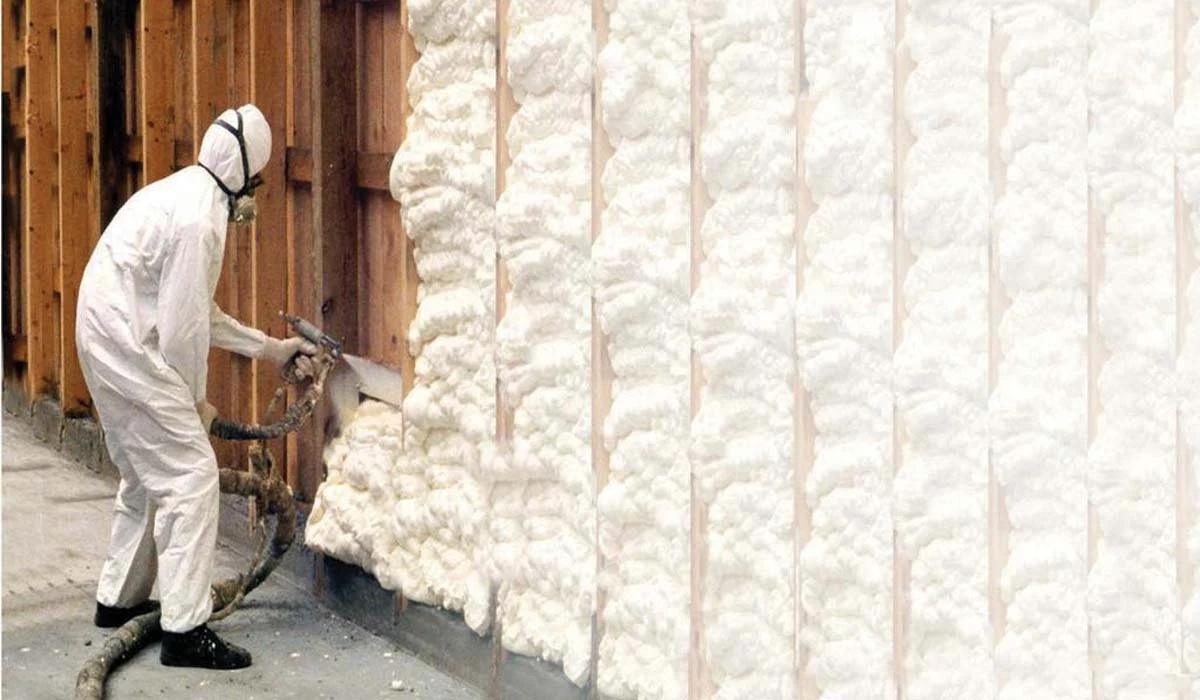
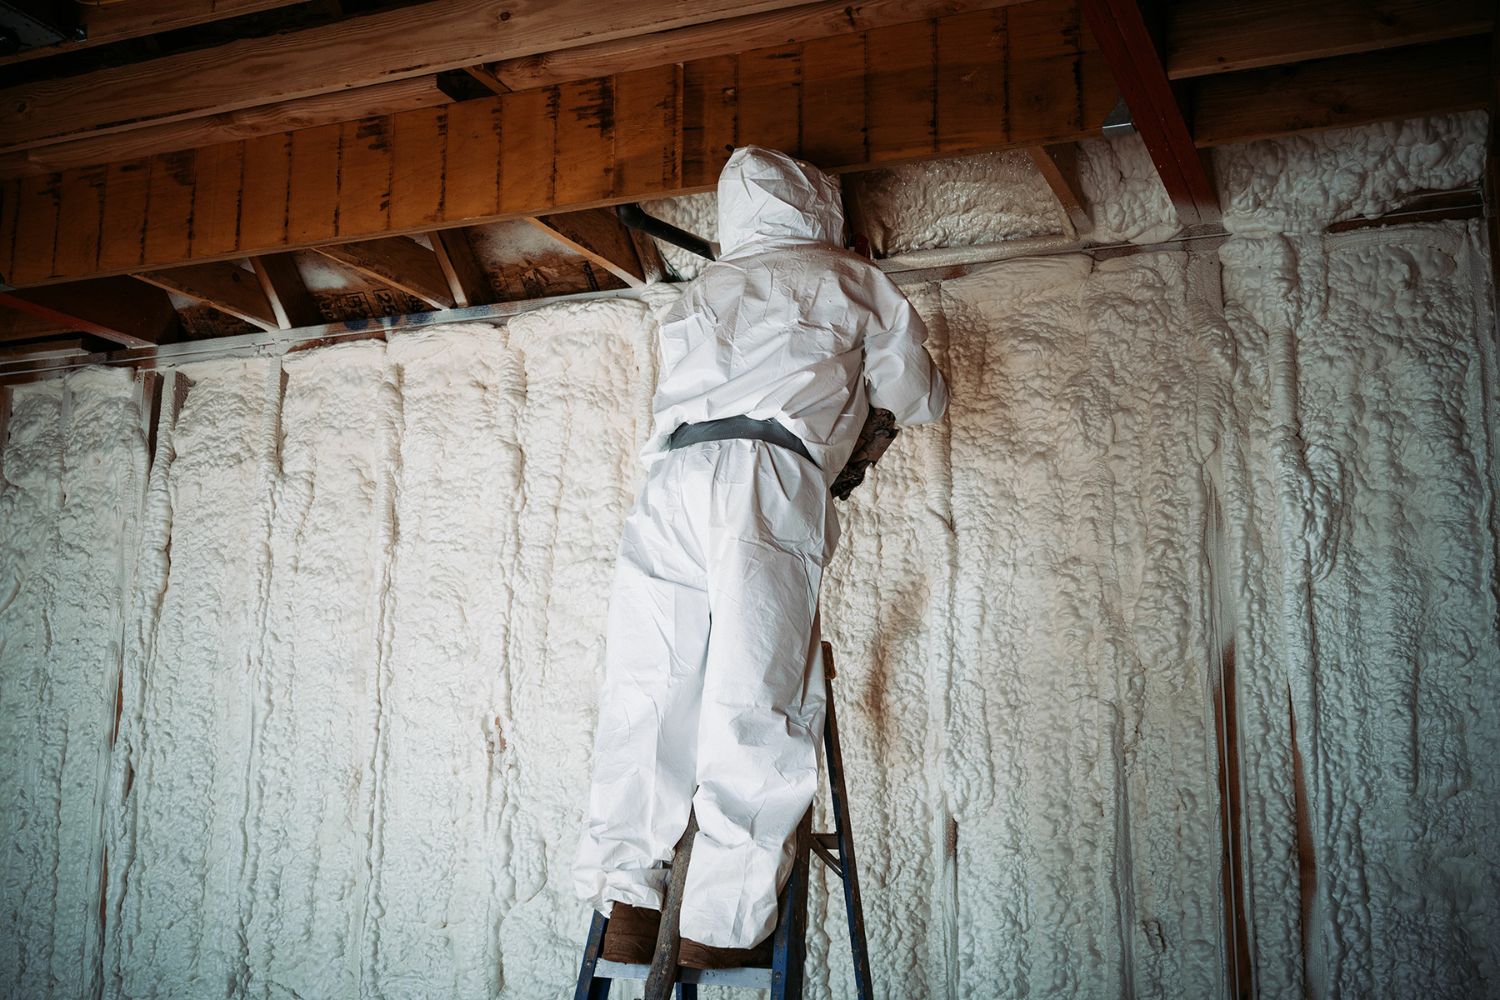
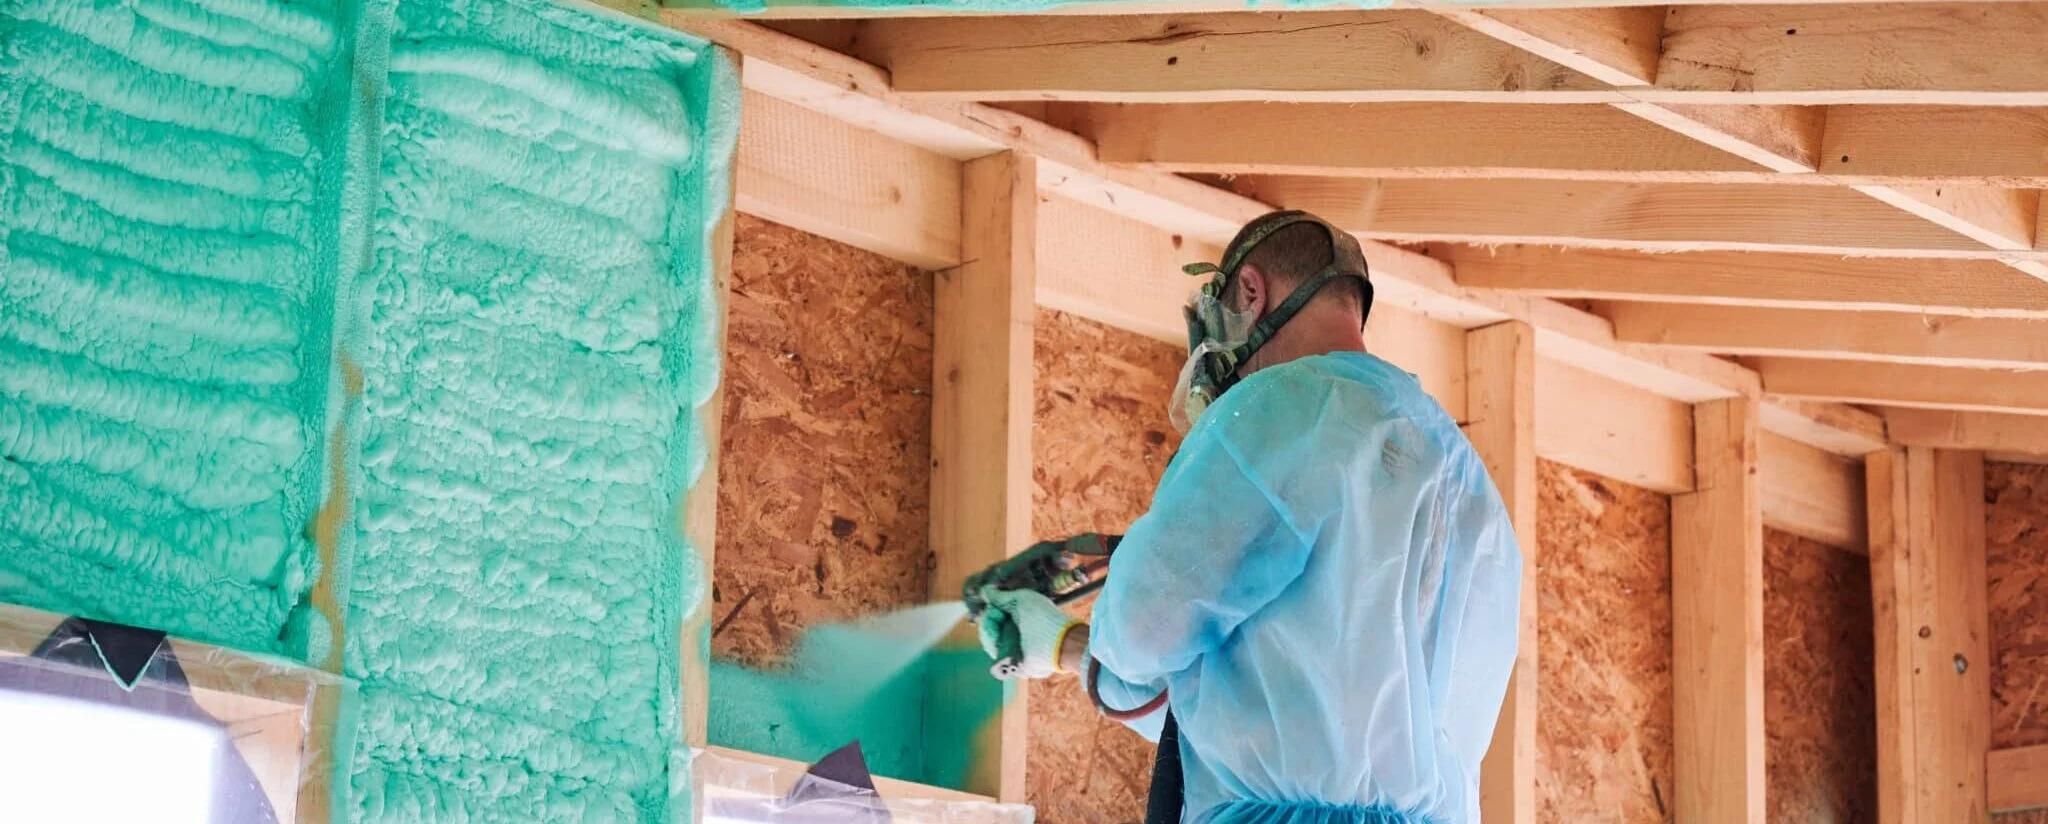
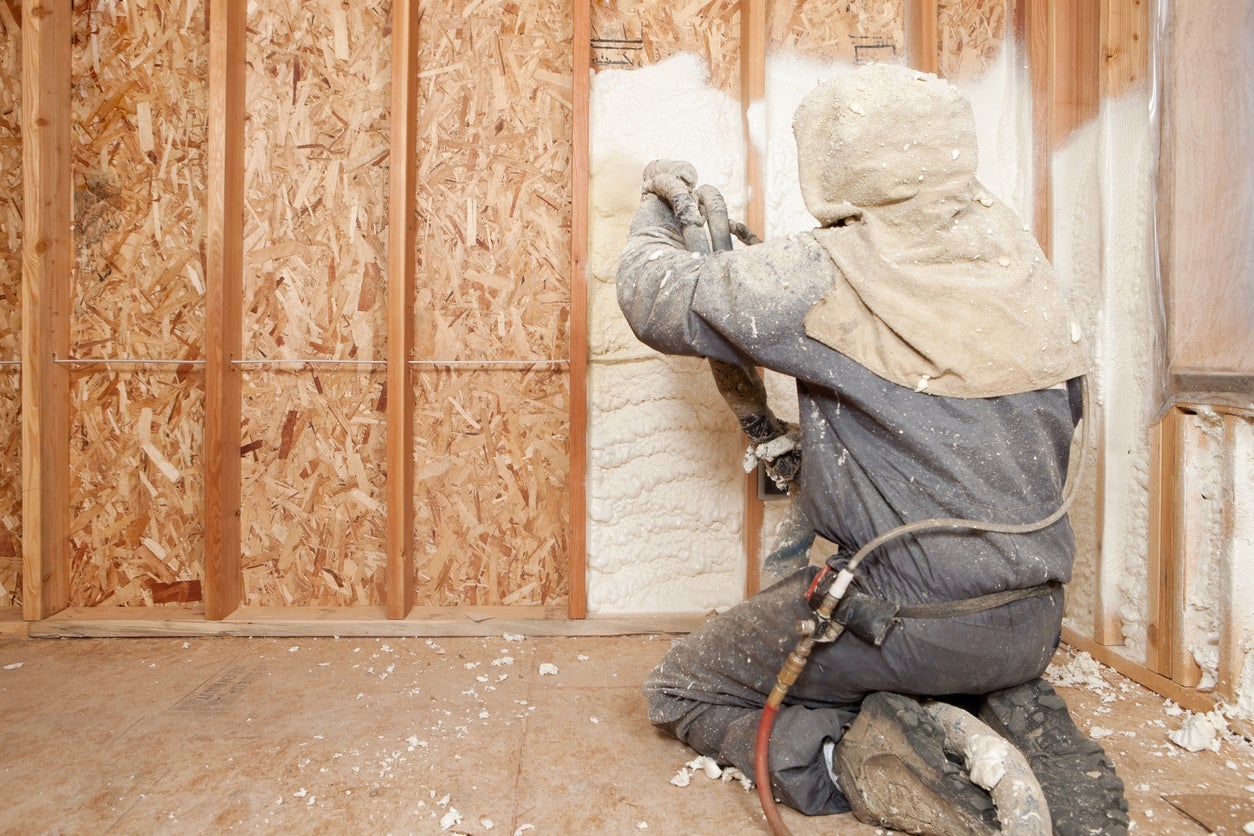
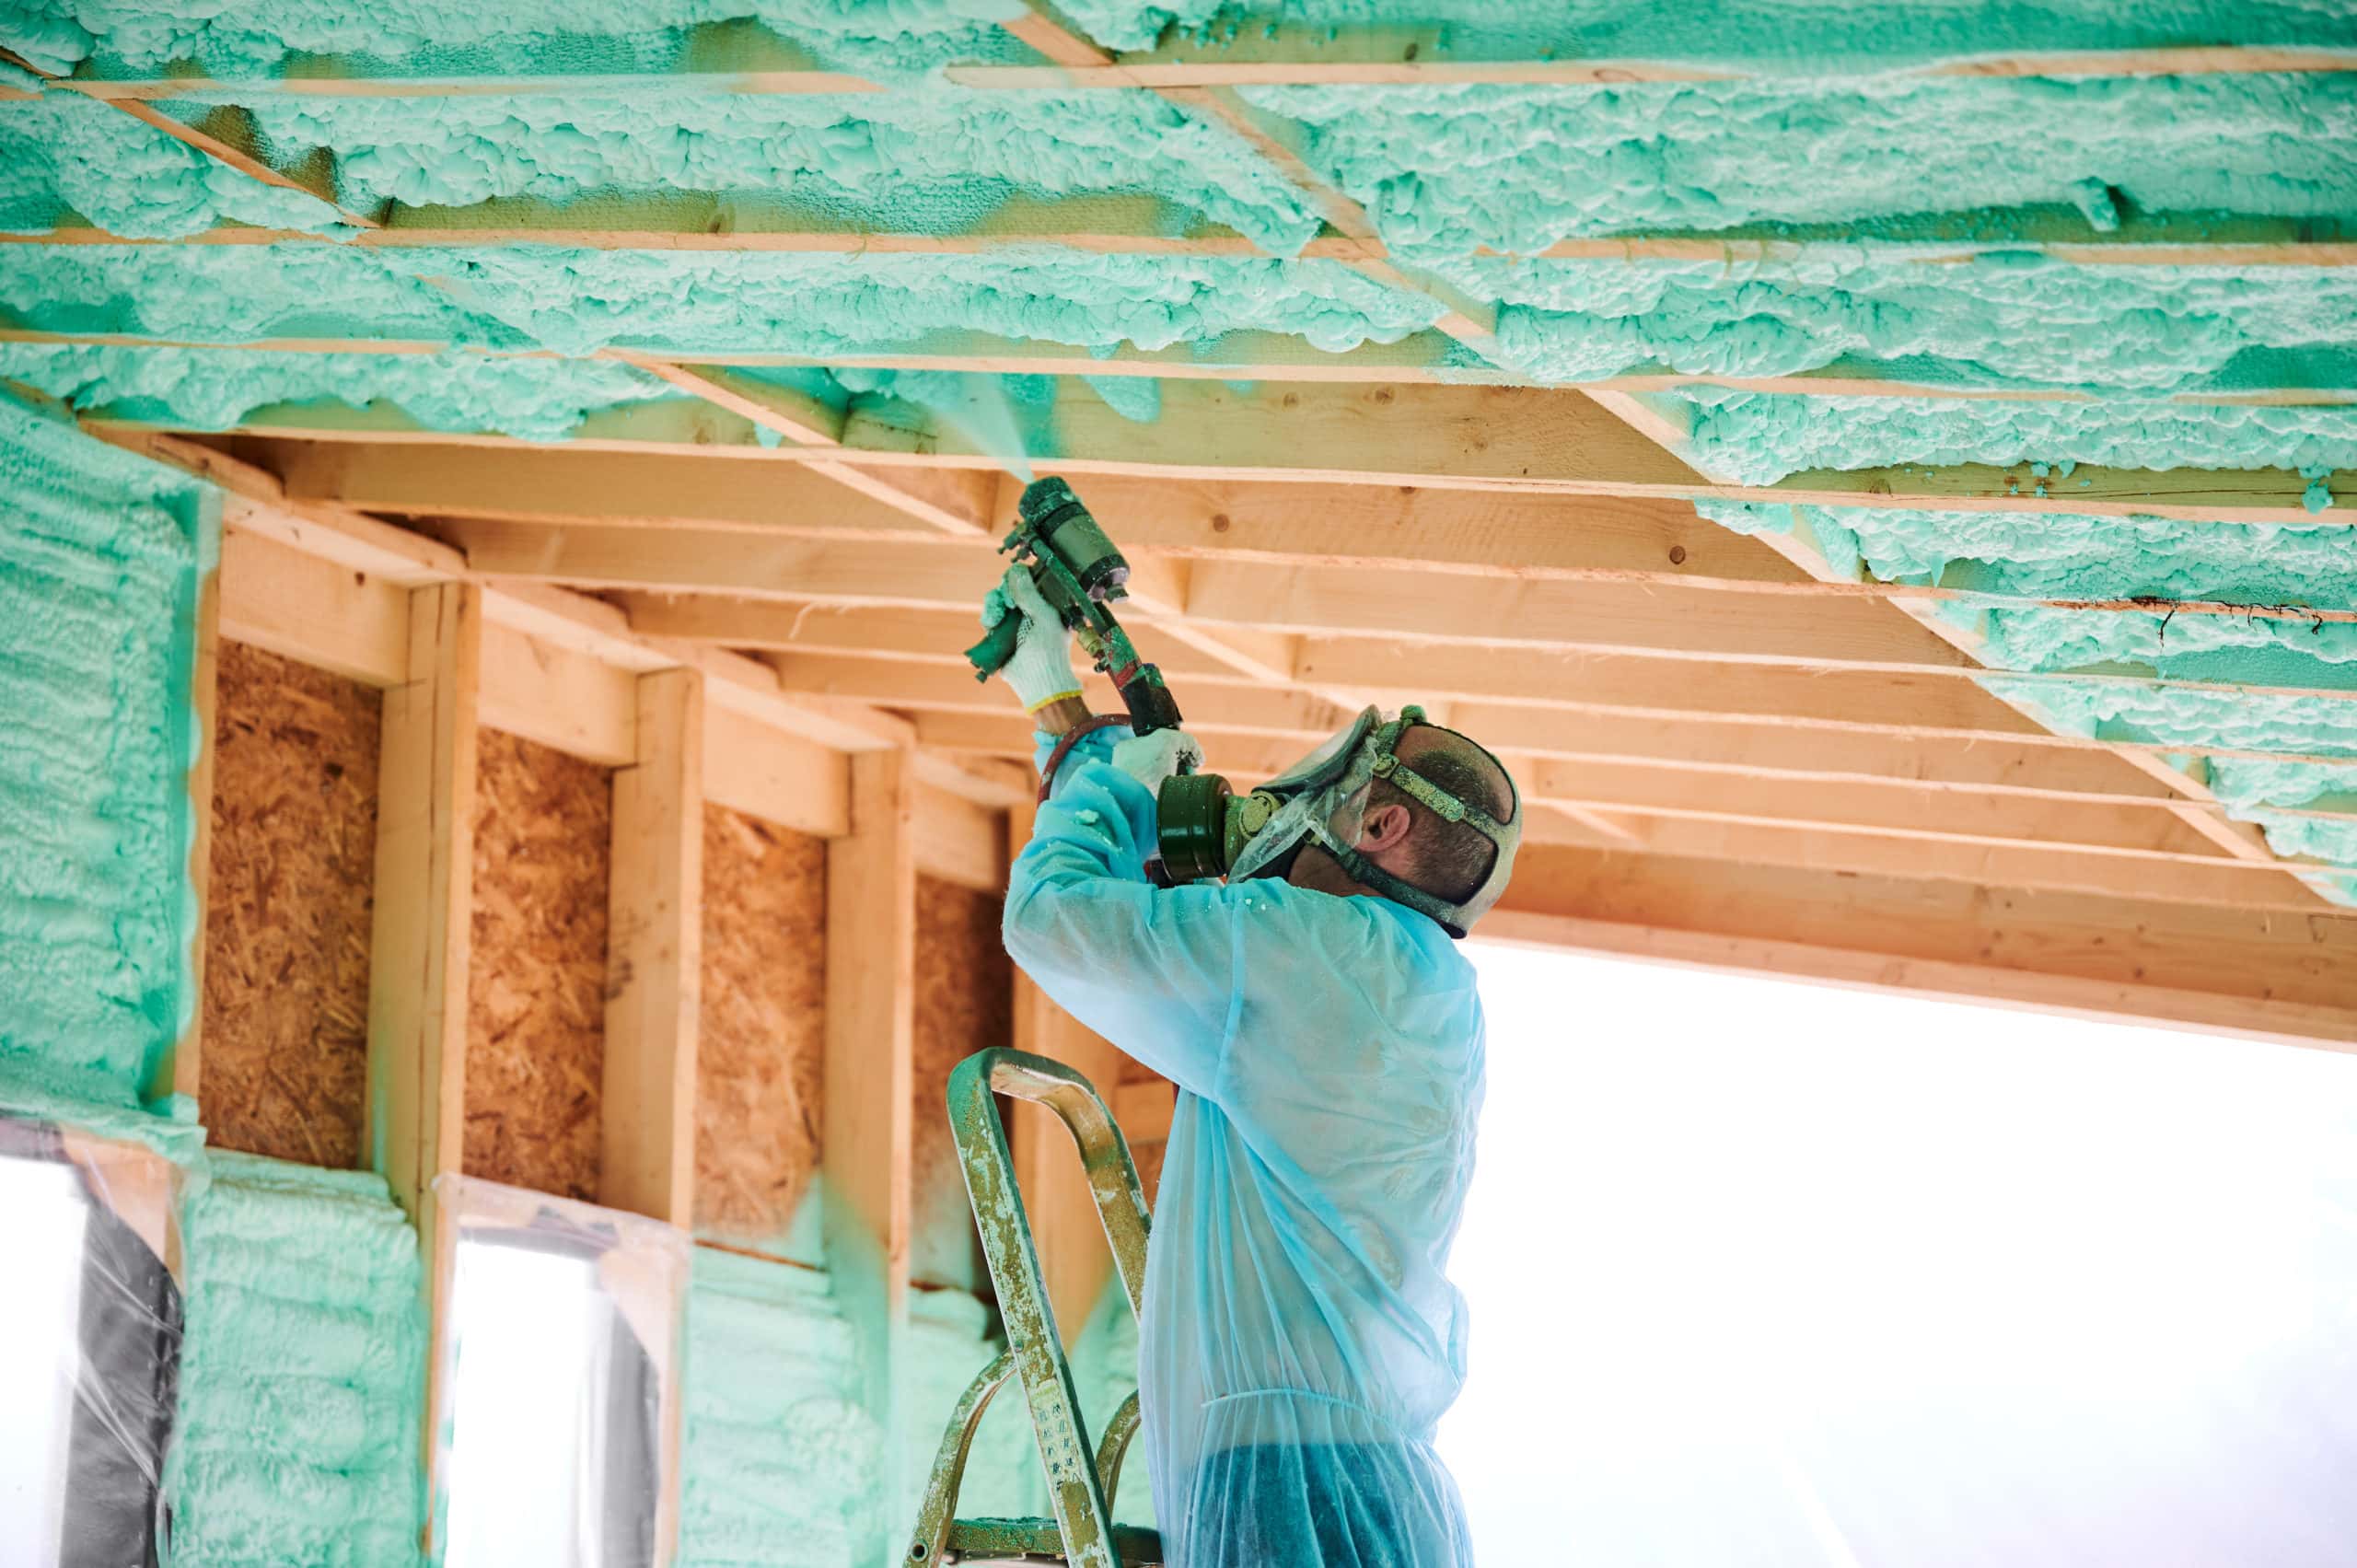
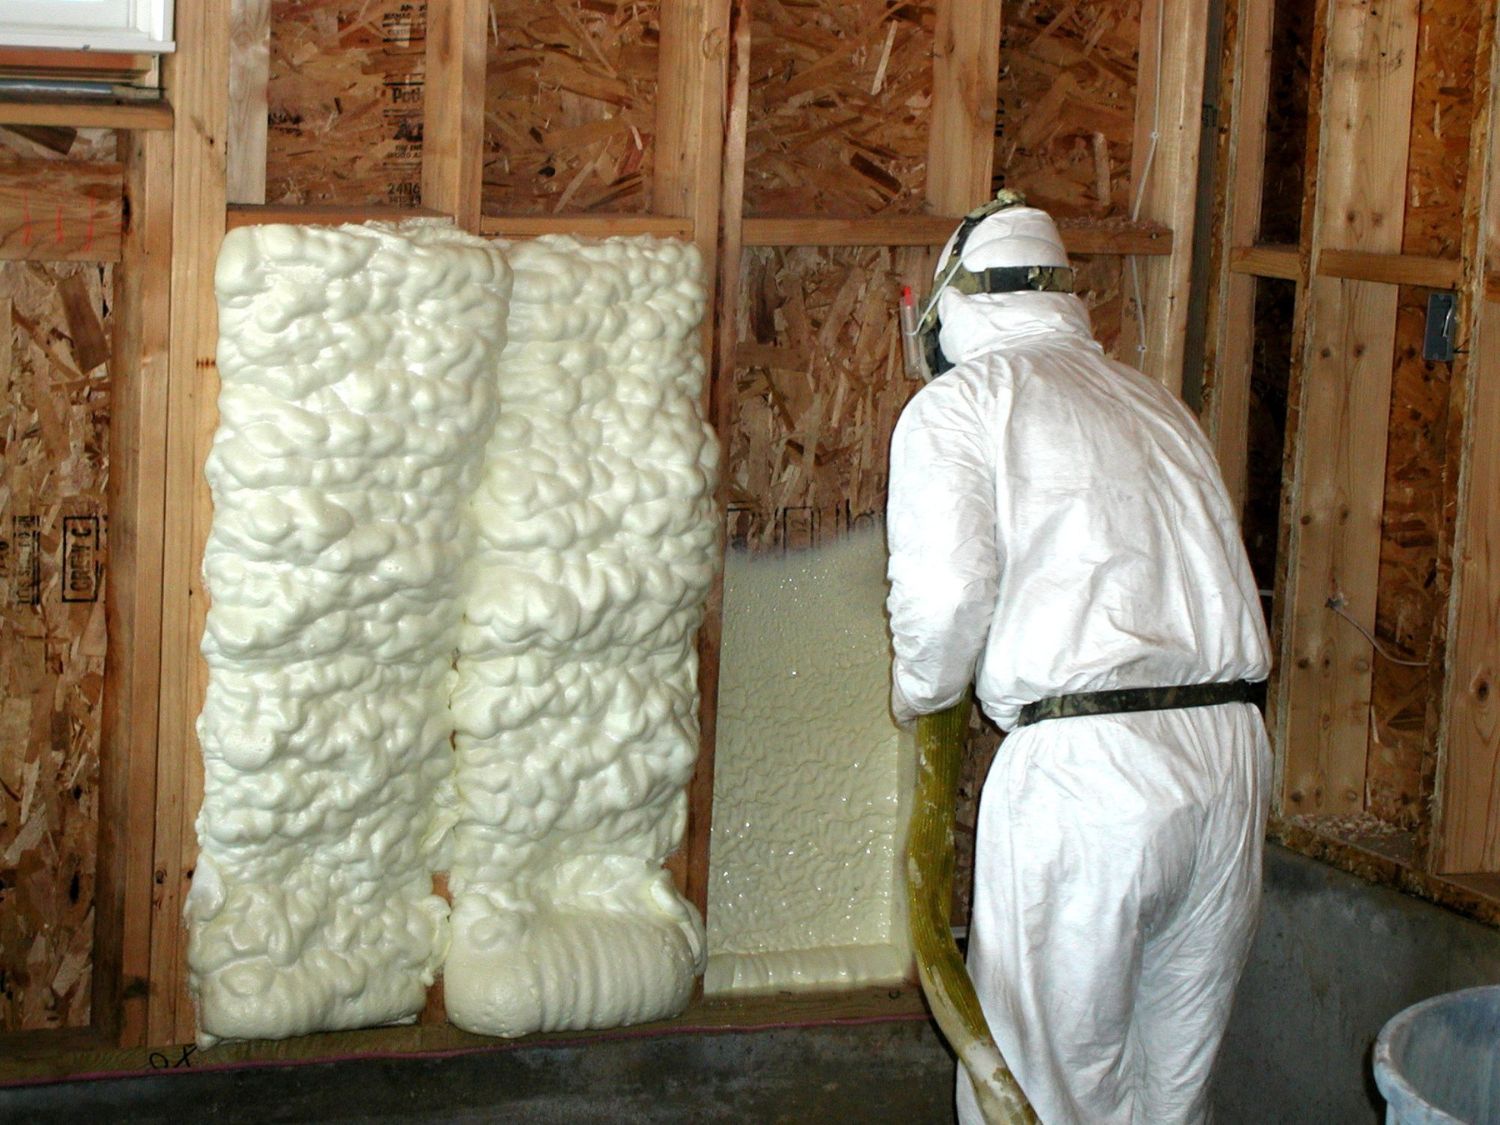
Step 7: Applying the Foam
Now that you have properly mixed the foam insulation, it’s time to apply it in your attic. This step requires careful attention to ensure even coverage and airtight sealing. Here’s how to apply the foam insulation:
- Start at the farthest corner: Begin spraying the foam insulation in the farthest corner of the attic. This will allow you to work your way back towards the entrance, ensuring that you don’t step on freshly sprayed foam.
- Hold the spray gun steadily: Hold the spray foam gun steadily and maintain a consistent distance from the surface you’re spraying. Follow the manufacturer’s recommendations for the ideal distance.
- Apply foam in a steady motion: Use smooth and controlled motions to apply the foam insulation. Move the spray foam gun in a sweeping or circular motion to ensure even coverage.
- Spray vertically and horizontally: Alternate between vertical and horizontal motions while spraying the foam. This will ensure that the foam fully expands and fills all the gaps and crevices in the attic.
- Overfill gaps and cavities: Pay close attention to areas with gaps or cavities, such as around wiring or plumbing pipes. Overfill these areas slightly to ensure maximum insulation and airtight sealing.
- Avoid overspray: Be careful to avoid overspray onto uncovered surfaces or areas that should not be coated with foam insulation. Use masking tape or cardboard to create barriers if necessary.
- Work in small sections: Divide your attic into manageable sections and focus on one section at a time. This will help you maintain control and ensure thorough coverage.
- Inspect and adjust as you go: Continuously inspect the foam application as you work. Adjust the flow rate or technique as needed to achieve the desired thickness and consistency.
Applying the foam insulation requires patience and attention to detail. Take your time to ensure even coverage and airtight sealing throughout the attic. By following these guidelines, you will achieve a successful application of the foam insulation. Once you have completed the foam application, it’s time to move on to the next step of checking for gaps and inspecting coverage.
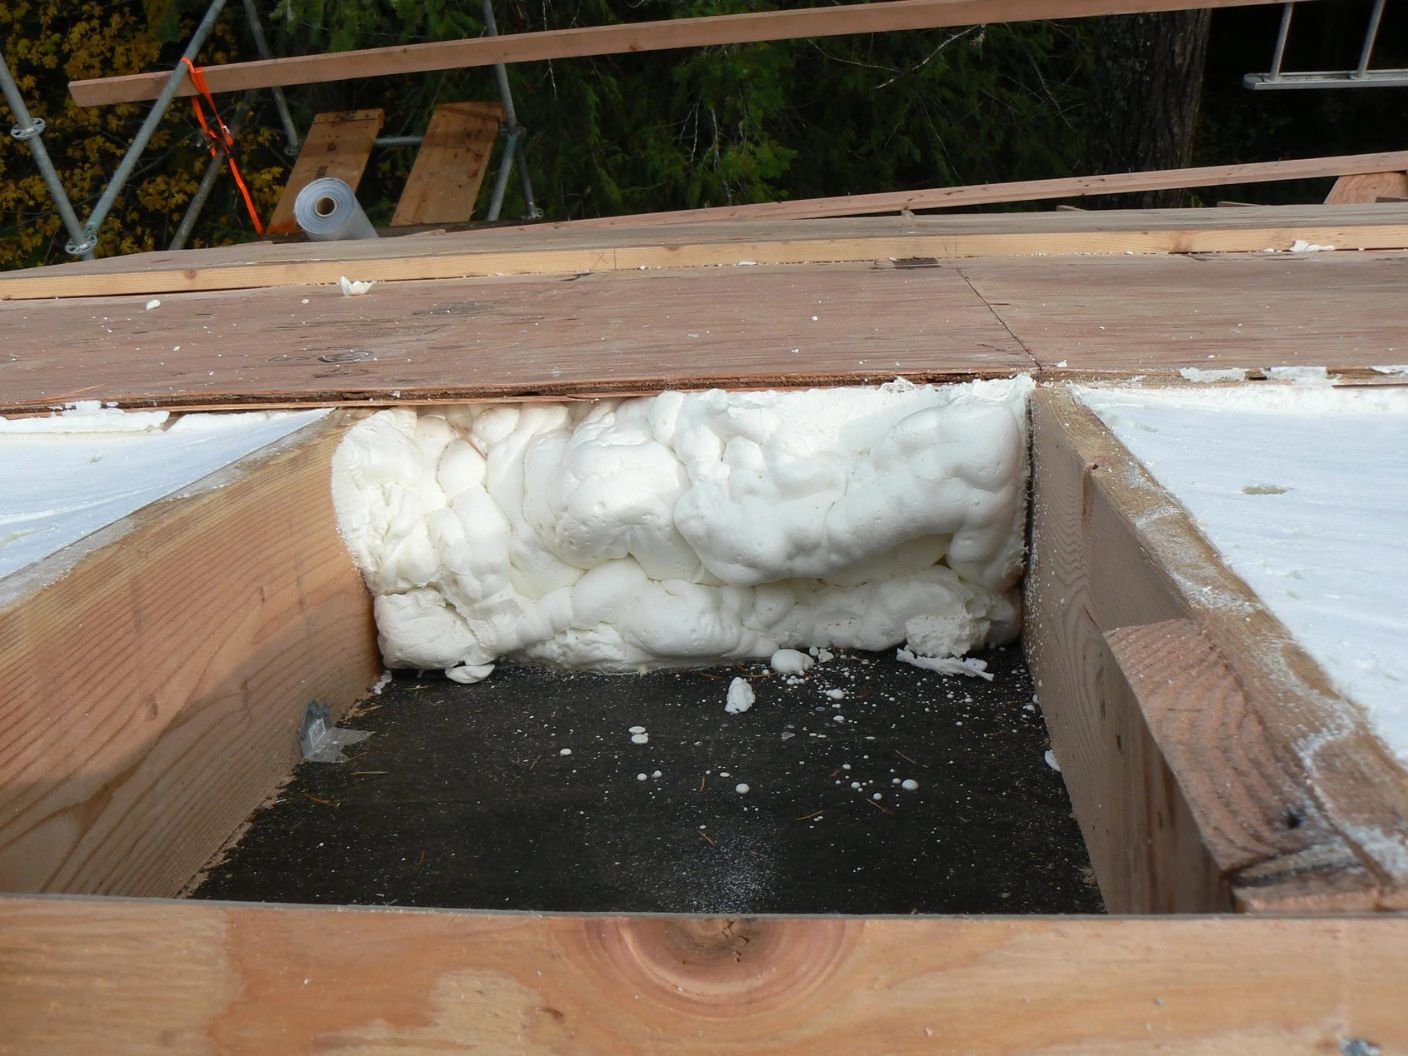
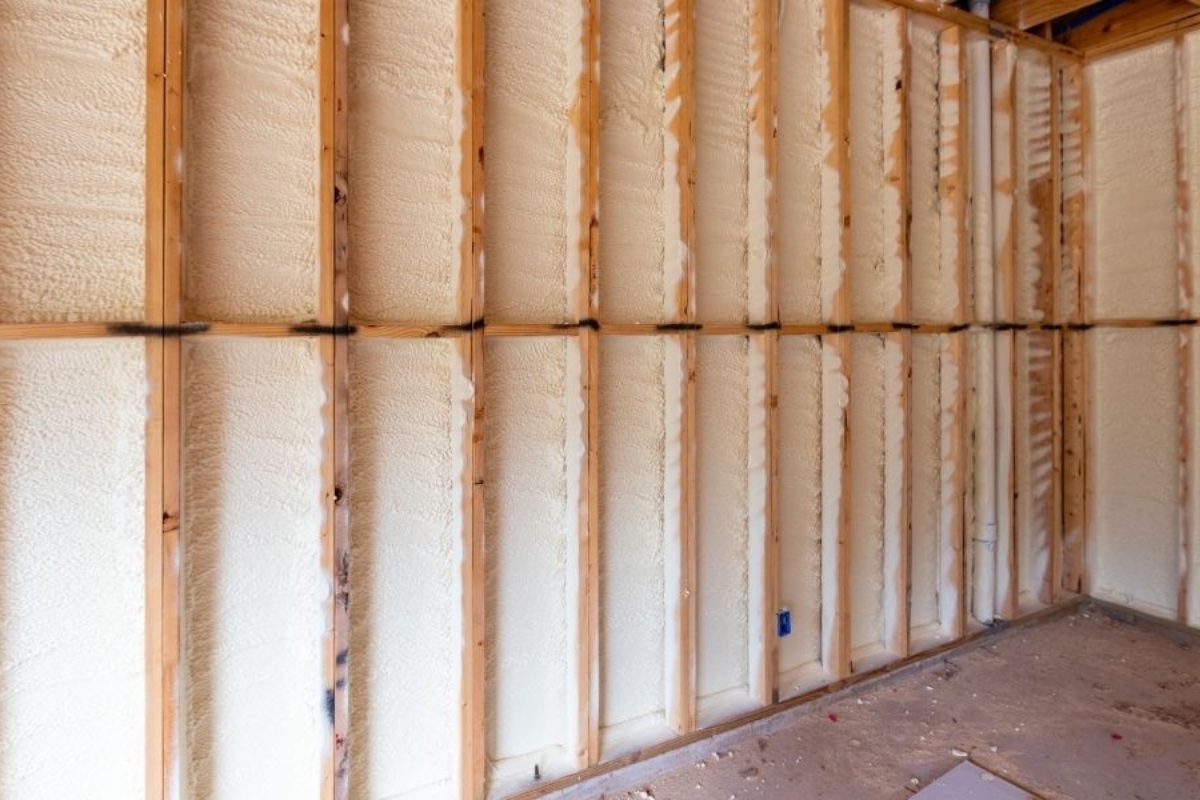
Step 8: Checking for Gaps and Inspecting Coverage
After applying the foam insulation in your attic, it’s important to check for any gaps or areas that may need additional coverage. This step ensures that your attic is properly insulated and achieves maximum energy efficiency. Here’s how to check for gaps and inspect coverage:
- Allow the foam to cure: Give the foam insulation ample time to cure and expand fully. Follow the manufacturer’s instructions for the recommended curing time.
- Inspect the attic: Once the foam has cured, conduct a thorough inspection of the attic. Use a flashlight to illuminate hard-to-reach areas and look for any gaps, missed spots, or uneven coverage.
- Mark problem areas: Use a marker or tape to mark any areas that require additional foam insulation. This will help you keep track of the spots that need to be addressed.
- Reapply foam as needed: Return to the marked problem areas and reapply foam insulation to fill in any gaps or areas that need additional coverage. Use the same application techniques as before.
- Check for airtight sealing: Verify that all openings, cracks, and gaps are sealed tightly. Properly sealed areas will prevent air leakage and ensure optimal energy efficiency.
- Ensure even and consistent coverage: Step back and assess the overall coverage in the attic. Check for any noticeable inconsistencies or areas where the foam may be too thin. Add extra foam as needed.
- Take before and after photos: It’s helpful to document the insulation process by taking before and after photos. This will give you a visual reference and allow you to compare the improvement in insulation coverage.
By carefully checking for gaps and inspecting the coverage, you can address any areas that may have been missed during the initial application. This step ensures that your attic is properly insulated, minimizing heat loss and maximizing energy efficiency. Once you have completed the inspection and addressed any gaps, you can proceed to the final step of cleanup and safety measures.
Read more: Where Not To Use Spray Foam Insulation
Step 9: Cleanup and Safety Measures
After successfully applying the foam insulation in your attic and ensuring proper coverage, it’s time to focus on cleanup and safety measures. Cleaning up the work area and following safety protocols is essential for a smooth finish and maintaining a safe environment. Here’s how to perform cleanup and implement safety measures:
- Dispose of leftover materials: Properly dispose of any unused or leftover foam insulation materials according to local regulations. Follow the manufacturer’s instructions for safely discarding any components or containers.
- Clean the work area: Remove any plastic sheets, drop cloths, or protective coverings from the attic floor. Sweep or vacuum the area to remove any debris or foam particles. Dispose of the waste material according to local guidelines.
- Store equipment safely: Clean and store your spray foam gun, hoses, and other equipment in a secure and organized manner. This will prolong their lifespan and ensure they’re ready for future use.
- Wash protective gear: Clean and launder your safety goggles, gloves, and any other protective gear used during the insulation process. Follow the manufacturer’s instructions for proper cleaning and storage.
- Check ventilation: Inspect the attic’s ventilation system to ensure it remains unobstructed. Clear away any foam overspray or debris that may have accumulated near vents or openings.
- Double-check for hazards: Take a final look around the attic to ensure there are no hidden hazards or exposed electrical wires. Clear away any potential tripping hazards or obstructions.
- Review safety precautions: Reflect on the safety precautions followed during the insulation process and ensure that any necessary safety measures are maintained in the attic going forward.
- Dispose of empty containers: Dispose of empty foam canisters, containers, and packaging in accordance with local waste disposal guidelines.
- Document the project: Document the completion of the project by taking photos of the attic and noting any relevant details. This can serve as a reference for future maintenance or insulation projects.
Wrap up your attic insulation project by performing a thorough cleanup, storing equipment properly, and reviewing safety measures. By following these steps, you’ll ensure a clean and safe work environment while maintaining the efficiency and effectiveness of your newly applied foam insulation.
Congratulations on successfully completing the process of spraying foam insulation in your attic! You have taken a significant step towards improving the energy efficiency and comfort of your home. Enjoy the benefits of a well-insulated attic, reduced energy costs, and a more comfortable living space.
Conclusion
Insulating your attic with spray foam is an excellent way to improve the energy efficiency of your home and create a more comfortable living environment. In this comprehensive guide, we’ve walked you through each step of the process, from preparation to cleanup and safety measures. By following these steps and adhering to the recommended safety precautions, you can successfully spray foam your attic and enjoy the benefits of a well-insulated space.
Through the steps outlined in this guide, you learned how to properly prepare your attic, ensure safety during the insulation process, clear the area for a clean workspace, cover vents and openings, set up your equipment, mix the foam, apply the insulation, check for gaps and inspect coverage, and perform cleanup and safety measures. Each of these steps plays a crucial role in achieving effective and efficient insulation.
Remember, safety should always be a top priority when working with spray foam insulation. Always wear proper protective gear, ensure proper ventilation, and follow the manufacturer’s instructions for optimal results. Additionally, taking the time to clear the attic, cover vents and openings, and properly mix the foam will contribute to a successful insulation process.
Once you’ve completed the insulation process, enjoy the benefits of a well-insulated attic. Spray foam insulation provides excellent thermal resistance, prevents air leakage, reduces energy costs, and creates a more comfortable living space. You’ll notice improved temperature regulation, reduced drafts, and potentially lower heating and cooling expenses.
Thank you for following this comprehensive guide on how to spray foam an attic. By implementing these steps, you are well on your way to achieving a well-insulated and energy-efficient home. Enjoy the comfort, savings, and peace of mind that come with a properly insulated attic!
Frequently Asked Questions about How To Spray Foam Insulation In An Attic
Was this page helpful?
At Storables.com, we guarantee accurate and reliable information. Our content, validated by Expert Board Contributors, is crafted following stringent Editorial Policies. We're committed to providing you with well-researched, expert-backed insights for all your informational needs.
0 thoughts on “How To Spray Foam Insulation In An Attic”