Articles
How To Store Homemade Buttermilk
Modified: August 23, 2024
Learn how to properly store your homemade buttermilk to maintain its freshness and quality. Read our informative articles for practical tips and guidelines.
(Many of the links in this article redirect to a specific reviewed product. Your purchase of these products through affiliate links helps to generate commission for Storables.com, at no extra cost. Learn more)
Introduction
Welcome to the world of homemade buttermilk! If you’re a lover of tangy, creamy, and versatile dairy products, then you’re in for a treat. Buttermilk, with its unique flavor and numerous culinary uses, has become a staple in many households. While it is readily available in stores, there is something truly special about making your own homemade buttermilk.
In this article, we will explore the art of making and storing homemade buttermilk. Whether you’re a seasoned chef or just starting your culinary journey, learning how to create and store this delicious and versatile ingredient will expand your cooking repertoire.
But before we dive into the process, let’s take a closer look at what exactly buttermilk is and why making it at home has its advantages.
Key Takeaways:
- Making homemade buttermilk allows for quality control, cost-effectiveness, and culinary flexibility, providing a fresher and more flavorful product tailored to your preferences.
- Proper storage of homemade buttermilk is crucial for maintaining its freshness and flavor. Refrigerate in a sealable container, away from odorous foods, and consider freezing in small portions for long-term use.
Read more: How To Store Buttermilk Pie
What is Buttermilk?
Buttermilk is a dairy product that has a tangy and creamy flavor. Contrary to its name, buttermilk is not actually made from butter. Traditionally, it is the liquid left behind after churning butter from cream.
Buttermilk is typically slightly acidic, which gives it its distinctive taste. The acidity is the result of natural lactic acid bacteria that ferment the milk sugars, converting them into lactic acid. This fermentation process also contributes to the thick and creamy texture of buttermilk.
Historically, buttermilk was a byproduct of butter-making, but nowadays, it is more commonly made by fermenting milk with specific bacterial cultures. This cultured buttermilk is what you’ll find in most stores. It contains added bacteria that provide the same tangy flavor and thick texture as traditional buttermilk.
Buttermilk is a versatile ingredient used in a wide range of dishes. Its acidity helps to tenderize meats, making it a popular choice for marinating chicken or pork. It is frequently used in baking, where it can act as a leavening agent when combined with baking soda. Buttermilk also adds depth of flavor and moisture to pancakes, biscuits, and cakes.
Aside from its culinary uses, buttermilk is also known for its health benefits. It is rich in essential nutrients like calcium, potassium, and vitamin B12. Additionally, the probiotics found in cultured buttermilk can promote a healthy gut and aid digestion.
Now that you have a better understanding of what buttermilk is, let’s explore the reasons why you might want to make your own homemade version.
Why Make Homemade Buttermilk?
Making your own homemade buttermilk offers several advantages over store-bought options. Here are a few reasons why you might want to give it a try:
- Quality Control: When you make buttermilk at home, you have full control over the ingredients. You can choose to use high-quality milk, preferably organic or locally sourced, ensuring that you know exactly what goes into your buttermilk.
- Freshness: Homemade buttermilk is incredibly fresh since you make it on-demand. You don’t have to worry about buying buttermilk that has been sitting on store shelves for extended periods. The result is a fresher and more flavorful product.
- Cost-Effectiveness: Making your own buttermilk can be more cost-effective, especially if you frequently use it in your cooking and baking. Buying store-bought buttermilk can add up over time, whereas making it at home allows you to save money in the long run.
- Enhanced Flavor: Homemade buttermilk often has a richer and more complex flavor compared to store-bought varieties. The live cultures present in homemade buttermilk contribute to its unique taste, providing a delightful tanginess that can enhance your culinary creations.
- Culinary Flexibility: Making your own buttermilk allows you to customize it to suit your preferences. You can adjust the level of tanginess by adjusting the fermentation time. Additionally, you can experiment with different types of milk, such as goat’s milk or non-dairy alternatives, to create a buttermilk that suits your dietary needs.
By making homemade buttermilk, you can enjoy a fresher, more flavorful, and customized product while having control over the quality of the ingredients. Now that you’re convinced of the benefits, let’s move on to the ingredients you’ll need to make your own buttermilk.
Ingredients Needed
Creating homemade buttermilk requires just a few simple ingredients. Here’s what you’ll need:
- Milk: The primary ingredient for making buttermilk is milk. You can choose from a variety of options, such as whole milk, low-fat milk, or even non-dairy milk like almond or soy milk if you have dietary restrictions or preferences.
- Buttermilk Starter Culture: To kick-start the fermentation process, you’ll need a small amount of buttermilk starter culture. This can be either store-bought buttermilk or leftover homemade buttermilk from a previous batch. Ensure that the buttermilk you use as a starter contains live and active cultures.
- Optional Additives: While not necessary, you can add a few optional ingredients to enhance the flavor or texture of your homemade buttermilk. These can include a pinch of salt or a tablespoon of lemon juice or vinegar to increase the tanginess.
- Equipment: You’ll need a few basic kitchen tools to make buttermilk, including a clean glass jar or container with a lid for fermentation, a whisk or spoon for mixing, and a kitchen thermometer to monitor the temperature if desired.
That’s it! With just a few readily available ingredients and simple equipment, you’re well on your way to creating your very own homemade buttermilk. Next, we’ll walk you through the step-by-step instructions on how to make the buttermilk from scratch.
Step-by-Step Instructions
Now that you have your ingredients ready, let’s dive into the step-by-step process of making homemade buttermilk:
- Sanitize the Equipment: Ensure that the glass jar or container and any utensils you’ll be using are clean and sanitized. This helps prevent the growth of unwanted bacteria and ensures the quality of your homemade buttermilk.
- Heat the Milk: In a saucepan, heat the milk over medium heat until it reaches a temperature of around 110°F (43°C). Heating the milk helps to sterilize it and also activates the live cultures in your buttermilk starter.
- Cool the Milk: Allow the milk to cool to a temperature of around 85°F (29°C). This temperature range is ideal for the growth of the beneficial bacteria in the buttermilk starter.
- Add the Buttermilk Starter Culture: Once the milk has cooled, add a small amount of buttermilk starter culture to the jar or container. The amount can vary, but a good rule of thumb is to add about 2 tablespoons of starter culture for every quart (4 cups) of milk.
- Mix Well: Use a whisk or spoon to thoroughly mix the milk and the buttermilk starter culture. Ensure that the starter culture is evenly distributed throughout the milk.
- Cover and Ferment: Securely cover the jar or container with a lid or plastic wrap. Place it in a warm spot, ideally around 70-75°F (21-24°C), and let it ferment undisturbed for about 12-24 hours. The longer you ferment, the tangier the resulting buttermilk will be.
- Check for Readiness: After the fermentation period, check the consistency and taste of your homemade buttermilk. It should have thickened and developed a tangy flavor. If it tastes pleasant and tangy, it is ready to use. If you prefer a stronger flavor, you can let it ferment for a few more hours.
- Refrigerate: Once your homemade buttermilk reaches the desired taste and consistency, refrigerate it to halt the fermentation process. It will keep well in the refrigerator for around 1-2 weeks.
Now that you know the step-by-step process of making homemade buttermilk, it’s time to move on to the next important topic: storing your homemade buttermilk.
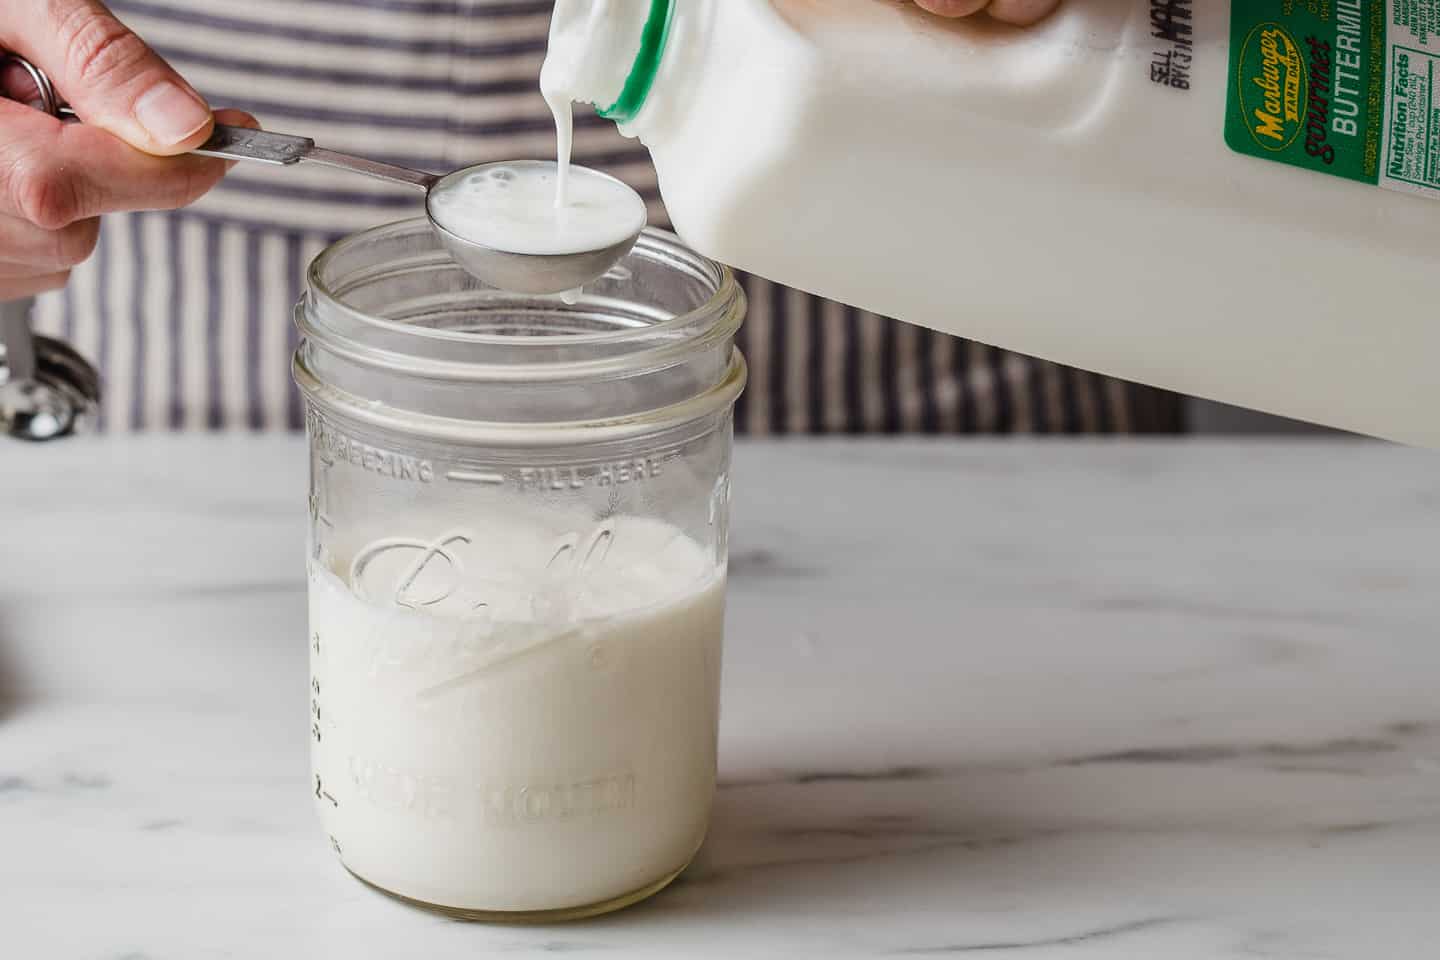
Store homemade buttermilk in an airtight container in the refrigerator. It will keep for up to 2 weeks. Shake well before using.
Read more: How To Store Homemade Boba
Storing Homemade Buttermilk
Proper storage is crucial to maintain the freshness and quality of your homemade buttermilk. Here are some guidelines to help you store your homemade buttermilk:
- Transfer to a Sealable Container: Once your homemade buttermilk is ready, transfer it to a clean, sealable container. A glass jar with a tight-fitting lid works well for this purpose.
- Label and Date: It’s a good practice to label the container with the date of preparation. This will help you keep track of its freshness and determine whether it is still safe to use.
- Refrigerate Immediately: Homemade buttermilk should be refrigerated as soon as possible to slow down any further fermentation and maintain its flavor and consistency. Place the jar in the refrigerator at a temperature below 40°F (4°C) to maximize its shelf life.
- Keep Away from Odorous Foods: Buttermilk tends to absorb odors from other foods in the refrigerator, so it’s best to store it away from strong-smelling ingredients like onions, garlic, or seafood.
- Shake Before Use: Before using your homemade buttermilk, give the jar a good shake to ensure that the liquid and any separated solids are well incorporated.
- Check for Freshness: As time passes, check the buttermilk for any signs of spoilage. If you notice any off smells, strange colors, or clumps forming, it is best to discard it and prepare a fresh batch.
- Use Within the Recommended Time: Homemade buttermilk typically stays fresh for around 1-2 weeks when properly refrigerated. However, its taste and texture may gradually change over time, so it is recommended to use it within this timeframe for the best results.
By following these storage guidelines, you can enjoy the full flavor and freshness of your homemade buttermilk for an extended period.
Next, let’s explore some additional tips for long-term storage of homemade buttermilk, which can be helpful when you want to make larger batches or extend its shelf life beyond a few weeks.
Tips for Long-Term Storage
If you want to store your homemade buttermilk for an extended period or make larger batches, here are some tips to help you achieve long-term storage:
- Freeze in Small Portions: For long-term storage, consider freezing your homemade buttermilk. However, freezing the entire batch can make it inconvenient to thaw and use as needed. Instead, freeze the buttermilk in small portions, such as ice cube trays or silicone molds. Once frozen, transfer the portions to a freezer-safe bag or container for easy access.
- Label and Date: Just like with refrigerated buttermilk, it’s essential to label each portion with the date of freezing. This way, you can keep track of its freshness and use it within a reasonable timeframe.
- Thawing the Frozen Buttermilk: When you’re ready to use the frozen buttermilk, simply remove the desired portion from the freezer and let it thaw in the refrigerator overnight. Thawing it slowly in the refrigerator helps maintain its texture and flavor.
- Stir Well After Thawing: Once the frozen buttermilk has thawed, give it a good stir to ensure all the separated liquid and solids are well combined. The texture may be slightly impacted after freezing, so stirring will help restore its original consistency.
- Use Thawed Buttermilk in Recipes: Thawed buttermilk may not be suitable for drinking due to textural changes. However, it can still be used in various recipes such as pancakes, biscuits, cakes, and marinades. Incorporating it into cooked or baked dishes will help overcome any textural differences.
- Consume Within 3-6 Months: While frozen buttermilk can retain its quality for an extended period, it is recommended to use it within 3-6 months for the best taste and texture.
- Discard if Spoiled: As with refrigerated buttermilk, if you notice any signs of spoilage, such as off smells, unusual colors, or substantial separation, it is best to discard the thawed buttermilk.
By following these tips, you can confidently store your homemade buttermilk for long-term use, allowing you to enjoy the delicious taste and versatility of this dairy product whenever you need it.
Now that we’ve covered tips for long-term storage, let’s address some frequently asked questions about homemade buttermilk.
Frequently Asked Questions
Here are answers to some common questions about homemade buttermilk:
1. Can I make buttermilk with non-dairy milk?
Yes, you can make buttermilk with non-dairy milk, such as almond milk or soy milk. Simply follow the same process using your preferred non-dairy milk. However, keep in mind that the flavor and texture may differ slightly from traditional buttermilk.
2. Can I use store-bought buttermilk as a starter culture?
Yes, store-bought buttermilk can be used as a starter culture. Look for buttermilk that contains live and active cultures to ensure successful fermentation.
3. Can I use homemade buttermilk as a substitute for regular milk in recipes?
In most cases, homemade buttermilk is not a direct substitute for regular milk due to its thicker consistency and tangy flavor. However, it can be used as a substitute in recipes that require the acidic properties of buttermilk or where a tangier flavor is desired.
4. Can I make buttermilk without a starter culture?
While it is possible to make buttermilk without a starter culture, using a starter culture ensures consistent results and speeds up the fermentation process. However, you can make a buttermilk substitute by adding lemon juice or vinegar to regular milk and letting it sit for a few minutes until it curdles slightly.
5. What can I do with leftover buttermilk?
If you have leftover buttermilk, there are plenty of delicious ways to use it. You can use it in pancakes, waffles, biscuits, muffins, cakes, dressings, marinades, and more. The tangy flavor of buttermilk adds a unique depth to both sweet and savory dishes.
6. Can I reuse homemade buttermilk as a starter for the next batch?
Yes, you can use a small amount of leftover homemade buttermilk as a starter culture for your next batch. This creates a cycle where you can continuously make fresh buttermilk. However, it is recommended to use store-bought buttermilk occasionally to maintain the health of the bacterial cultures.
If you have other questions or concerns about homemade buttermilk, don’t hesitate to reach out to us. Now that we’ve covered the frequently asked questions, let’s wrap up this article.
Conclusion
Congratulations! You have now learned how to make and store homemade buttermilk. By following the simple steps and using basic ingredients, you can create your very own tangy and creamy buttermilk, tailored to your preferences. Making homemade buttermilk not only allows you to have control over the ingredients and freshness but also offers a unique flavor that enhances your culinary creations.
Whether you use buttermilk for marinating meats, baking fluffy pancakes, or adding a creamy tang to your dressings and sauces, this versatile ingredient is a must-have in any kitchen.
We covered the importance of quality control, freshness, cost-saving, enhanced flavor, and culinary flexibility as reasons to make homemade buttermilk. With just milk, buttermilk starter culture, and a few optional additives, you can craft your own buttermilk masterpiece.
Remember to store your homemade buttermilk properly by refrigerating it in a sealable container, away from odorous foods, and use it within one to two weeks. If you want to store it for a more extended period, freezing in small portions is a great option.
Now it’s time to get creative in the kitchen and enjoy the benefits of homemade buttermilk. Use it in your favorite recipes or explore new dishes that showcase the tangy and creamy goodness of buttermilk.
We hope this article has inspired you to embark on your buttermilk-making journey and experiment with the endless possibilities that homemade buttermilk brings to your culinary repertoire. So roll up your sleeves, gather your ingredients, and get ready to savor the delightful flavors of your homemade buttermilk creations!
Frequently Asked Questions about How To Store Homemade Buttermilk
Was this page helpful?
At Storables.com, we guarantee accurate and reliable information. Our content, validated by Expert Board Contributors, is crafted following stringent Editorial Policies. We're committed to providing you with well-researched, expert-backed insights for all your informational needs.


0 thoughts on “How To Store Homemade Buttermilk”