Articles
How To Store Radishes In Mason Jars
Modified: August 16, 2024
Learn how to store radishes in mason jars for maximum freshness and convenience. Our informative articles provide step-by-step instructions and helpful tips for preserving your radishes.
(Many of the links in this article redirect to a specific reviewed product. Your purchase of these products through affiliate links helps to generate commission for Storables.com, at no extra cost. Learn more)
Introduction
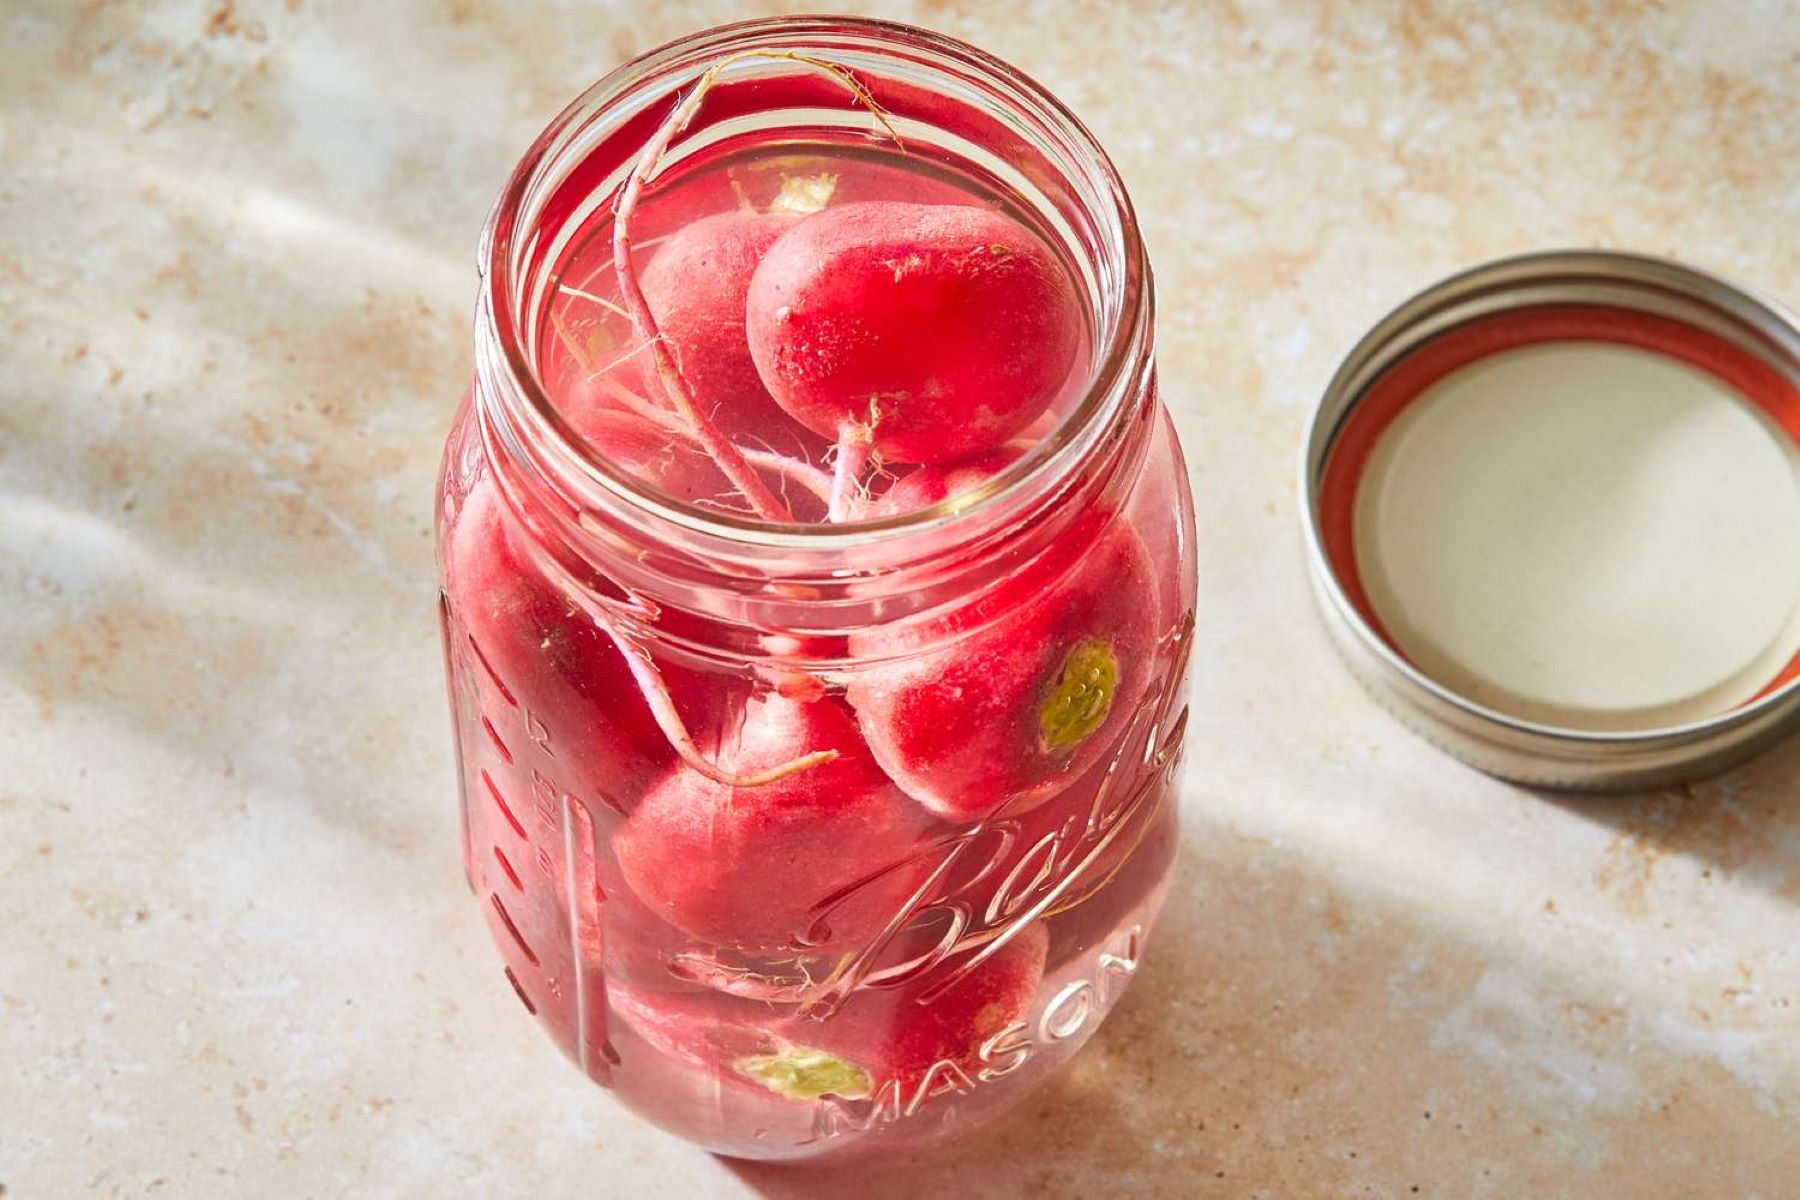
Radishes are crisp, vibrant root vegetables that add a delightful crunch and peppery flavor to salads, sandwiches, and other dishes. If you find yourself with an abundance of radishes, storing them properly becomes essential to maintain their freshness and extend their shelf life. One effective method for preserving radishes is by storing them in mason jars.
By following a few simple steps, you can ensure that your radishes stay fresh and delicious for an extended period. In this article, we will guide you through the process of storing radishes in mason jars, from harvesting the radishes to sealing and storing the jars.
Key Takeaways:
- Preserve radishes’ freshness by storing them in mason jars. Properly prepare radishes and jars, pack them with optional flavorings, and monitor for spoilage to enjoy their crispness and flavor for weeks.
- Extend the shelf life of radishes with mason jar storage. From harvesting to sealing, follow the step-by-step process to ensure fresh, flavorful radishes ready for your culinary creations.
Read more: How To Store Mason Jars
Supplies Needed
- Mason Jars: Choose jars with tight-fitting lids, preferably in quart or pint size.
- Fresh Radishes: Harvest radishes that are firm, free from blemishes, and with greens that are still attached.
- Water: Use clean, filtered water for rinsing and preparing the radishes.
- Vinegar (optional): Adding vinegar to the water helps to preserve the radishes’ texture and flavor.
- Salt (optional): Salt can be used to enhance the flavor of the radishes when preparing a brine.
Now that you have gathered all the necessary supplies, let’s dive into the step-by-step process of storing radishes in mason jars to keep them crisp and ready for your culinary adventures.
Key Takeaways:
- Preserve radishes’ freshness by storing them in mason jars. Properly prepare radishes and jars, pack them with optional flavorings, and monitor for spoilage to enjoy their crispness and flavor for weeks.
- Extend the shelf life of radishes with mason jar storage. From harvesting to sealing, follow the step-by-step process to ensure fresh, flavorful radishes ready for your culinary creations.
Read more: How To Store Mason Jars
Supplies Needed
When it comes to storing radishes in mason jars, having the right supplies on hand is essential. Here are the items you’ll need before you get started:
Mason Jars:
Mason jars are the perfect containers for storing radishes. Opt for jars with tight-fitting lids to ensure proper sealing and to maintain the freshness of the radishes. It’s recommended to use quart or pint-sized mason jars, depending on the quantity of radishes you have.
Fresh Radishes:
Of course, you’ll need fresh radishes to store in your mason jars. Look for radishes that are firm and free from any blemishes or signs of decay. Ideally, the radishes should still have their greens attached, as these greens can be used for other purposes, such as garnishing salads or sautéing as a side dish.
Read more: How To Store Blueberries In Mason Jars
Water:
You’ll need clean, filtered water for rinsing and preparing the radishes before storing them. Water plays a crucial role in maintaining the radishes’ moisture and crispness during storage.
Vinegar (optional):
Adding vinegar to the water when preparing radishes for storage can help preserve their texture and flavor. Vinegar acts as a natural preservative and also provides a tangy taste to the radishes, enhancing their overall flavor profile. However, using vinegar is optional, and you can skip this step if you prefer.
Salt (optional):
If you’re planning to create a brine solution to store your radishes, you might consider adding salt to enhance the flavor. Salt can be added to the brine mixture, providing a savory kick to the radishes. Again, this step is optional and can be skipped if desired.
Now that you’ve gathered all the necessary supplies, you’re ready to embark on the journey of storing your radishes in mason jars. Following the proper steps and using the right supplies will ensure that your radishes stay fresh and ready to use for an extended period of time.
Step 1: Harvesting Radishes
Before you can begin the process of storing radishes in mason jars, it’s important to harvest them properly. This step ensures that you have the freshest radishes possible to store for later use. Here are two key aspects of harvesting radishes that you should keep in mind:
Read more: How To Store Cucumbers In Mason Jars
Selecting Ripe Radishes:
When it comes to radishes, the key is to harvest them at the right time. Ripe radishes will have a vibrant hue, whether that’s a deep red, pink, or white, depending on the variety. The size of the radish may also be an indicator of ripeness, but it’s best to rely on color as the primary factor for determining ripeness. Make sure to avoid radishes that are overly large or have cracks, as these may indicate that they are past their prime.
Properly Cleaning Radishes:
Once you have selected ripe radishes to store, the next step is to give them a thorough cleaning. Start by removing any excess soil or dirt from the radishes. Gently scrub them under cool running water using a soft brush or your hands to remove any remaining dirt. Pay extra attention to the areas around the roots and the top, where the greens were attached.
After rinsing, pat the radishes dry using a clean kitchen towel or paper towels. Properly drying the radishes ensures that any excess moisture is removed, which can help prevent spoilage during storage. Remember, moisture is a factor that can accelerate the decaying process, so it’s crucial to handle the radishes carefully and ensure they are completely dry before moving on to the next step.
By carefully selecting and cleaning your radishes, you are setting the foundation for successful storage. Following these steps will help ensure that your radishes are at their peak freshness when they go into the mason jars.
Step 2: Preparing Mason Jars
Before you can begin packing your radishes into mason jars for storage, it’s essential to properly prepare the jars. This step ensures that the jars are clean and ready to preserve your radishes effectively. Here are two crucial aspects of preparing mason jars:
Washing and Sterilizing Jars:
Start by washing the mason jars thoroughly with warm soapy water. Pay close attention to the inside and outside surfaces, as well as the lids. Use a bottle brush or sponge to scrub the jars, ensuring that all residue and possible contaminants are removed. Rinse the jars well with clean water to remove any soap residue.
Once the jars are clean, it’s time to sterilize them. There are a few methods you can use for sterilization. One common method is to boil the jars in a large pot of water for approximately 10 minutes. Alternatively, you can place the jars and lids in the dishwasher on the highest temperature setting. Regardless of the method you choose, the goal is to eliminate any bacteria or microorganisms that could potentially spoil your radishes during storage.
Read more: How To Store Fruit In Mason Jars
Ensuring Jars are Dry:
After sterilizing the jars, it’s crucial to ensure that they are completely dry before proceeding. Any residual moisture left in the jars can lead to mold growth or spoilage of your radishes. Allow the jars to air dry upside down on a clean dish rack or use a clean, lint-free towel to dry them thoroughly.
It’s important to note that if you are using mason jars with rubber gaskets or seals, such as those used for canning, ensure that the seals are in good condition and free from any cracks or damage. A secure seal is necessary to maintain the freshness and longevity of your stored radishes. Replace any damaged seals before proceeding.
By taking the time to wash, sterilize, and thoroughly dry your mason jars, you are creating the optimal environment for storing your radishes. These steps help prevent contamination and ensure that your radishes stay fresh and safe for consumption over an extended period.
Step 3: Preparing Radishes for Storage
Now that your mason jars are ready, it’s time to prepare the radishes for storage. This step involves a few important tasks to ensure that your radishes remain fresh and flavorful. Here are three key aspects of preparing radishes for storage:
Trimming Radish Greens:
Start by trimming the greens from the radishes. While the greens are edible and can be used in various recipes, they can also draw moisture away from the radish roots, causing them to lose their crispness more quickly. To remove the greens, use a sharp knife or kitchen shears to cut them off just above the root. You can save the greens for other culinary uses if desired.
Washing Radishes Thoroughly:
After trimming the greens, it’s crucial to wash the radishes thoroughly to remove any remaining dirt or debris. Place the radishes under cool running water and gently scrub them using your hands or a soft brush. Pay attention to all sides of the radishes, including any crevices or indentations. Rinse them well to ensure that all dirt is removed.
Read more: How To Store Flour In Mason Jars
Optional Step: Blanching Radishes:
Blanching radishes is an optional step that can help maintain their color and texture during storage. It involves briefly immersing the radishes in boiling water, followed by rapid cooling in an ice bath. To blanch radishes, bring a pot of water to a rolling boil and carefully drop the radishes into the boiling water. Let them cook for about 30 seconds to 1 minute, then remove them and immediately transfer them to a bowl of ice water to cool. Once cooled, drain the radishes and pat them dry before proceeding.
Blanching can help preserve the radishes and prevent them from becoming mushy during storage. However, it’s important to note that blanching is not necessary for all varieties of radishes and can be skipped if desired.
By trimming the greens, thoroughly washing the radishes, and optionally blanching them, you are preparing them for optimal storage. These steps help maintain the freshness, crispness, and vibrant color of the radishes as you pack them into the mason jars.
Step 4: Packing Radishes in Mason Jars
Now that your radishes are prepared, it’s time to start packing them into the mason jars for storage. This step ensures that the radishes are organized, properly sealed, and ready to be enjoyed later. Here are three key aspects of packing the radishes:
Layering Radishes in Jars:
Begin by layering the prepared radishes in the mason jars. Take care to arrange them in a way that maximizes space while still allowing for proper circulation of air and prevention of bruising. You can either stack the radishes in a single layer or create alternating layers, depending on the size of your radishes and jars. Leave a small amount of headspace at the top of each jar to accommodate any liquid or additional ingredients you may add.
Adding Additional Flavorings (Optional):
At this stage, you have the option to add extra flavorings to enhance the taste of your radishes during storage. Some popular choices include adding herbs, such as dill or thyme, or spices, like black peppercorns or mustard seeds. These additional flavorings can infuse the radishes with a subtle, aromatic touch. Simply sprinkle the desired flavorings among the layers of radishes in the jars.
Read more: How To Store Produce In Mason Jars
Creating Brine (Optional):
If you prefer to store your radishes in a brine solution, now is the time to create it. To make a simple brine, dissolve salt (approximately 2 tablespoons per cup of water) in clean, filtered water. You can also add a splash of vinegar for added tanginess if desired. Pour the brine over the radishes in the jars, making sure they are fully submerged. Be mindful not to overfill the jars, as the brine will expand slightly during the sealing process.
By layering the radishes in the mason jars, adding optional flavorings, and creating a brine if desired, you are ensuring that your stored radishes are packed with deliciousness. These steps help preserve the radishes and infuse them with additional flavors, enhancing your culinary experience when you’re ready to use them.
Step 5: Sealing and Storing Mason Jars
Now that your radishes are packed and ready to go, it’s time to seal the mason jars and properly store them to maintain their freshness. This final step ensures that your hard work pays off and that your radishes remain delicious for an extended period. Here are three essential aspects of sealing and storing the mason jars:
Sealing the Jars:
Before sealing the jars, wipe the rims and edges with a clean, damp cloth to remove any residue or brine. This ensures a good seal and prevents any contaminants from interfering with the storage process. Once clean, carefully place the lids on the jars and secure them tightly. If you’re using mason jars with screw lids, twist the lids until they’re snug but not overly tight.
Proper Storage Conditions:
For optimal storage, place the sealed mason jars in a cool, dark, and dry place, such as a pantry or cellar. Avoid exposing the jars to direct sunlight or extreme temperature fluctuations, as these can degrade the quality of the radishes. The ideal temperature for storage is around 50-55°F (10-13°C). If refrigeration is necessary, store the jars in the refrigerator, although the radishes may lose some crispness over time.
Read more: How To Store Lettuce In Mason Jars
Monitoring for Spoilage:
As time passes, it’s essential to monitor the stored radishes for any signs of spoilage. Inspect the jars regularly for any bulging lids, excessive bubbling, or unusual odors. If you notice any of these signs or if the radishes appear slimy or discolored, it’s best to discard them to prevent any potential health risks. In most cases, properly stored radishes should remain fresh for several weeks.
By sealing the jars, storing them under the right conditions, and keeping an eye out for spoilage, you are ensuring that your stored radishes maintain their quality and safety. With proper care, you’ll be able to enjoy your preserved radishes in various recipes whenever you desire.
Conclusion
Storing radishes in mason jars is a fantastic way to extend their shelf life, keeping them fresh, crisp, and full of flavor for longer periods. By following the step-by-step process outlined in this article, you can successfully store your radishes and have them readily available for future culinary adventures.
From harvesting ripe radishes and properly cleaning them to preparing the mason jars and packing the radishes, each step plays a crucial role in maintaining their quality. Taking the time to trim radish greens, wash them thoroughly, and optionally blanch them helps ensure that they are in their best condition before storage. Properly preparing the mason jars, including washing, sterilizing, and ensuring they are dry, creates a clean and safe environment for your radishes.
When it comes to packing the radishes, layering them in the jars and adding optional flavorings offers flexibility and allows you to tailor the taste to your preference. Creating a brine solution can provide an extra level of flavor and preservation if desired. Sealing the jars carefully and storing them in suitable conditions, such as a cool and dark place, helps maintain the radishes’ freshness and extends their shelf life.
Throughout the storage process, it’s crucial to monitor the radishes for any signs of spoilage and discard any jars that show signs of deterioration. Regular inspection ensures that you can enjoy your preserved radishes with complete peace of mind.
With these guidelines in mind, you can confidently store your radishes in mason jars, allowing you to enjoy their wonderful flavors and textures long after the harvest season. So, the next time you find yourself with a surplus of radishes, don’t let them go to waste – follow these steps and savor the delightful taste of fresh radishes in your favorite dishes throughout the year.
Frequently Asked Questions about How To Store Radishes In Mason Jars
Was this page helpful?
At Storables.com, we guarantee accurate and reliable information. Our content, validated by Expert Board Contributors, is crafted following stringent Editorial Policies. We're committed to providing you with well-researched, expert-backed insights for all your informational needs.

0 thoughts on “How To Store Radishes In Mason Jars”