Articles
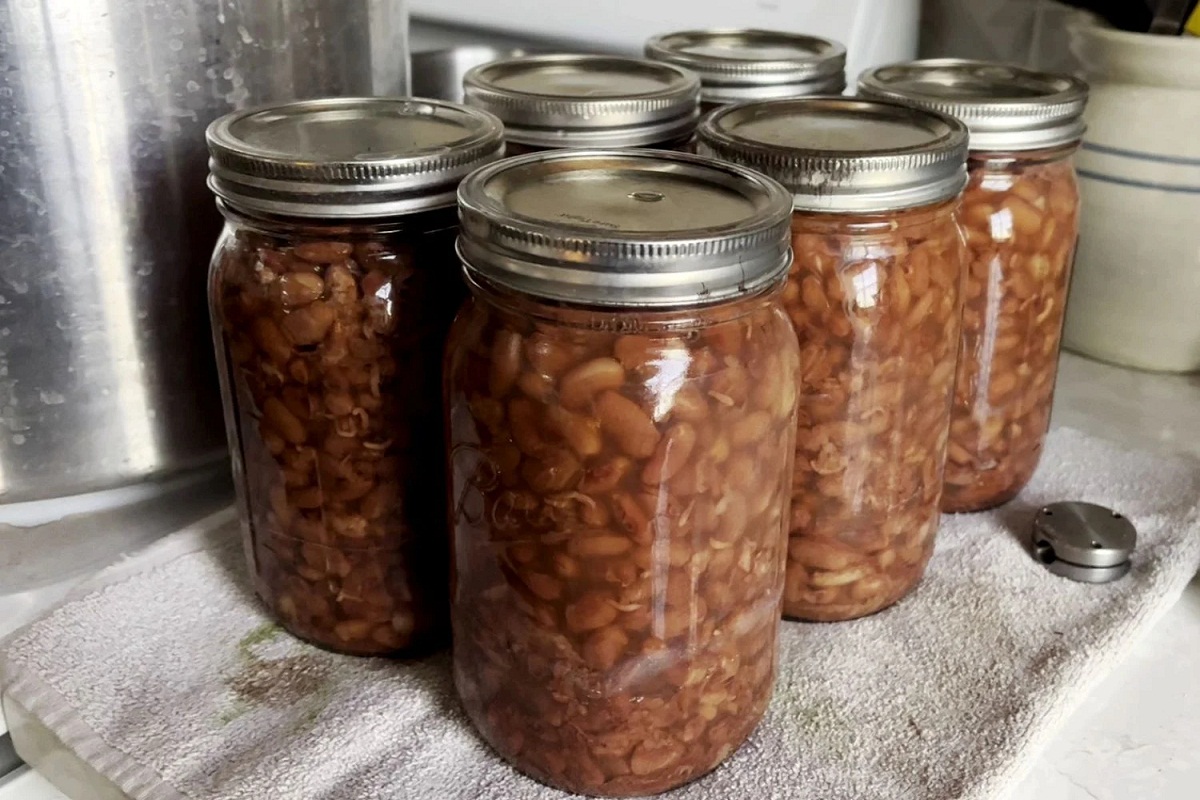
How To Store Cooked Beans In Mason Jars
Modified: August 28, 2024
Learn how to store cooked beans in mason jars with our helpful articles. Discover the best methods and tips for preserving beans for future use.
(Many of the links in this article redirect to a specific reviewed product. Your purchase of these products through affiliate links helps to generate commission for Storables.com, at no extra cost. Learn more)
Introduction
Welcome to the world of cooking with beans! Beans are a versatile and nutritious ingredient that can be used in a variety of dishes, from soups and stews to salads and casseroles. If you often find yourself cooking large batches of beans and want to preserve them for future use, storing them in mason jars is a great option.
Mason jars are not only practical and convenient for storage, but they also provide an airtight seal that helps prolong the shelf life of cooked beans. In this article, we’ll guide you through the step-by-step process of storing cooked beans in mason jars, ensuring that they remain fresh and flavorful for months to come.
Before we dive into the details, it’s important to note that the method we will discuss is specifically for cooked beans, not raw or dried beans. If you’re starting with raw beans, you’ll need to cook them first before proceeding with the storage process.
Now, let’s get started with the first step of preparing the mason jars for storing your cooked beans.
Key Takeaways:
- Preserve the delicious flavors and nutritional value of cooked beans by storing them in mason jars. Follow the step-by-step guide to ensure freshness and convenience in your culinary creations.
- Enjoy the convenience of having pre-cooked beans on hand, ready to elevate your meals with their rich flavors and nutritional benefits. Store, label, and reheat with ease for versatile and delicious dishes.
Read more: How To Store Dry Beans In Mason Jars
Step 1: Prepare the Mason Jars
The first step in storing cooked beans in mason jars is to ensure that the jars are clean and free from any residue or bacteria. Start by gathering your mason jars and inspecting them for any cracks or chips. It’s essential to use jars that are in good condition to prevent leakage or contamination.
Once you’ve chosen your jars, wash them thoroughly with hot, soapy water and rinse them well. You can also run them through a dishwasher cycle to ensure they’re sterilized. Be sure to clean both the jars and lids, paying attention to any ridges or crevices where bacteria can hide.
After cleaning, sterilize the jars by boiling them in a large pot of water for about 10 minutes. This step will further eliminate any remaining bacteria and ensure the jars are ready for safe food storage. Use tongs or a jar lifter to carefully remove the jars from the boiling water and set them aside on a clean, dry surface.
It’s important to note that while the jars are still hot, avoid touching the inside of the jar or the lids with your bare hands, as this can introduce bacteria. Instead, use clean tongs or a clean towel when handling the jars.
Now that your mason jars are clean and sterilized, you’re ready to move on to the next step: cooking the beans.
Step 2: Cook the Beans
Before you can store cooked beans in mason jars, you’ll need to cook them to perfection. The cooking process may vary depending on the type of beans you’re using, so be sure to follow the instructions on the packaging or use a recipe that suits your preference.
Start by rinsing the beans under cold water to remove any dirt or debris. Then, soak them in water overnight or according to the instructions on the package. Soaking beans helps soften them and reduces the cooking time.
Once the beans have soaked, drain and rinse them again before transferring them to a large pot. Add enough water to cover the beans by a couple of inches, and bring the water to a boil over high heat.
Once the water is boiling, reduce the heat to low and let the beans simmer gently. The cooking time will vary depending on the type and size of the beans, so it’s crucial to keep an eye on them and test their tenderness periodically.
While cooking the beans, you can add various flavorings and seasonings to enhance their taste. Common ingredients include garlic, onions, herbs, and spices. However, be mindful of the amount of salt you use, as adding too much at this stage can toughen the beans.
Continue cooking the beans until they are tender but not mushy. The cooking time can range from 1 to 2 hours, depending on the type of beans. To test their doneness, simply pinch a bean between your fingers; it should be easy to mash but still hold its shape.
Once the beans are cooked to perfection, you’re ready to move on to the next step: cooling the cooked beans.
Step 3: Cool the Cooked Beans
After cooking the beans, it’s important to allow them to cool completely before transferring them to the mason jars. This step is essential to prevent condensation and maintain the quality of the beans during storage.
To cool the cooked beans, start by draining them from the cooking liquid. You can use a colander or a slotted spoon to separate the beans from the excess liquid. You may choose to save some of the cooking liquid if you plan to add it to the jars later, but this step is optional.
Once the beans are drained, spread them out on a large tray or baking sheet in a single layer. This will help them cool more quickly and evenly. Avoid stacking or overcrowding the beans, as this can trap heat and slow down the cooling process.
Allow the beans to cool at room temperature for about 30 minutes to 1 hour. During this time, the beans will release any excess heat and moisture, ensuring they are fully cooled down before transferring them to the mason jars.
While the beans are cooling, ensure that your mason jars and lids remain clean and dry. Any excess moisture in the jars can promote the growth of bacteria, so it’s crucial to keep them dry and ready for storage.
Once the beans have cooled completely, you’re ready to move on to the next step: transferring the beans to the mason jars.
Step 4: Transfer the Beans to Mason Jars
Now that the cooked beans have cooled down, it’s time to transfer them to the mason jars for storage. Follow these steps to ensure a seamless and organized process:
- Start by preparing a clean and dry workspace. Place the mason jars, lids, and a wide-mouth funnel (if available) within easy reach.
- Using a clean spoon or ladle, carefully transfer the cooled beans into the jars, filling them up to about ¾ of their capacity. Be mindful not to overfill the jars, as the beans need space for expansion during storage.
- If you prefer, you can layer the beans with other ingredients like herbs, spices, or vegetables for added flavor. This step is optional but can enhance the taste and versatility of the stored beans.
- If you want to add some of the cooking liquid to the jars, now is the time to do so. This liquid can help keep the beans moist during storage. Leave about ½ inch of headspace at the top of the jar to allow for expansion.
- Using a clean cloth or paper towel, wipe the rims of the jars to remove any residue or bean particles. This ensures a proper seal when you close the jars.
- If you have a wide-mouth funnel, place it on top of the jar and carefully pour the beans into the jars, guiding them into the funnel. This will help prevent spills and keep the process neat and efficient.
- Once the beans are in the jars, use a clean spoon or a spatula to press them down slightly, removing any air bubbles that may have formed. This step ensures a more compact and stable arrangement of the beans.
- Double-check that the rims of the jars are clean and dry. Then, place the lids on top of the jars and screw them on tightly. Ensure a snug fit but avoid overtightening, as this can make it difficult to open the jars later.
With the beans now securely transferred to the mason jars, it’s time to move on to the next step: adding liquid (optional).
After cooking the beans, let them cool to room temperature before transferring them to clean, dry mason jars. Seal the jars tightly and store them in the refrigerator for up to 5 days or in the freezer for up to 6 months.
Read more: How To Store Mason Jars
Step 5: Add Liquid (Optional)
Adding liquid to the mason jars is an optional step, but it can help keep the stored beans moist and flavorful during storage. If you choose to add liquid, follow these guidelines:
- Before adding any liquid, make sure there is enough headspace left in the jars to accommodate the additional liquid. Maintain at least ½ inch of space between the top of the jar and the contents.
- The type of liquid you add will depend on your preference and the intended use of the beans. Some options include vegetable broth, bean cooking liquid, or olive oil.
- If using vegetable broth or bean cooking liquid, make sure it is fully cooled before adding it to the jars. Hot liquid can cause the jars to crack or compromise the seal.
- Pour the liquid into the jars, ensuring that it covers the beans but leaves some headspace at the top. This will create a protective barrier and help prevent the beans from drying out.
- If adding olive oil, pour enough oil into the jars to cover the beans. This oil can impart flavor and act as a natural preservative.
- Once the liquid is added, secure the lids tightly. Make sure they are properly sealed to maintain the integrity of the beans during storage.
Adding liquid to the mason jars is optional, but it can enhance the taste and texture of the stored beans. Consider your preferences and the intended use of the beans before deciding whether to include this step.
Now that the beans are prepared and any optional liquid has been added, it’s time to move on to the next step: sealing the jars.
Step 6: Seal the Jars
Sealing the mason jars is a crucial step in ensuring the long-term freshness and preservation of the stored beans. Follow these steps to properly seal the jars:
- Start by checking the rims of the jars to ensure they are clean and free from any debris or liquid. Wipe them with a clean cloth or paper towel if necessary.
- Place the lids on top of the jars, making sure the rubber gasket is facing down towards the beans.
- Gently screw the metal bands or rings on the jars, securing the lids in place. Tighten the bands until you feel resistance, but avoid overtightening, as this can distort the lids and affect the seal.
- If using mason jars with two-piece lids, make sure the flat portion of the lid is centered and properly aligned with the jar rim. The screw band should be tightened securely but not overly so.
- Once the jars are sealed, double-check each one to ensure the lids are secure and there are no signs of leakage.
- If you notice any jars with loose lids or signs of compromised seals, remove the lid, check the jar rim for any damage, and replace it with a new lid. Proper sealing is essential to maintain the freshness and quality of the stored beans.
- After all the jars are sealed, give them a gentle shake or tap to check for any loose lids or faulty seals. If you hear any clicking or rattling, recheck and adjust the lids as necessary.
By properly sealing the mason jars, you create an airtight environment that helps preserve the flavor, texture, and nutritional value of the stored beans. Now that the jars are sealed securely, it’s time to label and store them for future use.
Step 7: Label and Store the Jars
Labeling and properly storing the mason jars is essential for easy identification and to ensure the longevity of the stored beans. Follow these steps to label and store the jars:
- Start by preparing adhesive labels or masking tape and a permanent marker. These will be used to label the jars with the contents and date of storage.
- On each label or piece of tape, write the name of the beans and the date they were stored. This information will help you keep track of the freshness and rotation of your stored beans.
- Stick the label or tape onto the side or lid of each jar. Make sure it is securely attached and easily visible.
- Find a cool, dark, and dry storage area for your mason jars. Avoid areas that are exposed to direct sunlight, heat, or fluctuating temperatures, as these can affect the quality of the beans.
- Arrange the labeled jars in an organized manner, preferably in rows, to easily locate specific types of beans when needed.
- Keep the jars away from any strong odors or chemicals, as beans can absorb these smells and affect their flavor.
- Regularly check the stored beans for any signs of spoilage, such as mold growth, unusual smells, or off-colors. If you notice any abnormalities, discard the affected jars for safety.
- Use the beans within a reasonable timeframe to ensure their flavor and quality. While properly stored beans can last for several months, it’s best to consume them within 6-12 months for optimal freshness.
By labeling and storing the mason jars in a suitable environment, you can keep your cooked beans safe and ready for use whenever you need them. With the storage process complete, we’ll move on to the final step: reheating and using the stored beans.
Step 8: Reheating and Using the Stored Beans
Now that you have successfully stored your cooked beans in mason jars, it’s time to enjoy their delicious flavors. Follow these steps to reheat and incorporate your stored beans into various dishes:
- To reheat the beans, simply remove the desired amount of jars from storage and open one jar at a time.
- Pour the desired amount of beans into a saucepan or microwave-safe container, depending on your preferred reheating method.
- If using a stovetop, gently heat the beans on medium-low heat, stirring occasionally to prevent sticking or scorching. Add a splash of water or broth if the beans appear dry or need a little more moisture.
- If using a microwave, cover the container and heat the beans in short intervals, stirring in between, until they are heated through.
- Once the beans are reheated, they are ready to be incorporated into a variety of dishes. Use them in soups, stews, chili, salads, or as a filling for burritos, tacos, or enchiladas.
- Get creative with your bean recipes! You can mash some beans to create dips or spreads, blend them into creamy soups, or even use them as a base for veggie burgers.
- Experiment with different flavors and seasonings to enhance the taste of your dishes. Add herbs, spices, vegetables, or even a squeeze of citrus juice for a burst of freshness.
- Remember to store any unused portion of the reheated beans in the refrigerator and consume them within a few days to maintain their freshness.
By reheating and incorporating your stored beans into various dishes, you can enjoy their nutritious goodness and versatility all year round. Regularly check the remaining mason jars for any signs of spoilage and discard any jars that show signs of contamination or deterioration.
With these steps complete, you have successfully learned how to store cooked beans in mason jars. Enjoy the convenience of having pre-cooked beans on hand, ready to elevate your meals with their rich flavors and nutritional benefits!
Read more: How To Store Blueberries In Mason Jars
Conclusion
Storing cooked beans in mason jars is an excellent way to preserve their delicious flavors and nutritional value for future use. By following the step-by-step process outlined in this guide, you can ensure that your stored beans remain fresh, tasty, and versatile in a variety of dishes.
From preparing the mason jars to cooking and cooling the beans, each step plays a crucial role in maintaining the quality of the stored beans. Properly sealing the jars and labeling them with the contents and storage date are essential for easy identification and rotation.
Once stored, your beans will be conveniently available whenever you need them. Reheating the beans is a breeze, offering you the opportunity to incorporate them into a range of recipes, from comforting soups and stews to vibrant salads and hearty casseroles.
Remember to regularly check the stored beans for any signs of spoilage and discard any jars that show signs of contamination or deterioration. It’s important to consume the stored beans within a reasonable timeframe to ensure their freshness and optimal flavor.
Cooking with beans has never been easier with the convenience of storing cooked beans in mason jars. Experience the joys of having ready-to-use, homemade beans at your fingertips, providing you with a nutritious and satisfying ingredient for your culinary creations.
So, go ahead and embrace the world of preserving cooked beans in mason jars, and elevate your cooking game with the convenience and versatility they offer!
Frequently Asked Questions about How To Store Cooked Beans In Mason Jars
Was this page helpful?
At Storables.com, we guarantee accurate and reliable information. Our content, validated by Expert Board Contributors, is crafted following stringent Editorial Policies. We're committed to providing you with well-researched, expert-backed insights for all your informational needs.


0 thoughts on “How To Store Cooked Beans In Mason Jars”