Articles
How To Turn My Mini Fridge Into A Kegerator
Modified: October 18, 2024
Learn how to transform your mini fridge into a kegerator with these informative articles. Discover the step-by-step process and expert tips for the ultimate beer dispensing experience.
(Many of the links in this article redirect to a specific reviewed product. Your purchase of these products through affiliate links helps to generate commission for Storables.com, at no extra cost. Learn more)
Introduction
Turning your mini fridge into a kegerator is a fantastic DIY project that allows you to enjoy fresh, draught beer right in the comfort of your own home. Not only does it save you money in the long run, but it also adds a fun and unique element to your home bar or entertainment area. In this article, we will guide you through the step-by-step process of transforming your mini fridge into a fully functional kegerator.
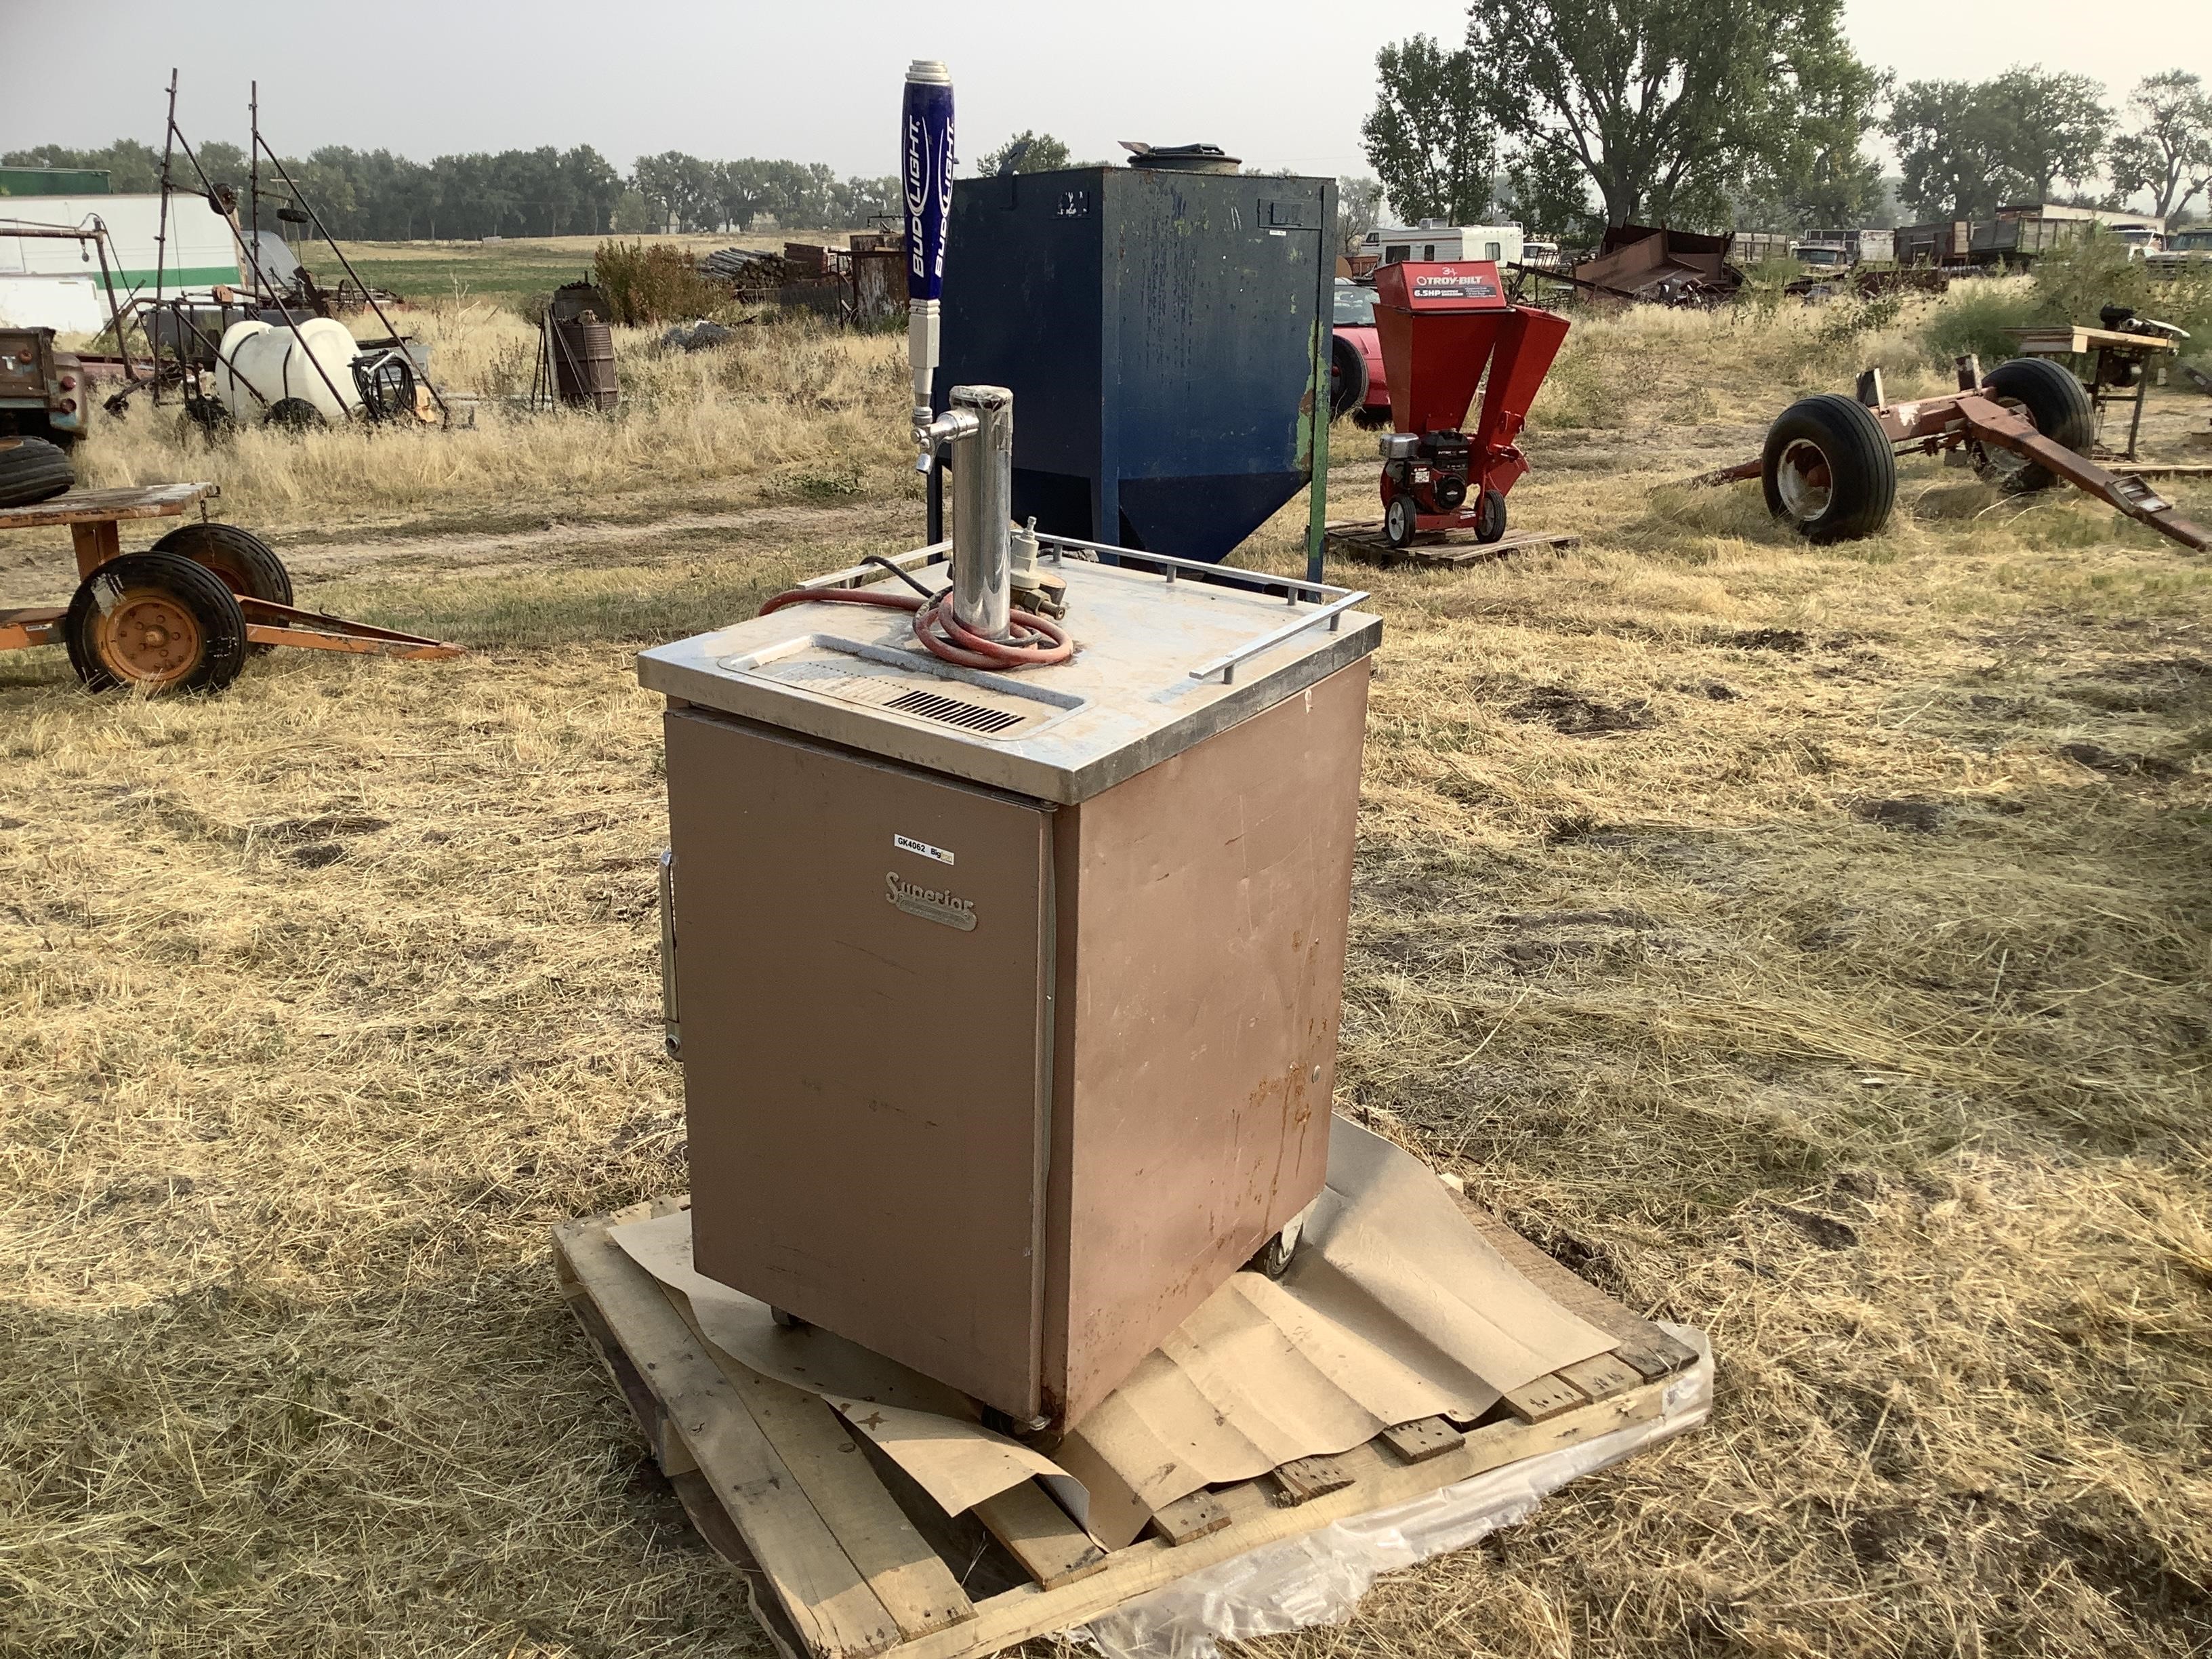
Before we dive into the details, let’s quickly go over what a kegerator is, for those who might be new to the concept. A kegerator is essentially a refrigerator that has been modified to dispense kegged beer. It typically consists of a temperature-controlled chamber, a tap tower, and a CO2 system for pressurizing and dispensing the beer. With a kegerator, you no longer have to worry about storing and serving your beer in bottles or cans – you get to enjoy it fresh from the tap, just like at your favorite bar.
Now that we have a basic understanding of what a kegerator is, let’s move on to the first step in our conversion process: choosing the right mini fridge.
Key Takeaways:
- Transforming a mini fridge into a kegerator is a fun DIY project that brings the joy of fresh, draught beer to your home bar. From choosing the right mini fridge to connecting the CO2 system, this article guides you through the step-by-step process with expert tips and considerations.
- By following the detailed steps in this article, you can create a fully functional kegerator that delivers refreshing beer right at your fingertips. From selecting the right mini fridge to maintaining your kegerator, you’ll be equipped with the knowledge and confidence to enjoy the convenience and pleasure of having a professional beer dispensing system in your own home.
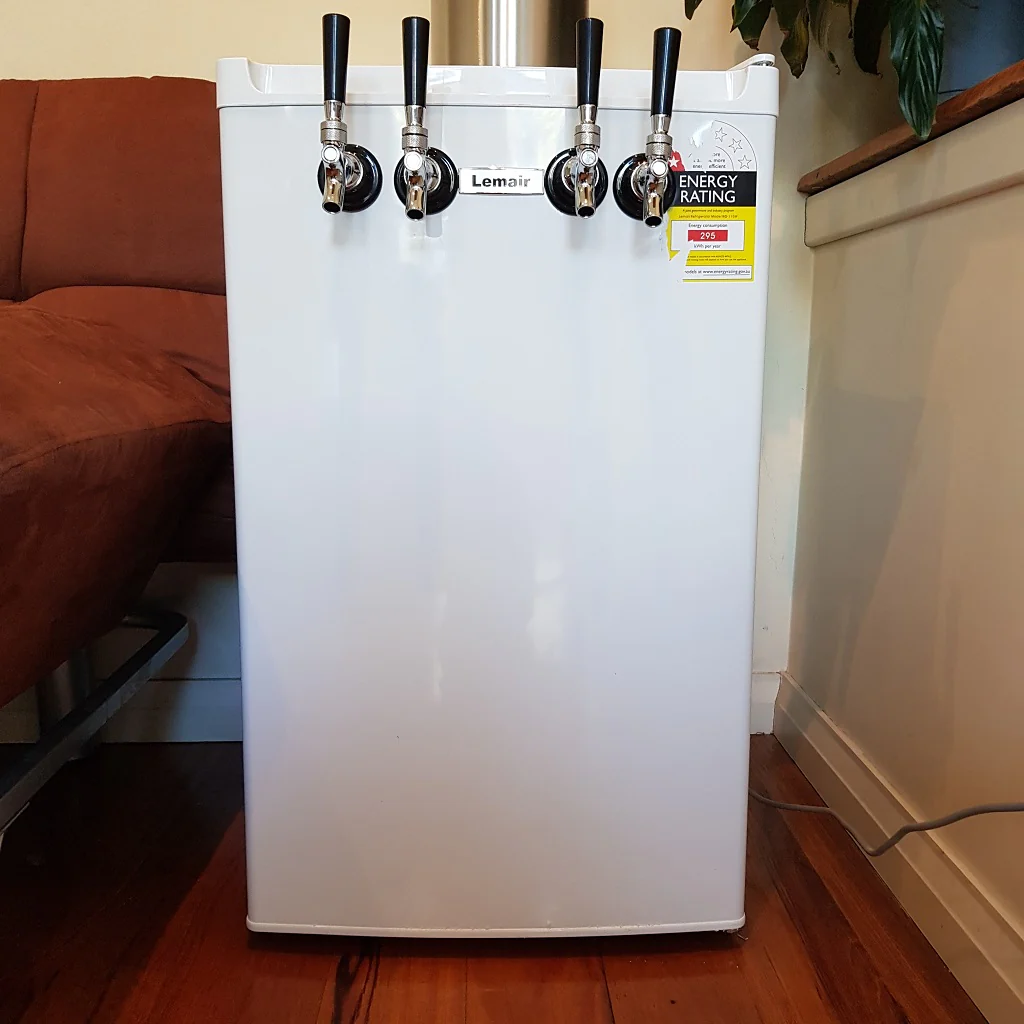
Step 1: Choosing the Right Mini Fridge
When it comes to turning your mini fridge into a kegerator, selecting the right mini fridge is crucial. Here are a few key factors to consider:
- Size: The size of your mini fridge will determine how many kegs you can fit inside. Measure the available space in your mini fridge and make sure it can accommodate the keg(s) you plan to use. Additionally, consider the height clearance required for installing the tap tower.
- Temperature Control: Look for a mini fridge with adjustable temperature control. It’s important to maintain the beer at the ideal serving temperature, usually between 36°F and 40°F (2°C and 4°C).
- Energy Efficiency: Opt for an energy-efficient mini fridge to minimize power consumption and reduce the cost of running your kegerator. Look for models with an Energy Star rating.
- Door Style: Consider whether you want a mini fridge with a solid door or a glass door. A glass door allows you to showcase your kegs and adds a visually appealing element to your kegerator.
- Budget: Set a budget for your kegerator project and choose a mini fridge that fits within that budget. Keep in mind that higher-end mini fridges may offer better insulation and temperature stability.
Once you have considered these factors, you can start searching for the perfect mini fridge for your kegerator conversion. Look for mini fridges that have enough space, the right temperature control, and energy efficiency features. Additionally, read customer reviews and ratings to get an idea of the performance and reliability of the mini fridge.
Remember, choosing the right mini fridge is the foundation of a successful kegerator conversion. Take your time, do thorough research, and select a mini fridge that meets your specific requirements and preferences. In the next step, we will discuss how to select the kegerator conversion kit that is compatible with your chosen mini fridge.
Step 2: Selecting the Kegerator Conversion Kit
Once you have chosen the mini fridge that will serve as the base for your kegerator, the next step is to select a suitable kegerator conversion kit. This kit will contain all the necessary components to transform your mini fridge into a fully functional kegerator.
Here are the key components you should look for when selecting a kegerator conversion kit:
- Tap Tower: The tap tower is the vertical structure that houses the beer faucet(s) and beer lines. It is important to choose a tap tower that is compatible with your mini fridge and fits the available space. Consider the number of faucets you want to have, as well as the material and design of the tap tower.
- CO2 System: The CO2 system is responsible for pressurizing and dispensing the beer. It includes a CO2 tank, regulator, and gas lines. Make sure the CO2 system is compatible with your mini fridge and can provide the appropriate pressure for your kegs.
- Beer Lines and Faucets: The beer lines and faucets are crucial for delivering the beer from the keg to your glass. Look for high-quality, food-grade beer lines and faucets that are easy to clean and maintain.
- Drip Tray: A drip tray is a convenient accessory that catches any drips or spills during the dispensing process. It helps keep your kegerator clean and prevents messes.
- Extras: Some conversion kits may include additional accessories such as a cleaning kit, keg couplers, and keg seals. Consider these extras based on your specific needs and preferences.
When selecting a kegerator conversion kit, it is important to ensure that all the components are compatible with each other and with your chosen mini fridge. Check the product descriptions or consult with the manufacturer or seller if you are unsure about compatibility.
Finally, consider the quality and reputation of the manufacturer when making your decision. Read customer reviews and ratings to gain insights into the performance and reliability of the conversion kit. A well-made and reliable conversion kit will ensure that your kegerator functions smoothly and delivers great-tasting beer.
With the kegerator conversion kit in hand, you are now ready to move on to the next step: preparing your mini fridge for the transformation into a kegerator.
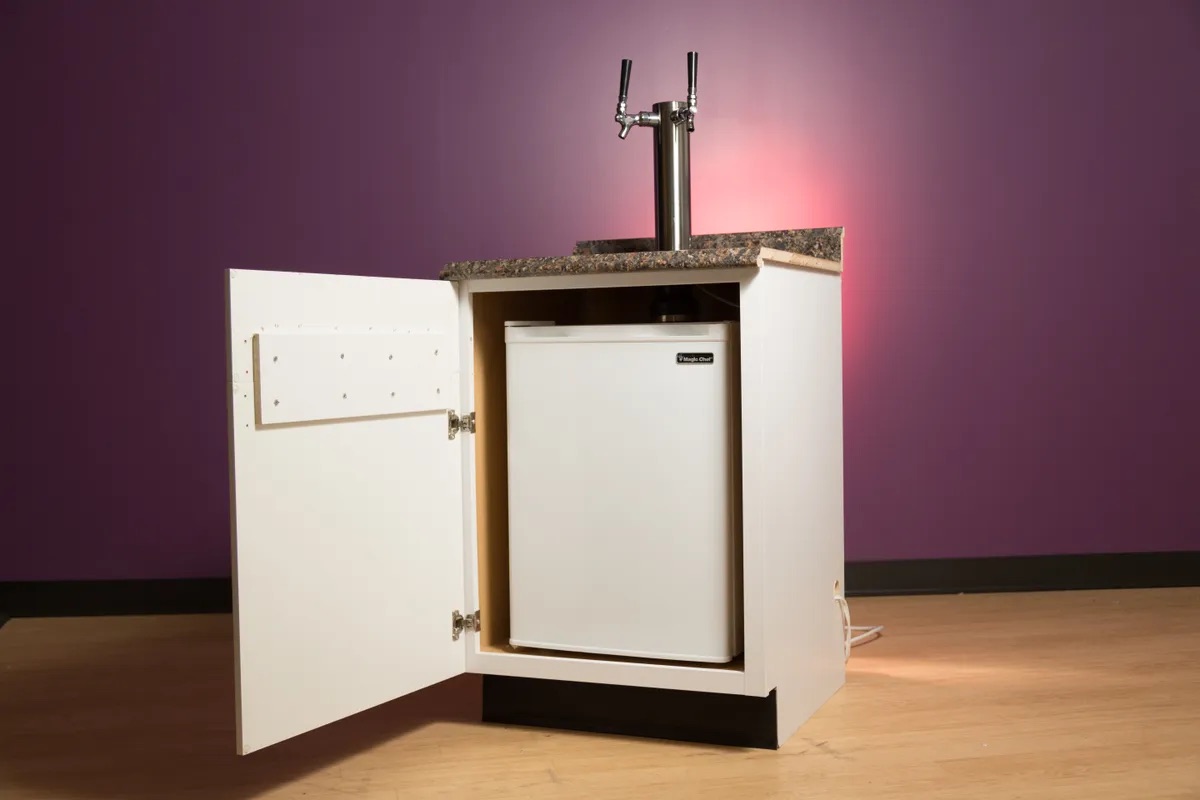
Step 3: Preparing the Mini Fridge
Now that you have the mini fridge and the kegerator conversion kit, it’s time to prepare the mini fridge for the transformation into a kegerator. Here are the steps to follow:
- Empty and Clean the Mini Fridge: Start by removing all items from the mini fridge and giving it a thorough cleaning. This includes removing shelves, drawers, and any other removable parts. Use warm soapy water or a gentle cleaning solution to clean the interior of the fridge. Pay attention to any stubborn stains or odors and address them accordingly. Once cleaned, allow the mini fridge to dry completely before proceeding.
- Remove the Door: In order to facilitate the installation of the tap tower, you will need to remove the door of the mini fridge. Carefully unscrew any hinges or attachment points and set the door aside in a safe place. Be sure to keep track of any screws or hardware that you remove, as you will need them for reassembly later.
- Drill a Hole for the Tap Tower: Measure and mark the spot on the top of the mini fridge where you want to install the tap tower. Use a drill and an appropriately sized hole saw bit to carefully drill a hole in the top of the fridge. Be gentle and apply steady pressure to avoid damaging the mini fridge.
- Fit the Tap Tower: Once the hole is drilled, insert the tap tower through the hole from the top of the fridge. Depending on the design of the tap tower, you may need to secure it with screws or nuts on the bottom side of the mini fridge. Follow the manufacturer’s instructions for proper installation.
- Reattach the Door: After the tap tower is installed, carefully reattach the door of the mini fridge using the screws or hardware that you removed earlier. Make sure the door is properly aligned and secured.
By following these steps, you will have successfully prepared your mini fridge for the conversion into a kegerator. The next step will cover the installation of the tap tower, connecting the CO2 system, and getting your kegerator ready for use.
It’s important to note that these instructions are general in nature and may vary depending on the specific model of your mini fridge and kegerator conversion kit. Always refer to the manufacturer’s instructions and guidelines to ensure a safe and proper installation process.
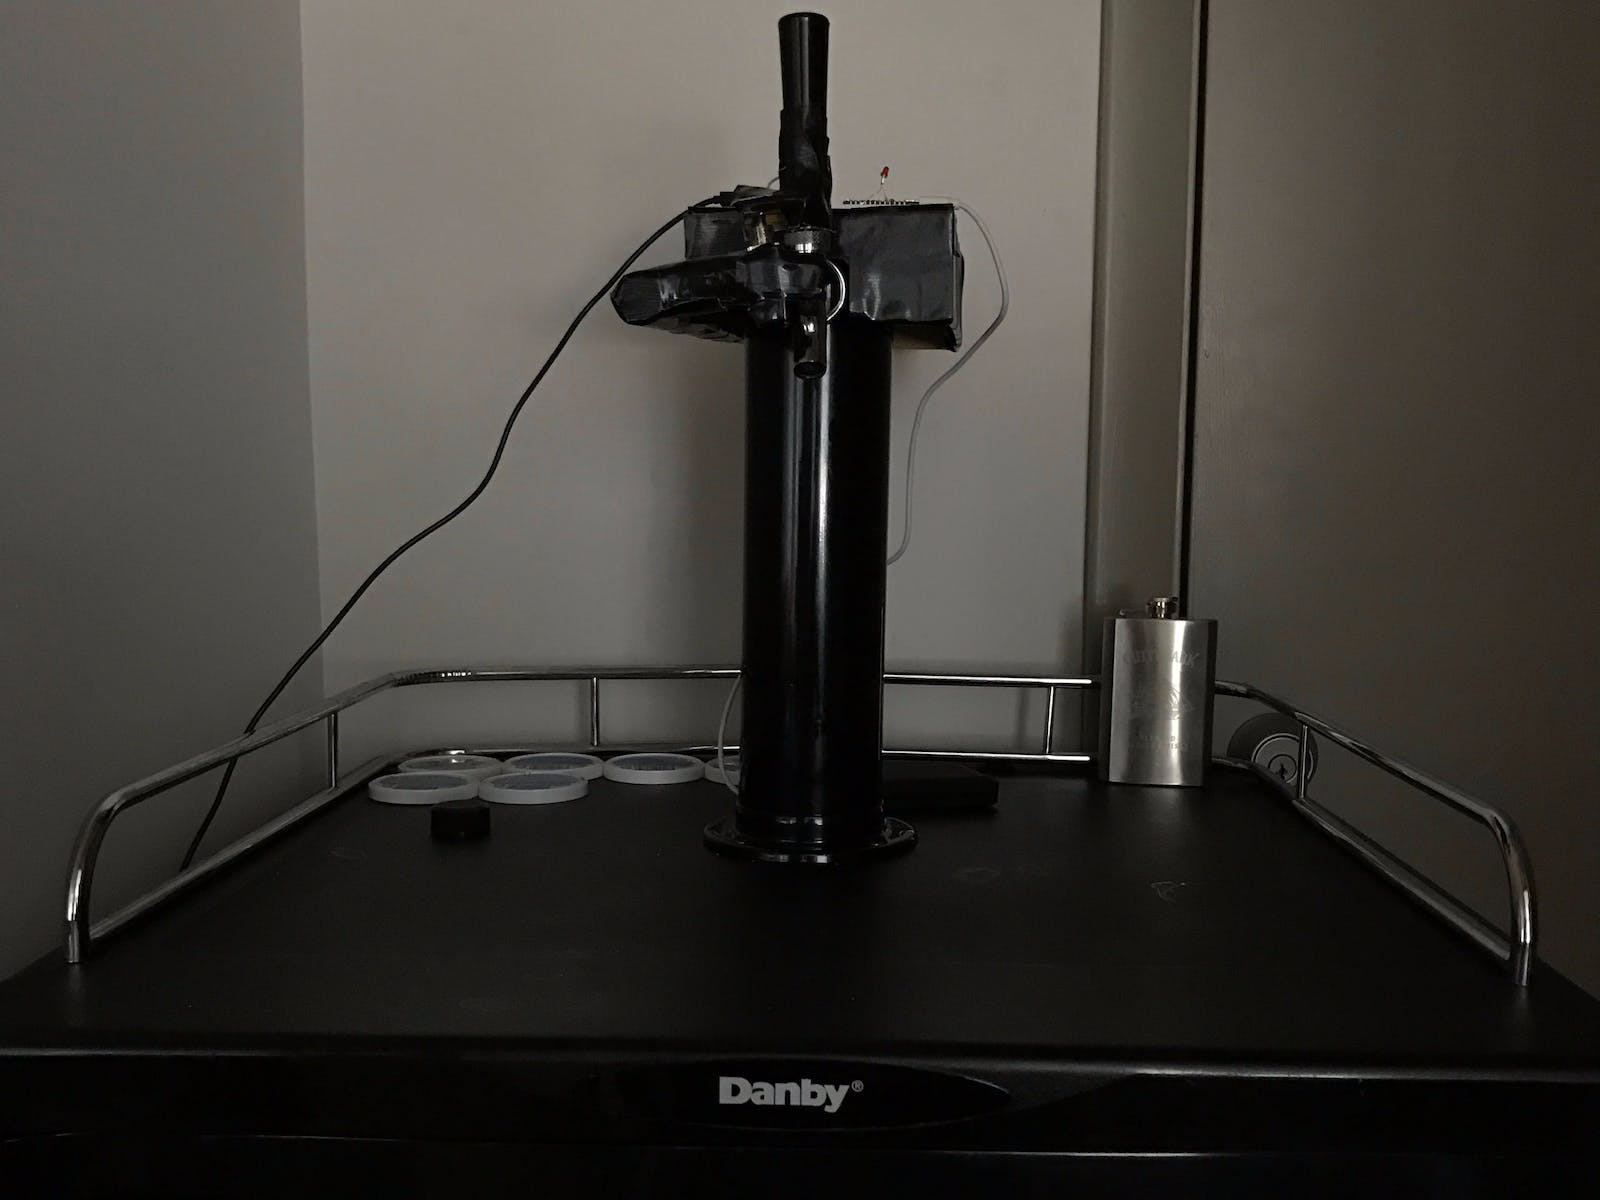
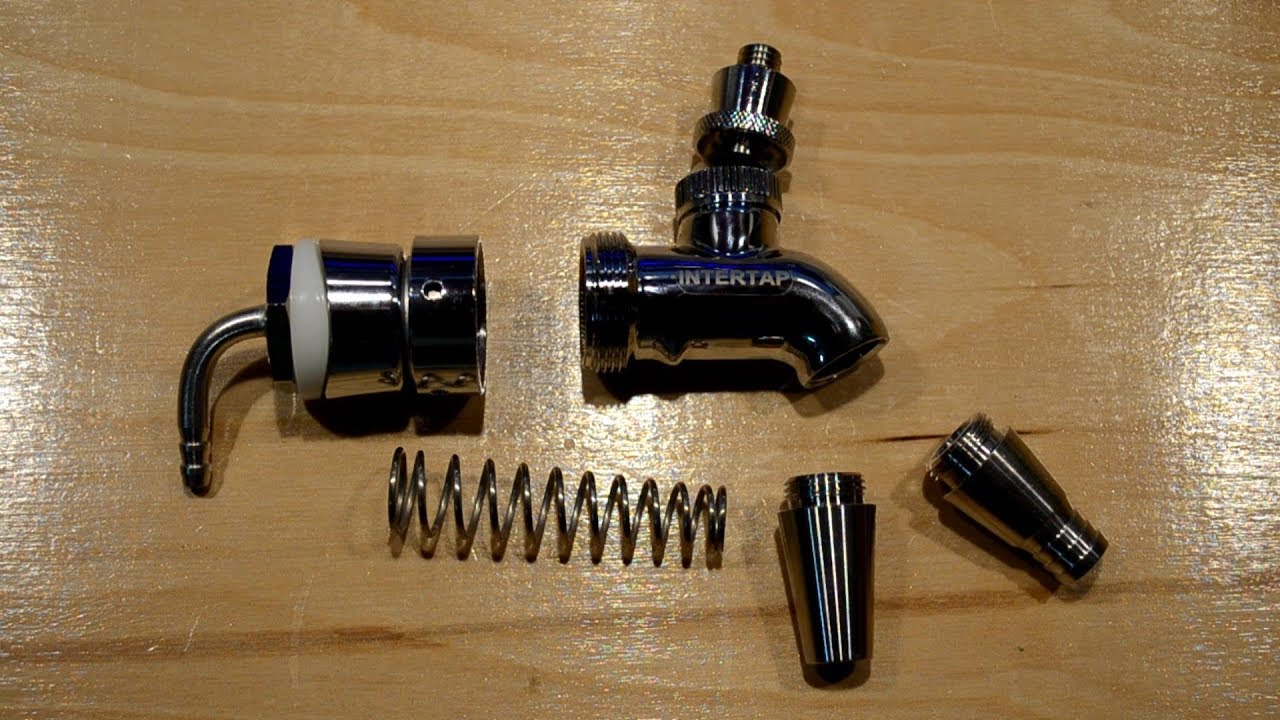
Step 4: Installing the Tap TowerWith your mini fridge prepared and the tap tower hole drilled, it’s time to move on to installing the tap tower. This step is crucial as it will determine the functionality and aesthetic appeal of your kegerator. Follow these steps to properly install the tap tower:
- Check Compatibility: Ensure that the tap tower provided in your kegerator conversion kit is compatible with your mini fridge. Verify that the diameter of the tap tower matches the hole you drilled in the previous step.
- Attach the Faucet(s): Begin by attaching the beer faucet(s) to the top of the tap tower. Use the necessary hardware provided in the kegerator conversion kit to securely fasten the faucet(s). Take care not to overtighten, as it can damage the components.
- Attach the Beer Line(s): Next, connect the beer line(s) to the beer faucet(s). Ensure that the connections are tight and secure to prevent any leaks. Trim the beer lines to the appropriate length, keeping in mind the distance between the keg(s) and the tap tower.
- Secure the Tap Tower: Carefully insert the tap tower through the hole on top of the mini fridge. If necessary, use the provided screws or brackets to secure the tap tower to the mini fridge. Follow the manufacturer’s instructions to ensure proper installation and stability.
- Verify Connections: Double-check that all connections are secure and tight. Turn on the faucets briefly to ensure there are no leaks or drips. Adjust or tighten any connections as needed.
Once you have completed these steps, the tap tower should be securely installed on top of your mini fridge, ready for dispensing refreshing draught beer from your kegs. However, before you can enjoy your beer, you need to connect the CO2 system, which we will discuss in the next step.
Remember to follow the manufacturer’s instructions and guidelines provided with your kegerator conversion kit for the specific installation process. This will help ensure that your tap tower is correctly installed and functions properly.
Consider purchasing a kegerator conversion kit, which typically includes a CO2 tank, regulator, and beer lines. This will allow you to easily convert your mini fridge into a kegerator for dispensing draft beer.
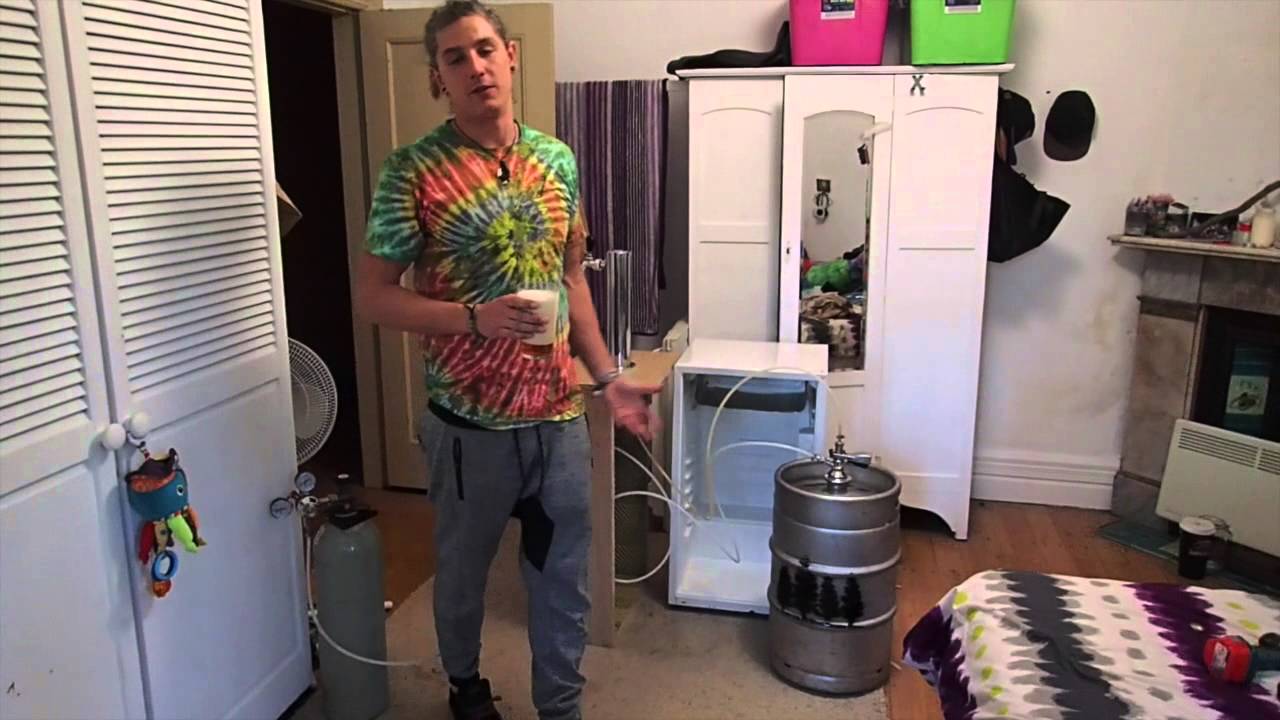
Step 5: Connecting the CO2 System
Connecting the CO2 system is a crucial step in creating a functional kegerator. The CO2 system pressurizes the keg, allowing the beer to flow smoothly from the tap. Follow these steps to properly connect the CO2 system:
- Ensure Safety: Before proceeding, make sure the CO2 tank is in an upright position and securely fastened to prevent any accidents or leaks.
- Check Regulator: Start by attaching the regulator to the CO2 tank. Ensure that the regulator is compatible with your CO2 tank and securely fasten it according to the manufacturer’s instructions. Make sure the regulator is set to the off position before proceeding.
- Connect Gas Line: Connect one end of the gas line to the output port of the regulator. The specific connection method may vary depending on the type of regulator and gas line fittings. Ensure the connection is tight and secure.
- Attach Keg Coupler: If you haven’t already, attach the appropriate keg coupler to each of the kegs you plan to connect to the kegerator. The keg coupler connects the CO2 line to the keg, allowing for pressurization and dispensing of beer.
- Connect Gas Line to Keg: Connect the other end of the gas line to the gas-in port on the keg coupler. Make sure the connection is tight and secure.
- Adjust Pressure: Slowly turn on the CO2 tank valve to allow gas to flow into the system. Adjust the pressure on the regulator to the recommended level for the type of beer you are serving. Consult the brewery or beer supplier for the recommended pressure.
- Check for Leaks: Spray a mixture of soapy water onto all the connections to check for any leaks. If you see bubbles forming, there is a leak. Tighten the connections or replace any faulty components to eliminate leaks.
By carefully following these steps, you will have successfully connected the CO2 system to your kegerator, allowing for proper pressurization and dispensing of your favorite beers. However, before you can start pouring, it’s important to test and adjust the temperature in your kegerator, which we will cover in the next step.
Always refer to the manufacturer’s instructions and guidelines provided with your CO2 system for the specific connection process. Proper installation and maintenance of the CO2 system is essential for safe and efficient operation of your kegerator.
Step 6: Testing and Adjusting the Temperature
Once you have connected the CO2 system, it’s time to test and adjust the temperature in your kegerator. Proper temperature control is essential for maintaining the quality and taste of your beer. Follow these steps to test and adjust the temperature:
- Power On: Ensure that the mini fridge is plugged in and turned on. Allow it to run for a few hours to reach its desired operating temperature.
- Temperature Measurement: Use a reliable thermometer to measure the temperature inside the kegerator. Place the thermometer in a central location where it will accurately reflect the average temperature.
- Observe and Adjust: Monitor the temperature over a period of time, taking note of any fluctuations or inconsistencies. The ideal serving temperature for most beers is typically between 36°F and 40°F (2°C and 4°C).
- Adjust the Thermostat: If the temperature is too high or too low, adjust the thermostat control on the mini fridge to achieve the desired temperature range. Make small adjustments and allow the fridge to stabilize before reassessing the temperature.
- Temperature Calibration: If necessary, calibrate the thermometer to ensure accurate temperature readings. Refer to the manufacturer’s instructions for your specific thermometer on how to calibrate it properly.
- Monitor and Fine-tune: Continue to monitor and fine-tune the temperature as needed. Be patient, as it may take some trial and error to find the optimal setting that maintains a consistent temperature throughout the kegerator.
Regularly check the temperature in your kegerator, especially during periods of heavy use or changes in ambient conditions. Remember that factors such as keg placement, frequency of door openings, and outside temperature can all impact the internal temperature of the kegerator.
By carefully testing and adjusting the temperature, you can ensure that your kegerator maintains the ideal conditions for serving perfectly chilled, refreshing beer. Once you have achieved a stable temperature, it’s time to move on to the final step: cleaning and maintaining your kegerator.
Always refer to the manufacturer’s instructions and guidelines provided with your mini fridge for information specific to the temperature control settings and calibration process.
Step 7: Cleaning and Maintaining Your Kegerator
Cleaning and maintaining your kegerator is essential to ensuring the longevity and optimal performance of your system, as well as the quality of your beer. Follow these steps to keep your kegerator clean and in top shape:
- Regular Cleaning: Regularly clean the interior of your kegerator to remove any residual beer, yeast, or bacteria that may build up over time. Empty the kegs and disconnect the beer lines, faucets, and keg couplers. Clean these components thoroughly with warm water and a mild, brewery-approved cleaning solution. Rinse them well and allow them to dry completely before reassembling.
- Sanitization: After cleaning, sanitize all the components to eliminate any remaining bacteria or contaminants. Use a food-grade sanitizer and follow the manufacturer’s instructions for proper dilution and contact time. Be sure to sanitize the beer lines, keg couplers, faucet, and tap tower.
- Cleaning the Drip Tray: Remove the drip tray and clean it separately using warm water and a mild detergent. Scrub it gently to remove any residue or stains. Rinse thoroughly and dry before reattaching it to the kegerator.
- Inspect and Replace: Regularly inspect the beer lines, faucets, and seals for any signs of wear or damage. Replace any worn-out or damaged components promptly to avoid any leaks or deterioration in performance.
- Check CO2 Levels: Monitor the CO2 level in your tank regularly to ensure you don’t run out of gas. Keep a spare CO2 tank on hand to avoid interruptions in serving your beer.
- Temperature Maintenance: Continuously monitor and maintain the temperature inside your kegerator. Check for any temperature fluctuations and adjust the thermostat as necessary. This will help ensure the freshness and quality of your beer.
- Regular Maintenance: Perform routine maintenance tasks such as cleaning the condenser coils, checking and cleaning the air vents for proper airflow, and inspecting the door gaskets for any gaps or damage. These tasks will help optimize the performance of your kegerator and extend its lifespan.
By following these cleaning and maintenance practices, you can enjoy fresh and great-tasting beer from your kegerator for years to come. Remember to always refer to the manufacturer’s instructions for specific guidance on cleaning and maintaining your particular kegerator model.
Now that you have successfully cleaned and maintained your kegerator, it’s time to sit back, relax, and enjoy your favorite beers poured perfectly from your very own kegerator!
Conclusion
Congratulations! You have completed the journey of transforming your mini fridge into a fully functional kegerator. By following the steps outlined in this article, you have created an exciting addition to your home bar or entertainment area, allowing you to enjoy fresh, draught beer right at your fingertips.
Throughout the process, you learned how to choose the right mini fridge that suits your needs, select a compatible kegerator conversion kit, prepare the mini fridge for the transformation, install the tap tower, connect the CO2 system, and test and adjust the temperature. Additionally, you discovered the importance of cleaning and maintaining your kegerator to ensure optimal performance and the highest quality beer.
With your kegerator up and running, it’s time to invite friends over for a beer tasting or to simply enjoy a refreshing pint after a long day. You now have the convenience and enjoyment of a professional beer dispensing system in the comfort of your own home.
Remember to continue to monitor and maintain your kegerator to ensure the freshness and quality of your beer. Regularly clean and sanitize the components, check for any damage or wear, and stay on top of temperature control. By doing so, you can ensure that your kegerator remains in excellent working condition for years to come.
So, raise your glass to your DIY kegerator project, and cheers to the joy of pouring and savoring your favorite beers on tap. Enjoy the convenience, cost savings, and pleasure of having a perfectly chilled pint of beer right at your fingertips. Cheers!
Frequently Asked Questions about How To Turn My Mini Fridge Into A Kegerator
Was this page helpful?
At Storables.com, we guarantee accurate and reliable information. Our content, validated by Expert Board Contributors, is crafted following stringent Editorial Policies. We're committed to providing you with well-researched, expert-backed insights for all your informational needs.


0 thoughts on “How To Turn My Mini Fridge Into A Kegerator”