Articles
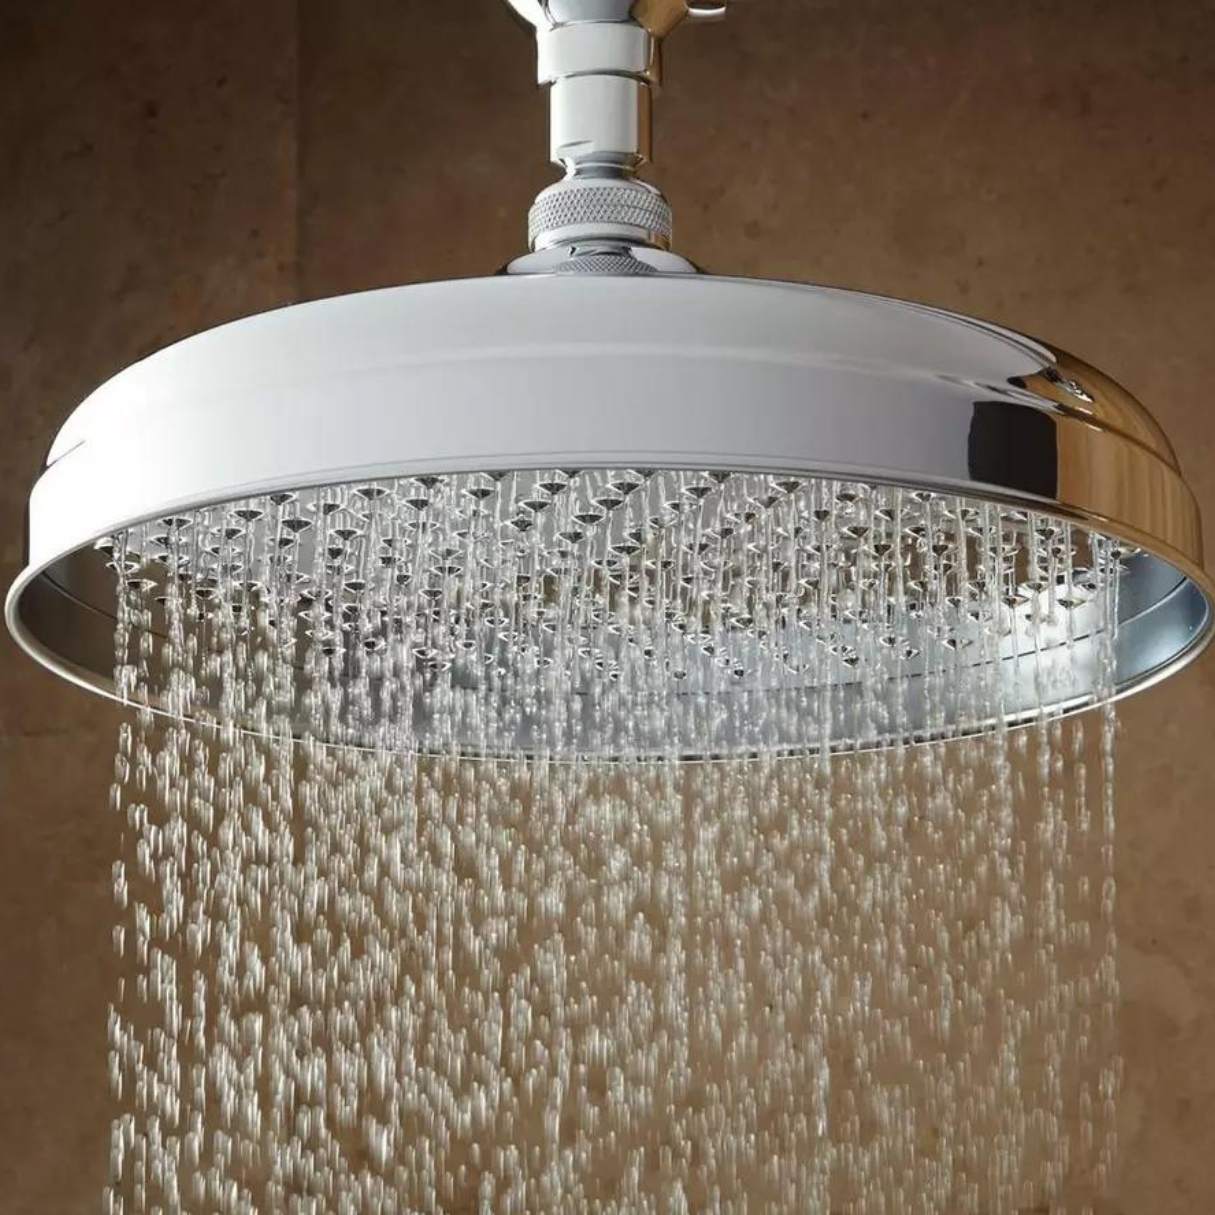
How To Turn On My Showerhead
Modified: October 22, 2024
Learn how to turn on your showerhead with these helpful articles. Get step-by-step instructions and troubleshooting tips for a relaxing and refreshing shower experience.
(Many of the links in this article redirect to a specific reviewed product. Your purchase of these products through affiliate links helps to generate commission for Storables.com, at no extra cost. Learn more)
Introduction
Welcome to our guide on how to turn on your showerhead! Having a functional and enjoyable shower experience is essential for starting your day or winding down after a long day. However, if you’re having trouble figuring out how to turn on your showerhead, we’re here to help.
Turning on a showerhead may seem like a simple task, but it’s important to ensure that you are doing it correctly to avoid any issues. Whether you have a traditional showerhead or a more advanced model with various settings and features, this guide will provide you with step-by-step instructions to turn it on properly.
Before we get started, it’s important to note that the specific steps may vary depending on the type and model of your showerhead. However, the general process remains the same. With that said, let’s dive into the details and get you on your way to a refreshing and invigorating shower experience.
Key Takeaways:
- Properly maintaining and turning on your showerhead involves gathering tools, preparing the showerhead, inspecting for blockages, adjusting settings, testing water flow, and troubleshooting common issues for an optimal shower experience.
- If you encounter issues with your showerhead, troubleshoot common problems such as low water pressure, uneven spray patterns, leaking, or inconsistent temperature. Seek professional help if needed for uninterrupted shower enjoyment.
Step 1: Gather necessary tools and materials
Before you can turn on your showerhead, it is important to gather all the necessary tools and materials. While this step may seem obvious, it’s crucial to make sure you have everything you need to complete the task without any interruptions. Here is a list of items you may need:
- A wrench or pliers
- A cloth or towel
- Teflon tape (also known as plumber’s tape)
Having these tools and materials ready will ensure that you can easily maneuver and install the showerhead without any complications. The wrench or pliers will be helpful if you need to loosen or tighten any connections, and the cloth or towel will come in handy for cleaning or drying the showerhead.
Teflon tape, a thin and flexible tape, is an essential item for ensuring a watertight seal. It is commonly used in plumbing applications to prevent leaks. If your showerhead does not already have Teflon tape applied, it’s a good idea to have it handy for the installation process.
Once you have gathered all the necessary tools and materials, you’re ready to move on to the next step: preparing the showerhead.
Step 2: Prepare the showerhead
Now that you have gathered the necessary tools and materials, it’s time to prepare the showerhead for installation. This step will involve removing any packaging or protective coverings and ensuring that the showerhead is clean and free from any debris or buildup that may affect its performance.
If your showerhead came in a box or packaging, carefully open it and remove any plastic wrapping or protective coverings. Be sure to check for any included instructions or additional components that may need to be installed along with the showerhead.
Once the showerhead is unpacked, inspect it for any visible damage or defects. Check the showerhead’s surface for any dirt, grime, or residue that may have accumulated during storage or transportation. If necessary, use a cloth or towel to wipe down the showerhead and remove any debris or buildup.
If your showerhead has any removable parts, such as a filter or restrictor, take them out and clean them thoroughly. This will help ensure that the water flow is not obstructed and that you have the best showering experience possible.
After you have prepared the showerhead, it’s time to move on to the next step: inspecting the showerhead for any blockages or issues.
Step 3: Inspect the showerhead for any blockages
Inspecting the showerhead for any blockages is an important step to ensure proper water flow and functionality. Over time, mineral deposits, debris, or other foreign substances can accumulate within the showerhead, causing reduced water pressure or uneven spray patterns. By identifying and removing these blockages, you can restore your showerhead to optimal performance.
To inspect the showerhead, follow these steps:
- Turn off the water supply to the showerhead. This can usually be done by turning off the main water valve or by shutting off the individual water valve in the bathroom.
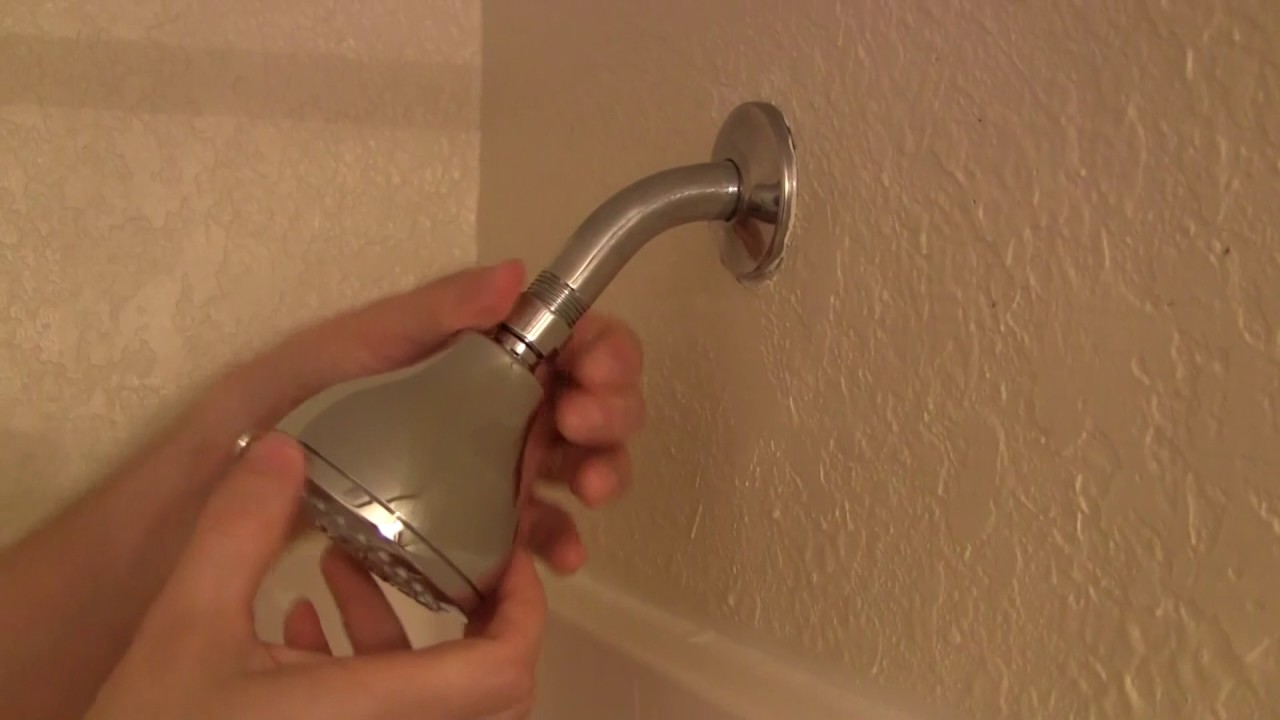
- Twist the showerhead counterclockwise to remove it from the shower arm. Use a wrench or pliers if it is tightly attached.
- Examine the showerhead for any visible blockages. Look for mineral deposits, rust, or debris that may be obstructing the water flow. If you notice any blockages, use a toothbrush or small brush to gently scrub the affected areas and remove any buildup.
- Check for a flow restrictor. Some showerheads are equipped with a flow restrictor to conserve water. If you find it, you can choose to leave it in place or remove it for increased water flow. However, keep in mind that removing the flow restrictor may affect water efficiency.
After inspecting and cleaning the showerhead, it’s time to move on to the next step: turning on the water supply.
Step 4: Turn on the water supply
Now that you have inspected and cleaned the showerhead, it’s time to turn on the water supply. This step will involve ensuring that the water is flowing to the showerhead and that there are no leaks or issues with the plumbing connections.
To turn on the water supply and test the showerhead, follow these steps:
- If you had previously turned off the water supply to the showerhead, turn it back on by opening the main water valve or the individual water valve in the bathroom.
- Allow the water to flow through the pipes and reach the showerhead. Initially, you may notice sputtering or air in the line, which is normal after the water has been turned off.
- Check for any leaks or drips around the showerhead and the plumbing connections. If you notice any leaks, use a wrench or pliers to tighten the connections until the leak stops.
- Turn the showerhead on by twisting the showerhead clockwise onto the shower arm. Make sure it is securely attached but avoid overtightening.
Once the showerhead is securely attached and there are no visible leaks, you’re ready to move on to the next step: adjusting the showerhead settings.
It’s important to note that if you encounter any significant issues or leaks during this step, it may be necessary to consult a professional plumber for assistance.
To turn on your showerhead, simply locate the water handle or knob in your shower and turn it clockwise to increase the water flow. Adjust the temperature to your preference and enjoy your shower.
Read more: How To Turn Bluetooth On Moxie Showerhead
Step 5: Adjust the showerhead settings
Adjusting the showerhead settings allows you to customize your shower experience to your preferences. Depending on the type of showerhead you have, there may be various settings and controls that you can adjust to achieve your desired water flow, pressure, and spray pattern.
To adjust the showerhead settings, follow these steps:
- Refer to the manufacturer’s instructions, if available, to understand the specific settings and controls of your showerhead. Different showerheads may have different mechanisms for adjusting settings, such as a lever, dial, or buttons.
- Locate the controls or settings on your showerhead and experiment with them to find the desired water flow and spray pattern. Some common settings may include:
- Single jet: Delivers a concentrated stream of water.
- Wide spray: Provides a wider coverage for a more luxurious shower experience.
- Massage mode: Creates a pulsating water flow for a soothing massage-like sensation.
- Rainfall mode: Mimics the sensation of rainfall, with a gentle and calming water flow.
- Test each setting by turning the showerhead on and adjusting the controls accordingly. Pay attention to the water flow, pressure, and spray pattern to find the setting that suits your preferences.
Remember that not all showerheads have adjustable settings. If your showerhead does not have adjustable settings, you can skip this step and move on to the next one: testing the water flow.
Once you have adjusted the showerhead settings to your liking, you’re ready to move on to the next step: testing the water flow to ensure everything is functioning properly.
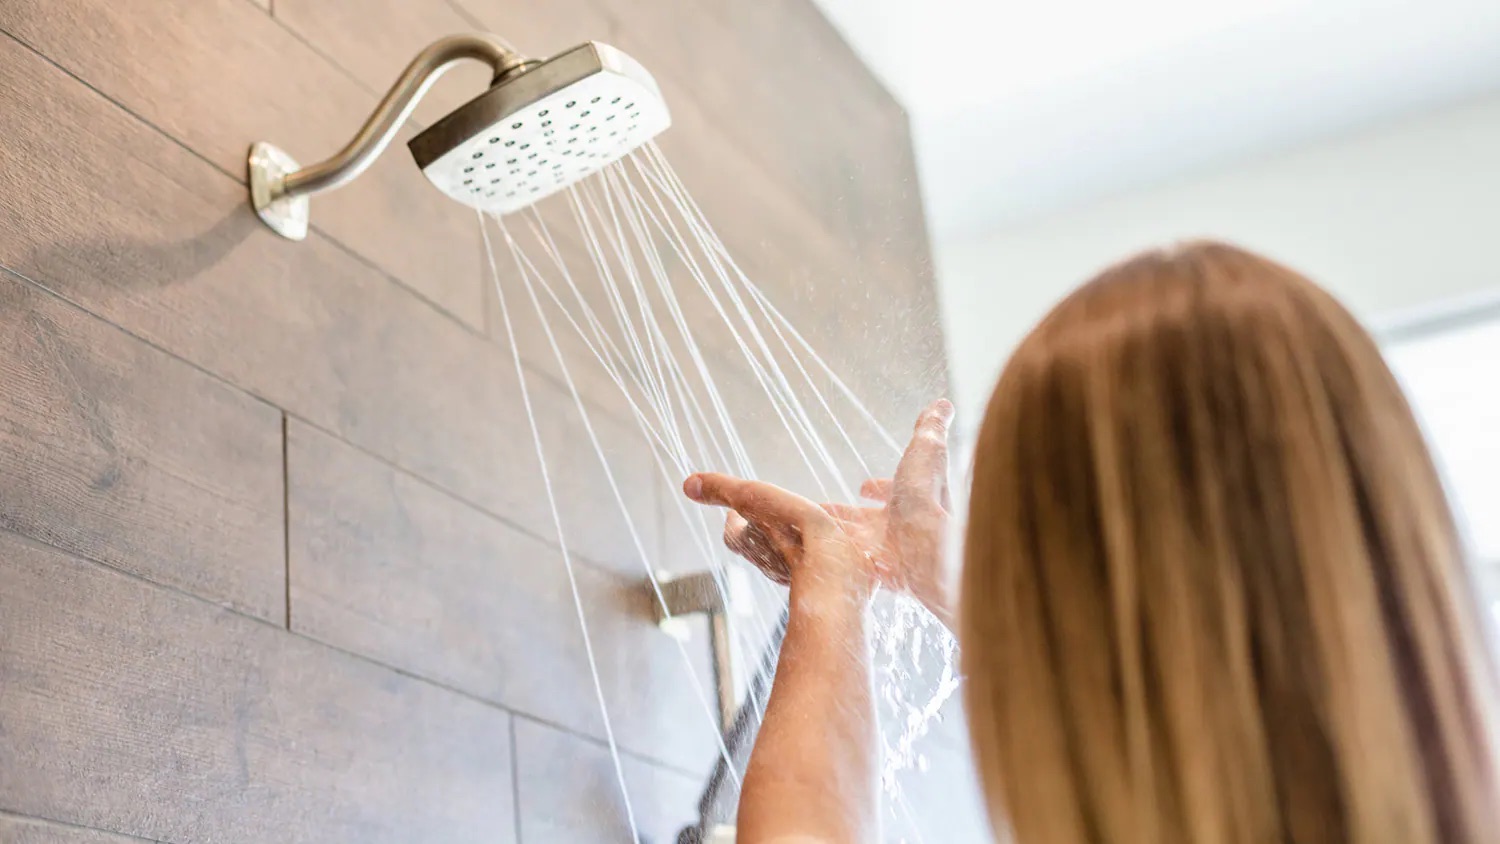
Step 6: Test the water flow
Testing the water flow of your showerhead is an essential step to ensure that it is functioning properly and delivering the desired water pressure and temperature. By testing the water flow, you can identify any issues or adjustments that may be needed to enhance your shower experience.
To test the water flow, follow these steps:
- Make sure the showerhead is turned on and securely attached to the shower arm.
- Step into the shower and stand under the water flow.
- Observe the water flow and pressure. Pay attention to factors such as the strength of the water flow, the temperature of the water, and the coverage of the spray pattern.
- If the water flow is too weak or inconsistent, it may be a sign of a blockage or an issue with your plumbing system. Consider checking the showerhead for any further blockages or consulting a professional plumber for assistance.
- If you are satisfied with the water flow and coverage, you have successfully tested the showerhead’s functionality and can proceed to enjoy your refreshing shower.
If you encounter any difficulties or notice any problems during the testing process, it may be necessary to troubleshoot and address those issues. You can refer to the next step, Step 7: Troubleshooting common issues, for guidance on resolving potential problems.
Now that you have tested the water flow, you are one step closer to having a fully functional showerhead. The final step in this process is to address any common issues that may arise.
Step 7: Troubleshooting common issues
Even with proper installation and maintenance, there may be instances where you encounter common issues with your showerhead. Fortunately, many of these issues can be resolved with some troubleshooting techniques. Here are some common issues you may encounter and how to troubleshoot them:
- Low water pressure: If you are experiencing low water pressure, it could be due to a blockage in the showerhead or a problem with the water supply. Try removing the showerhead and cleaning it thoroughly to remove any debris or mineral deposits. If the issue persists, check other faucets or fixtures in your home to see if they also have low water pressure. If they do, the problem may be with the water supply, and you may need to contact your water provider or a plumber to investigate further.
- Uneven spray pattern: If the spray pattern of your showerhead is uneven or concentrated in certain areas, it could be due to mineral buildup or a clogged nozzle. Remove the showerhead and soak it in a mixture of vinegar and water to dissolve any mineral deposits. Use a toothbrush or gentle brush to clean the nozzle openings. Rinse thoroughly and reattach the showerhead to see if the spray pattern improves.
- Leaking showerhead: If you notice water dripping or leaking from the showerhead even when it is turned off, it may indicate a loose connection or worn-out washers. Ensure that the showerhead is securely attached to the shower arm and tighten any loose connections using a wrench or pliers. If the leakage continues, you may need to replace the washers or seals in the showerhead or seek professional assistance.
- Inconsistent temperature: If you are experiencing fluctuations in water temperature during your shower, it could be an issue with your water heater or plumbing system. Check other faucets in your home to see if they also have inconsistent temperature. If they do, it may be a problem with the water heater or plumbing. Contact a professional plumber to diagnose and address the issue.
If you encounter any other issues that are not mentioned here or if the troubleshooting techniques do not resolve the problem, it is recommended to consult a professional plumber for further assistance.
With troubleshooting techniques in mind, you can address common issues and ensure that your showerhead is functioning optimally. Enjoy your refreshing showers without any interruptions!
That concludes our guide on how to turn on your showerhead. We hope this step-by-step process has been helpful in assisting you with the proper operation of your showerhead. Remember, always follow the instructions specific to your showerhead model and seek professional help when needed. Enjoy your showers and the rejuvenating experience they provide!
Conclusion
Congratulations! You have successfully learned how to turn on your showerhead and troubleshoot common issues that may arise. By following the step-by-step instructions outlined in this guide, you can ensure that your showerhead is properly installed, clean, and functioning optimally for a refreshing shower experience.
Remember, each showerhead may have specific features and settings, so be sure to refer to the manufacturer’s instructions for any additional details or guidance. It’s important to gather the necessary tools and materials, prepare the showerhead, inspect for blockages, turn on the water supply, adjust the settings, test the water flow, and troubleshoot common issues.
By taking the time to properly maintain and care for your showerhead, you can enjoy a steady and comfortable water flow, a satisfying spray pattern, and a rejuvenating shower experience every time.
If you encounter any significant issues or if the troubleshooting steps outlined in this guide do not resolve the problem, do not hesitate to seek professional assistance. A qualified plumber can help diagnose and address any underlying plumbing issues that may affect your showerhead’s performance.
We hope this guide has been helpful in improving your understanding of how to turn on your showerhead. Now go ahead, turn on the water, and enjoy a refreshing and invigorating shower!
Frequently Asked Questions about How To Turn On My Showerhead
Was this page helpful?
At Storables.com, we guarantee accurate and reliable information. Our content, validated by Expert Board Contributors, is crafted following stringent Editorial Policies. We're committed to providing you with well-researched, expert-backed insights for all your informational needs.


0 thoughts on “How To Turn On My Showerhead”