Articles
How To Use Fence Stretcher
Modified: October 20, 2024
Learn how to efficiently use a fence stretcher to ensure the proper installation of your articles. Get step-by-step instructions and expert advice for optimal results.
(Many of the links in this article redirect to a specific reviewed product. Your purchase of these products through affiliate links helps to generate commission for Storables.com, at no extra cost. Learn more)
Introduction
Welcome to this comprehensive guide on how to use a fence stretcher. If you’re a homeowner or a farmer looking to install or repair a fence, a fence stretcher is an essential tool to have. It allows you to pull the fence wire tightly, ensuring a secure and straight fence line. In this article, we will walk you through the process of using a fence stretcher, step by step.
Whether you’re working with barbed wire, chain-link, or electric fencing, a fence stretcher will make your job easier and more efficient. By pulling the fence wire tight, you’ll prevent sagging or loose areas, ensuring that your fence serves its purpose effectively. Before we dive into the details of using a fence stretcher, let’s first understand what it is and the different types available.
Key Takeaways:
- Properly preparing the fence, securely attaching the stretcher, and stretching the wire in sections are crucial steps to ensure a secure and straight fence line using a fence stretcher.
- Prioritizing safety, wearing protective gear, and following manufacturer instructions are essential when using a fence stretcher to achieve a durable and professional-looking fence.
Read more: How To Use Fence Staples
What is a Fence Stretcher?
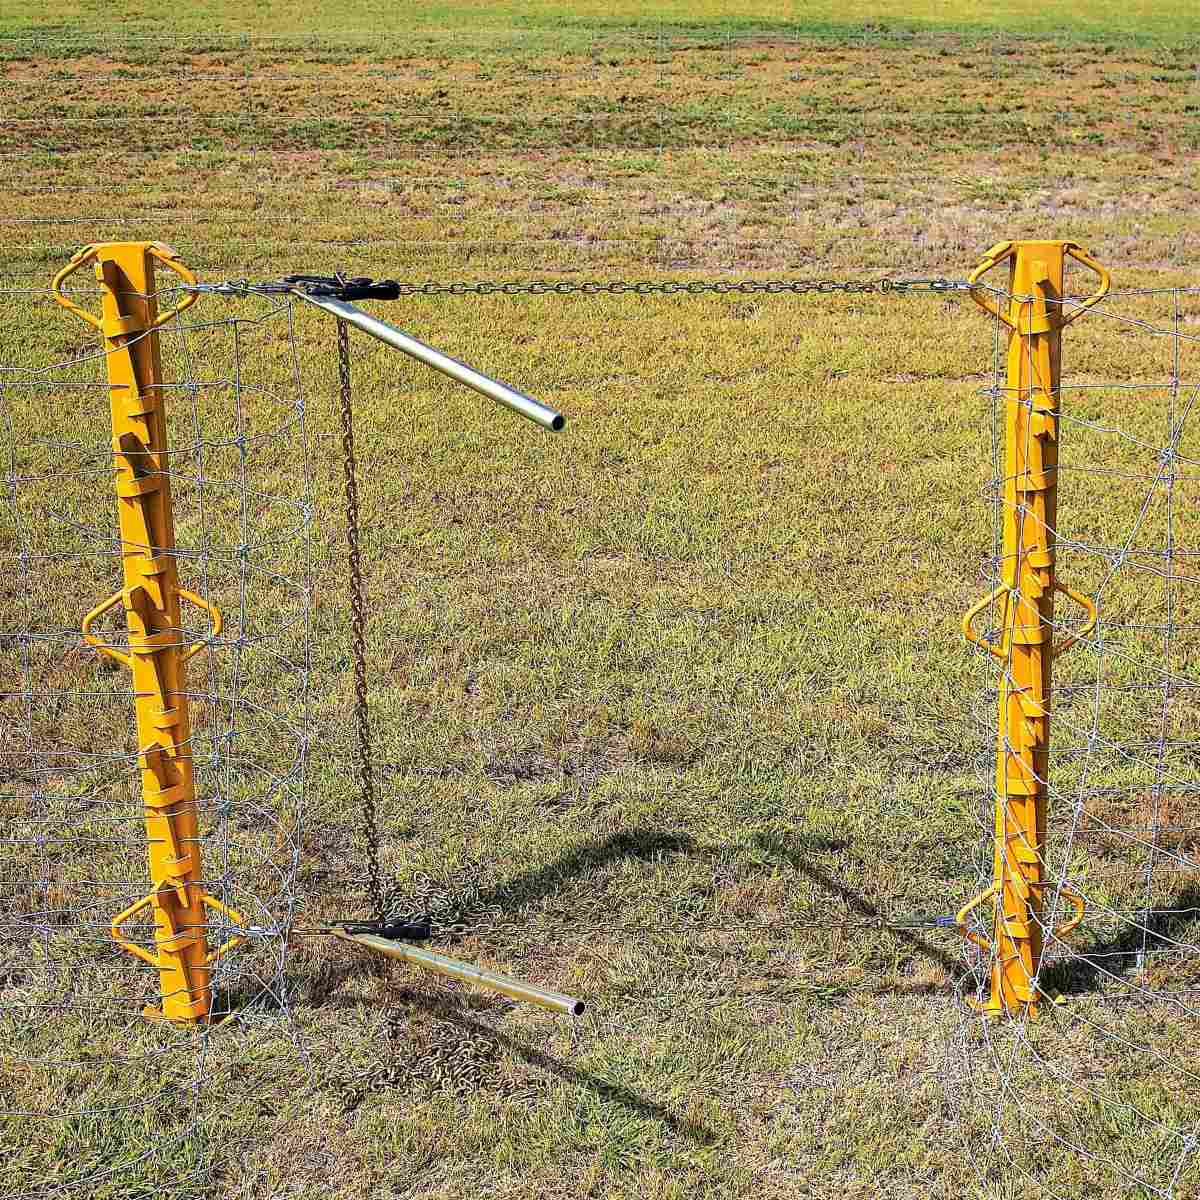
A fence stretcher is a specialized tool that is used to tighten and straighten fence wire. It is essential for installing or repairing fences, as it ensures that the wire is pulled tight and secured properly. The primary purpose of a fence stretcher is to eliminate any sagging or loose areas in the fence line.
Fence stretchers come in various designs, but they all function in a similar way. They typically consist of a long handle, a clamp, and a ratchet mechanism. The clamp attaches to the fence wire, and as you turn the handle, the ratchet tightens the wire, pulling it taut. This process allows you to evenly distribute tension along the entire fence line.
Fence stretchers can be manual or powered, depending on your preference and the scale of the project. Manual fence stretchers require physical effort to operate, while powered stretchers use machinery such as hydraulic or pneumatic systems to pull the wire tight. The choice between manual and powered stretchers will depend on the size of the area you’re working on and the amount of tension required.
Using a fence stretcher offers several benefits. Firstly, it ensures that the fence wire is tightly stretched, preventing animals from pushing through or getting entangled in the fence. Secondly, it helps maintain a straight fence line, enhancing the overall appearance and professionalism of the fence. Lastly, a properly stretched fence eliminates the risk of sagging, which can cause structural issues and compromise the effectiveness of the fence.
It’s important to note that fence stretchers are not limited to a specific type of fencing. Whether you’re working with barbed wire, chain-link, or electric fencing, a fence stretcher can be used to tighten and secure the wire. However, it’s always recommended to check the specific instructions and guidelines for your particular type of fence before using a stretcher.
Types of Fence Stretchers
When it comes to fence stretchers, there are several different types available, each designed for specific purposes and preferences. Understanding the various types will help you choose the right stretcher for your needs. Here are some common types of fence stretchers:
- Manual Ratchet Stretchers: These are the most common type of fence stretchers and are usually operated by hand. They feature a ratchet mechanism that allows you to tighten the wire incrementally as you turn the handle. Manual ratchet stretchers are versatile and can be used for various types of fencing materials.
- Pullers and Claws: Pullers and claws are another type of manual fence stretchers that are designed specifically for wire fencing. They have sharp claws that grip the wire, and as you pull the handle, the wire is stretched and secured. Pullers and claws are ideal for barbed wire fencing.
- Hydraulic Stretchers: Hydraulic stretchers are powered by hydraulic systems, making them more suitable for larger-scale projects or heavy-duty fencing. They provide a high level of tension and can stretch the wire quickly and efficiently. Hydraulic stretchers are commonly used for large agricultural or industrial fencing projects.
- Pneumatic Stretchers: Similar to hydraulic stretchers, pneumatic stretchers are powered by compressed air to provide tension. They are lightweight and portable, making them ideal for fence repairs or installations in hard-to-reach areas. Pneumatic stretchers are often used for chain-link or electric fences.
- Manual Come-Along Stretchers: A come-along is a hand-operated winch-like device commonly used in construction and fencing. It uses a cable and a ratchet mechanism to apply tension gradually. Manual come-along stretchers are versatile and can be used for various types of fencing materials.
When choosing a fence stretcher, consider factors such as the size of your project, the type of fencing material, and your personal preferences for ease of use and convenience. Some stretchers may be more suitable for certain types of fences or specific project requirements, so do some research and select the stretcher that best fits your needs.
Tools Needed
Before you begin using a fence stretcher, it’s important to gather the necessary tools to ensure a smooth and efficient process. Here’s a list of essential tools you’ll need:
- Fence Stretcher: Of course, the most important tool you’ll need is a fence stretcher itself. Choose a stretcher that is appropriate for your specific type of fence and project requirements, as discussed earlier. Make sure the stretcher is in good working condition before you start.
- Wire Cutters: Wire cutters are essential for cutting the fencing material to the desired length. They also come in handy when removing any excess wire or trimming the wire during installation or repair.
- Pliers: Pliers are versatile tools that can be used for various tasks during the fence installation or repair process. They help with twisting and tying wire, gripping small parts, and making adjustments as needed.
- Hammer: A hammer is useful for driving in staples or nails when securing the fence wire to posts or wooden supports. It provides a firm and secure attachment, enhancing the overall stability of the fence.
- Post Hole Digger: If you’re installing a new fence and need to dig holes for the fence posts, a post hole digger will be required. This tool allows you to efficiently dig holes of the appropriate size and depth for your posts.
- Tape Measure: Accurate measurements are crucial for ensuring that the fence is level and properly aligned. A tape measure helps you measure the distance between posts and ensures that the fence wire is evenly spaced.
- Gloves and Safety Glasses: As with any construction or DIY project, safety should be a top priority. Gloves protect your hands from sharp edges, splinters, or wire cuts, while safety glasses shield your eyes from debris or potential hazards.
Having the right tools on hand will make the process of using a fence stretcher much easier and more efficient. Before you start, double-check that you have all the necessary tools within reach to ensure a hassle-free experience.
Step 1: Preparing the Fence
Before you can begin using a fence stretcher, it’s essential to properly prepare the fence and ensure that it is ready for stretching. Follow these steps to prepare the fence:
- Inspect the Fence: Start by visually inspecting the entire length of the fence. Look for any damaged or broken sections that need to be repaired or replaced. Additionally, check for any loose or missing staples or nails that might need to be tightened or replaced.
- Clear Vegetation: Remove any vegetation or obstacles that may obstruct the fence line. Trim back overgrown plants or grass along the fence to ensure you have a clear path for stretching the wire.
- Secure the Ends: Check that the fence ends are properly secured to posts or other supports. Ensure that the wire is secured tightly and cannot move or slip. Use wire clips or staples to secure any loose ends or areas that require reinforcement.
- Adjust the Height: If you’re installing a new fence or making modifications, make sure the fence height is appropriate for your needs. Consider factors such as animal containment or privacy requirements and adjust the height accordingly.
- Check Tension: Before using the fence stretcher, check the existing tension of the fence wire. If the wire is noticeably loose or sagging, it may need to be tightened before using the stretcher. This can be done by hand or with the help of a puller or come-along tool.
By properly preparing and inspecting the fence, you’ll ensure that the stretching process goes smoothly and successfully. Taking the time to address any issues or repairs before stretching will result in a sturdy and secure fence.
When using a fence stretcher, make sure to wear gloves to protect your hands from the tension of the wire. Always follow the manufacturer’s instructions for proper use and safety precautions.
Read also: 12 Incredible Carpet Stretcher for 2025
Step 2: Attaching the Fence Stretcher
Once you have prepared the fence and ensured that it is ready for stretching, it’s time to attach the fence stretcher. Follow these steps to properly attach the stretcher:
- Select the Stretcher Attachment Point: Determine the location on the fence where you will attach the stretcher. This point should be sturdy and able to withstand the tension that will be applied to the wire. It’s often best to select a point near one end of the fence for easier access.
- Position the Stretcher: Hold the fence stretcher near the chosen attachment point and position it vertically, ensuring that the clamp is in line with the fence wire. Make sure the handle of the stretcher is accessible and easy to grip.
- Open the Stretcher Clamp: Most fence stretchers have a clamp that secures the wire to the stretcher. Open the clamp wide enough to fit around the fence wire, ensuring a secure grip once tightened.
- Place the Clamp around the Wire: Gently place the opened clamp around the fence wire, positioning it as close to the attachment point as possible. The clamp should firmly grip the wire without causing any damage or deformation.
- Close the Stretcher Clamp: Use the handle or lever on the stretcher to close the clamp, securing the fence wire in place. Make sure the clamp is tightened enough to prevent any slippage or movement of the wire.
- Ensure Proper Alignment: Double-check the alignment of the stretcher and the wire to ensure that they are in line with each other. This will help maintain a straight fence line during the stretching process.
- Secure the Stretcher: If your stretcher has additional mechanisms or hooks to secure it to the fence, make sure they are properly engaged and tightened. This will provide stability and prevent the stretcher from moving or shifting while stretching the wire.
By securely attaching the fence stretcher to the wire, you’ll be ready to move on to the next step of stretching the fence. Take your time to position the stretcher properly and ensure a strong and secure connection to achieve the best results.
Step 3: Stretching the Fence
With the fence stretcher properly attached to the wire, you’re now ready to start stretching the fence. Follow these steps to achieve the desired tension:
- Begin Applying Tension: Use the handle or mechanism provided on the fence stretcher to apply tension to the wire. Start turning, pumping, or activating the stretching mechanism slowly and steadily. This will begin to tighten the wire and remove any slack.
- Continue Applying Tension: Keep applying tension until the wire is sufficiently stretched. The amount of tension required will depend on the type of fence and personal preference, but aim for a tight and secure wire without causing any damage or deformation.
- Monitor the Wire: As you stretch the wire, keep a close eye on its alignment and tension throughout the process. Make adjustments if necessary to ensure that the wire remains straight and evenly tensioned along the fence line.
- Use a Tension Gauge (Optional): If you have a tension gauge available, you can use it to measure the tension of the wire. This will help you achieve consistent tension levels throughout the fence, especially if you’re working on a larger project.
- Stretch in Sections: Depending on the length of your fence and the type of stretcher you’re using, you may need to stretch the fence in sections. This involves moving the stretcher along the fence line, repeating the stretching process until the entire fence is properly tensioned.
- Check for Sagging or Uneven Areas: While stretching the fence, keep an eye out for any areas that may be sagging or uneven. If you notice any such areas, adjust the tension accordingly and make any necessary corrections to ensure a uniform and straight fence line.
- Secure the Wire: Once you’re satisfied with the tension of the wire and the straightness of the fence line, secure the wire at the attachment points. Use staples, nails, or clips to firmly secure the wire to posts or other supports to maintain the desired tension.
Remember to work slowly and make adjustments as needed to achieve the desired tension and alignment. Taking the time to properly stretch the fence will result in a secure, straight, and visually appealing fence line.
Step 4: Securing the Fence
After stretching the fence and achieving the desired tension, it’s important to properly secure the fence to ensure its stability and longevity. Follow these steps to securely fasten the fence:
- Inspect the Attachments: Check all the attachment points along the fence where the wire is secured. Ensure that the wire is properly attached to posts, braces, or other supports. Look for any loose or damaged attachments that may need to be repaired or reinforced.
- Replace or Tighten Fasteners: If you notice any loose staples, nails, or clips, replace them with new ones or tighten them as necessary. This will ensure that the fence wire stays securely in place and prevents any slipping or movement.
- Use Secure Fastening Techniques: Consider using additional fastening techniques, such as using double-clips or double-wrapping wire around posts, to enhance the stability of the fence. These techniques can provide extra support, especially for fences under high tension or in areas with strong winds or heavy use.
- Install Bracing (if needed): In areas where extra support is required, install braces or additional posts to reinforce the fence. Braces help maintain the tension and prevent the fence from sagging or leaning over time.
- Check for Clearance: Ensure that there is sufficient clearance between the fence wire and the ground or any other nearby structures. This will prevent animals from pushing or digging under the fence and maintain its effectiveness as a barrier.
- Remove Excess Wire: If you have any excess wire protruding from the knots or fastening points, carefully trim it using wire cutters. This will eliminate any potential hazards and give the fence a neater appearance.
- Inspect Overall Fence Stability: Take a few steps back and observe the fence as a whole. Check for any areas that may still require adjustments or additional stabilization. Walk along the fence line, gently pushing against it to ensure that it remains sturdy and securely in place.
- Maintain Regular Inspections: It’s important to periodically inspect and maintain your fence to address any issues promptly. Regularly check the attachments, tension, and overall condition of the fence to ensure its optimal performance and longevity.
By following these steps and ensuring that the fence is properly secured, you’ll have a sturdy and reliable fence that can withstand the elements and serve its intended purpose effectively.
Tips and Safety Precautions
When using a fence stretcher, it’s important to keep the following tips and safety precautions in mind to ensure a smooth and safe experience:
- Wear Protective Gear: Always wear appropriate protective gear, including gloves and safety glasses, when working with fences and tools. This will protect you from injury and prevent any potential accidents.
- Read the Instructions: Familiarize yourself with the specific instructions and guidelines provided by the manufacturer for the fence stretcher you’re using. Follow them carefully to avoid any misuse or potential damage to the stretcher or the fence.
- Use the Right Type of Stretcher: Choose a fence stretcher that is suitable for the type of fence you’re working with. Different materials and fence types may require specific stretchers or techniques, so ensure that you have the appropriate tools for the job.
- Stretch in Moderation: Gradually apply tension to the fence wire when stretching, rather than trying to achieve maximum tension all at once. This will prevent overstretching or damaging the wire, ensuring a longer-lasting fence.
- Inspect the Wire: Before stretching, check the condition of the wire. If you notice any signs of damage or corrosion, replace or repair the wire as needed. Using damaged wire can compromise the overall integrity of the fence.
- Work with a Partner: Stretching a fence can be physically demanding. Consider working with a partner who can help with holding the stretcher, managing the tension, or providing extra support during the stretching process.
- Take Breaks: If you’re working on a large or time-consuming fence project, take breaks to avoid overexertion or fatigue. Stay hydrated and rest as needed to maintain focus and prevent any potential accidents.
- Inspect for Wildlife: Before stretching or repairing a fence, check for any wildlife or nests that may be hidden in or around the fence. Take necessary precautions to ensure the safety of the animals and yourself during the process.
- Maintain Proper Post Placement: Ensure that the fence posts are properly spaced and securely anchored in the ground. This will provide a solid foundation and ensure the long-term stability of the fence.
- Follow Proper Post Hole Digging Techniques: When digging post holes, be mindful of underground utilities such as cables or pipes. Use caution and follow proper digging techniques to avoid any damage or accidents.
By following these tips and safety precautions, you can complete your fence project efficiently while prioritizing your safety and the durability of the fence.
Read more: What Is Silt Fence Used For
Conclusion
Congratulations! You have now learned how to use a fence stretcher to install or repair your fence. By following the steps outlined in this guide, you can achieve a secure, straight, and professional-looking fence line.
A fence stretcher is an invaluable tool that helps ensure the proper tension of the fence wire, preventing sagging and providing a strong barrier. With the right type of stretcher and proper techniques, you can work with various fencing materials such as barbed wire, chain-link, or electric fences.
Remember to start by inspecting and preparing the fence, clearing any vegetation, and ensuring the ends are securely attached. When attaching the fence stretcher, position it correctly and firmly secure it to the wire. Then, apply tension gradually, monitoring the alignment and making adjustments as needed.
After stretching the fence, it’s crucial to secure the wire properly using staples, nails, or clips. Regularly inspect and maintain the fence to address any issues promptly and ensure its long-term effectiveness.
While working with a fence stretcher, it’s essential to prioritize safety. Wear protective gear, read the instructions provided by the manufacturer, and work with a partner if necessary. Take breaks, stay hydrated, and be mindful of wildlife and underground utilities.
By following these guidelines and tips, you can successfully use a fence stretcher to achieve a sturdy, well-tensioned fence that serves its purpose effectively. So, grab your tools, prepare your fence, and start stretching!
Frequently Asked Questions about How To Use Fence Stretcher
Was this page helpful?
At Storables.com, we guarantee accurate and reliable information. Our content, validated by Expert Board Contributors, is crafted following stringent Editorial Policies. We're committed to providing you with well-researched, expert-backed insights for all your informational needs.


0 thoughts on “How To Use Fence Stretcher”