
Articles
How To Wire Doorbell Transformer
Modified: May 6, 2024
Learn how to properly wire a doorbell transformer with this informative article. Discover step-by-step instructions and helpful tips for a successful installation.
(Many of the links in this article redirect to a specific reviewed product. Your purchase of these products through affiliate links helps to generate commission for Storables.com, at no extra cost. Learn more)
Introduction
Welcome to our comprehensive guide on how to wire a doorbell transformer. In today’s modern age, having a functioning doorbell is a convenience that we often take for granted. The doorbell transformer plays a crucial role in powering the doorbell system, ensuring that you never miss an important visitor or package delivery. While the concept of wiring a doorbell transformer might seem daunting at first, with the right tools and knowledge, it can be a straightforward task that you can accomplish on your own.
In this article, we will take you through the step-by-step process of wiring a doorbell transformer, providing you with the necessary guidance and tips along the way. Whether you are replacing an existing transformer or installing a new one, we’ve got you covered. So, let’s dive in and learn how to wire a doorbell transformer!
Key Takeaways:
- Properly wiring a doorbell transformer is crucial for ensuring a functional doorbell system, enhancing home security, and extending battery life. Following the step-by-step process and prioritizing safety can lead to a successful installation.
- The importance of turning off power, locating the transformer, and testing the connection cannot be overstated. These steps, along with using the right tools and materials, are essential for a smooth and effective doorbell transformer wiring experience.
Read more: How To Install Doorbell Transformer
Importance of a Doorbell Transformer
A doorbell transformer serves as the power source for your doorbell system, converting the high voltage from your home’s electrical system to a lower voltage that’s safe for the doorbell circuitry to operate. Without a properly functioning transformer, your doorbell will not receive the power it needs to ring, rendering it useless. Let’s explore the importance of a doorbell transformer in more detail:
1. Powering the Doorbell: A doorbell transformer ensures that your doorbell receives the necessary electrical power to function properly. It converts the high voltage (typically 120 volts in North America) to a lower voltage (usually around 16-24 volts) that is safe for the doorbell system.
2. Ensuring Safety: The lower voltage provided by the doorbell transformer reduces the risk of electric shock when handling the doorbell system. It also prevents damage to the doorbell components by regulating the power supply and preventing voltage spikes or surges.
3. Compatibility: Doorbell systems are designed to work with a specific voltage range. By using a doorbell transformer that matches the required voltage, you ensure compatibility and optimal performance of your doorbell system.
4. Extending Battery Life: Many modern doorbell systems use wireless push buttons or have battery-powered components. The doorbell transformer keeps the batteries charged, extending their lifespan and reducing the need for frequent battery replacements.
5. Convenience and Safety Features: Doorbell transformers may also power additional features, such as chimes, intercom systems, and video doorbells. These features provide added convenience and security to your home, enhancing your overall doorbell experience.
Now that we understand the importance of a doorbell transformer, let’s move on to the tools and materials you’ll need for the wiring process.
Necessary Tools and Materials
Before you begin wiring a doorbell transformer, it’s important to gather all the necessary tools and materials. Here’s a list of what you’ll need:
1. Screwdriver: A flathead or Phillips screwdriver will be needed to remove and install screws during the wiring process. Make sure you have the appropriate screwdriver size for the job.
2. Wire Strippers: These are used to strip the insulation from the electrical wires, allowing for proper connections. Ensure you have a pair of wire strippers suitable for the gauge of wire you’ll be working with.
3. Wire Nuts: These small plastic caps with twist-on connectors are used to secure wire connections. Wire nuts are essential for connecting the doorbell transformer wires to the existing wiring or new wiring if you’re installing a new transformer.
4. Voltage Tester: To ensure safety, a voltage tester is necessary to confirm that the power to the doorbell system is turned off before starting any wiring work. It helps to verify there is no electricity flowing through the wires you’ll be working on.
5. Doorbell Transformer: If you’re replacing an existing transformer, make sure you have a compatible replacement. Choose a transformer with the appropriate voltage rating for your doorbell system. If you’re installing a new transformer, you’ll need to purchase one that suits your desired specifications.
6. Wiring: Depending on the requirements of your doorbell system, you may need to purchase additional wiring. This can include low-voltage wires of the appropriate gauge, such as 18 AWG (American Wire Gauge), which is commonly used for doorbell wiring. Measure the distance between the transformer and the doorbell push button to determine the length of wire you’ll need.
7. Drill (Optional): If you need to install the transformer in a new location or secure it to a surface, a drill may be necessary. Ensure you have the appropriate drill bit for the surface material.
Keep in mind that the specific tools and materials required may vary depending on your doorbell system and the scope of the wiring project. It’s important to read the manufacturer’s instructions and consult any applicable building codes before proceeding with the installation or replacement of the doorbell transformer.
With all the necessary tools and materials at hand, you’re now ready to begin wiring the doorbell transformer. In the following steps, we’ll guide you through the process to ensure a successful installation. Let’s get started!
Step 1: Turn Off Power
Before you start working on wiring a doorbell transformer, it’s crucial to turn off the power to the doorbell system. This step is essential to ensure your safety and to prevent any electrical accidents. Follow these steps to safely turn off the power:
- Locate the electrical panel in your home. It is usually found in the basement, garage, or utility room.
- Open the panel door. You may need to use a screwdriver to remove any screws securing the panel door.
- Inside the electrical panel, look for the circuit breaker labeled “Doorbell” or “Bell.” In some cases, it may be labeled as “Chime.”
- Flip the corresponding circuit breaker to the “Off” position. This will shut off the power supply to the doorbell system.
- For extra precaution, place a piece of tape over the circuit breaker to prevent it from being accidentally turned back on while you’re working.
Once you have turned off the power, use a voltage tester to confirm that there is no electrical current flowing through the doorbell wires. Simply touch the tester’s probes to the wires or wire connections to ensure they’re not live. If the voltage tester indicates that there is still power, double-check your circuit breaker and make sure it is fully switched off. Only proceed with the next steps once you have verified that there is no electrical current present.
Remember, it is important to exercise caution when working with electricity. If you’re unsure about any aspect of turning off the power or working with electrical components, it’s wise to consult a licensed electrician for assistance. Safety should always be the top priority when conducting any electrical work in your home.
Now that you have ensured the power is turned off, we can move on to the next step of wiring the doorbell transformer.
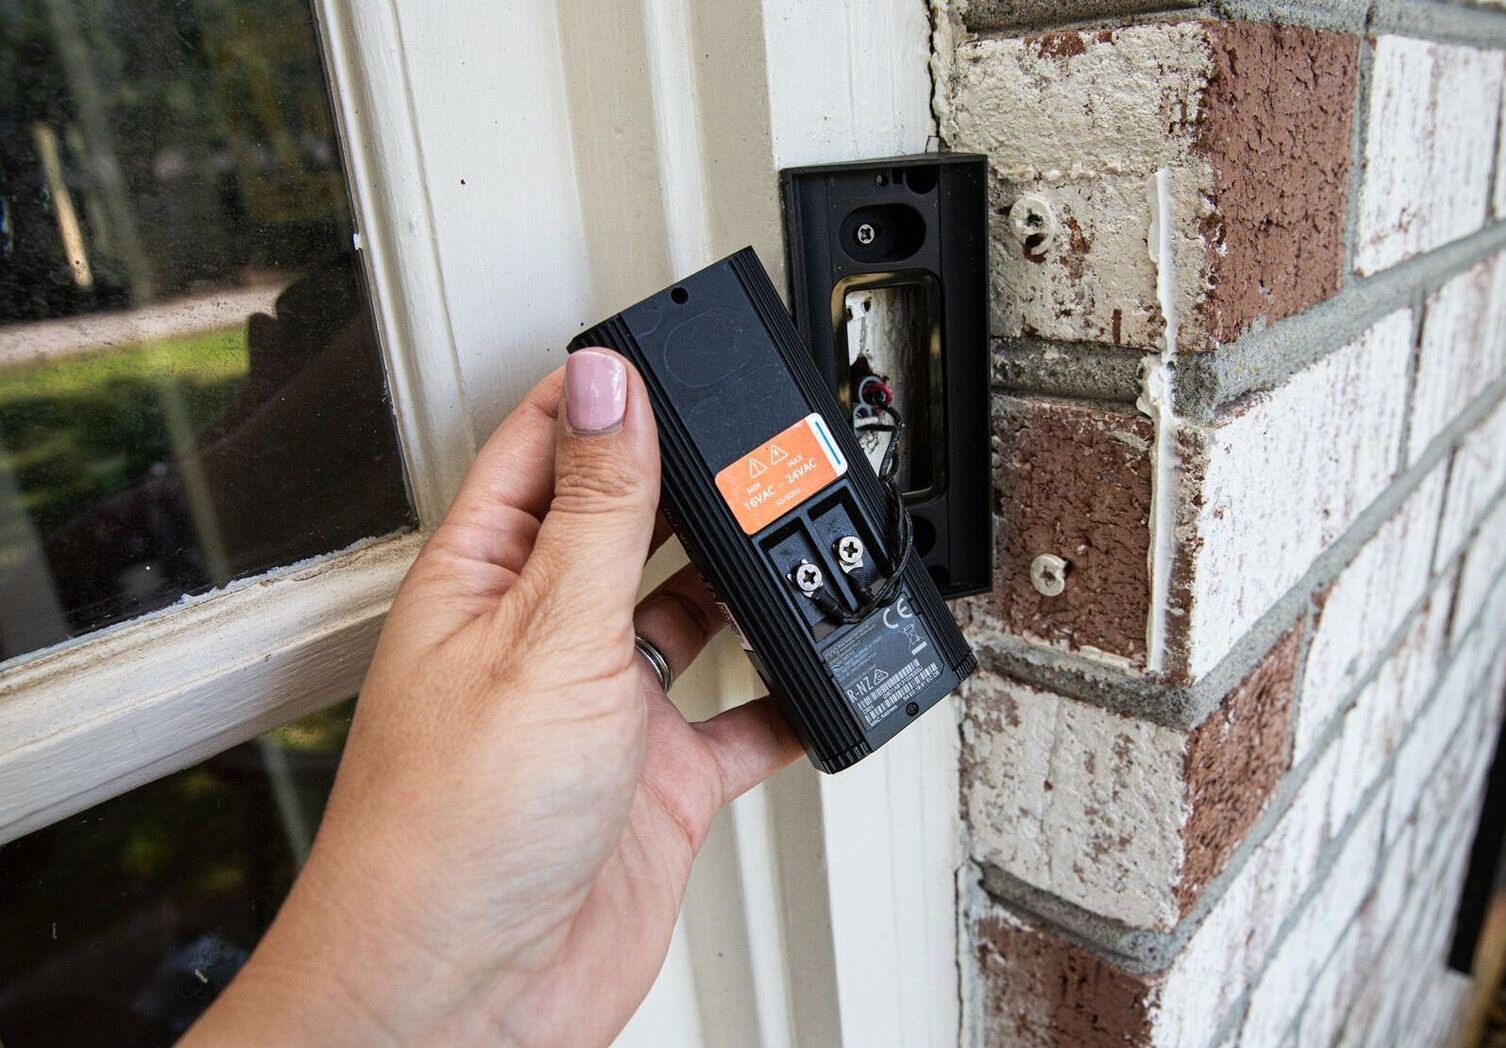
Step 2: Locate the Doorbell Transformer
Once you have turned off the power to the doorbell system, the next step is to locate the doorbell transformer. The transformer is typically installed somewhere in your home’s electrical system, often in a basement, utility room, or attic. Follow these steps to locate the doorbell transformer:
- Refer to the manufacturer’s documentation or the floor plan of your home. These resources may provide information about the general location of the transformer.
- If you’re unsure of the transformer’s location, visually inspect the area near the doorbell chimes. In many cases, the transformer is mounted or installed on the same wall as the chimes.
- Look for a small box or unit mounted on the wall or ceiling. The transformer may be attached to a junction box or secured to a surface using screws.
- If you still can’t locate the transformer visually, follow the doorbell wiring from the chimes to trace its path. The transformer is usually located along the wiring route, often near an electrical outlet or junction box.
- Use a voltage tester to test the voltage of the wires you suspect are connected to the transformer. The wires originating from the doorbell push button are typically connected to the transformer. The voltage tester will indicate a low voltage reading if it is indeed connected to the transformer.
Keep in mind that the doorbell transformer’s appearance and location may vary depending on the manufacturer and the installation style. If you’re having difficulty locating the transformer or are unsure whether you have correctly identified it, consult the manufacturer’s documentation or consider seeking professional assistance.
Once you have successfully located the doorbell transformer, you’re now ready to proceed with disconnecting the old wiring in the next step.
When wiring a doorbell transformer, always turn off the power at the circuit breaker before starting. Use a voltage tester to ensure the power is off before touching any wires.
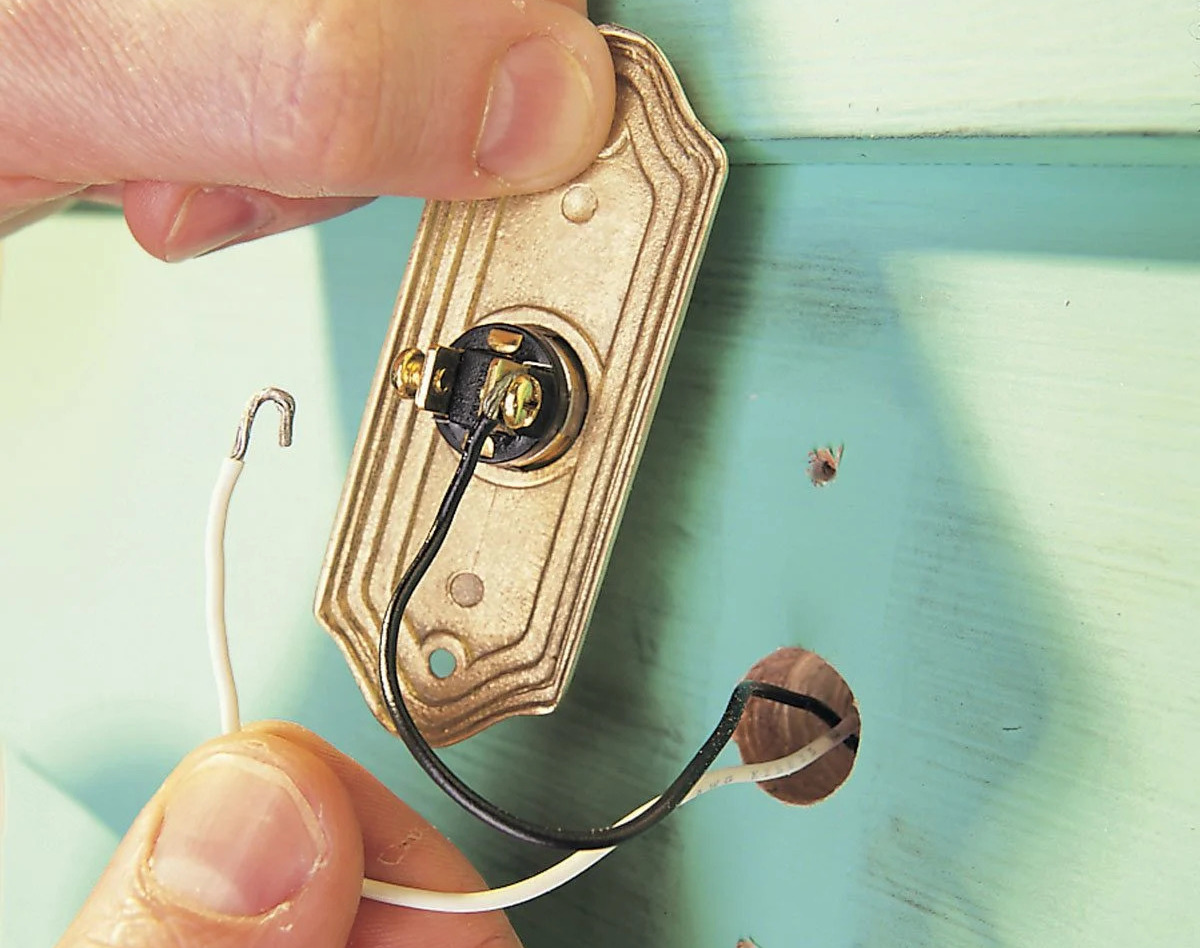
Step 3: Disconnect Old Wiring
Now that you have located the doorbell transformer, it’s time to disconnect the old wiring to prepare for the installation of a new transformer. Follow these steps to safely disconnect the old wiring:
- Using a screwdriver, remove the screws that secure the cover or housing of the doorbell transformer. Set the screws aside in a safe place, as you will need them later.
- Gently pull the cover or housing away from the wall or surface to expose the internal wiring connections.
- Take note of the existing wiring connections. You may want to take a photo or make a diagram to ensure you can replicate the connections correctly with the new transformer.
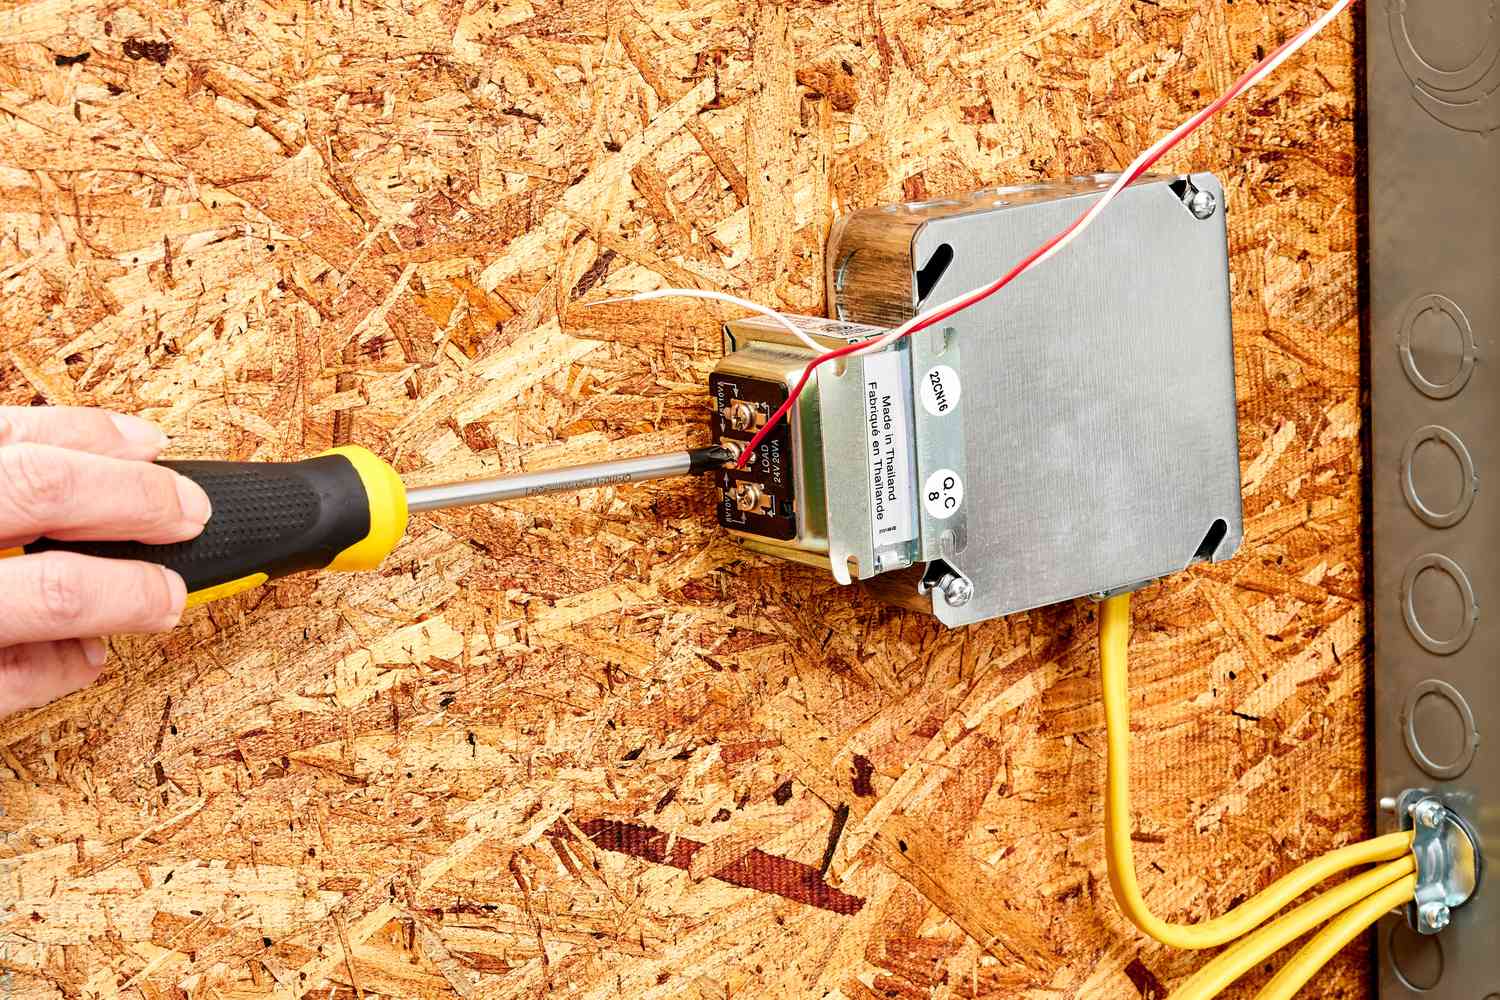
- Using a screwdriver, loosen the terminal screws that secure the wires connected to the transformer. Most transformers have multiple terminals, often labeled with indicators such as “R” for red wire and “C” for common wire.
- Once the terminal screws are loosened, carefully remove the wires from the transformer by pulling them out. Take care not to damage or break the wires during this process.
- If there are wire nuts connecting the transformer wires to other wires in the circuit, remove them by twisting counterclockwise. This will separate the wires and allow you to disconnect the old wiring completely.
- Inspect the old wiring for any signs of damage or wear. If you notice any frayed or damaged wires, replace them with new wiring as part of the installation process.
As you disconnect the old wiring, remember to handle the wires with care and avoid touching any exposed metal parts. If you’re uncertain about the wiring connections, refer to the photo or diagram you made earlier, or consult the manufacturer’s documentation for guidance.
With the old wiring disconnected, you’re now ready to move on to the next step, which involves connecting the new wiring for the doorbell transformer.
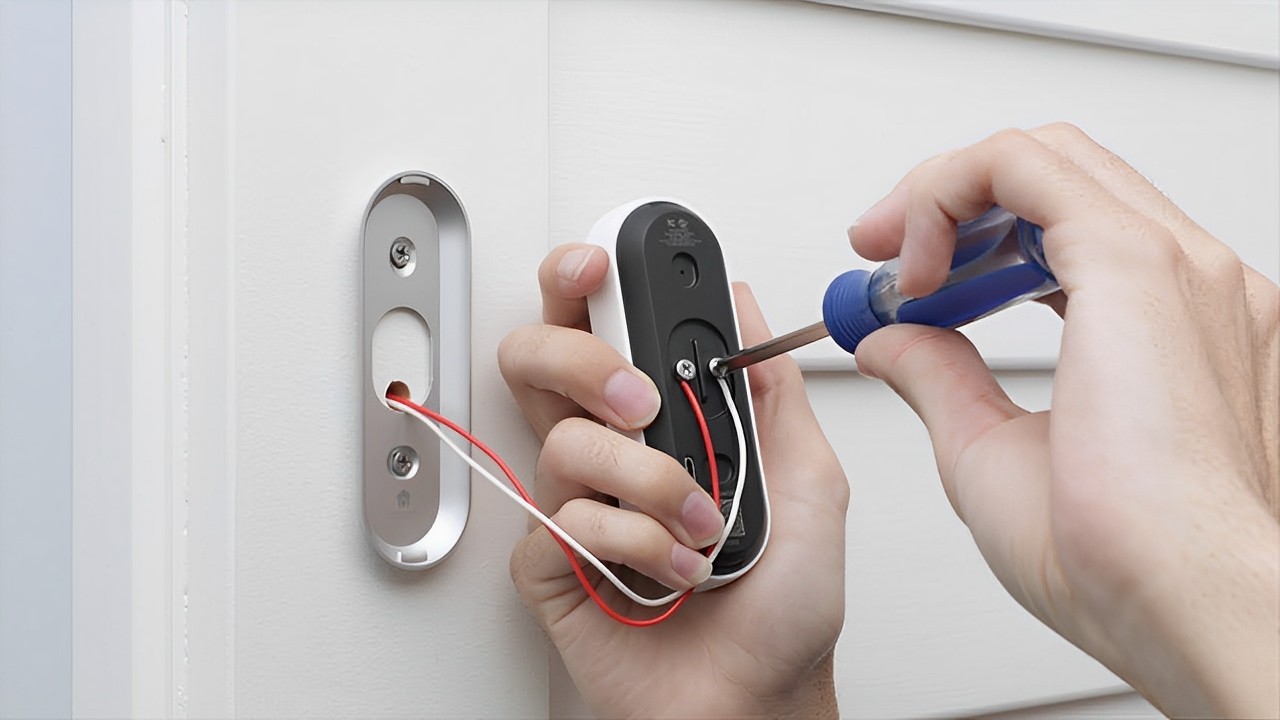
Step 4: Connect New Wiring
Now that the old wiring has been disconnected, it’s time to connect the new wiring for the doorbell transformer. Follow these steps to ensure a proper and secure connection:
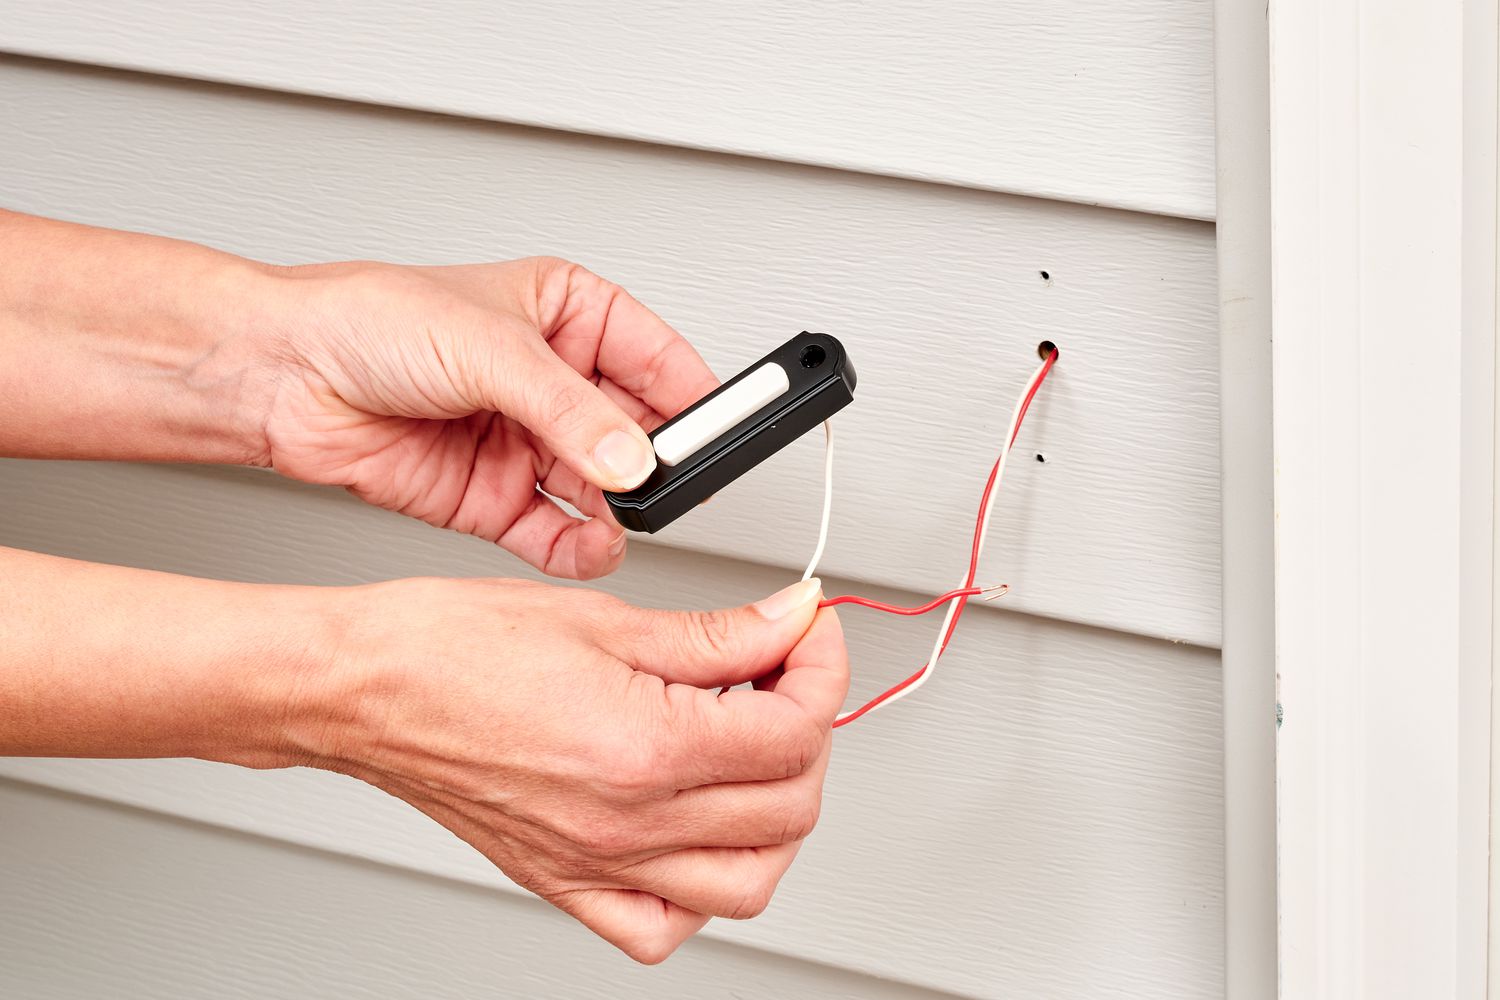
- If you’re using new wiring, strip about 1/2 inch of insulation from the ends of the wires using wire strippers. This will expose the bare copper wire for proper connection.
- Refer to the manufacturer’s documentation or the wiring diagram provided with the new transformer to identify the correct terminals for the wiring connections.
- Starting with the primary side, which typically has a higher voltage, connect the corresponding wires to the appropriate terminals on the transformer. Tighten the terminal screws using a screwdriver to ensure a secure connection.
- If your new transformer has a secondary voltage output, connect the secondary wires to their respective terminals, following the same process as the primary side.
- If there are additional wires or connections for features like chimes or intercom systems, consult the manufacturer’s documentation for specific instructions on how to connect them.
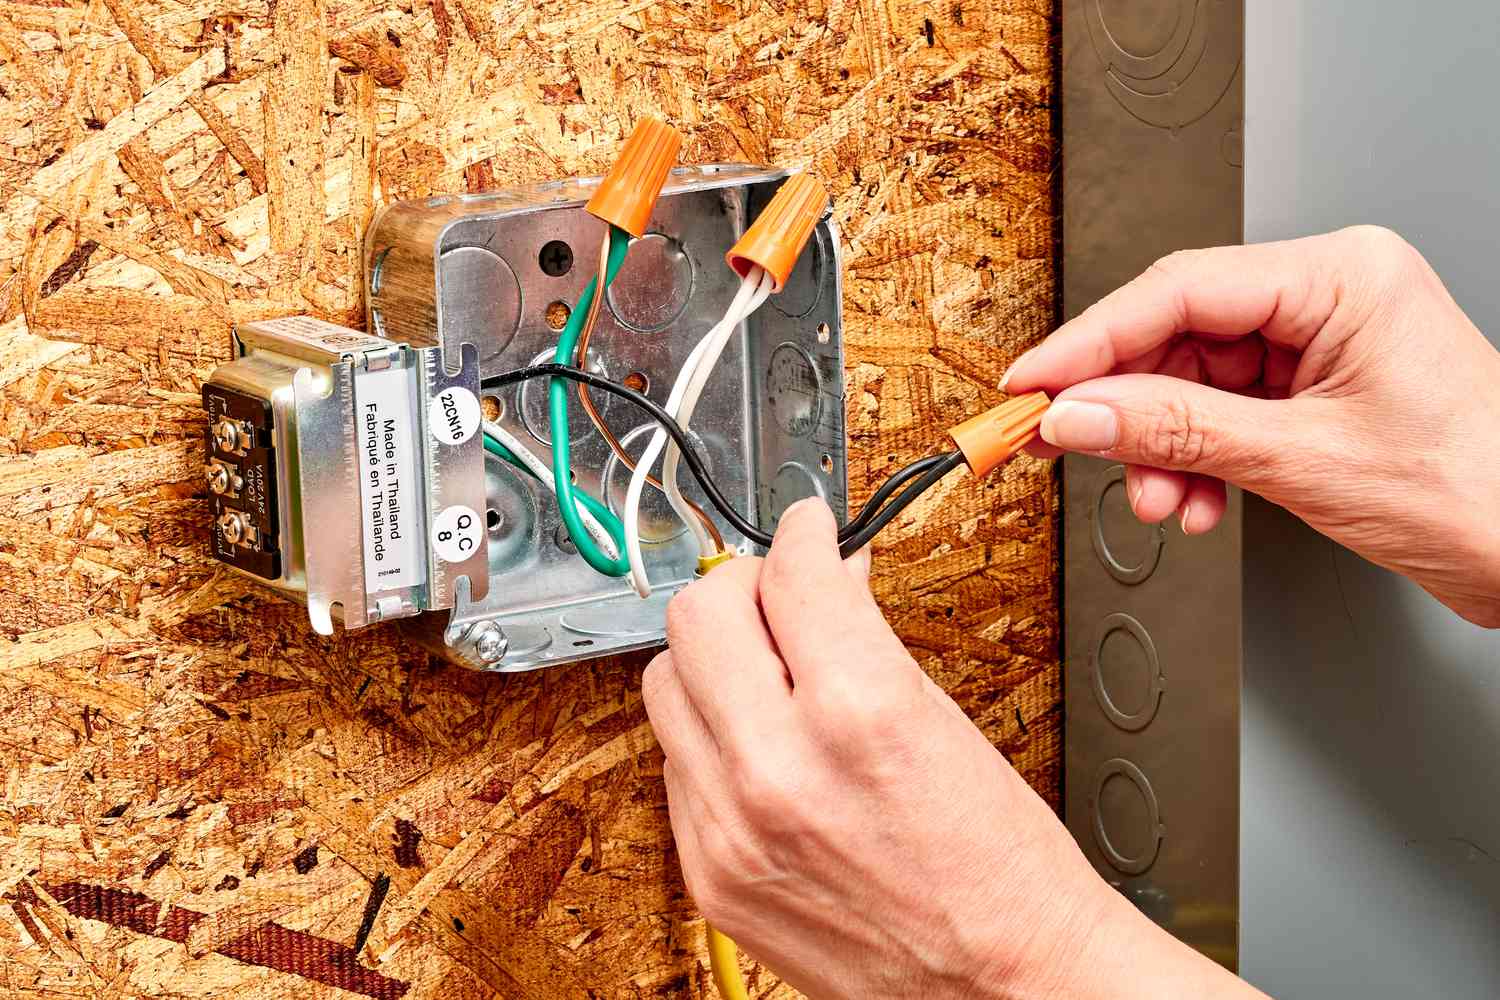
- Once all the wires are securely connected to the transformer, use wire nuts to twist and connect any additional wires, such as those coming from the doorbell push button or other components. Make sure the wire nuts are tightened securely.
- If necessary, secure any loose wiring using cable ties or wiring clips to keep them organized and out of the way.
- Carefully place the cover or housing back onto the transformer, aligning it with the screw holes. Insert and tighten the screws to secure the cover in place.
Throughout the process, double-check and ensure that each wire is connected to the correct terminal. Take your time to make sure the connections are secure, as loose wiring can cause the doorbell system to function improperly or not at all.
If you encounter any difficulties during the wiring process or are unsure about any particular connection, refer back to the manufacturer’s documentation or seek the assistance of a licensed electrician.
With the new wiring properly connected to the doorbell transformer, you’re ready to move on to the next step: testing the connection.
Step 5: Test the Connection
After successfully connecting the new wiring to the doorbell transformer, it’s important to test the connection to ensure everything is functioning properly. Here are the steps to test the connection:
- Turn on the power to the doorbell system by flipping the circuit breaker back to the “On” position. Ensure that the power is restored to the transformer.
- Press the doorbell push button to see if the chime or bell rings in response. If it does, that’s a good sign that your wiring connection is correct!
- If the doorbell doesn’t ring, double-check the connections at the transformer and make sure the wires are securely fastened to the appropriate terminals.
- Use a voltage tester to check the voltage at the terminals of the transformer. This will help determine if power is being delivered to the doorbell system. Refer to the manufacturer’s documentation for the expected voltage range.
- If the voltage tester indicates a problem, it may be due to a faulty transformer or problematic wiring. Consider inspecting the connections again or consult a professional for further assistance.
- Test the doorbell from various locations inside and outside your home to ensure it can be heard clearly and at an appropriate volume.
- If your doorbell system includes any additional features, such as chimes or a video doorbell, test each of these to ensure they’re functioning correctly.
During the testing process, it’s important to listen for any unusual sounds or observe any abnormal behavior in the doorbell system. This could indicate a problem with the wiring or the transformer itself.
If everything is working as expected, congratulations! You’ve successfully wired a doorbell transformer. If there are any issues, don’t hesitate to review your connections, consult the manufacturer’s documentation, or seek professional help to get your doorbell system operating smoothly.
Now that you have tested the connection and verified that your doorbell system is working, you’re ready for the final step: safely turning on the power.
Step 6: Turn On Power
Now that you have successfully tested the connection and ensured that your doorbell system is functioning properly, it’s time to turn on the power. Follow these steps to safely restore the power:
- Double-check that all the wiring connections are secured and the doorbell transformer cover or housing is properly in place. Ensure that there are no loose wires or exposed terminals.
- If you haven’t already, remove any tape or labels that were placed on the circuit breaker to indicate that it was turned off.
- Return to the electrical panel where the circuit breaker for the doorbell system is located.
- Flip the circuit breaker to the “On” position, restoring power to the doorbell system.
- Wait for a few moments to allow the system to power up and stabilize.
- Press the doorbell push button again to confirm that the chime or bell rings, indicating that the doorbell system is functioning properly after the power restoration.
- Listen for any unusual sounds or observe any abnormal behavior during the initial power-up. If you notice anything out of the ordinary, disconnect the power and inspect the wiring connections again to ensure everything is correct.
Turning on the power is the final step in the process of wiring a doorbell transformer. By following these steps carefully, you should now have a fully functional doorbell system, ready to alert you to visitors and deliveries at your home’s entrance.
Congratulations on successfully wiring your doorbell transformer! Remember to periodically check the system to ensure it is working correctly and maintain the wiring connections in good condition. If you experience any issues or if you’re unsure about any aspect of the installation, it’s always best to consult a licensed electrician for assistance.
Thank you for following our comprehensive guide. We hope this step-by-step process has been helpful in your doorbell transformer wiring journey. Enjoy the convenience and peace of mind that a functional doorbell system brings to your home!
Read more: What Does A Doorbell Transformer Do
Conclusion
Wiring a doorbell transformer is a task that may seem daunting at first, but with the right tools, knowledge, and careful execution, it can be accomplished by anyone. In this comprehensive guide, we have walked you through the step-by-step process of wiring a doorbell transformer, ensuring that your doorbell system is powered and fully functional.
We started by emphasizing the importance of a doorbell transformer in providing power to your doorbell system, ensuring safety, compatibility, and extending battery life. We then discussed the necessary tools and materials you will need for the wiring process, such as screwdrivers, wire strippers, wire nuts, voltage testers, the doorbell transformer itself, and appropriate wiring.
We carefully explained each step, from turning off the power to locating the doorbell transformer, disconnecting the old wiring, connecting the new wiring, testing the connection, and finally, turning the power back on. Each step was outlined to assist you in successfully completing the task, while prioritizing safety, accuracy, and a proper working doorbell system.
Remember that safety should always be your top priority when working with electricity. If you have any doubts or concerns about any aspect of the installation or if you are unfamiliar with electrical systems, it is recommended to consult a licensed electrician for assistance.
By following this guide, you can now enjoy the convenience and functionality of a fully operational doorbell system. You will never miss a visitor or delivery, and you can enhance the security and accessibility of your home.
Thank you for choosing our guide to help you wire your doorbell transformer. We hope that you found the information valuable and that the installation process went smoothly. Feel free to refer back to this guide whenever you need a refresher or assistance with your doorbell system. Enjoy the benefits of a properly wired doorbell transformer!
Ready to take your home technology to new heights? Dive into our latest guide on the best options for home automation, where you'll find cutting-edge solutions to simplify your life. If your interest lies in enhancing your visitor's experience, don't miss our reviews on the latest doorbell systems. And for those who love a hands-on approach, our practical tips on DIY home improvement will surely keep you engaged and ready to tackle your next project with confidence.
Frequently Asked Questions about How To Wire Doorbell Transformer
Was this page helpful?
At Storables.com, we guarantee accurate and reliable information. Our content, validated by Expert Board Contributors, is crafted following stringent Editorial Policies. We're committed to providing you with well-researched, expert-backed insights for all your informational needs.
0 thoughts on “How To Wire Doorbell Transformer”