Home>Articles>How To Wire Ring Doorbell Without Existing Doorbell

Articles
How To Wire Ring Doorbell Without Existing Doorbell
Modified: August 26, 2024
Learn how to wire a Ring Doorbell even without an existing doorbell. Our step-by-step guide and tips make installation easy. Read more in our informative articles.
(Many of the links in this article redirect to a specific reviewed product. Your purchase of these products through affiliate links helps to generate commission for Storables.com, at no extra cost. Learn more)
Introduction
Installing a Ring Doorbell is a great way to enhance your home’s security and keep an eye on your surroundings. However, what do you do if your home doesn’t have an existing doorbell? Don’t worry; you can still wire your Ring Doorbell without a pre-existing doorbell system. This article will guide you through the step-by-step process of wiring a Ring Doorbell without an existing doorbell. By following these instructions, you’ll have your Ring Doorbell up and running in no time.
Before we get started, it’s important to note that dealing with electrical wiring can be dangerous. If you’re not comfortable working with electrical components, it’s best to hire a professional electrician to handle the installation for you. However, if you have some experience or feel confident in your abilities, you can follow the instructions here to wire your Ring Doorbell safely.
Let’s proceed to the first step, where we’ll gather all the necessary tools and materials required for the installation process.
Key Takeaways:
- Enhance your home’s security by wiring a Ring Doorbell without an existing doorbell. Follow the step-by-step guide to ensure a safe and successful installation, bringing convenience and peace of mind.
- Prioritize safety and thorough preparation when installing a Ring Doorbell. From gathering tools to testing the device, each step contributes to a seamless and secure wiring process.
Read more: How To Connect To An Existing Ring Doorbell
Step 1: Gather the necessary tools and materials
Before you start wiring your Ring Doorbell, make sure you have the following tools and materials handy:
- Ring Doorbell kit (including the doorbell unit, mounting bracket, and screws)
- Wire cutters/strippers
- Flathead screwdriver
- Electric drill
- Drill bit suitable for your mounting surface (wood, concrete, etc.)
- Voltage tester
- Wire nuts
- Electrical tape
- Marker or pen
- Measuring tape or ruler
- Wire clamps (if necessary)
Make sure you have all the tools and materials before you begin the installation process. This will save you time and prevent any unnecessary delays or interruptions.
Once you have gathered all the necessary tools and materials, you’re ready to proceed to the next step – turning off the power.
Step 2: Turn off the power
Before starting any electrical work, it is crucial to turn off the power to the area where you will be installing your Ring Doorbell. This step is essential for your safety and to prevent any accidents.
Locate your home’s electrical panel or circuit breaker box. It is usually found in a basement, garage, or utility room. Open the panel or box, and look for the circuit breaker that controls the power to your doorbell or the specific area you will be working on. Typically, the doorbell is on a circuit labeled “doorbell” or “bell.”
Once you have located the correct circuit breaker, flip it to the “off” position. Double-check to ensure that the power is turned off by testing the existing doorbell or using a voltage tester on the wires. If the doorbell doesn’t ring or there is no voltage detected, then you have successfully turned off the power.
It is essential to take precautions and treat all electrical wiring as if it is live until you have confirmed that it is not. This will help keep you safe during the installation process.
Now that the power is turned off, we can move on to the next step – locating the transformer for your doorbell system.
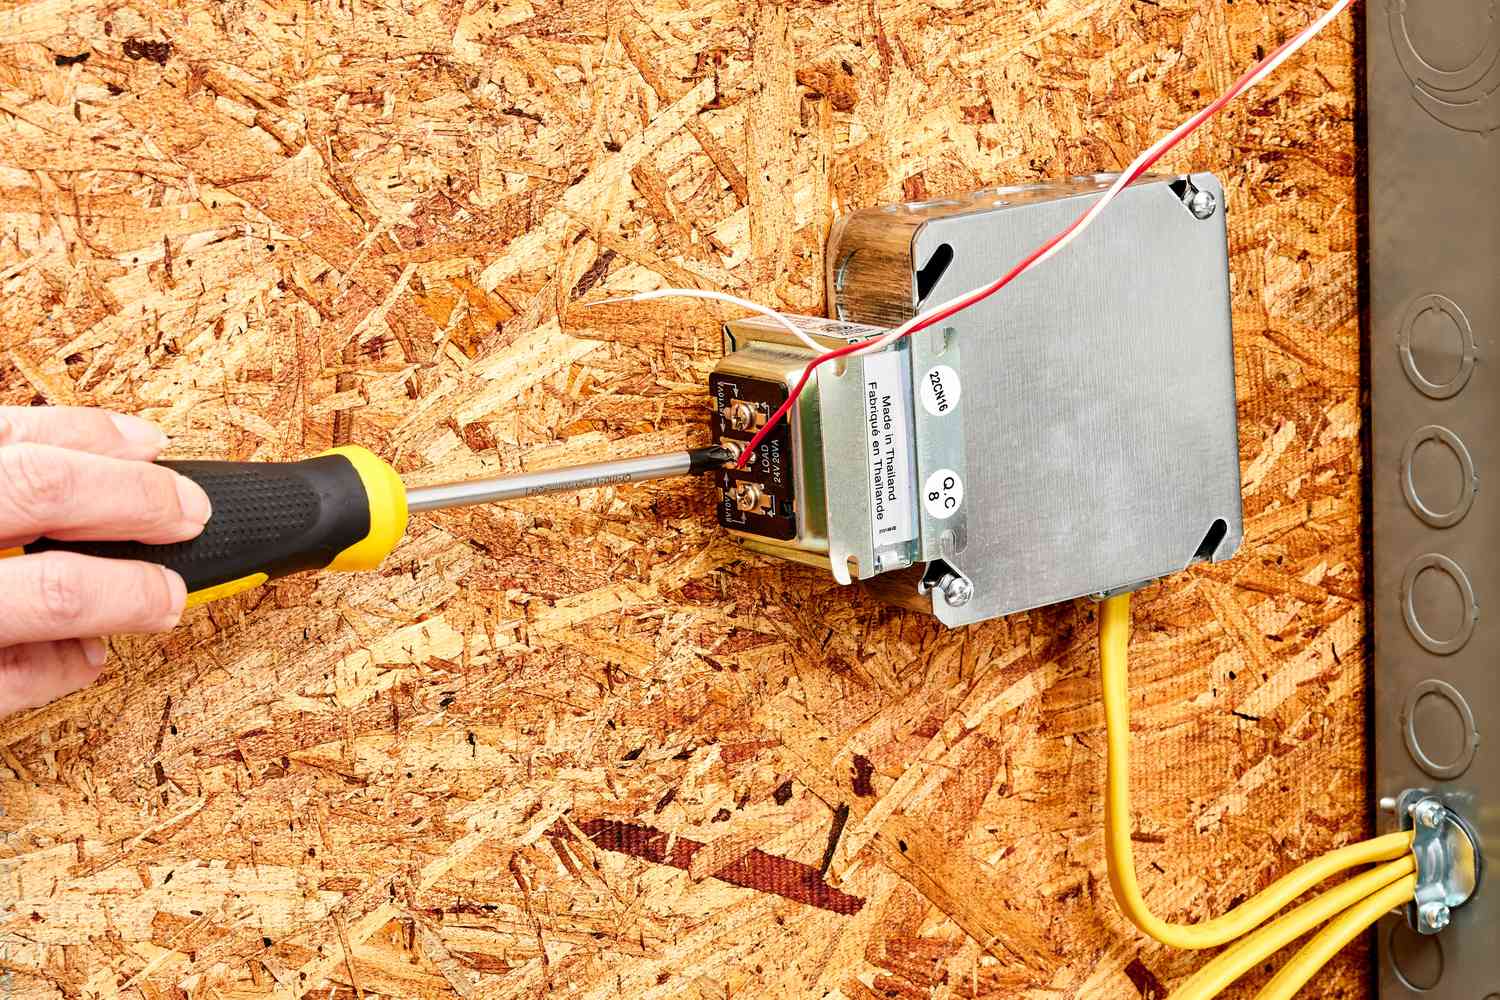
Step 3: Locate the transformer
In order to wire your Ring Doorbell without an existing doorbell, you need to locate the transformer that supplies power to the doorbell system. The transformer is usually located near the electrical panel or inside a mechanical room.
Here are some common places to look for the doorbell transformer:
- Near the electrical panel or circuit breaker box
- In the attic or basement
- Inside a closet
- Behind a cover plate
Once you have located the transformer, use a voltage tester to confirm that it is not live. This adds an extra layer of safety during the wiring process.
Some transformers may be attached directly to the electrical panel, while others might be mounted on a junction box. The transformer will have two low-voltage wires coming out of it, which are typically labeled “Front” and “Trans.” These wires carry the power to the doorbell system.
Now that you have located the transformer and ensured it is not live, you can move on to the next step – disconnecting the existing doorbell.
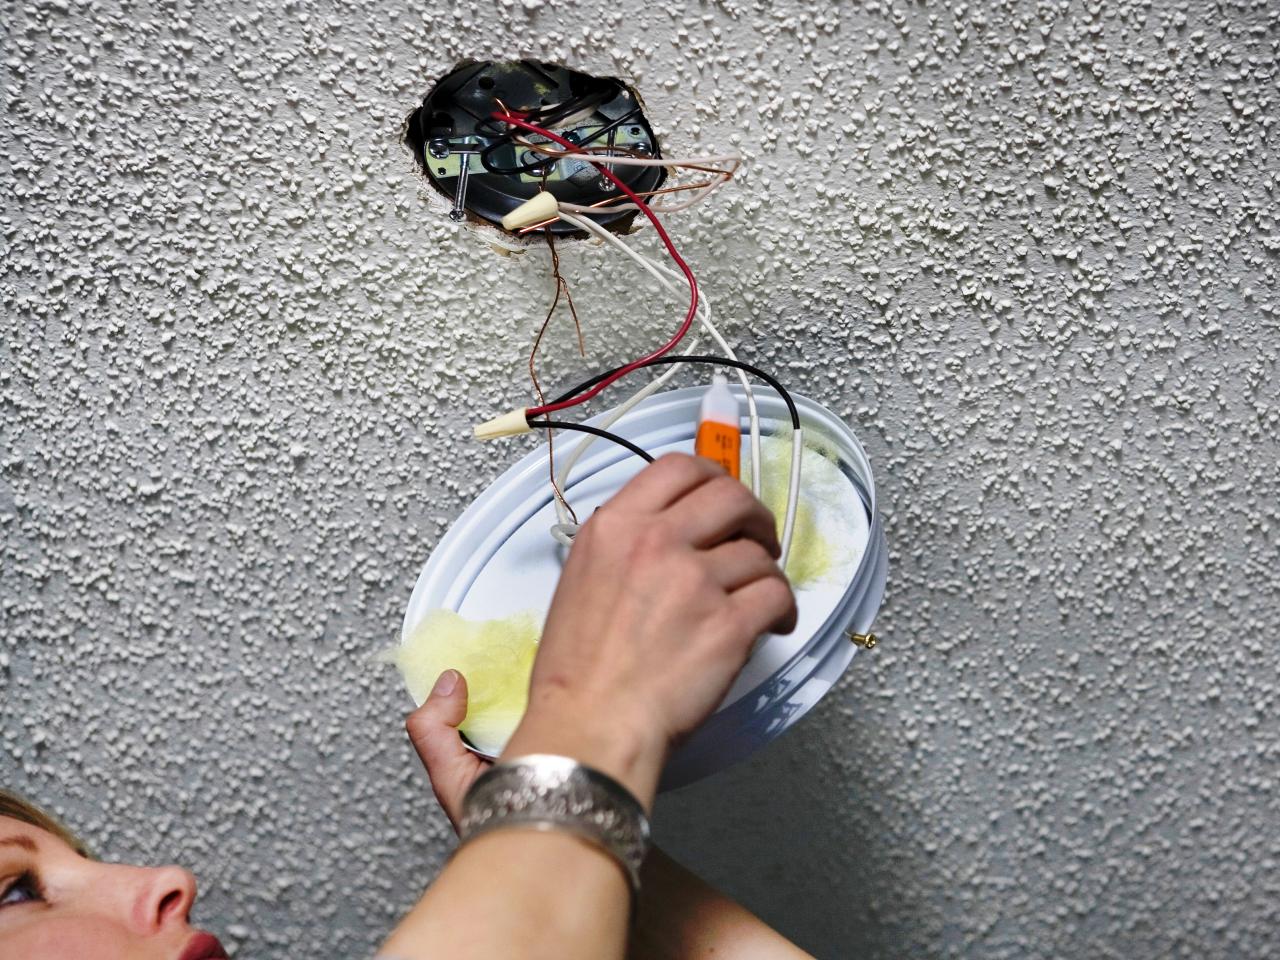
Step 4: Disconnect the existing doorbell
Before you can wire your Ring Doorbell, you need to disconnect the existing doorbell, if there is one. This step involves removing the old doorbell unit and disconnecting the wiring.
Start by removing the cover or faceplate of the existing doorbell unit. This will expose the wiring and the connections behind it. You may need to unscrew the faceplate or gently pry it off, depending on the type of doorbell you have.
Once the wiring is visible, take note of how it is connected. There will typically be two wires – one connected to the “Front” terminal and the other to the “Trans” terminal. These wires carry the low-voltage power to the doorbell system.
Using your wire cutters or wire strippers, carefully cut or strip the ends of the wires, removing them from the existing doorbell unit. Be cautious not to cut the wires too short, as you will need them to connect your Ring Doorbell.
After disconnecting the wires, you can remove the old doorbell unit from its mounting bracket. This will give you a clean and open surface to work with when wiring your Ring Doorbell.
With the existing doorbell disconnected and removed, you are now ready to prepare the wiring for the installation of your Ring Doorbell. Proceed to the next step for further instructions.
Step 5: Prepare the wiring for the Ring Doorbell
Now that you have disconnected the existing doorbell, it’s time to prepare the wiring for your Ring Doorbell installation. This step involves assessing the condition of the existing wiring and making any necessary adjustments or modifications.
Start by examining the exposed wiring from the previous doorbell. Check for any damage, such as frayed or cut wires. If you notice any issues, it’s best to replace the damaged wiring with new low-voltage wires of the same gauge. Cut off the damaged portion of the wire and strip the ends with wire cutters or strippers.
Next, determine if the existing wiring is suitable to use with your Ring Doorbell. Keep in mind that the Ring Doorbell requires a low-voltage power supply ranging from 8-24 volts AC. Most existing doorbell systems operate within this range, but it’s essential to confirm the voltage to ensure compatibility.
If your existing wiring meets the voltage requirements, you can proceed with the installation. However, if the voltage is higher or lower than the recommended range, you may need to install a compatible transformer to provide the correct power supply.
Before moving forward, it’s a good idea to label the wires to avoid confusion during the installation. Use a marker or pen to label each wire according to its original terminal – “Front” or “Trans.” This will help you accurately connect the wires to your Ring Doorbell later on.
With the wiring prepared and any necessary adjustments made, you are now ready to connect your Ring Doorbell. Proceed to the next step for detailed instructions on how to perform the wiring.
If you don’t have an existing doorbell, you can wire your Ring doorbell using a plug-in adapter or a hardwired transformer. Follow the manufacturer’s instructions carefully for a safe and secure installation.
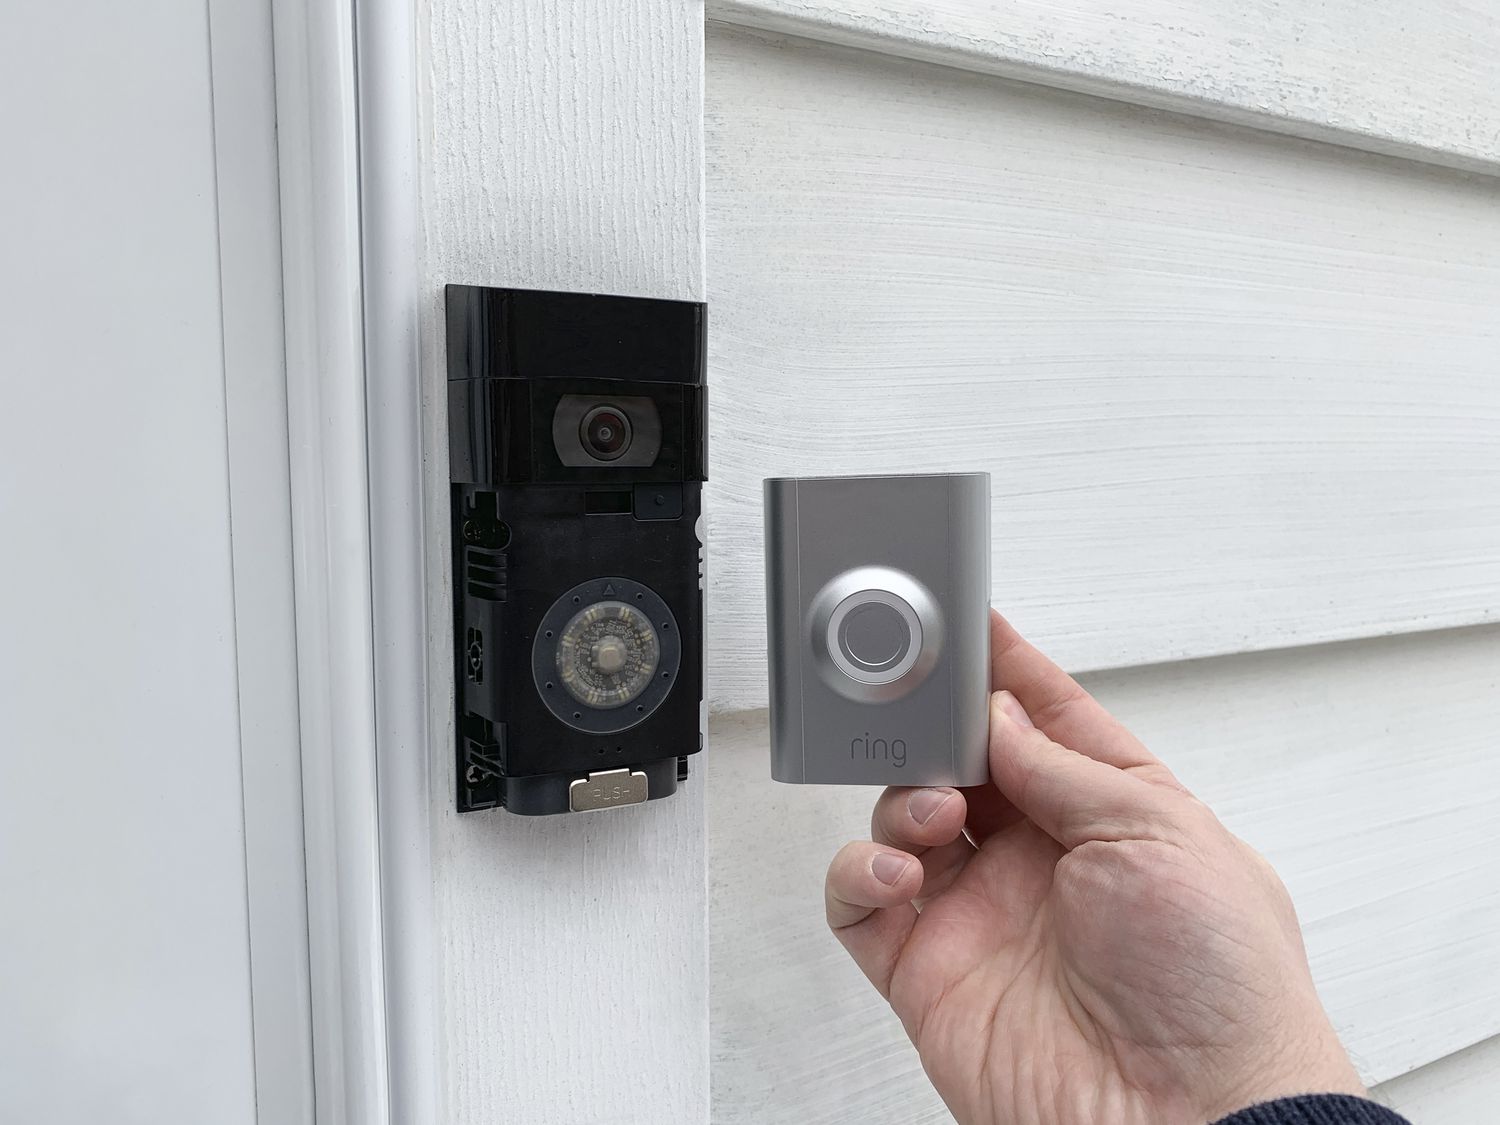
Step 6: Connect the Ring Doorbell to the wiring
Now that you have prepared the wiring, it’s time to connect your Ring Doorbell. Follow these steps to ensure a proper and secure connection:
- Take the mounting bracket that came with your Ring Doorbell and align it with the holes on your desired mounting surface (such as your front door frame or wall). Use a marker or pen to mark the positions of the screw holes.
- Using an electric drill and the appropriate drill bit, create pilot holes at the marked positions.
- Place the mounting bracket back on the mounting surface and secure it in place using the provided screws. Ensure that the mounting bracket is level and securely attached.
- Take the low-voltage wires and pass them through the center opening at the back of the mounting bracket.
- Strip the ends of the low-voltage wires using wire cutters or strippers, exposing a small section of the copper wire.
- Referencing the labels you made earlier, connect the wire from the “Front” terminal of your existing wiring to the corresponding terminal on the back of the Ring Doorbell unit. Twist the wires together and secure them with a wire nut.
- Repeat the previous step for the wire from the “Trans” terminal.
- Once the wires are securely connected, gently push the excess wiring back into the mounting surface, making sure it is hidden from view.
With the wiring connections complete, your Ring Doorbell is now properly connected. Before moving on, it’s a good idea to perform a quick test to ensure everything is functioning correctly.
Proceed to the next step to learn how to test your Ring Doorbell and continue with the installation process.
Step 7: Test the Ring Doorbell
After connecting the Ring Doorbell to the wiring, it’s important to test it to ensure that it’s functioning properly before proceeding with the installation.
Here’s how you can test your Ring Doorbell:
- Restore power to the area by flipping the circuit breaker or fuse back to the “on” position. Double-check that the power is restored by verifying that other electrical devices are functioning.
- On your smartphone or tablet, open the Ring app and follow the instructions to set up your Ring Doorbell. This usually involves creating an account, connecting to your home’s Wi-Fi network, and following the on-screen prompts.
- Once the Ring Doorbell is connected to your account, go to the doorbell settings and activate the doorbell’s test mode or live view mode. This will allow you to see and hear the real-time video and audio feed from the doorbell.
- With the Ring app active and the live feed displayed, press the doorbell button on the Ring Doorbell unit. You should see and hear a notification in the app indicating that someone is at the door.
- Test the audio by speaking into your smartphone or tablet. The audio should go through the Ring Doorbell unit and be audible outside your front door.
If the Ring Doorbell functions correctly during the test, congratulations! You have successfully wired and tested your Ring Doorbell. If there are any issues or the doorbell isn’t functioning as expected, double-check the wiring connections and troubleshoot any potential problems.
Once you are satisfied with the test results, you can proceed to the next step – mounting the Ring Doorbell on the mounting bracket.
Step 8: Mount the Ring Doorbell
With the Ring Doorbell properly wired and tested, it’s time to securely mount it onto the mounting bracket. Follow these steps to ensure a stable and reliable installation:
- Align the Ring Doorbell unit with the mounting bracket, making sure it sits flush and level on the surface.
- Secure the Ring Doorbell to the bracket using the provided screws. Depending on the model of your Ring Doorbell, you may need to use a screwdriver or an included screwdriver bit.
- Tighten the screws just enough to hold the doorbell in place, but avoid overtightening as it may cause damage to the unit.
- Once the Ring Doorbell is securely mounted, make any necessary adjustments to ensure the camera lens has a clear and optimal view of the area you want to monitor.
Take into consideration factors such as the angle and height at which you mounted the doorbell to obtain the best field of view. It should cover the desired area while minimizing any unnecessary motion alerts.
If your Ring Doorbell model comes with interchangeable faceplates, you can now select and attach a faceplate that matches your preference or the style of your home.
With your Ring Doorbell successfully mounted, you’re almost done with the installation process. The final step is to restore power and complete the setup of your Ring Doorbell.
Proceed to the next step to learn how to restore power and finalize the installation.
Read more: How To Install A Wired Ring Doorbell
Step 9: Restore power and complete setup
Now that the Ring Doorbell is securely mounted, it’s time to restore power and complete the setup process. Follow these final steps to finalize the installation:
- Return to your home’s electrical panel or circuit breaker box and flip the circuit breaker or fuse back to the “on” position to restore power to the doorbell.
- Allow a few moments for the Ring Doorbell to power up. You may see a series of lights or hear a chime indicating that the device is ready for setup.
- Open the Ring app on your smartphone or tablet and sign in to your account. If you haven’t already done so, follow the on-screen instructions to set up your Ring Doorbell.
- During the setup process, you will need to connect your Ring Doorbell to your home’s Wi-Fi network. Follow the prompts in the app to enter your Wi-Fi network details and complete the connection.
- Once your Ring Doorbell is connected to Wi-Fi, you can customize your device’s settings, such as motion detection sensitivity, notification preferences, and video recording options, through the Ring app.
- Take a moment to familiarize yourself with the features and functionality of your Ring Doorbell. Explore options such as two-way communication, video recording playback, and integration with other smart home devices.
Congratulations! You have successfully wired and installed your Ring Doorbell without an existing doorbell. Your home’s security and convenience are now enhanced with the added functionality of the Ring Doorbell.
If you encounter any issues or need further assistance, refer to the user manual or contact Ring’s customer support for additional guidance.
Remember to periodically check for software updates and maintain the proper functioning of your Ring Doorbell. Enjoy the peace of mind that comes with the added security and convenience of your Ring Doorbell.
Thank you for following this installation guide. We hope this article has been helpful in successfully wiring your Ring Doorbell without an existing doorbell.
Stay safe and secure!
Additional note: When interacting with Ring products, it’s always a good idea to regularly review and adjust privacy settings to ensure your personal information and recordings are protected.
Conclusion
Wiring a Ring Doorbell without an existing doorbell might seem like a daunting task, but with the right tools and instructions, it can be a straightforward process. By following the steps outlined in this guide, you can successfully wire your Ring Doorbell and enjoy the added security and convenience it offers.
Starting with gathering the necessary tools and materials, you ensured you had everything you needed before beginning the installation. Turning off the power and locating the transformer added an extra layer of safety to the process. Disconnecting the existing doorbell and preparing the wiring ensured a clean and stable foundation for your Ring Doorbell installation.
Connecting the Ring Doorbell to the wiring and testing it verified that everything was functioning as expected. Mounting the Ring Doorbell securely on the mounting bracket provided stability and optimal positioning. Lastly, restoring power and completing the setup allowed you to customize your Ring Doorbell’s settings and start using its features.
Remember, safety should always be your top priority when working with electrical components. If at any point you feel uncertain or uncomfortable, it is best to consult a professional electrician who can assist you with the installation.
With your Ring Doorbell successfully installed, you can now enjoy the peace of mind that comes with enhanced home security. The ability to monitor your surroundings, receive notifications, and communicate with visitors remotely adds convenience and a sense of control to your daily life.
Take the time to familiarize yourself with the features and functionality of your Ring Doorbell. Explore the various settings and customize them to suit your needs and preferences. Regularly update the firmware and review privacy settings to ensure your security and privacy remain intact.
We hope this guide has provided you with the knowledge and confidence to wire your Ring Doorbell without an existing doorbell. Embrace the benefits, stay vigilant, and enjoy the enhanced security that your Ring Doorbell brings to your home.
Remember, your safety and peace of mind are worth the effort. Stay secure, stay connected!
Ready to take your DIY skills up a notch? If you're keen on enhancing your home’s curb appeal, consider learning more about Ring doorbell installation on different surfaces, including tricky siding. For those interested in making life simpler and more connected, dive into our comprehensive review of the best home automation systems for 2024. Both guides offer practical steps and savvy advice to smarten up your living space effortlessly.
Frequently Asked Questions about How To Wire Ring Doorbell Without Existing Doorbell
Was this page helpful?
At Storables.com, we guarantee accurate and reliable information. Our content, validated by Expert Board Contributors, is crafted following stringent Editorial Policies. We're committed to providing you with well-researched, expert-backed insights for all your informational needs.


0 thoughts on “How To Wire Ring Doorbell Without Existing Doorbell”