Articles
How To Run Wire For A Doorbell
Modified: October 20, 2024
Learn how to run wire for a doorbell with our informative articles. Discover step-by-step instructions and expert tips for a flawless installation.
(Many of the links in this article redirect to a specific reviewed product. Your purchase of these products through affiliate links helps to generate commission for Storables.com, at no extra cost. Learn more)
Introduction
Welcome to our guide on how to run wire for a doorbell. Installing or replacing a doorbell system can be a great way to enhance the functionality and convenience of your home. Whether you are setting up a brand new doorbell or upgrading an existing one, running wire is an essential step in the process.
Running wire for a doorbell involves connecting the doorbell button, transformer, and doorbell chime. It allows for the transmission of low-voltage electrical signals that enable the doorbell to ring when the button is pressed. While the task may seem daunting at first, with the right tools and a bit of patience, you can easily complete this project yourself.
In this guide, we will take you through the step-by-step process of running wire for a doorbell. We will cover all the necessary tools and materials you will need, as well as provide detailed instructions for each stage of the installation. By following this guide, you can have a fully functional doorbell system in no time.
Before we dive into the installation process, it is important to note that working with electrical wiring can be dangerous if not done properly. If you are uncomfortable or uncertain about any part of the process, it is always best to hire a professional electrician to ensure your safety and the proper functioning of the doorbell system.
Now, let’s gather our tools and materials and get started on running wire for your doorbell!
Key Takeaways:
- Proper planning and preparation are essential before installing a doorbell system. Choosing the right wire, measuring accurately, and securing connections are crucial for a successful installation.
- Testing and troubleshooting the doorbell system ensures proper functionality. If issues arise, checking wire connections, transformer voltage, and consulting a professional electrician can help resolve any problems.
Read more: How To Wire A Doorbell
Tools and Materials Needed
Before you begin running wire for your doorbell, it is important to gather all the necessary tools and materials. Having everything prepared will make the installation process smoother and more efficient. Here is a list of the tools and materials you will need:
Tools:
- Wire cutters
- Wire strippers
- Needle-nose pliers
- Electric drill
- Drill bits
- Screwdrivers (flathead and Phillips)
- Electrical tape
- Measuring tape
Materials:
- Doorbell wire (typically 18 or 20 gauge)
- Doorbell button
- Doorbell transformer
- Doorbell chime
- Screws and anchors
Wire cutters and strippers are essential for cutting and stripping the doorbell wire to the appropriate length. Needle-nose pliers come in handy for manipulating and connecting the wire ends.
An electric drill and drill bits are needed for creating holes in the walls or surfaces where you will be running the wire. Screwdrivers, both flathead and Phillips, are used for securing the doorbell components in place.
Electrical tape is used to secure and insulate wire connections, providing extra protection against electrical hazards. A measuring tape allows you to accurately measure and cut the wire to the desired length.
When it comes to the materials, doorbell wire is the lifeline of the system, allowing the electrical signals to travel from the transformer to the doorbell button and chime. The gauge of the wire will depend on the specific requirements of your doorbell system.
The doorbell button is the component that is pressed by visitors to activate the doorbell. The doorbell transformer converts the standard household voltage into the lower voltage required for the doorbell system.
The doorbell chime is the auditory component of the system, producing the sound or melody when the doorbell button is pressed. Lastly, screws and anchors are used to securely mount the doorbell components to the wall or door frame.
Now that you have gathered all the necessary tools and materials, you are ready to move on to the next step: planning and preparation.
Step 1: Planning and Preparation
Before you begin the process of running wire for your doorbell, it is crucial to take some time for planning and preparation. This step will ensure that you have a clear understanding of the layout, placement, and requirements of your doorbell system. Here are some key considerations to keep in mind:
Read more: How To Run Electrical Wire In A House
1. Determine the Doorbell System Type:
First, determine the type of doorbell system you have or want to install. Common types include wired doorbells, wireless doorbells, and smart doorbells. For this guide, we will focus on the installation of a wired doorbell system.
2. Choose the Location:
Select a suitable location for your doorbell button, transformer, and chime. Typically, the button is placed near the front door, while the transformer is mounted on an electrical junction box near the doorbell chime.
3. Check Wiring Accessibility:
Take a look at the area where you plan to run the wire. Ensure there is adequate space and accessibility for running the wire without any obstacles or obstructions. Consider the distance between the doorbell button, transformer, and chime, and plan accordingly.
4. Familiarize Yourself with the Wiring Connections:
Before starting the installation process, familiarize yourself with the different wire connections involved in a doorbell system. This typically includes the wiring connections between the doorbell button, transformer, and chime.
Read more: How To Run Outdoor Electrical Wire
5. Ensure Safety Precautions:
It is essential to prioritize safety during the installation process. Ensure that the power to the circuit you will be working on is turned off. If you are uncertain about handling electrical wiring, consider hiring a professional electrician to assist you.
By taking the time to plan and prepare, you will have a clear roadmap for the doorbell installation process. This step sets you up for success and helps avoid any potential issues or delays along the way.
Once you have completed the planning and preparation phase, you can move on to the next step: choosing the doorbell wire.
Step 2: Choosing the Doorbell Wire
Choosing the right doorbell wire is crucial for the proper functioning of your doorbell system. The wire serves as the conduit for transmitting the electrical signals between the doorbell button, transformer, and chime. Here are some factors to consider when selecting the doorbell wire:
1. Wire Gauge:
The wire gauge refers to the thickness of the wire. For doorbell systems, 18 or 20-gauge wire is commonly used. Thicker wires, such as 16-gauge, may not fit into the connectors of the doorbell components. Ensure that the wire gauge you choose is compatible with your doorbell system.
2. Wire Type:
Doorbell wire is usually insulated with a non-conductive material, typically PVC. This insulation helps protect the wire from damage and ensures safe and reliable operation. Look for doorbell wire specifically designed for low-voltage applications.
Read more: What Electrical Wire To Run Underground
3. Wire Length:
Determine the length of wire you will need based on the distance between the doorbell button, transformer, and chime. Measure the route the wire will take and add a few extra feet to account for any necessary adjustments or routing considerations.
4. Wire Color:
Doorbell wires are often available in different colors, such as white, red, green, and black. While the color is primarily a personal preference, it can also help with organizing and identifying the different wires and their respective connections.
5. Spool Size:
Consider the spool size of the wire, especially if you have a large surface area to cover or multiple doorbell systems to install. Larger spools can save you time and minimize the need for splicing multiple pieces of wire together.
Once you have considered these factors, you can proceed with purchasing the doorbell wire. It is always a good idea to buy a little extra wire in case you need to make adjustments or repairs in the future.
With the doorbell wire in hand, you are now ready to move on to the next step: measuring and cutting the wire.
Step 3: Measuring and Cutting the Wire
Now that you have chosen the appropriate doorbell wire, it’s time to measure and cut the wire to the required length. This ensures that the wire fits perfectly between the doorbell button, transformer, and chime, without any excess or shortage. Follow these steps to accurately measure and cut the wire:
Read more: How To Run Electrical Wire Through Walls
1. Measure the Distance:
Take a measuring tape and measure the distance between the doorbell button, transformer, and chime. Make sure to account for any obstacles or pathways the wire needs to follow.
2. Add Extra Length:
Add a few extra feet to the measured distance to allow for flexibility and adjustments during the installation process. It’s better to have a bit more wire than to be short.
3. Cut the Wire:
Using wire cutters, carefully cut the doorbell wire to the length you measured and added the extra feet to. Make a clean, straight cut to ensure proper connectivity and insulation.
4. Strip the Wire Ends:
With wire strippers, strip off about half an inch of insulation from each end of the wire. This will expose the bare copper conductors, which will be used for making connections.
5. Inspect the Wire:
Take a close look at the stripped wire ends to ensure that the copper conductors are undamaged and intact. Trim any frayed or damaged ends to ensure a clean and solid connection.
By measuring and cutting the wire accurately, you will have the perfect length needed to connect the doorbell button, transformer, and chime. This step sets you up for seamless installation and ensures a reliable and properly functioning doorbell system.
Now that you have the wire ready, it’s time to move on to the next step: running the wire from the transformer to the doorbell chime.
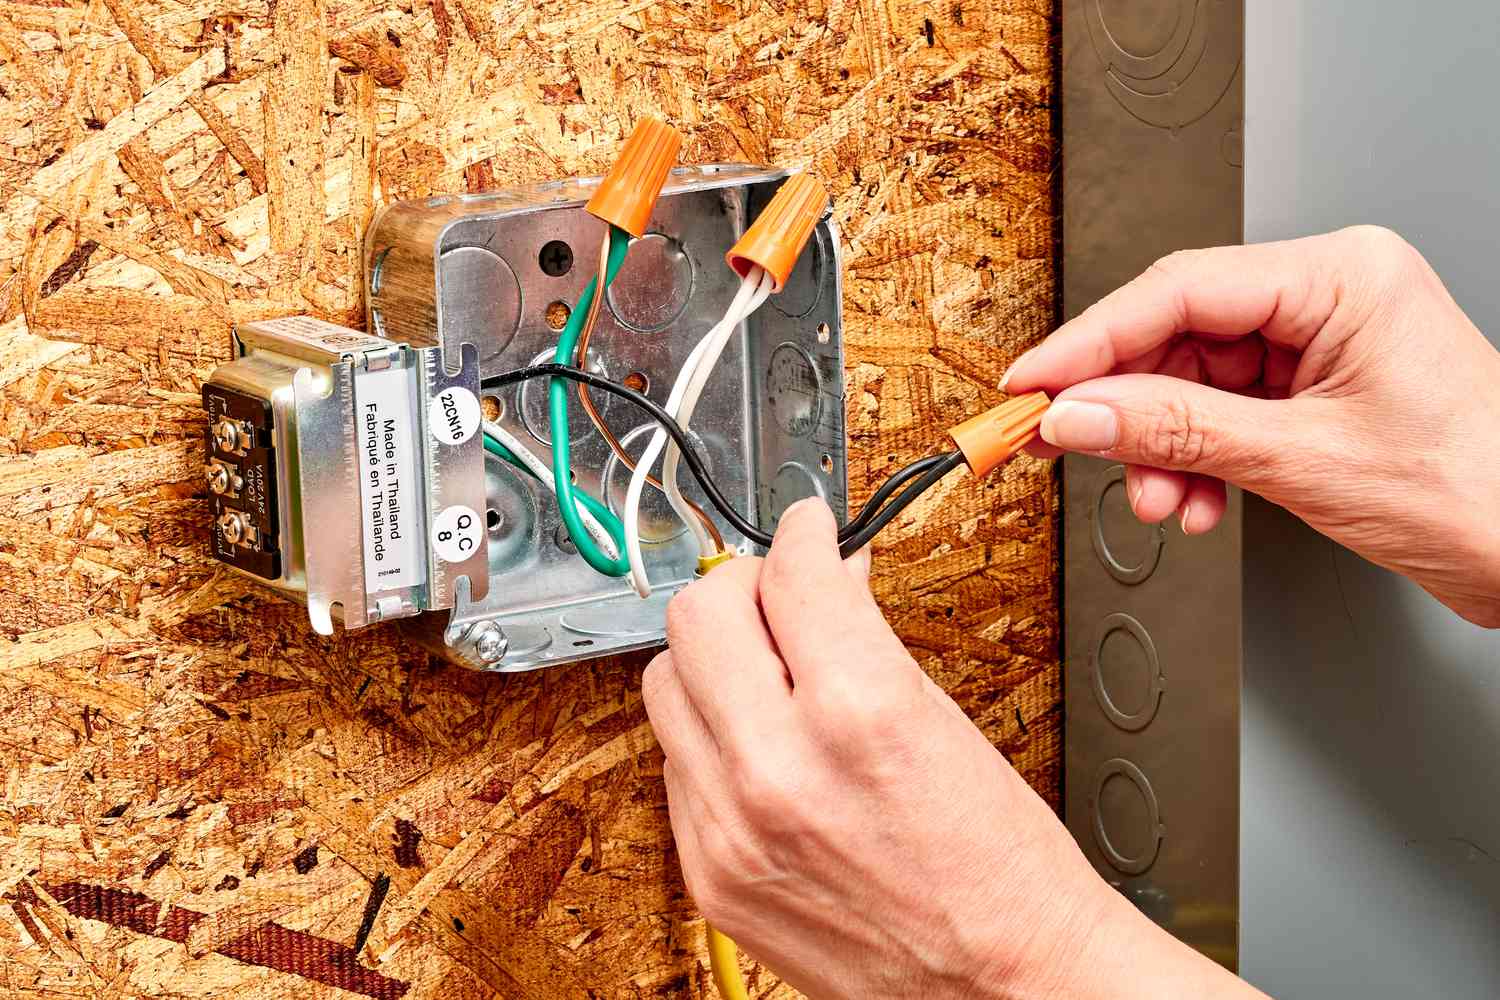
Step 4: Running the Wire from the Transformer to the Doorbell Chime
In this step, we will guide you through the process of running the doorbell wire from the transformer to the doorbell chime. This part of the installation ensures a proper connection between the power source and the sound-producing component of the doorbell system. Follow these steps to run the wire efficiently:
1. Locate the Transformer:
Start by locating the doorbell transformer, which is typically installed near the electrical panel or in an accessible junction box. Ensure that the power to the transformer is turned off before proceeding with any work.
2. Mark Drill Points:
On the walls or ceilings, mark the spots where the wire will enter and exit to create a pathway from the transformer to the doorbell chime. Ensure that the wire will be hidden and not exposed in high-traffic areas.
Read more: How To Run Doorbell Wire Through Brick
3. Drill Holes:
Using an electric drill and a drill bit suitable for your wall material, carefully drill holes at the marked entry and exit points. Ensure that the holes are just big enough to accommodate the doorbell wire.
4. Feed the Wire:
Starting from the entry point, feed the doorbell wire through the drilled hole. Carefully maneuver the wire through any obstacles or tight spots until it reaches the exit point.
5. Secure the Wire:
Using clips, staples, or adhesive hooks, secure the wire along the pathway to keep it in place and prevent it from sagging or dangling. Be careful not to pinch or damage the wire while securing it.
6. Connect the Wire:
At the doorbell chime location, strip off a small amount of insulation from the wire ends. Follow the manufacturer’s instructions to connect the wire to the appropriate terminals on the doorbell chime.
Read more: How To Run Electrical Wire On Concrete Wall
7. Double-check Connections:
Ensure that all wire connections are secure and tight. Use electrical tape to wrap each connection point, providing extra insulation and preventing any accidental disconnections.
By following these steps, you will successfully run the wire from the transformer to the doorbell chime. This ensures a proper electrical connection for the sound-producing component of the doorbell system. With this step completed, you can now move on to connecting the wire to the transformer.
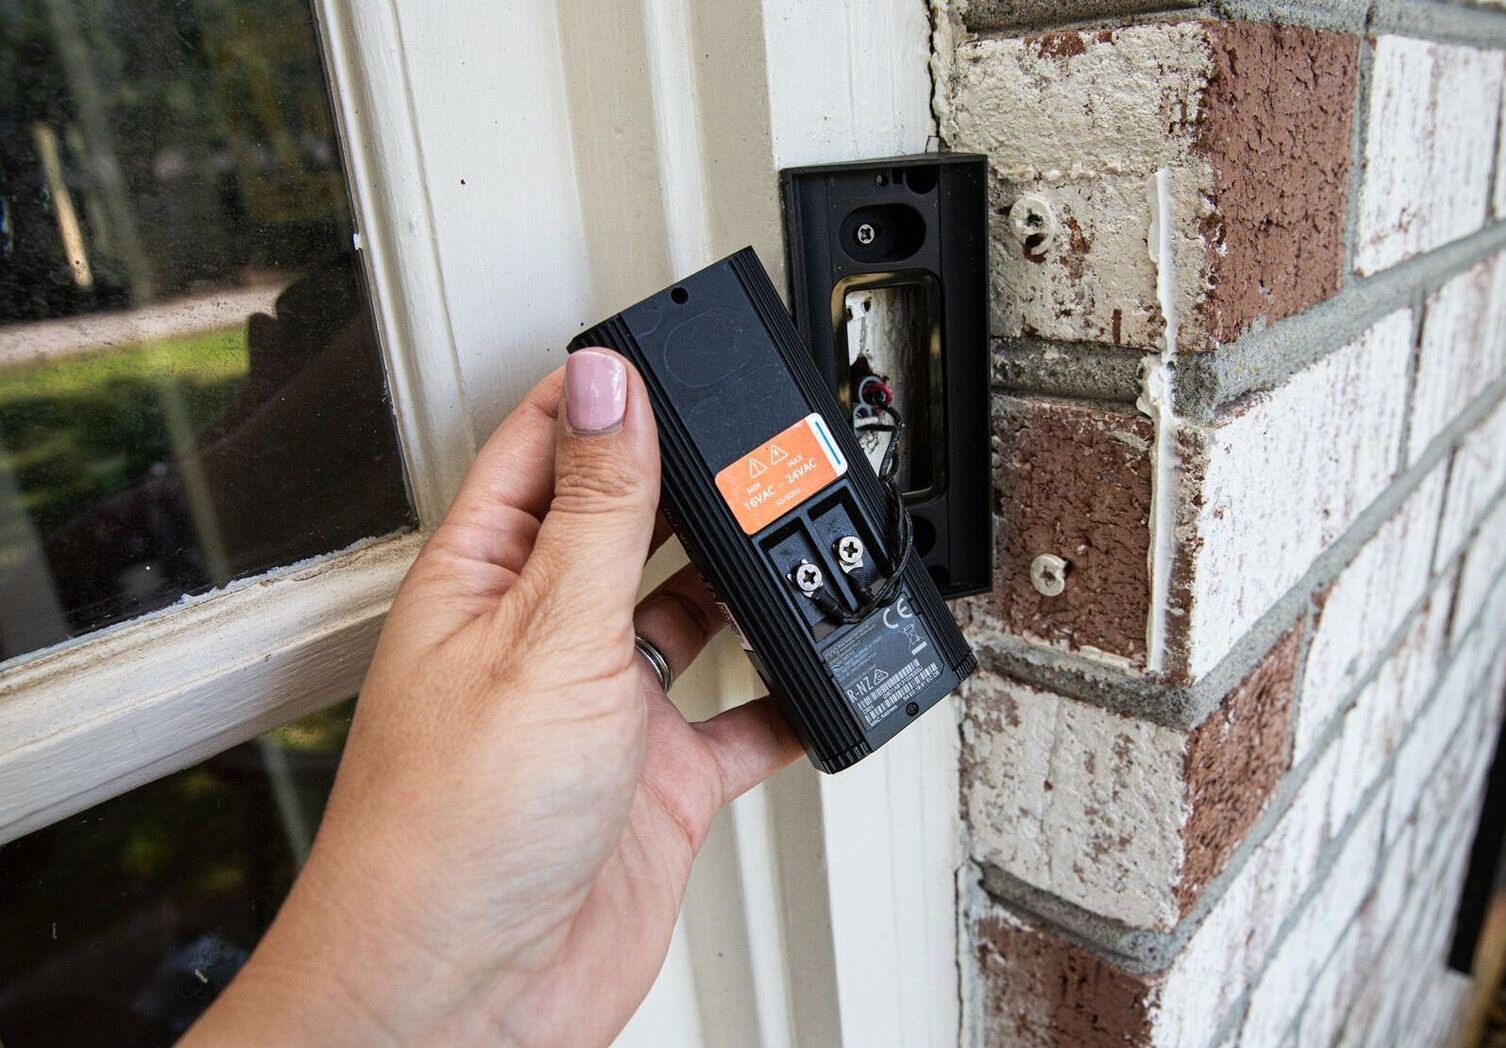
Step 5: Connecting the Wire to the Transformer
In this step, we will guide you through the process of connecting the doorbell wire to the transformer. This crucial step establishes the power source for the doorbell system and ensures that the low-voltage electrical signals are delivered to the doorbell button and chime. Follow these steps to connect the wire to the transformer:
1. Locate the Transformer:
Ensure that you have located the doorbell transformer, which is typically installed near the electrical panel or in a junction box. Make sure that the power to the transformer is turned off before proceeding.
2. Strip the Wire Ends:
Using wire strippers, strip off about half an inch of insulation from the ends of the doorbell wire that will be connected to the transformer. This will expose the bare copper conductors.
Read more: How To Install Wired Nest Doorbell
3. Identify the Transformer Terminals:
Inspect the transformer and locate the terminals designated for the doorbell wire connections. Typically, these terminals are labeled “Front” or “Trans” for the front door connection and “Rear” or “Rearr” for the rear door connection.
4. Connect the Wire to the Transformer:
Insert the stripped ends of the doorbell wire into the corresponding terminals on the transformer. For example, insert one wire into the “Front” or “Trans” terminal and the other wire into the “Rear” or “Rearr” terminal.
5. Secure the Connections:
Tighten the terminals on the transformer to secure the wire connections. Ensure that the wires are held firmly and cannot be easily pulled out or disconnected.
6. Insulate the Connections:
Wrap each wire connection with electrical tape to provide insulation and protection against accidental contact. This will help prevent any electrical shocks or short circuits.
Read more: How Long Can You Run Electrical Wire
7. Restore Power:
Once the wire connections are secure and insulated, turn the power back on to the doorbell system by flipping the respective circuit breaker or activating the power source.
By following these steps, you will successfully connect the doorbell wire to the transformer, establishing the power source for your doorbell system. This ensures that the low-voltage electrical signals from the transformer are effectively delivered to the doorbell button and chime. With this step completed, you can now move on to connecting the wire to the doorbell chime.
Step 6: Connecting the Wire to the Doorbell Chime
In this step, we will guide you through the process of connecting the doorbell wire to the doorbell chime. This step establishes the connection between the doorbell button and the chime, allowing the chime to produce the desired sound when the button is pressed. Follow these steps to properly connect the wire to the doorbell chime:
1. Locate the Doorbell Chime:
Identify the location where you will be installing the doorbell chime. It is typically placed in a central area of the house, such as the hallway or foyer, where it can be easily heard throughout the home.
2. Strip the Wire Ends:
Using wire strippers, strip off about half an inch of insulation from the ends of the doorbell wire that will be connected to the doorbell chime. Make sure the bare copper conductors are exposed.
Read more: How To Replace Wired Doorbell
3. Identify the Chime Terminals:
Inspect the doorbell chime and locate the terminals designated for the wire connections. Commonly, there will be terminals labeled “Front” or “Trans” for the front door connection and “Rear” or “Rearr” for the rear door connection.
4. Connect the Wire to the Chime:
Insert one wire end into the appropriate terminal for the front or rear door connection on the doorbell chime. Insert the other wire end into the corresponding terminal for the other door.
5. Secure the Connections:
Tighten the terminals on the doorbell chime to secure the wire connections. Ensure that the wires are held firmly and cannot be easily pulled out or disconnected.
6. Insulate the Connections:
Wrap each wire connection with electrical tape to provide insulation and protection against accidental contact. This will help prevent any electrical shocks or short circuits.
Read more: How To Move Doorbell Wiring
7. Test the Doorbell Chime:
With the wire connections made, test the doorbell chime by pressing the doorbell button. Ensure that the chime produces the desired sound or melody. If it doesn’t, recheck the wire connections and troubleshoot any issues if necessary.
By following these steps, you will successfully connect the doorbell wire to the doorbell chime, allowing the chime to produce the desired sound when the button is pressed. With this step completed, you can move on to the final step: testing and troubleshooting the doorbell system.
Step 7: Testing and Troubleshooting
Congratulations on reaching the final step of installing and connecting your doorbell system! In this step, we will guide you through the process of testing the doorbell system and troubleshooting any issues that may arise. Follow these steps to ensure that your doorbell is functioning properly:
1. Restore Power:
If you haven’t already done so, turn the power back on to the doorbell system by flipping the respective circuit breaker or activating the power source.
2. Press the Doorbell Button:
Press the doorbell button to test if the doorbell chime produces the desired sound or melody. Listen carefully to ensure that the chime is loud and clear. If you don’t hear any sound, proceed to the next step.
Read more: What Gauge Is Doorbell Wire
3. Check Wire Connections:
Inspect the wire connections at the doorbell chime and the transformer. Make sure the wires are securely attached to the terminals. Look for any loose connections, frayed wires, or signs of damage. If you find any issues, rectify them by tightening the connections or replacing the damaged wire.
4. Check Transformer Voltage:
Using a multimeter, measure the voltage output of the transformer. Ensure that it matches the recommended voltage for your specific doorbell system. If the voltage is too low or non-existent, consider replacing the transformer.
5. Test Continuity:
Using a multimeter set on the continuity or ohms setting, check the continuity of the doorbell wire. Touch the multimeter probes to each end of the wire to ensure there is a continuous electrical flow. A reading of zero or close to zero indicates good continuity.
6. Recheck Wiring and Components:
Inspect the wiring and components again, paying close attention to any potential issues. Look for loose connections, crossed wires, or faulty components. Ensure that all components, including the doorbell button, transformer, and chime, are securely mounted and functioning correctly.
7. Consult a Professional:
If you are unable to identify or resolve any issues with your doorbell system, it may be best to consult a professional electrician. They will have the expertise to diagnose and repair any electrical problems you may encounter.
By following these steps and troubleshooting any issues along the way, you can ensure that your doorbell system is functioning properly and providing the convenience and security you desire for your home.
Thank you for following this comprehensive guide on how to run wire for a doorbell. We hope that the information provided has been helpful in successfully installing and connecting your doorbell system. Enjoy the convenience of hearing the doorbell ring with confidence!
Conclusion
Congratulations on successfully completing the installation and connection of your doorbell system! By following the step-by-step guide provided, you have now set up a fully functional doorbell that enhances the convenience and security of your home. Here are the key points to remember:
– Planning and preparation are crucial before starting the installation process. Ensure you understand the type of doorbell system you want to install and choose suitable locations for the doorbell button, transformer, and chime.
– Choose the right doorbell wire by considering factors such as wire gauge, type, length, color, and spool size. The wire serves as the conduit for transmitting the electrical signals between the components of the doorbell system.
– Measure and cut the wire accurately to ensure a proper fit between the doorbell button, transformer, and chime. Strip the wire ends and inspect for any damage before proceeding.
– Run the wire from the transformer to the doorbell chime, securing it along the pathway. Make sure to drill holes, feed the wire, and connect it securely to the terminals on the chime.
– Connect the wire to the transformer by identifying the appropriate terminals and securing the wire connections. Insulate the connections with electrical tape to provide extra protection.
– Connect the wire to the doorbell chime, ensuring it is properly attached to the designated terminals. Insulate the connections to prevent any potential electrical hazards.
– Test the doorbell system by pressing the button and listening for the sound or melody produced by the chime. Troubleshoot any issues that arise, checking wire connections, transformer voltage, and overall system functionality.
Remember, if you encounter any difficulties or are unsure about any part of the installation process, it is always recommended to consult a professional electrician for assistance. Your safety and the proper functioning of the doorbell system are of utmost importance.
Thank you for using this guide to run wire for your doorbell. We hope that your newly installed doorbell system brings you convenience and peace of mind for years to come. Enjoy the added functionality and security it provides to your home!
Frequently Asked Questions about How To Run Wire For A Doorbell
Was this page helpful?
At Storables.com, we guarantee accurate and reliable information. Our content, validated by Expert Board Contributors, is crafted following stringent Editorial Policies. We're committed to providing you with well-researched, expert-backed insights for all your informational needs.

0 thoughts on “How To Run Wire For A Doorbell”